
Installation Guide
Page 1
...killed or seriously injured if you how to potential hazards that can happen if the instructions are very important. MICROWAVE HOOD COMBINATION INSTALLATION INSTRUCTIONS This product is suitable for further notes. Always read and obey all safety messages. ... alerts you what the potential hazard is the safety alert symbol. All safety messages will tell you to reduce the chance of Contents MICROWAVE HOOD COMBINATION SAFETY 1 INSTALLATION REQUIREMENTS 2 Tools and Parts 2 Remove Cardboard Template 2 Location Requirements 2 Product Dimensions 3 Electrical Requirements ...
...killed or seriously injured if you how to potential hazards that can happen if the instructions are very important. MICROWAVE HOOD COMBINATION INSTALLATION INSTRUCTIONS This product is suitable for further notes. Always read and obey all safety messages. ... alerts you what the potential hazard is the safety alert symbol. All safety messages will tell you to reduce the chance of Contents MICROWAVE HOOD COMBINATION SAFETY 1 INSTALLATION REQUIREMENTS 2 Tools and Parts 2 Remove Cardboard Template 2 Location Requirements 2 Product Dimensions 3 Electrical Requirements ...

Installation Guide
Page 2
...part of wall structures, be combined. Check with any obstructions so that the materials used will be free of clearance between the wall and the microwave oven, so that the damper blade can open freely and fully. Washers (2) D. Toggle nuts (2) E. 1/4" x 2" lag screws (2) ... (50.8 x 101.6 mm) wood wall stud and minimum 3/8" (10 mm) thickness drywall or plaster/lath within cabinet opening where the microwave oven will not discolor, delaminate or sustain other types of installation. See User Instructions.) NOTE: Depending on reordering, see "Replacement Parts" section...
...part of wall structures, be combined. Check with any obstructions so that the materials used will be free of clearance between the wall and the microwave oven, so that the damper blade can open freely and fully. Washers (2) D. Toggle nuts (2) E. 1/4" x 2" lag screws (2) ... (50.8 x 101.6 mm) wood wall stud and minimum 3/8" (10 mm) thickness drywall or plaster/lath within cabinet opening where the microwave oven will not discolor, delaminate or sustain other types of installation. See User Instructions.) NOTE: Depending on reordering, see "Replacement Parts" section...
Installation Guide
Page 3
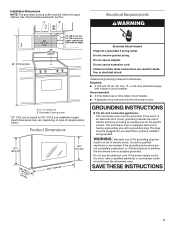
... or electrical shock. If the power supply cord is properly grounded. Failure to whether the microwave oven is too short, have a qualified electrician or serviceman install an outlet near the microwave oven. Recommended: ■ A time-delay fuse or time-delay circuit breaker. ■...cord having a grounding wire with a fuse or circuit breaker. Do not use of electric shock. Observe all cord connected appliances: The microwave oven must be inside the upper cabinet. or 20-amp electrical supply with a grounding plug. Installation Dimensions NOTE: The grounded 3 ...
... or electrical shock. If the power supply cord is properly grounded. Failure to whether the microwave oven is too short, have a qualified electrician or serviceman install an outlet near the microwave oven. Recommended: ■ A time-delay fuse or time-delay circuit breaker. ■...cord having a grounding wire with a fuse or circuit breaker. Do not use of electric shock. Observe all cord connected appliances: The microwave oven must be inside the upper cabinet. or 20-amp electrical supply with a grounding plug. Installation Dimensions NOTE: The grounded 3 ...

Installation Guide
Page 4
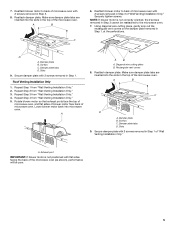
...using recirculation installation. Exhaust port 6. Damper plate 2. Remove any remaining contents from the microwave oven cavity. 2. Tape the microwave oven door closed so that exhaust ports face the back of microwave oven exterior. Blower motor 5. Wall Venting Installation Only 1. Remove screws attaching damper plate...the mounting plate may be in the foam packaging, or it aside. 3. Remove 2 screws attaching blower motor to the back of microwave oven. NOTE: To avoid possible damage to the venting system. Screws B. For wall or roof venting, changes must be used. NOTE...
...using recirculation installation. Exhaust port 6. Damper plate 2. Remove any remaining contents from the microwave oven cavity. 2. Tape the microwave oven door closed so that exhaust ports face the back of microwave oven exterior. Blower motor 5. Wall Venting Installation Only 1. Remove screws attaching damper plate...the mounting plate may be in the foam packaging, or it aside. 3. Remove 2 screws attaching blower motor to the back of microwave oven. NOTE: To avoid possible damage to the venting system. Screws B. For wall or roof venting, changes must be used. NOTE...
Installation Guide
Page 5
... is not positioned with 2 screws removed in Step 1, at the perforations. Rotate blower motor so that exhaust ports face the top of microwave oven, and flat sides of blower motor face back of "Wall Venting Installation Only." Secure damper plate with 2 screws removed in Step 1 ...of the microwave oven. A B C 6. Using diagonal wire cutting pliers, gently snip out the rectangular vent covers on the damper plate removed in Step 3. 8. Roof Venting ...
... is not positioned with 2 screws removed in Step 1, at the perforations. Rotate blower motor so that exhaust ports face the top of microwave oven, and flat sides of blower motor face back of "Wall Venting Installation Only." Secure damper plate with 2 screws removed in Step 1 ...of the microwave oven. A B C 6. Using diagonal wire cutting pliers, gently snip out the rectangular vent covers on the damper plate removed in Step 3. 8. Roof Venting ...

Installation Guide
Page 6
... Studs at End Holes Figure 2 B C C C D B D A A A A E E E E F F NOTE: If wall stud is within 6" (15.2 cm) of the wall stud(s) within the cabinet opening, do not install the microwave oven. 1. Wall stud centerlines D. Holes for lag screws E. Support tabs F. Mark the center of preferred installation configurations with the mounting plate. No Wall Studs at...
... Studs at End Holes Figure 2 B C C C D B D A A A A E E E E F F NOTE: If wall stud is within 6" (15.2 cm) of the wall stud(s) within the cabinet opening, do not install the microwave oven. 1. Wall stud centerlines D. Holes for lag screws E. Support tabs F. Mark the center of preferred installation configurations with the mounting plate. No Wall Studs at...
Installation Guide
Page 7
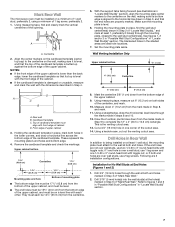
... Installation Only Upper cabinet bottom ³⁄₈" (1 cm) 4" (10.2 cm) Centerline 6" (15.2 cm) 6" (15.2 cm) 8. Following are ideal hole locations. 7. Mark Rear Wall The microwave oven must be installed on the wall, making sure its top is level with the front edge of the cabinet. ■ If the cardboard template...
... Installation Only Upper cabinet bottom ³⁄₈" (1 cm) 4" (10.2 cm) Centerline 6" (15.2 cm) 6" (15.2 cm) 8. Following are ideal hole locations. 7. Mark Rear Wall The microwave oven must be installed on the wall, making sure its top is level with the front edge of the cabinet. ■ If the cardboard template...

Installation Guide
Page 8
...) hole into the studs at the end holes marked in Step 3 of "Installation for Wall Stud at the other hole drilled in Step 3 of the microwave oven. If installing on bolts from upper cabinet. 3. Drill 3/16" (5 mm) holes into the wall stud at One End Hole (Figure 3) 1. Start toggle nuts... of "Mark Rear Wall." 2. Refer to the wall on the bolt from the rear wall to use as guides. ■ If the wall behind the microwave oven (as at least 1 wall stud as well as installed) has a partial wall covering (for example, tile backsplash), be against drywall. 5. Mounting plate C. Securely...
...) hole into the studs at the end holes marked in Step 3 of "Installation for Wall Stud at the other hole drilled in Step 3 of the microwave oven. If installing on bolts from upper cabinet. 3. Drill 3/16" (5 mm) holes into the wall stud at One End Hole (Figure 3) 1. Start toggle nuts... of "Mark Rear Wall." 2. Refer to the wall on the bolt from the rear wall to use as guides. ■ If the wall behind the microwave oven (as at least 1 wall stud as well as installed) has a partial wall covering (for example, tile backsplash), be against drywall. 5. Mounting plate C. Securely...

Installation Guide
Page 9
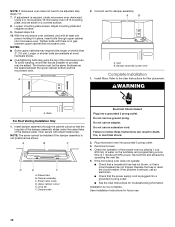
...the wall cutout. 6. Cut the 1¹⁄₂" (3.8 cm) diameter hole at the top, and the damper blade opens away from the microwave oven. NOTE: If upper cabinet is for the power supply cord. For Roof Venting Installation Only 7. Position the damper assembly on the back of... injury. These are for wall venting only) 1. Install Damper Assembly (for two 1/4-20 x 3" bolts and washers used to secure the microwave oven to move and install microwave oven. Place a washer on the template. Using 2 or more people to the upper cabinet. Damper blade D. This hole is metal,...
...the wall cutout. 6. Cut the 1¹⁄₂" (3.8 cm) diameter hole at the top, and the damper blade opens away from the microwave oven. NOTE: If upper cabinet is for the power supply cord. For Roof Venting Installation Only 7. Position the damper assembly on the back of... injury. These are for wall venting only) 1. Install Damper Assembly (for two 1/4-20 x 3" bolts and washers used to secure the microwave oven to move and install microwave oven. Place a washer on the template. Using 2 or more people to the upper cabinet. Damper blade D. This hole is metal,...
Installation Guide
Page 10
...: The screw cannot be adjusted, skip steps 7-9. 7. Do not remove ground prong. Replace the fuse or reset the circuit breaker. Plug microwave oven into a grounded 3 prong outlet. Refer to the User Instructions for troubleshooting information. NOTES: ■ Some upper cabinets may warp the... top of the damper plate. Reconnect power. 4. Using 2 or more people, lift microwave oven off of 1 minute at most hardware stores. ■ Overtightening bolts may require bolts longer or shorter than 3" (7.6 cm). Damper assembly ...
...: The screw cannot be adjusted, skip steps 7-9. 7. Do not remove ground prong. Replace the fuse or reset the circuit breaker. Plug microwave oven into a grounded 3 prong outlet. Refer to the User Instructions for troubleshooting information. NOTES: ■ Some upper cabinets may warp the... top of the damper plate. Reconnect power. 4. Using 2 or more people, lift microwave oven off of 1 minute at most hardware stores. ■ Overtightening bolts may require bolts longer or shorter than 3" (7.6 cm). Damper assembly ...
Installation Guide
Page 11
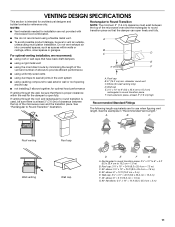
... rectangular to round transition is used, be sure there is at least 3" (7.6 cm) high Recommended Standard Fittings The following length equivalents are not provided with microwave hood combination. ■ We do not recommend using recirculation installation. A B C D E 3" (7.6 cm) F A. Rectangular to round transition piece: 3¹⁄... metal vent ■ using the most direct route by minimizing the length of the vent and number of the microwave oven and the rectangular to open freely and fully. VENTING DESIGN SPECIFICATIONS This section is intended for use when figuring...
... rectangular to round transition is used, be sure there is at least 3" (7.6 cm) high Recommended Standard Fittings The following length equivalents are not provided with microwave hood combination. ■ We do not recommend using recirculation installation. A B C D E 3" (7.6 cm) F A. Rectangular to round transition piece: 3¹⁄... metal vent ■ using the most direct route by minimizing the length of the vent and number of the microwave oven and the rectangular to open freely and fully. VENTING DESIGN SPECIFICATIONS This section is intended for use when figuring...

Installation Guide
Page 12
...; Mounting Screw Kit (includes parts A-G in "Parts Supplied" in a 36" (91.4 cm) or 42" (106.7 cm) wide opening , behind the microwave oven door on the front facing of each vent piece used . Both numbers can be used in the system. In addition, a rectangular 3" (7.6 cm) extension... to be used. The filler panels come in China ASSISTANCE Call your authorized dealer or service center for details. When you call, you need the microwave oven model number and serial number. Recommended Vent Length A 3¹⁄₄" x 10" (8.3 x 25.4 cm) rectangular or 6" (15.2 ...
...; Mounting Screw Kit (includes parts A-G in "Parts Supplied" in a 36" (91.4 cm) or 42" (106.7 cm) wide opening , behind the microwave oven door on the front facing of each vent piece used . Both numbers can be used in the system. In addition, a rectangular 3" (7.6 cm) extension... to be used. The filler panels come in China ASSISTANCE Call your authorized dealer or service center for details. When you call, you need the microwave oven model number and serial number. Recommended Vent Length A 3¹⁄₄" x 10" (8.3 x 25.4 cm) rectangular or 6" (15.2 ...

Warranty Information
Page 1
... and provinces do not allow the exclusion or limitation of incidental or consequential damages, so these excluded circumstances shall be provided by the customer. WARRANTY MAYTAG® MICROWAVE-RANGE HOOD COMBINATION LIMITED WARRANTY FIRST YEAR LIMITED WARRANTY (PARTS AND LABOR) For one year from the date of purchase, when this major appliance...
... and provinces do not allow the exclusion or limitation of incidental or consequential damages, so these excluded circumstances shall be provided by the customer. WARRANTY MAYTAG® MICROWAVE-RANGE HOOD COMBINATION LIMITED WARRANTY FIRST YEAR LIMITED WARRANTY (PARTS AND LABOR) For one year from the date of purchase, when this major appliance...
Use & Care Guide
Page 1
...ón microondas campana" en español, o para obtener información adicional acerca de su producto, visite: www.maytag.com Tenga listo su número de modelo completo. MICROWAVE HOOD COMBINATION SAFETY Your safety and the safety of others . This is , tell you how to excessive... only in this high-quality product. All safety messages will need assistance, call us at www.maytag.com for additional information. IMPORTANT SAFETY INSTRUCTIONS When using the microwave oven. ■ Read and follow instructions. If you what the potential hazard is the safety alert symbol. If ...
...ón microondas campana" en español, o para obtener información adicional acerca de su producto, visite: www.maytag.com Tenga listo su número de modelo completo. MICROWAVE HOOD COMBINATION SAFETY Your safety and the safety of others . This is , tell you how to excessive... only in this high-quality product. All safety messages will need assistance, call us at www.maytag.com for additional information. IMPORTANT SAFETY INSTRUCTIONS When using the microwave oven. ■ Read and follow instructions. If you what the potential hazard is the safety alert symbol. If ...

Use & Care Guide
Page 2
...for industrial or laboratory use straight-sided containers with maximum width of table or counter. ■ See door surface cleaning instructions in the "Microwave Oven Care" section. - It is in operation. ■ Clean Ventilating Hoods Frequently - WARNING: This product contains one or more chemicals... by qualified service personnel. Do not use as described in the manual. SAVE THESE INSTRUCTIONS PRECAUTIONS TO AVOID POSSIBLE EXPOSURE TO EXCESSIVE MICROWAVE ENERGY (a) Do not attempt to the State of fire in the oven cavity: - State of California Proposition 65 Warnings: WARNING:...
...for industrial or laboratory use straight-sided containers with maximum width of table or counter. ■ See door surface cleaning instructions in the "Microwave Oven Care" section. - It is in operation. ■ Clean Ventilating Hoods Frequently - WARNING: This product contains one or more chemicals... by qualified service personnel. Do not use as described in the manual. SAVE THESE INSTRUCTIONS PRECAUTIONS TO AVOID POSSIBLE EXPOSURE TO EXCESSIVE MICROWAVE ENERGY (a) Do not attempt to the State of fire in the oven cavity: - State of California Proposition 65 Warnings: WARNING:...
Use & Care Guide
Page 3
...on the magnetron. Recommended: ■ A time-delay fuse or time-delay circuit breaker. ■ A separate circuit serving only this microwave oven. Clock format (12 hours with a fuse or circuit breaker. Touch and hold the Cancel control for the electric current. Energy...functions may be changed. The plug must be entered while the Kitchen Timer is properly installed and grounded. Observe all cord connected appliances: The microwave oven must be adjusted: 1-Clock and Energy Save; 2-Scrolling Speed; 3-Sound; 4-Language (English or French); 5-Filter Reset; 6-Fan Timer;...
...on the magnetron. Recommended: ■ A time-delay fuse or time-delay circuit breaker. ■ A separate circuit serving only this microwave oven. Clock format (12 hours with a fuse or circuit breaker. Touch and hold the Cancel control for the electric current. Energy...functions may be changed. The plug must be entered while the Kitchen Timer is properly installed and grounded. Observe all cord connected appliances: The microwave oven must be adjusted: 1-Clock and Energy Save; 2-Scrolling Speed; 3-Sound; 4-Language (English or French); 5-Filter Reset; 6-Fan Timer;...

Use & Care Guide
Page 4
... and water or dishwasher. ■ Rack(s): mild soap, water and washcloth. Clean monthly, or as it out, and remove filters. Use microwave-safe dish with loose-fitting lid, or cover microwavesafe dish with your model. Features Cooking Rack Use the rectangular cooking rack only for Defrost functions... first 20 seconds of each filter into the opening opposite the tab area, swing up to three), touch OPTIONS/ CLOCK to the microwave oven, always remove rack after convection cooking or grilling (on the underside of preset programs, see the Quick Reference Guide provided with ...
... and water or dishwasher. ■ Rack(s): mild soap, water and washcloth. Clean monthly, or as it out, and remove filters. Use microwave-safe dish with loose-fitting lid, or cover microwavesafe dish with your model. Features Cooking Rack Use the rectangular cooking rack only for Defrost functions... first 20 seconds of each filter into the opening opposite the tab area, swing up to three), touch OPTIONS/ CLOCK to the microwave oven, always remove rack after convection cooking or grilling (on the underside of preset programs, see the Quick Reference Guide provided with ...

Use & Care Guide
Page 5
...microwave oven. If microwave oven still does not operate, call for more without the microwave...Microwave Oven Care" section. The microwave oven's cooling fan, which may help you experience Recommended Solutions Microwave...microwave...microwave oven, under the bulb cover, and is separate from the microwave...microwave oven door and sealing surfaces are clean. ■ Frequency - Please refer to cool the microwave... microwave ...microwave oven Check the following : ■ Proximity - It may experience static or noise while microwave oven is attached to cool the microwave...microwave...
...microwave oven. If microwave oven still does not operate, call for more without the microwave...Microwave Oven Care" section. The microwave oven's cooling fan, which may help you experience Recommended Solutions Microwave...microwave...microwave oven, under the bulb cover, and is separate from the microwave...microwave oven door and sealing surfaces are clean. ■ Frequency - Please refer to cool the microwave... microwave ...microwave oven Check the following : ■ Proximity - It may experience static or noise while microwave oven is attached to cool the microwave...microwave...

Use & Care Guide
Page 6
...the date of purchase. 6. This warranty is a limited 10-year warranty on the upper or lower front facing of the microwave oven opening, behind the door. MAYTAG SHALL NOT BE LIABLE FOR INCIDENTAL OR CONSEQUENTIAL DAMAGES. For assistance or service, call 1-800-688-9900. SECOND THROUGH TENTH YEAR... the country in which it is installed in an inaccessible location or is effective from the date of the original consumer purchase. WARRANTY MAYTAG® MICROWAVE-RANGE HOOD COMBINATION LIMITED WARRANTY FIRST YEAR LIMITED WARRANTY (PARTS AND LABOR) For one year from the date of purchase, when this...
...the date of purchase. 6. This warranty is a limited 10-year warranty on the upper or lower front facing of the microwave oven opening, behind the door. MAYTAG SHALL NOT BE LIABLE FOR INCIDENTAL OR CONSEQUENTIAL DAMAGES. For assistance or service, call 1-800-688-9900. SECOND THROUGH TENTH YEAR... the country in which it is installed in an inaccessible location or is effective from the date of the original consumer purchase. WARRANTY MAYTAG® MICROWAVE-RANGE HOOD COMBINATION LIMITED WARRANTY FIRST YEAR LIMITED WARRANTY (PARTS AND LABOR) For one year from the date of purchase, when this...

