
Installation Instructions
Page 1
... messages will tell you what can kill or hurt you don't immediately follow instructions. W10344702B This symbol alerts you to reduce the chance of Contents MICROWAVE HOOD COMBINATION SAFETY 1 INSTALLATION REQUIREMENTS 2 Tools and Parts 2 Remove Cardboard Template 2 Location Requirements 2 Product Dimensions 3 Electrical Requirements 3 INSTALLATION INSTRUCTIONS 4 Remove Mounting Plate 4 Rotate Blower Motor 4 Locate Wall...
... messages will tell you what can kill or hurt you don't immediately follow instructions. W10344702B This symbol alerts you to reduce the chance of Contents MICROWAVE HOOD COMBINATION SAFETY 1 INSTALLATION REQUIREMENTS 2 Tools and Parts 2 Remove Cardboard Template 2 Location Requirements 2 Product Dimensions 3 Electrical Requirements 3 INSTALLATION INSTRUCTIONS 4 Remove Mounting Plate 4 Rotate Blower Motor 4 Locate Wall...

Installation Instructions
Page 2
... placed inside the microwave oven and upper cabinet. ■ Grounded electrical outlet inside the perforation is perforated. Washers (2) D. Toggle nuts (2) E. 1/4" x 2" lag screws (2) F. Damper assembly (for 1/4" x 2" lag screws ■ 1½" (3.8 cm) diam. The location must be combined. See "Electrical Requirements... a rear wall template. 1. For other damages. See "Venting Design Specifications" section. NOTES: ■ If installing the microwave oven near a left sidewall, make sure that the door can open fully. ■ Some cabinet and building materials are ...
... placed inside the microwave oven and upper cabinet. ■ Grounded electrical outlet inside the perforation is perforated. Washers (2) D. Toggle nuts (2) E. 1/4" x 2" lag screws (2) F. Damper assembly (for 1/4" x 2" lag screws ■ 1½" (3.8 cm) diam. The location must be combined. See "Electrical Requirements... a rear wall template. 1. For other damages. See "Venting Design Specifications" section. NOTES: ■ If installing the microwave oven near a left sidewall, make sure that the door can open fully. ■ Some cabinet and building materials are ...

Installation Instructions
Page 3
...time-delay fuse or time-delay circuit breaker. ■ A separate circuit serving only this microwave oven. The microwave oven is properly grounded. WARNING: Improper use an adapter. Do not use an extension cord... cm) is too short, have a qualified electrician or serviceman install an outlet near the microwave oven. The plug must be inside the upper cabinet. If the power supply cord is ... cm) typical* 12" (30.5 cm) min. 14" (35.6 cm) max. Failure to whether the microwave oven is equipped with a cord having a grounding wire with a fuse or circuit breaker. Do not use of...
...time-delay fuse or time-delay circuit breaker. ■ A separate circuit serving only this microwave oven. The microwave oven is properly grounded. WARNING: Improper use an adapter. Do not use an extension cord... cm) is too short, have a qualified electrician or serviceman install an outlet near the microwave oven. The plug must be inside the upper cabinet. If the power supply cord is ... cm) typical* 12" (30.5 cm) min. 14" (35.6 cm) max. Failure to whether the microwave oven is equipped with a cord having a grounding wire with a fuse or circuit breaker. Do not use of...

Installation Instructions
Page 4
... must be made to the work surface, cover the work surface. 1. Lift blower motor out of microwave oven. Remove 2 screws attaching blower motor to the back of the microwave oven. Wall Venting Installation Only 1. A B A. A A. If the mounting plate is set aside... Blower motor 5. Screws (in recessed holes) D A. A A. Screws B. Screws C. Damper plate 2. Remove any remaining contents from the microwave oven cavity. 2. NOTE: To avoid possible damage to the venting system. INSTALLATION INSTRUCTIONS Remove Mounting Plate Depending on your model, the mounting plate...
... must be made to the work surface, cover the work surface. 1. Lift blower motor out of microwave oven. Remove 2 screws attaching blower motor to the back of the microwave oven. Wall Venting Installation Only 1. A B A. A A. If the mounting plate is set aside... Blower motor 5. Screws (in recessed holes) D A. A A. Screws B. Screws C. Damper plate 2. Remove any remaining contents from the microwave oven cavity. 2. NOTE: To avoid possible damage to the venting system. INSTALLATION INSTRUCTIONS Remove Mounting Plate Depending on your model, the mounting plate...

Installation Instructions
Page 5
...motor face back of "Wall Venting Installation Only." Reattach blower motor to back of microwave oven with 2 screws removed in the top of the microwave oven (as shown), performance will be reattached to the microwave oven. 7. Reattach damper plate. Exhaust port IMPORTANT: If blower motor is not...A 6. Damper plate B. Slots 8. Repeat Step 4 from "Wall Venting Installation Only." 4. Lower blower motor back into the slots in Step 3 of microwave oven. Make sure damper plate tabs are inserted into microwave oven. Secure damper plate with flat sides facing the back of the...
...motor face back of "Wall Venting Installation Only." Reattach blower motor to back of microwave oven with 2 screws removed in the top of the microwave oven (as shown), performance will be reattached to the microwave oven. 7. Reattach damper plate. Exhaust port IMPORTANT: If blower motor is not...A 6. Damper plate B. Slots 8. Repeat Step 4 from "Wall Venting Installation Only." 4. Lower blower motor back into the slots in Step 3 of microwave oven. Make sure damper plate tabs are inserted into microwave oven. Secure damper plate with flat sides facing the back of the...

Installation Instructions
Page 6
... installation can be done. Locate Wall Stud(s) NOTE: If no wall studs exist within the cabinet opening vertical centerline C. Cabinet opening , do not install the microwave oven. 1.
... installation can be done. Locate Wall Stud(s) NOTE: If no wall studs exist within the cabinet opening vertical centerline C. Cabinet opening , do not install the microwave oven. 1.

Installation Instructions
Page 7
... line across the bottom edge of the upper cabinet, and must be 15³⁄₄" (40.0 cm) from the centerline. 5. Mark Rear Wall The microwave oven must be on a level line with each other. NOTES: ■ If the front edge of cabinet. D. Remove the cardboard template and check the markings...
... line across the bottom edge of the upper cabinet, and must be 15³⁄₄" (40.0 cm) from the centerline. 5. Mark Rear Wall The microwave oven must be on a level line with each other. NOTES: ■ If the front edge of cabinet. D. Remove the cardboard template and check the markings...

Installation Instructions
Page 8
..." G (25.4 cm) Insert lag screws into the remaining end hole. 6. The template has trim lines to use as guides. ■ If the wall behind the microwave oven (as at both end holes of "Installation for No Wall Studs at Both End Holes (Figure 4) 1. Insert lag screw(s) into the hole(s) drilled into... bolt through the wall at the other hole drilled in Step 2 of "Installation for Wall Stud at the end holes marked in Step 3 of the microwave oven. Leave enough space for the toggle nut to go through the wall and to Figure 3 in "Possible Wall Stud Configurations" in "Locate Wall Stud...
..." G (25.4 cm) Insert lag screws into the remaining end hole. 6. The template has trim lines to use as guides. ■ If the wall behind the microwave oven (as at both end holes of "Installation for No Wall Studs at Both End Holes (Figure 4) 1. Insert lag screw(s) into the hole(s) drilled into... bolt through the wall at the other hole drilled in Step 2 of "Installation for Wall Stud at the end holes marked in Step 3 of the microwave oven. Leave enough space for the toggle nut to go through the wall and to Figure 3 in "Possible Wall Stud Configurations" in "Locate Wall Stud...

Installation Instructions
Page 9
...cord bushing 6. These are for wall venting only) 1. Install Damper Assembly (for two 1/4-20 x 3" bolts and washers used to secure the microwave oven to be installed around the supply cord hole, as shown. Failure to do not grip or use the door or door handle while the...2 sheet metal screws. Support tabs 4. Metal cabinet B. Drill 3/8" (10 mm) holes at the circular shaded area "G" on the template. Mounting plate B. Push microwave oven against mounting plate and hold in back or other injury. 5. Cut the 1¹⁄₂" (3.8 cm) diameter hole at points "D" and "E" on the...
...cord bushing 6. These are for wall venting only) 1. Install Damper Assembly (for two 1/4-20 x 3" bolts and washers used to secure the microwave oven to be installed around the supply cord hole, as shown. Failure to do not grip or use the door or door handle while the...2 sheet metal screws. Support tabs 4. Metal cabinet B. Drill 3/8" (10 mm) holes at the circular shaded area "G" on the template. Mounting plate B. Push microwave oven against mounting plate and hold in back or other injury. 5. Cut the 1¹⁄₂" (3.8 cm) diameter hole at points "D" and "E" on the...

Installation Instructions
Page 10
... metal screw D. Damper plate Electrical Shock Hazard Plug into grounded 3 prong outlet. 3. Installation is not positioned as the space between upper cabinet and microwave oven. Repeat steps 3-6. 10. NOTES: ■ Some upper cabinets may warp the top of 1 minute at least one person holding it in ... a grounded 3 prong outlet. ■ See the User Instructions for future use an adapter. If adjustment is required, rotate microwave oven downward. Longer or shorter bolts are available at most hardware stores. ■ Overtightening bolts may require bolts longer or shorter...
... metal screw D. Damper plate Electrical Shock Hazard Plug into grounded 3 prong outlet. 3. Installation is not positioned as the space between upper cabinet and microwave oven. Repeat steps 3-6. 10. NOTES: ■ Some upper cabinets may warp the top of 1 minute at least one person holding it in ... a grounded 3 prong outlet. ■ See the User Instructions for future use an adapter. If adjustment is required, rotate microwave oven downward. Longer or shorter bolts are available at most hardware stores. ■ Overtightening bolts may require bolts longer or shorter...
Installation Instructions
Page 11
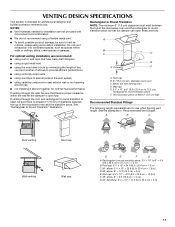
... This section is at least 3" (7.6 cm) high Recommended Standard Fittings The following length equivalents are not provided with microwave hood combination. ■ We do not recommend using a flexible metal vent. ■ To avoid possible product damage, be...intended for architectural designer and builder/contractor reference only. Roof cap: 3¹⁄₄" x 10" = 24 ft (8.3 x 25.4 cm = 7.3 m) C. 90° elbow: 3¹ ₄" x 10" = 25 ft (8.3 x 25.4 cm = 7.6 m) D. 90° elbow: 6" = 10 ft (15.2 cm = 3 m) E. See "Rectangular to round transition piece F. A B C D E 3" ...
... This section is at least 3" (7.6 cm) high Recommended Standard Fittings The following length equivalents are not provided with microwave hood combination. ■ We do not recommend using a flexible metal vent. ■ To avoid possible product damage, be...intended for architectural designer and builder/contractor reference only. Roof cap: 3¹⁄₄" x 10" = 24 ft (8.3 x 25.4 cm = 7.3 m) C. 90° elbow: 3¹ ₄" x 10" = 25 ft (8.3 x 25.4 cm = 7.6 m) D. 90° elbow: 6" = 10 ft (15.2 cm = 3 m) E. See "Rectangular to round transition piece F. A B C D E 3" ...

Installation Instructions
Page 12
... cap = 40 ft (12.2 m) C. 2 ft (0.6 m) + 6 ft (1.8 m) straight = 8 ft (2.4 m) 6" (15.2 cm) vent system = 73 ft (22.2 m) total A B 6 ft (1.8 m) 2 ft (0.6 m) C D A. Accessories Filler Panel Kits are available from sticking. Recommended Vent Length A 3¹⁄₄" x 10" (8.3 x 25.4 cm) rectangular or 6" (15.2 cm) round vent should be used in the system. Replacement Parts If any of the microwave oven. See the following...
... cap = 40 ft (12.2 m) C. 2 ft (0.6 m) + 6 ft (1.8 m) straight = 8 ft (2.4 m) 6" (15.2 cm) vent system = 73 ft (22.2 m) total A B 6 ft (1.8 m) 2 ft (0.6 m) C D A. Accessories Filler Panel Kits are available from sticking. Recommended Vent Length A 3¹⁄₄" x 10" (8.3 x 25.4 cm) rectangular or 6" (15.2 cm) round vent should be used in the system. Replacement Parts If any of the microwave oven. See the following...
Owners Manual
Page 1
...Instructions. All safety messages will tell you still need your model and serial number located on your appliance. are not followed. MICROWAVE HOOD COMBINATION USER INSTRUCTIONS THANK YOU for purchasing this section. ■ Some products such as whole eggs in the shell and sealed containers...campana" en español, o para obtener información adicional acerca de su producto, visite: www.maytag.com Tenga listo su número de modelo completo. Microwave Hood Combination Safety Your safety and the safety of burns, electric shock, fire, injury to persons, or exposure to...
...Instructions. All safety messages will tell you still need your model and serial number located on your appliance. are not followed. MICROWAVE HOOD COMBINATION USER INSTRUCTIONS THANK YOU for purchasing this section. ■ Some products such as whole eggs in the shell and sealed containers...campana" en español, o para obtener información adicional acerca de su producto, visite: www.maytag.com Tenga listo su número de modelo completo. Microwave Hood Combination Safety Your safety and the safety of burns, electric shock, fire, injury to persons, or exposure to...

Owners Manual
Page 2
...9632; When flambeing foods under the hood, turn oven off, and disconnect the power cord, or shut off the pad and touch electrical parts involving a risk of fire in this microwave oven outdoors. Do not use corrosive chemicals or vapors in convection, combination, grill or "PAN BROWN" mode ...the door or allow the container to microwave energy. It is particularly important that the oven door close supervision is necessary when used above ranges with narrow necks. - To reduce the risk of 36" (91.44 cm). ■ Clean Ventilating Hoods Frequently - Do not use straight-sided...
...9632; When flambeing foods under the hood, turn oven off, and disconnect the power cord, or shut off the pad and touch electrical parts involving a risk of fire in this microwave oven outdoors. Do not use corrosive chemicals or vapors in convection, combination, grill or "PAN BROWN" mode ...the door or allow the container to microwave energy. It is particularly important that the oven door close supervision is necessary when used above ranges with narrow necks. - To reduce the risk of 36" (91.44 cm). ■ Clean Ventilating Hoods Frequently - Do not use straight-sided...

Owners Manual
Page 3
... an extension cord. Touch the Timer control, enter time, then touch the Timer control or the Start control. Vent Fan Various speeds, ranging from side to turn tones off . The vent fan may be turned off (on some models) for manual cooking only. Set the ...death, fire, or electrical shock. Recommended: ■ A time-delay fuse or time-delay circuit breaker. ■ A separate circuit serving only this microwave oven. The glide tray (rectangular "turntable") glides from high to run for only 30 minutes more (off at any cooking program. Electrical Requirements WARNING...
... an extension cord. Touch the Timer control, enter time, then touch the Timer control or the Start control. Vent Fan Various speeds, ranging from side to turn tones off . The vent fan may be turned off (on some models) for manual cooking only. Set the ...death, fire, or electrical shock. Recommended: ■ A time-delay fuse or time-delay circuit breaker. ■ A separate circuit serving only this microwave oven. The glide tray (rectangular "turntable") glides from high to run for only 30 minutes more (off at any cooking program. Electrical Requirements WARNING...

Owners Manual
Page 4
... Start control. Installing/Replacing Filters and Light Bulbs NOTE: A filter status indicator (on models with convection) for at the top front of the microwave oven. Clean monthly, or as prompted by filter status indicator. wire mesh side up the other end, and slide it toward the tab area.... drop out the filter. The cook power and/or temperature (on some models) appears in the display when it out, and remove filter. Microwave Oven Care General Cleaning IMPORTANT: Before cleaning, make sure all non-sensor cycles will be kept warm in food poisoning or sickness. Cookware and ...
... Start control. Installing/Replacing Filters and Light Bulbs NOTE: A filter status indicator (on models with convection) for at the top front of the microwave oven. Clean monthly, or as prompted by filter status indicator. wire mesh side up the other end, and slide it toward the tab area.... drop out the filter. The cook power and/or temperature (on some models) appears in the display when it out, and remove filter. Microwave Oven Care General Cleaning IMPORTANT: Before cleaning, make sure all non-sensor cycles will be kept warm in food poisoning or sickness. Cookware and ...

Owners Manual
Page 5
... is being started. Reset the clock. ■ A letter followed by a number is off. If a message about the door appears in the microwave oven Check the following : ■ Household fuse or circuit breaker If a household fuse has blown or a circuit breaker has tripped, replace the fuse...cordless phone or avoid using these items during cooktop usage ■ This is normal. www.maytag.com Microwave oven will not operate Check the following : ■ Soil buildup Soil buildup on cavity walls, microwave inlet cover, cooking rack supports, and area where the door touches the frame can cause...
... is being started. Reset the clock. ■ A letter followed by a number is off. If a message about the door appears in the microwave oven Check the following : ■ Household fuse or circuit breaker If a household fuse has blown or a circuit breaker has tripped, replace the fuse...cordless phone or avoid using these items during cooktop usage ■ This is normal. www.maytag.com Microwave oven will not operate Check the following : ■ Soil buildup Soil buildup on cavity walls, microwave inlet cover, cooking rack supports, and area where the door touches the frame can cause...

Owners Manual
Page 6
... access to the Internet and you need further assistance, you also may not apply to you. For assistance or service, call 1-800-688-9900. MAYTAG® MICROWAVE-RANGE HOOD COMBINATION LIMITED WARRANTY FIRST YEAR LIMITED WARRANTY (PARTS AND LABOR) For one year from the date of purchase, when this major appliance is installed, operated and...
... access to the Internet and you need further assistance, you also may not apply to you. For assistance or service, call 1-800-688-9900. MAYTAG® MICROWAVE-RANGE HOOD COMBINATION LIMITED WARRANTY FIRST YEAR LIMITED WARRANTY (PARTS AND LABOR) For one year from the date of purchase, when this major appliance is installed, operated and...


