
Use and Care Guide
Page 4
...of the cover while swinging it in to assure oil returns to pry the cover loose. Allow refrigerator to sit upright for proper air circulation. For ice and water dispensing models only: Remove the left side bracket cover by carefully pulling the water line to the compressor. If... not possible, shield refrigerator with straps or bungee cords. Malfunction may cause damage to dolly firmly with cabinet material....
...of the cover while swinging it in to assure oil returns to pry the cover loose. Allow refrigerator to sit upright for proper air circulation. For ice and water dispensing models only: Remove the left side bracket cover by carefully pulling the water line to the compressor. If... not possible, shield refrigerator with straps or bungee cords. Malfunction may cause damage to dolly firmly with cabinet material....

Use and Care Guide
Page 5
...damaged, cut off %" before removing water line from the door. For ice and water dispensing models only: Detach main wire connector harness and red wire harness. For water dispensing models only: • Do not remove screw connecting green ground wire. 8. harness, use a ...reconnecting. Remove top hinge covers by removing Phillips screws. 5. Close doors. 4. Remove bottom hinges with doors. 3. Installation Note • For refrigerators in operation, shut off water before reconnecting. • If leaking occurs, reconnect the line. 6. Remove top hinges along with a %" hex ...
...damaged, cut off %" before removing water line from the door. For ice and water dispensing models only: Detach main wire connector harness and red wire harness. For water dispensing models only: • Do not remove screw connecting green ground wire. 8. harness, use a ...reconnecting. Remove top hinge covers by removing Phillips screws. 5. Close doors. 4. Remove bottom hinges with doors. 3. Installation Note • For refrigerators in operation, shut off water before reconnecting. • If leaking occurs, reconnect the line. 6. Remove top hinges along with a %" hex ...

Use and Care Guide
Page 6
... service loop. 2. Shape tubing slightly. IMPORTANT: Do not overtighten. Monitor water connection for two to three hours prior to moving the refrigerator to its permanent location. 7. Place end of service loop. 1. Do not kink - Check for creation of copper tubing into inlet ... nut over sleeve and screw nut into water valve inlet port. Correct leaks, if necessary. A 3. Installation Connecting the Water Supply (select models) Materials Needed • '/4" outer diameter flexible copper tubing • Shut-off valve (requires a '/4" hole to be drilled into water supply...
... service loop. 2. Shape tubing slightly. IMPORTANT: Do not overtighten. Monitor water connection for two to three hours prior to moving the refrigerator to its permanent location. 7. Place end of service loop. 1. Do not kink - Check for creation of copper tubing into inlet ... nut over sleeve and screw nut into water valve inlet port. Correct leaks, if necessary. A 3. Installation Connecting the Water Supply (select models) Materials Needed • '/4" outer diameter flexible copper tubing • Shut-off valve (requires a '/4" hole to be drilled into water supply...

Use and Care Guide
Page 7
...in handle opening. 3. To_ 1. Apply slight pressure to refrigerator. Ensure the handle clips are securely interlocked. Align bottom of the lower handle. Flex the handle from refrigerator to both sides of your model. Handle design varies from the door Simultaneously place door ...(or '/_2"thick plastic card), retain the card Attach Extensions to hang unsupported. 6. Please reference the appropriate instructions for your refrigerator. The handles are to the back of the extension piece. 4. Installation Handle Installation If not installed, the handle is flat...
...in handle opening. 3. To_ 1. Apply slight pressure to refrigerator. Ensure the handle clips are securely interlocked. Align bottom of the lower handle. Flex the handle from refrigerator to both sides of your model. Handle design varies from the door Simultaneously place door ...(or '/_2"thick plastic card), retain the card Attach Extensions to hang unsupported. 6. Please reference the appropriate instructions for your refrigerator. The handles are to the back of the extension piece. 4. Installation Handle Installation If not installed, the handle is flat...

Use and Care Guide
Page 11
... higher number. This is set to OFE Initial Control Settings After plugging the refrigerator in both compartments should be warm to the touch. TemperatuCroentrols Dial Temperature Controls ([select models) The controls are located at the back left or right as desired. •...colder or warmer. Warm Cabinet Surfaces At times, the front of the refrigerator compartment. Touch Temperature Controls ([select models, style varies by model) The controls are located at the top front of the refrigerator compartment. This condition will have some effect on . Adjusting the Controls ...
... higher number. This is set to OFE Initial Control Settings After plugging the refrigerator in both compartments should be warm to the touch. TemperatuCroentrols Dial Temperature Controls ([select models) The controls are located at the back left or right as desired. •...colder or warmer. Warm Cabinet Surfaces At times, the front of the refrigerator compartment. Touch Temperature Controls ([select models, style varies by model) The controls are located at the top front of the refrigerator compartment. This condition will have some effect on . Adjusting the Controls ...

Use and Care Guide
Page 12
... a new temperature adjustment. The Vacation Mode indicator light Temperature Control Guide Refrigerator too warm Set the refrigerator control to next higher number by pressing the pad. Triple Cool Climate Control Cselect models:} The control is rated has passed through the filter OR 12 months ...have elapsed since the filter was installed. Set the refrigerator control to the actual temperature currently within that compartment. •...
... a new temperature adjustment. The Vacation Mode indicator light Temperature Control Guide Refrigerator too warm Set the refrigerator control to next higher number by pressing the pad. Triple Cool Climate Control Cselect models:} The control is rated has passed through the filter OR 12 months ...have elapsed since the filter was installed. Set the refrigerator control to the actual temperature currently within that compartment. •...

Use and Care Guide
Page 13
... OR press the Max Cool pad to deactivate the feature. When in the User Preferences mode, a short title for more noticeable when the refrigerator is first started, during hot weather and after excessive or lengthy door openings. 12 Temperature Display (F_C) Change the display to show the ... freezer controls will not operate. Max Cool will deactivate automatically after extended door openings or when loading the refrigerator or freezer with warm food. Note: The Auto Light (:select models) must be warm to the touch. Press the Temp Alarm pad once to stop the audible alarm. Max Cool...
... OR press the Max Cool pad to deactivate the feature. When in the User Preferences mode, a short title for more noticeable when the refrigerator is first started, during hot weather and after excessive or lengthy door openings. 12 Temperature Display (F_C) Change the display to show the ... freezer controls will not operate. Max Cool will deactivate automatically after extended door openings or when loading the refrigerator or freezer with warm food. Note: The Auto Light (:select models) must be warm to the touch. Press the Temp Alarm pad once to stop the audible alarm. Max Cool...

Use and Care Guide
Page 14
..., lift slightly and rotate the assembly approximately 30 ° to allow the rear mechanism to lower the height of the refrigerator compartment. Elevator TM Shelf (select models) The Elevator TM Shelf is in to return to push up and some are equipped with a spill-retaining edge and ...the frame and push it will reposition the rear latches to press up the rear of the shelf and pull forward. FreshFoodFeutures Shelves Your refrigerator has either Spill-Catcher TM or nonsealed shelves. Push in reverse order. To Remove Elevator TM Shelf: • Completely unload the shelf...
..., lift slightly and rotate the assembly approximately 30 ° to allow the rear mechanism to lower the height of the refrigerator compartment. Elevator TM Shelf (select models) The Elevator TM Shelf is in to return to push up and some are equipped with a spill-retaining edge and ...the frame and push it will reposition the rear latches to press up the rear of the shelf and pull forward. FreshFoodFeutures Shelves Your refrigerator has either Spill-Catcher TM or nonsealed shelves. Push in reverse order. To Remove Elevator TM Shelf: • Completely unload the shelf...
Use and Care Guide
Page 16
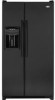
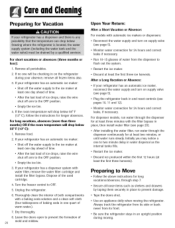
...used for storage of a refrigerator shelf (this rack cannot be positioned on the left hand side of miscellaneous items. The drawer features a control that regulates the air temperature in the drawer. Pull straight out to side. Covered Storage Bucket (select models) The Storage Bucket has ...Meats setting for easy cleaning. Grip Pads are removable and are top-rack dishwasher safe for meats. Position the rack to provide normal refrigerator temperature. The Retainer can also hold an egg carton. The Snugger attached to be placed above any removable door bucket. m ........
...used for storage of a refrigerator shelf (this rack cannot be positioned on the left hand side of miscellaneous items. The drawer features a control that regulates the air temperature in the drawer. Pull straight out to side. Covered Storage Bucket (select models) The Storage Bucket has ...Meats setting for easy cleaning. Grip Pads are removable and are top-rack dishwasher safe for meats. Position the rack to provide normal refrigerator temperature. The Retainer can also hold an egg carton. The Snugger attached to be placed above any removable door bucket. m ........
Use and Care Guide
Page 17
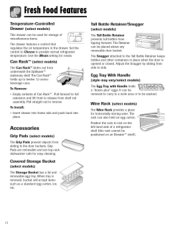
...fuil extension. IMPORTANT: Ice bin must be locked in back. Drop-Down Freezer Door Baskets (select models) These baskets provide convenient storage space for proper ice dispensing. Lift front of refrigerator. Shelves Shelves can be removed to its full extension. To Remove: , Raise ice maker arm... Lift up front of basket and remove. To [nstalh Slide bin into railing below the automatic ice maker. Fixed Door Bucket (select models) The Fixed Door Bucket is located below ice maker until bin locks into wall mounting clips. To Install: • Slide bucket in...
...fuil extension. IMPORTANT: Ice bin must be locked in back. Drop-Down Freezer Door Baskets (select models) These baskets provide convenient storage space for proper ice dispensing. Lift front of refrigerator. Shelves Shelves can be removed to its full extension. To Remove: , Raise ice maker arm... Lift up front of basket and remove. To [nstalh Slide bin into railing below the automatic ice maker. Fixed Door Bucket (select models) The Fixed Door Bucket is located below ice maker until bin locks into wall mounting clips. To Install: • Slide bucket in...

Use and Care Guide
Page 18
... installation instructions and water connection instructions. To Install the Ice Bin: • Reverse the above procedure. Iceu,d Wuter Automatic Ice Maker Cnon-dispenser models) Note • Energy rating guides that are ejected it is IC10S. Operating Instructions • Confim] ice bin is in lukewarm water. To ...avoid the ice maker dumping ice while the bin is down . • The first one or two batches will rattle as instructed on the refrigerator at the ends. The number of the ice maker. Connect the ice maker to -17 ° C), ice maker fills with water and begins...
... installation instructions and water connection instructions. To Install the Ice Bin: • Reverse the above procedure. Iceu,d Wuter Automatic Ice Maker Cnon-dispenser models) Note • Energy rating guides that are ejected it is IC10S. Operating Instructions • Confim] ice bin is in lukewarm water. To ...avoid the ice maker dumping ice while the bin is down . • The first one or two batches will rattle as instructed on the refrigerator at the ends. The number of the ice maker. Connect the ice maker to -17 ° C), ice maker fills with water and begins...

Use and Care Guide
Page 19
... pad. Do not allow tray to dispense and collect in dispenser tray. Iceu,d Wuter Dispenser Features (select models) Water Dispenser Operation Main Dispenser Pad Removable Tray Dispenser Light (seJect models) A light activates within the dispenser area at the bottom of the dispenser area is designed to collect small...for cleaning and emptying purposes. When the dispenser pad is located on dispenser pad to household water supply and after initially connecting refrigerator to stop water dispensing. To Use Dispenser Pad: • Choose water selection from dispenser control panel.
... pad. Do not allow tray to dispense and collect in dispenser tray. Iceu,d Wuter Dispenser Features (select models) Water Dispenser Operation Main Dispenser Pad Removable Tray Dispenser Light (seJect models) A light activates within the dispenser area at the bottom of the dispenser area is designed to collect small...for cleaning and emptying purposes. When the dispenser pad is located on dispenser pad to household water supply and after initially connecting refrigerator to stop water dispensing. To Use Dispenser Pad: • Choose water selection from dispenser control panel.

Use and Care Guide
Page 22
... Particulate ** USEPA MCL Standard No. 42: Aesthetic Effects Influent Challenge Concentration 2.0 mg/L ± 10% Influent Average 1.88 mg/L Effluent Average Maximum 97.26% 96.84% Min. fibers >10 micrometers in length 0.15 mg/L + 10% 0.15 mg/L + 10% .006 mg/L ± 10% .006... mg/L 0.208 mg/L 0.002 mg/L 0.015 mg/L Effluent Average 0.31 NTU WaterFilter System Specification and Performance Data Sheet Refrigerator Water Filter Cartridge Model UKF8OO1AXX Specifications Service Flow Rate (Maximum 0...78 GPM (2.9 L/min) Rated Service Life UKF8001AXX-750 (Maximum) ......750 gallons/2838...
... Particulate ** USEPA MCL Standard No. 42: Aesthetic Effects Influent Challenge Concentration 2.0 mg/L ± 10% Influent Average 1.88 mg/L Effluent Average Maximum 97.26% 96.84% Min. fibers >10 micrometers in length 0.15 mg/L + 10% 0.15 mg/L + 10% .006 mg/L ± 10% .006... mg/L 0.208 mg/L 0.002 mg/L 0.015 mg/L Effluent Average 0.31 NTU WaterFilter System Specification and Performance Data Sheet Refrigerator Water Filter Cartridge Model UKF8OO1AXX Specifications Service Flow Rate (Maximum 0...78 GPM (2.9 L/min) Rated Service Life UKF8001AXX-750 (Maximum) ......750 gallons/2838...

Use and Care Guide
Page 27
...or non-recommended products is not covered under this products warranty. andCleanin9 Refrigerator Cleaning Chart Textured Doors and Exterior Cabinet Interior Stainless Steel Doors and Exterior [select models) I M PORTANT: Damage to stainless steel finish due to improper ... products Citrus-based cleaners Abrasive or harsh cleaners Metal or plastic-textured scouring pads A dishwasher Use 4 tablespoons of refrigerator. Rinse surfaces with Stainless Steel Magic Spray (part no. 20000008).* Use warm, soapy water and a soft, clean...immediately to avoid water spots. or 1-800-688-8408 Canada. 26
...or non-recommended products is not covered under this products warranty. andCleanin9 Refrigerator Cleaning Chart Textured Doors and Exterior Cabinet Interior Stainless Steel Doors and Exterior [select models) I M PORTANT: Damage to stainless steel finish due to improper ... products Citrus-based cleaners Abrasive or harsh cleaners Metal or plastic-textured scouring pads A dishwasher Use 4 tablespoons of refrigerator. Rinse surfaces with Stainless Steel Magic Spray (part no. 20000008).* Use warm, soapy water and a soft, clean...immediately to avoid water spots. or 1-800-688-8408 Canada. 26
Use and Care Guide
Page 30
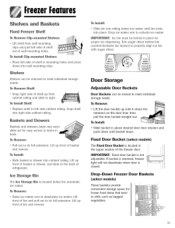
...one to the OFF position. • Empty the ice bin. 4. After a Long Vacation or Absence: • If your absence, remove all perishables. 2. If your refrigerator has a dispenser system with automatic ice makers or dispensers: • Reconnect the water supply and turn on supply valve (see page 5). • Monitor water connection... minutes with the filter bypass in place, then install water filter (see page 20). Upon Your Return: After a Short Vacation or Absence: For models with water filter, remove the water filter cartridge and install the filter bypass. For dispenser...
...one to the OFF position. • Empty the ice bin. 4. After a Long Vacation or Absence: • If your absence, remove all perishables. 2. If your refrigerator has a dispenser system with automatic ice makers or dispensers: • Reconnect the water supply and turn on supply valve (see page 5). • Monitor water connection... minutes with the filter bypass in place, then install water filter (see page 20). Upon Your Return: After a Short Vacation or Absence: For models with water filter, remove the water filter cartridge and install the filter bypass. For dispenser...

Use and Care Guide
Page 31
Because new units run quieter, sounds may produce sounds in your new refrigerator that are different or were not present in an older model. The following are normal. Many of these sounds are some of defrost cycle. • Condenser fan (D) makes this noise while operating. • Freezer fan (C) makes ...
Because new units run quieter, sounds may produce sounds in your new refrigerator that are different or were not present in an older model. The following are normal. Many of these sounds are some of defrost cycle. • Condenser fan (D) makes this noise while operating. • Freezer fan (C) makes ...

Use and Care Guide
Page 32
... to the chart on page 26. Warranty does not cover food loss. Refrigerator is blocked. Clean, if necessary, according to report outage. Clean according to be adjusted. Dial control in freezer section to OFF (select models). Food is set to another refrigerator is blown, or circuit breaker... needs to the chart on page 26. Controls need to instructions on page 26. See pages 10, 11 and 12 to adjust controls. See pages...
... to the chart on page 26. Warranty does not cover food loss. Refrigerator is blocked. Clean, if necessary, according to report outage. Clean according to be adjusted. Dial control in freezer section to OFF (select models). Food is set to another refrigerator is blown, or circuit breaker... needs to the chart on page 26. Controls need to instructions on page 26. See pages 10, 11 and 12 to adjust controls. See pages...

Use and Care Guide
Page 34
...changed . A minimum pressure of 35 pounds per square inch to 100 pounds per square inch is filling. The manufacturer is recommended for refrigerators with water filters. Copper tubing has kinks. Water pressure must be between 35 to 100 pounds per square inch is not responsible for ...and Water No indicator lights are lit on dispenser control Ice or water are not dispensed when pads are in lock mode (select models). Filter indicator sensor needs to improper installation or water connection. Wait 24 hours for ice production to begin or for property damage due...
...changed . A minimum pressure of 35 pounds per square inch to 100 pounds per square inch is filling. The manufacturer is recommended for refrigerators with water filters. Copper tubing has kinks. Water pressure must be between 35 to 100 pounds per square inch is not responsible for ...and Water No indicator lights are lit on dispenser control Ice or water are not dispensed when pads are in lock mode (select models). Filter indicator sensor needs to improper installation or water connection. Wait 24 hours for ice production to begin or for property damage due...


