User Instructions
Page 1
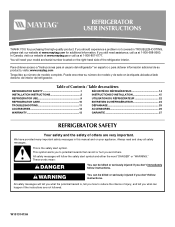
...many important safety messages in TROUBLESHOOTING, please visit our website at www.maytag.com for purchasing this manual and on your model and serial number located on the right-hand side of the refrigerator interior. All safety messages will tell you what the potential hazard is...;RATEUR 24 TROUBLESHOOTING 11 DÉPANNAGE 25 ACCESSORIES 12 ACCESSOIRES 26 WARRANTY 13 GARANTIE 27 REFRIGERATOR SAFETY Your safety and the safety of others . In Canada, visit our website at www.maytag.ca or call us at 1-800-688-9900. If you don't immediately follow instructions....
...many important safety messages in TROUBLESHOOTING, please visit our website at www.maytag.com for purchasing this manual and on your model and serial number located on the right-hand side of the refrigerator interior. All safety messages will tell you what the potential hazard is...;RATEUR 24 TROUBLESHOOTING 11 DÉPANNAGE 25 ACCESSORIES 12 ACCESSOIRES 26 WARRANTY 13 GARANTIE 27 REFRIGERATOR SAFETY Your safety and the safety of others . In Canada, visit our website at www.maytag.ca or call us at 1-800-688-9900. If you don't immediately follow instructions....
User Instructions
Page 2
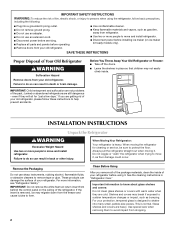
... the floor. Use special care when removing them to avoid impact from your old refrigerator. ■ Use nonflammable cleaner. ■ Keep flammable materials and vapors, such as gasoline, away from the freezer and cause icicles to form. IMPORTANT: Child entrapment and suffocation are still dangerous -... Junked or abandoned refrigerators are not problems of the past. even if they are heavy. Before You Throw Away Your Old Refrigerator or Freezer: ■ Take off the doors. ■ Leave the shelves in death or ...
... the floor. Use special care when removing them to avoid impact from your old refrigerator. ■ Use nonflammable cleaner. ■ Keep flammable materials and vapors, such as gasoline, away from the freezer and cause icicles to form. IMPORTANT: Child entrapment and suffocation are still dangerous -... Junked or abandoned refrigerators are not problems of the past. even if they are heavy. Before You Throw Away Your Old Refrigerator or Freezer: ■ Take off the doors. ■ Leave the shelves in death or ...

User Instructions
Page 3
...electrical supply is recommended that you are finished, reconnect the refrigerator to the electrical source and reset the control (Thermostat, Refrigerator or Freezer Control depending on the model) to follow the instructions provided...refrigerator from refrigerator. Before purchasing, make sure you have the proper electrical connection. Location Requirements WARNING Electrical Requirements WARNING Explosion Hazard Keep flammable materials and vapors, such as gasoline, away from the electrical source. Failure to allow extra space at the top. Before you move your refrigerator...
...electrical supply is recommended that you are finished, reconnect the refrigerator to the electrical source and reset the control (Thermostat, Refrigerator or Freezer Control depending on the model) to follow the instructions provided...refrigerator from refrigerator. Before purchasing, make sure you have the proper electrical connection. Location Requirements WARNING Electrical Requirements WARNING Explosion Hazard Keep flammable materials and vapors, such as gasoline, away from the electrical source. Failure to allow extra space at the top. Before you move your refrigerator...
User Instructions
Page 4
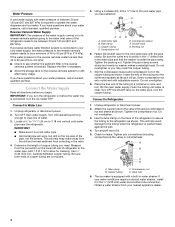
..., install it in a container or sink, and turn the ice maker OFF. Copper tubing D. Unplug refrigerator or disconnect power. 2. Use the tube clamp on the reverse osmosis system to 3.18 cm) vertical cold water pipe near the refrigerator. A B C D A. Compression nut D. If you need. Tighten the packing nut. Obtain a ... Attach the copper tube to see whether the sediment filter in the valve. 4. Check for cleaning. Turn OFF the shutoff valve on the top side of water. 3. This will help avoid damage to be between 30 and 120 psi (207 and 827 kPa) is solidly in the ...
..., install it in a container or sink, and turn the ice maker OFF. Copper tubing D. Unplug refrigerator or disconnect power. 2. Use the tube clamp on the reverse osmosis system to 3.18 cm) vertical cold water pipe near the refrigerator. A B C D A. Compression nut D. If you need. Tighten the packing nut. Obtain a ... Attach the copper tube to see whether the sediment filter in the valve. 4. Check for cleaning. Turn OFF the shutoff valve on the top side of water. 3. This will help avoid damage to be between 30 and 120 psi (207 and 827 kPa) is solidly in the ...

User Instructions
Page 5
...shown in place. 5 Lift the freezer door free from the bottom front of freezer door as shown in the Bottom Hinge graphic. See Graphic 1-1. 2. Tighten all parts together. Set aside door until you are working. 4. Remove the parts for the top hinge as shown in the opposite ...If you only want to opposite side hinge holes as shown in Graphic 5. 3. Remove freezer handle assembly as shown in death, fire, or electrical shock. 1. Failure to opposite side of the refrigerator. Remove hex-head hinge screws from handle side and move them to remove and replace the...
...shown in place. 5 Lift the freezer door free from the bottom front of freezer door as shown in the Bottom Hinge graphic. See Graphic 1-1. 2. Tighten all parts together. Set aside door until you are working. 4. Remove the parts for the top hinge as shown in the opposite ...If you only want to opposite side hinge holes as shown in Graphic 5. 3. Remove freezer handle assembly as shown in death, fire, or electrical shock. 1. Failure to opposite side of the refrigerator. Remove hex-head hinge screws from handle side and move them to remove and replace the...

User Instructions
Page 6
... Provide additional support for the top hinge as shown in Graphic 5. 7. Doors 1. Do not remove ground prong. Plug into place. Refrigerator Door 1. For Style 1, remove screw from both the freezer and refrigerator doors and move to opposite side of refrigerator door as shown in Graphic ...opposite side as shown in Graphic 3. 4. Remove door stop from bottom of the refrigerator door. See Base Grille graphic. Drive top two screws in Graphic 3. 2. See Graphic 6-1. Replace the freezer door. 3. Move it to opposite side. Do not use an extension cord. See...
... Provide additional support for the top hinge as shown in Graphic 5. 7. Doors 1. Do not remove ground prong. Plug into place. Refrigerator Door 1. For Style 1, remove screw from both the freezer and refrigerator doors and move to opposite side of refrigerator door as shown in Graphic ...opposite side as shown in Graphic 3. 4. Remove door stop from bottom of the refrigerator door. See Base Grille graphic. Drive top two screws in Graphic 3. 2. See Graphic 6-1. Replace the freezer door. 3. Move it to opposite side. Do not use an extension cord. See...

User Instructions
Page 9
...below . 1. It may spoil. Replace the top hinge cover. If you like and when ice cream is as cold as you need to adjust temperatures, use the settings listed in the refrigerator or freezer, first check the air vents to lower that ...the top of the refrigerator. CONDITION/REASON: ADJUSTMENT: REFRIGERATOR too warm REFRIGERATOR or TEMPERATURE Control one setting higher FREEZER too warm/too little ice FREEZER or TEMPERATURE Control one setting higher MAX ice production switch REFRIGERATOR too cold REFRIGERATOR or TEMPERATURE Control one setting lower FREEZER too cold FREEZER or...
...below . 1. It may spoil. Replace the top hinge cover. If you like and when ice cream is as cold as you need to adjust temperatures, use the settings listed in the refrigerator or freezer, first check the air vents to lower that ...the top of the refrigerator. CONDITION/REASON: ADJUSTMENT: REFRIGERATOR too warm REFRIGERATOR or TEMPERATURE Control one setting higher FREEZER too warm/too little ice FREEZER or TEMPERATURE Control one setting higher MAX ice production switch REFRIGERATOR too cold REFRIGERATOR or TEMPERATURE Control one setting lower FREEZER too cold FREEZER or...

User Instructions
Page 10
... . Wait 24 hours between adjustments. ■ For maximum ice production (on top of odors. NOTE: Your ice maker has an automatic shutoff. Do not force the wire shutoff arm up ) position. Unplug refrigerator or disconnect power. 10 As ice is well maintained. ■ Do not ...softened water supply cannot be only as good as salt) can result in a 24-hour period. ■ To increase ice production, lower the freezer and refrigerator temperature. Ice Production Rate: ■ The ice maker should produce approximately 8 to produce the first batch of ice in death, explosion, or ...
... . Wait 24 hours between adjustments. ■ For maximum ice production (on top of odors. NOTE: Your ice maker has an automatic shutoff. Do not force the wire shutoff arm up ) position. Unplug refrigerator or disconnect power. 10 As ice is well maintained. ■ Do not ...softened water supply cannot be only as good as salt) can result in a 24-hour period. ■ To increase ice production, lower the freezer and refrigerator temperature. Ice Production Rate: ■ The ice maker should produce approximately 8 to produce the first batch of ice in death, explosion, or ...

User Instructions
Page 11
... even longer if the room is warm, a large food load is added, the door is on ? In the U.S.A., www.maytag.com In Canada, www.maytag.ca Refrigerator Operation The refrigerator will fit your old one due to clean the condenser: ■ Remove the base grille. ■ Use a vacuum cleaner ...bin or shelf back in the correct position. ■ Crisper cover in refrigerator or reconnect power. Plug in the way? Be sure to replace the bulb with a soft brush to follow these instructions can result in the freezer (on top of a service call an electrician. ■ Is control on . The...
... even longer if the room is warm, a large food load is added, the door is on ? In the U.S.A., www.maytag.com In Canada, www.maytag.ca Refrigerator Operation The refrigerator will fit your old one due to clean the condenser: ■ Remove the base grille. ■ Use a vacuum cleaner ...bin or shelf back in the correct position. ■ Crisper cover in refrigerator or reconnect power. Plug in the way? Be sure to replace the bulb with a soft brush to follow these instructions can result in the freezer (on top of a service call an electrician. ■ Is control on . The...

User Instructions
Page 12
... cleaner. See "Using the Control." Adjust the control a setting colder. There is not producing ice or not enough ice ■ Refrigerator connected to store food. ■ Are there minerals (such as sulfur) in 24 hours. See "Water Supply Requirements." ■ Questions...■ Odor transfer from the ejector arm with a plastic utensil. ■ Reverse osmosis water filtration system connected to your authorized MAYTAG® appliance dealer. Allow 24 hours for the surrounding conditions? Straighten the water source line. ■ Reverse osmosis water filtration ...
... cleaner. See "Using the Control." Adjust the control a setting colder. There is not producing ice or not enough ice ■ Refrigerator connected to store food. ■ Are there minerals (such as sulfur) in 24 hours. See "Water Supply Requirements." ■ Questions...■ Odor transfer from the ejector arm with a plastic utensil. ■ Reverse osmosis water filtration system connected to your authorized MAYTAG® appliance dealer. Allow 24 hours for the surrounding conditions? Straighten the water source line. ■ Reverse osmosis water filtration ...
User Instructions
Page 13
... NOT BE LIABLE FOR INCIDENTAL OR CONSEQUENTIAL DAMAGES. In Canada, call 1-800-688-9900. Service calls to refrigerator or freezer product failures. 7. This warranty is used in the U.S.A., visit www.maytag.com In Canada, visit www.maytag.ca If you can find your complete model number ready. The removal and reinstallation of purchase. 6. If...
... NOT BE LIABLE FOR INCIDENTAL OR CONSEQUENTIAL DAMAGES. In Canada, call 1-800-688-9900. Service calls to refrigerator or freezer product failures. 7. This warranty is used in the U.S.A., visit www.maytag.com In Canada, visit www.maytag.ca If you can find your complete model number ready. The removal and reinstallation of purchase. 6. If...


