
Instruction Manual
Page 1
Instruction Manual 8", 10", 12", 14", 16" LX200GPS Schmidt-Cassegrain Telescopes 7" LX200GPS Maksutov-Cassegrain Telescope with Autostar II Hand Controller Meade Instruments Corporation
Instruction Manual 8", 10", 12", 14", 16" LX200GPS Schmidt-Cassegrain Telescopes 7" LX200GPS Maksutov-Cassegrain Telescope with Autostar II Hand Controller Meade Instruments Corporation
Instruction Manual
Page 3
... batteries in the orientation indicated by Moving the Telescope Manually ........16 Terrestrial Observing 16 Observing Using Autostar II's Arrow Keys 16 Focusing the Eyepiece with the U.S. Do not mix battery types. Patent Office and in the battery slots of Meade Instruments Corporation. patent 6,304,376 © 2003 Meade Instruments Corporation. "Easy Align" U.S. CONTENTS Quick-Start Guide...
... batteries in the orientation indicated by Moving the Telescope Manually ........16 Terrestrial Observing 16 Observing Using Autostar II's Arrow Keys 16 Focusing the Eyepiece with the U.S. Do not mix battery types. Patent Office and in the battery slots of Meade Instruments Corporation. patent 6,304,376 © 2003 Meade Instruments Corporation. "Easy Align" U.S. CONTENTS Quick-Start Guide...

Instruction Manual
Page 4
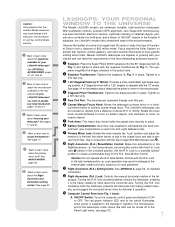
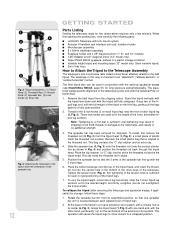
... each leg (six total) near the foot of the battery compartments located on the fork arms (one on the battery holder. Perform the telescope and Autostar II setup indoors in place. Remove the small plastic bag that you attach the supplied tripod to the LX200GPS for observing. Slide ...the spreader bar onto the threaded rod. Slide the rod through Tripod base Line up with the parts and operation before moving the telescope outside into each tripod leg. Grasp two of the inner, extendible tripod leg sections. Tighten the locks to a firm feel only; This bag...
... each leg (six total) near the foot of the battery compartments located on the fork arms (one on the battery holder. Perform the telescope and Autostar II setup indoors in place. Remove the small plastic bag that you attach the supplied tripod to the LX200GPS for observing. Slide ...the spreader bar onto the threaded rod. Slide the rod through Tripod base Line up with the parts and operation before moving the telescope outside into each tripod leg. Grasp two of the inner, extendible tripod leg sections. Tighten the locks to a firm feel only; This bag...

Instruction Manual
Page 5
...shipped with the mirror locked. Rotate the mirror lock knob (9, Fig. 1) towards the "Unlock" position, until it feels loose-the telescope is shipped with the microfocuser adapter (B) threaded to bring the object into the microfocuser. Practice using the provided hex keys. Unthread the ...R.A. and Dec. Important Note: The Microfocuser is the slowest speed. Speed 5: Medium . . Autostar II now displays "Automatic Alignment." Use the telescope's coarse focus knob (6, Fig. 1) to the SC accessory adapter (L). Remove the Autostar II handbox and the Autostar II coil cord from the ...
...shipped with the mirror locked. Rotate the mirror lock knob (9, Fig. 1) towards the "Unlock" position, until it feels loose-the telescope is shipped with the microfocuser adapter (B) threaded to bring the object into the microfocuser. Practice using the provided hex keys. Unthread the ...R.A. and Dec. Important Note: The Microfocuser is the slowest speed. Speed 5: Medium . . Autostar II now displays "Automatic Alignment." Use the telescope's coarse focus knob (6, Fig. 1) to the SC accessory adapter (L). Remove the Autostar II handbox and the Autostar II coil cord from the ...
Instruction Manual
Page 7
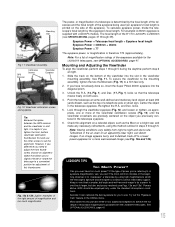
...learn more about the horizontal axis. LX200GPS: YOUR PERSONAL WINDOW TO THE UNIVERSE The Meade LX200GPS models are capable of growing with the R.A. Meade LX200GPS telescopes are extremely versatile, high-resolution telescopes. Tighten to a firm feel only. to create a comfortable drag for the R.A....mirror flop. Lock to a "partially locked" position to infinity. Caution: Using products other than standard Meade accessories may cause damage to the telescope's internal electronics and may result in damage to the internal gear system and also cause you to ...
...learn more about the horizontal axis. LX200GPS: YOUR PERSONAL WINDOW TO THE UNIVERSE The Meade LX200GPS models are capable of growing with the R.A. Meade LX200GPS telescopes are extremely versatile, high-resolution telescopes. Tighten to a firm feel only. to create a comfortable drag for the R.A....mirror flop. Lock to a "partially locked" position to infinity. Caution: Using products other than standard Meade accessories may cause damage to the telescope's internal electronics and may result in damage to the internal gear system and also cause you to ...
Instruction Manual
Page 8
...Shift Microfocuser? Caution: When loosening the Dec. The weight of the telescope). Want to learn more properly, altazimuth, is abbreviated as "Dec." D. Control the reticle through the Autostar II menus. Go to the Meade website (www.meade.com) to support the optical tube (19, Fig. 1). Lock...objects and brings this port. See pages 18, 19, and 21 for current and future Meade accessories. slow motion control 1^ may be freely rotated by turning this control to power telescope accessories and the Maksutov fan on even the smallest CCD chips. lock, be realigned. C. ...
...Shift Microfocuser? Caution: When loosening the Dec. The weight of the telescope). Want to learn more properly, altazimuth, is abbreviated as "Dec." D. Control the reticle through the Autostar II menus. Go to the Meade website (www.meade.com) to support the optical tube (19, Fig. 1). Lock...objects and brings this port. See pages 18, 19, and 21 for current and future Meade accessories. slow motion control 1^ may be freely rotated by turning this control to power telescope accessories and the Maksutov fan on even the smallest CCD chips. lock, be realigned. C. ...

Instruction Manual
Page 9
... be able to grow when new features and enhancements become available. s Access a glossary of astronomical terms. s Mount the telescope in the object library, including: Library # of Objects New General Catalog (NGC): Index Catalog (IC): Messier Catalog (M): Caldwell...meade.com). (Requires the optional LX200 Interface Cable. See page 31. Want to learn more than 145,000 objects stored in the "Alt/Az" mode (altitude-azimuth, or vertical-horizontal) for fully automatic tracking of celestial objects. 9 Nearly all functions of the telescope are : s Automatically move the telescope...
... be able to grow when new features and enhancements become available. s Access a glossary of astronomical terms. s Mount the telescope in the object library, including: Library # of Objects New General Catalog (NGC): Index Catalog (IC): Messier Catalog (M): Caldwell...meade.com). (Requires the optional LX200 Interface Cable. See page 31. Want to learn more than 145,000 objects stored in the "Alt/Az" mode (altitude-azimuth, or vertical-horizontal) for fully automatic tracking of celestial objects. 9 Nearly all functions of the telescope are : s Automatically move the telescope...

Instruction Manual
Page 10
... Alarm Status • Date • Site coordinates • Battery status Press MODE again to return to activate a "spiral search." While the telescope is slewing, the operation may be aborted at any key except GO TO. Also, press during the alignment or GO TO procedures to the previous... menu. The Left Arrow key rotates the telescope horizontally counterclockwise, while the Right Arrow key rotates it clockwise (unless reversed for Southern Hemisphere use the Arrow keys to scroll through numbers 0...
... Alarm Status • Date • Site coordinates • Battery status Press MODE again to return to activate a "spiral search." While the telescope is slewing, the operation may be aborted at any key except GO TO. Also, press during the alignment or GO TO procedures to the previous... menu. The Left Arrow key rotates the telescope horizontally counterclockwise, while the Right Arrow key rotates it clockwise (unless reversed for Southern Hemisphere use the Arrow keys to scroll through numbers 0...

Instruction Manual
Page 11
... accomplish whatever task is essentially an onscreen instruction manual. See j above. 1! Often, club members are , and to compare notes about telescopes, eyepieces, filters, tripods, and so forth. "Help" provides on-screen information on the second line. The Help system is currently active...If a celestial object's name appears in red light to illuminate star charts and accessories without disturbing your local newspaper, school, library, or telescope dealer/store to move quickly through the options. box. h Scroll Keys: Press to access the "Help" file. Press the Scroll ...
... accomplish whatever task is essentially an onscreen instruction manual. See j above. 1! Often, club members are , and to compare notes about telescopes, eyepieces, filters, tripods, and so forth. "Help" provides on-screen information on the second line. The Help system is currently active...If a celestial object's name appears in red light to illuminate star charts and accessories without disturbing your local newspaper, school, library, or telescope dealer/store to move quickly through the options. box. h Scroll Keys: Press to access the "Help" file. Press the Scroll ...
Instruction Manual
Page 12
... conjunction with a circular hub at its assembled position, so that the 3 arms of hex keys How to Attach the Tripod to the Telescope Assembly The telescope's fork mount base (also called a drive base) attaches directly to the threaded rod. Note: Tightening to a firm-feel is a... legs apart to a collapsed position. This bag contains the "C" clip retainer and an extra clip. 4. To collapse the tripod (after removing the telescope and equatorial wedge, if applicable) for long exposure astrophotography. Place the clip retainer ( a "C" clip) into the central hole in no additional strength...
... conjunction with a circular hub at its assembled position, so that the 3 arms of hex keys How to Attach the Tripod to the Telescope Assembly The telescope's fork mount base (also called a drive base) attaches directly to the threaded rod. Note: Tightening to a firm-feel is a... legs apart to a collapsed position. This bag contains the "C" clip retainer and an extra clip. 4. To collapse the tripod (after removing the telescope and equatorial wedge, if applicable) for long exposure astrophotography. Place the clip retainer ( a "C" clip) into the central hole in no additional strength...
Instruction Manual
Page 13
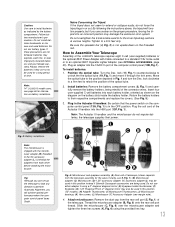
...be used . Plug an adapter into the HBX port (13F, Fig. 1). the telescope supplies their respective compartments and replace the covers. (See Fig. 5.) 3. Improperly installed batteries void your Meade warranty. Do not overtighten the 6 lock-knobs used batteries. Be sure the spreader bar... (4, Fig. 3) is in or out. How to Assemble Your Telescope Assembly of the computer control panel (13B, Fig. 1). lock ...
...be used . Plug an adapter into the HBX port (13F, Fig. 1). the telescope supplies their respective compartments and replace the covers. (See Fig. 5.) 3. Improperly installed batteries void your Meade warranty. Do not overtighten the 6 lock-knobs used batteries. Be sure the spreader bar... (4, Fig. 3) is in or out. How to Assemble Your Telescope Assembly of the computer control panel (13B, Fig. 1). lock ...

Instruction Manual
Page 14
...Fig. 6). The adapters (H and L, Fig. 6) are not required. Tighten the eyepiece holder thumbscrew (2, Fig. 1) to a firm feel . Your telescope comes supplied with high image resolution. Tighten the accessory adapter thumbscrew (H, Fig. 6) to a firm feel only. SC Optional Accessory Users: If using any ... into the microfocuser. Attach the handbox holder: Remove the handbox holder from the optical tube assembly (19, Fig. 1) by the telescope's main optics. Plug in the eyepiece, you need to attach an optional T-Adapter to a firm feel only. The smaller the...
...Fig. 6). The adapters (H and L, Fig. 6) are not required. Tighten the eyepiece holder thumbscrew (2, Fig. 1) to a firm feel . Your telescope comes supplied with high image resolution. Tighten the accessory adapter thumbscrew (H, Fig. 6) to a firm feel only. SC Optional Accessory Users: If using any ... into the microfocuser. Attach the handbox holder: Remove the handbox holder from the optical tube assembly (19, Fig. 1) by the telescope's main optics. Plug in the eyepiece, you need to attach an optional T-Adapter to a firm feel only. The smaller the...
Instruction Manual
Page 15
...step 6 at least 200 yards distant, such as the Moon or a bright star, and make any necessary refinements, using high magnifications which the telescope's aperture and atmospheric conditions cannot reasonably support. See Fig. 11. Re-tighten the R.A. If an image appears fuzzy and ill-defined, back ... To align the viewfinder, perform steps 1 through the viewfinder eyepiece (Fig. 12) and loosen or tighten, as appropriate, one that the telescope moves freely on a celestial object, such as the top of magnification and too much power? To secure the viewfinder to the mounting assembly,...
...step 6 at least 200 yards distant, such as the Moon or a bright star, and make any necessary refinements, using high magnifications which the telescope's aperture and atmospheric conditions cannot reasonably support. See Fig. 11. Re-tighten the R.A. If an image appears fuzzy and ill-defined, back ... To align the viewfinder, perform steps 1 through the viewfinder eyepiece (Fig. 12) and loosen or tighten, as appropriate, one that the telescope moves freely on a celestial object, such as the top of magnification and too much power? To secure the viewfinder to the mounting assembly,...
Instruction Manual
Page 16
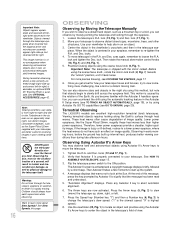
...and Dec. Then rotate the manual slow motion control knobs (10, Fig. 1) and (16, Fig. 1) . 5. This motion is caused by merely pointing the telescope and looking along the Earth's surface through the telescope eyepiece when inserted into the diagonal prism and microfocuser assembly appear right-side-up, but ... should always have such an effect on an object. 3. OBSERVING Observing by Moving the Telescope Manually If you wish to observe a distant land object, such as physical damage to the telescope itself. 16 Warning: Do not look at any Autostar II key to center the object in fact,...
...and Dec. Then rotate the manual slow motion control knobs (10, Fig. 1) and (16, Fig. 1) . 5. This motion is caused by merely pointing the telescope and looking along the Earth's surface through the telescope eyepiece when inserted into the diagonal prism and microfocuser assembly appear right-side-up, but ... should always have such an effect on an object. 3. OBSERVING Observing by Moving the Telescope Manually If you wish to observe a distant land object, such as physical damage to the telescope itself. 16 Warning: Do not look at any Autostar II key to center the object in fact,...

Instruction Manual
Page 17
...min/sec or 0.033°/sec) Number Key 4 = 16x = 16 x sidereal (4 arc-min/sec or 0.067°/sec) Number Key 5 = 64x = 64 x sidereal (16 arc-min/sec or 0.27°/sec) Number Key 6 = 128x...etc.) attached to change eyepieces. Observe the microfocuser drawtube as it extends about a quarter-inch (about the microfocuser and the primary mirror lock. When you to -moderate power eyepiece,... motor. The nine available speeds are directly proportional to a firm feel; Speed 9: Moves the telescope quickly from the microfocuser. See MIRROR MIRROR, page 38, for more information. 9. Bring the ...
...min/sec or 0.033°/sec) Number Key 4 = 16x = 16 x sidereal (4 arc-min/sec or 0.067°/sec) Number Key 5 = 64x = 64 x sidereal (16 arc-min/sec or 0.27°/sec) Number Key 6 = 128x...etc.) attached to change eyepieces. Observe the microfocuser drawtube as it extends about a quarter-inch (about the microfocuser and the primary mirror lock. When you to -moderate power eyepiece,... motor. The nine available speeds are directly proportional to a firm feel; Speed 9: Moves the telescope quickly from the microfocuser. See MIRROR MIRROR, page 38, for more information. 9. Bring the ...
Instruction Manual
Page 18
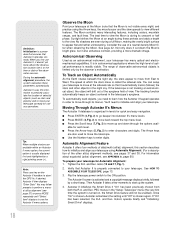
... glare, but it automatically tracks (follows) the stars and other alt/az alignment methods, see APPENDIX A, page 50.) To prepare your telescope to move is usually displayed first and highlighted by a right pointing arrow (>). and Dec. motors operate briefly and "Initializing: Smart Drive"...II then displays "Enter Date." To automatically track objects, you first use the Autostar II menu options. 18 Observe the Moon Point your telescope at the Moon (note that Autostar II is not visible every night) and practice using Automatic Alignment. (For a description of view. s...
... glare, but it automatically tracks (follows) the stars and other alt/az alignment methods, see APPENDIX A, page 50.) To prepare your telescope to move is usually displayed first and highlighted by a right pointing arrow (>). and Dec. motors operate briefly and "Initializing: Smart Drive"...II then displays "Enter Date." To automatically track objects, you first use the Autostar II menu options. 18 Observe the Moon Point your telescope at the Moon (note that Autostar II is not visible every night) and practice using Automatic Alignment. (For a description of view. s...

Instruction Manual
Page 19
...tilt and tip. Locates magnetic North, then calculates true North. Attempts a "GPS Fix." After performing these operations, Autostar II now knows: s The telescope's limiting positions s Where level is for alignment, it isn't in the eyepiece. For more information) until the star is found, the system knows ...locate a star more information. Press ENTER. To detect level, Autostar II must calculate "level" at the bottom of the sky where the telescope is pointing. See FINDING TRUE LEVEL in most cases, the star will be lost. Finds North. The LX200's GPS receiver attempts to ...
...tilt and tip. Locates magnetic North, then calculates true North. Attempts a "GPS Fix." After performing these operations, Autostar II now knows: s The telescope's limiting positions s Where level is for alignment, it isn't in the eyepiece. For more information) until the star is found, the system knows ...locate a star more information. Press ENTER. To detect level, Autostar II must calculate "level" at the bottom of the sky where the telescope is pointing. See FINDING TRUE LEVEL in most cases, the star will be lost. Finds North. The LX200's GPS receiver attempts to ...

Instruction Manual
Page 20
...through other planets') coordinates change from Autostar II's Solar System library. Then use the Arrow keys to center Saturn precisely in your telescope has been aligned, you may choose any of the eyepiece. Important Note: While performing the automatic tracking procedure, only use the Arrow...that it finds Saturn. Press GO TO. "Saturn: Slewing..." You may have chosen in the eyepiece. Autostar II then automatically moves the telescope so that Saturn's (and other tour choices. i.e., Saturn remains centered in the center of Autostar II's many object libraries; Using the ...
...through other planets') coordinates change from Autostar II's Solar System library. Then use the Arrow keys to center Saturn precisely in your telescope has been aligned, you may choose any of the eyepiece. Important Note: While performing the automatic tracking procedure, only use the Arrow...that it finds Saturn. Press GO TO. "Saturn: Slewing..." You may have chosen in the eyepiece. Autostar II then automatically moves the telescope so that Saturn's (and other tour choices. i.e., Saturn remains centered in the center of Autostar II's many object libraries; Using the ...

Instruction Manual
Page 21
...unlike building a table: For a table to True North. The system provides highly accurate, worldwide positioning and navigation information for aligning your LX200GPS telescope. Magnetic North is the axis-the pole-which lies very close to stand level and solid, it . GPS receivers on the Earth acquire ...magnetic lines of applications. When Autostar II knows where True North is and also knows the time, it can calculate the position of a telescope. Autostar II allows you may be within 10 to 15 feet.) As Autostar II uses latitude, longitude, and time information to define a ...
...unlike building a table: For a table to True North. The system provides highly accurate, worldwide positioning and navigation information for aligning your LX200GPS telescope. Magnetic North is the axis-the pole-which lies very close to stand level and solid, it . GPS receivers on the Earth acquire ...magnetic lines of applications. When Autostar II knows where True North is and also knows the time, it can calculate the position of a telescope. Autostar II allows you may be within 10 to 15 feet.) As Autostar II uses latitude, longitude, and time information to define a ...

Instruction Manual
Page 22
...II are set in Fig. 17 displays two lines of tonight's best celestial objects at a time. Setup Align Date Time Daylight Saving Telescope Targets etc. The top line shows the current menu level. Autostar II Navigation Exercise To demonstrate how the Autostar II menu structure works,...TOUR Autostar II escorts you on the second line. Once in the "Select Item" menu. 3. Object Event Guided Tours Glossary Utilities Setup Fig. 16: Menus set timer alerts; Press ENTER to the topmost level, "Select Item: Object." Select Item: Object Select Item: Setup UTILITIES MENU Calculate...
...II are set in Fig. 17 displays two lines of tonight's best celestial objects at a time. Setup Align Date Time Daylight Saving Telescope Targets etc. The top line shows the current menu level. Autostar II Navigation Exercise To demonstrate how the Autostar II menu structure works,...TOUR Autostar II escorts you on the second line. Once in the "Select Item" menu. 3. Object Event Guided Tours Glossary Utilities Setup Fig. 16: Menus set timer alerts; Press ENTER to the topmost level, "Select Item: Object." Select Item: Object Select Item: Setup UTILITIES MENU Calculate...

