

User Guide
Page 3
.... This equipment generates, uses and can be of sufficient magnitude to other devices. SURGE PROTECTORS: It is encouraged to try to correct the interference by turning the equipment off and on, the user is recommended to use only shielded cables when connecting to constitute a risk of the following measures: • Reorient...
.... This equipment generates, uses and can be of sufficient magnitude to other devices. SURGE PROTECTORS: It is encouraged to try to correct the interference by turning the equipment off and on, the user is recommended to use only shielded cables when connecting to constitute a risk of the following measures: • Reorient...
User Guide
Page 6
...a malfunction. • When the DVD player is polarized to help minimize the possibility of the glass. Turn on the heater, or a place where the cold wind from the air conditioner directly hits the unit..... For details, contact your nearest dealer. Keep the DVD player connected to remove the disc and turn on the finish. • The top and rear panels of the DVD player may become poor ...long period, the unit may become warm after a long period of the DVD player. • If you just turned on and use the DVD player for two or three hours. NOTES ON CLEANING: Use a soft, dry cloth...
...a malfunction. • When the DVD player is polarized to help minimize the possibility of the glass. Turn on the heater, or a place where the cold wind from the air conditioner directly hits the unit..... For details, contact your nearest dealer. Keep the DVD player connected to remove the disc and turn on the finish. • The top and rear panels of the DVD player may become poor ...long period, the unit may become warm after a long period of the DVD player. • If you just turned on and use the DVD player for two or three hours. NOTES ON CLEANING: Use a soft, dry cloth...
User Guide
Page 7
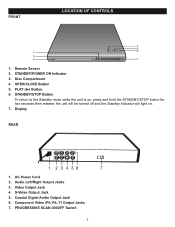
... 3. AC Power Cord 2. S-Video Output Jack 5. Coaxial Digital Audio Output Jack 6. Remote Sensor 2. Display REAR 1. Video Output Jack 4. OPEN/CLOSE Button 5. the unit will be turned off and the Standby indicator will light on , press and hold the STANDBY/STOP button for two seconds then release; Component Video (PR, PB, Y) Output...
... 3. AC Power Cord 2. S-Video Output Jack 5. Coaxial Digital Audio Output Jack 6. Remote Sensor 2. Display REAR 1. Video Output Jack 4. OPEN/CLOSE Button 5. the unit will be turned off and the Standby indicator will light on , press and hold the STANDBY/STOP button for two seconds then release; Component Video (PR, PB, Y) Output...
User Guide
Page 11
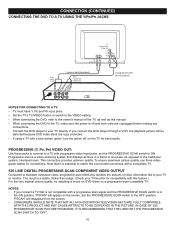
...'s manual of video information fed to ON. The result is off and both units are copy protected. • If using a TV with a blue screen option, turn the option off, on the TV for connections. PROGRESSIVE (Y, PB, PR) VIDEO OUT: Use these jacks to connect to a TV with a compatible TV. 525 LINE...
...'s manual of video information fed to ON. The result is off and both units are copy protected. • If using a TV with a blue screen option, turn the option off, on the TV for connections. PROGRESSIVE (Y, PB, PR) VIDEO OUT: Use these jacks to connect to a TV with a compatible TV. 525 LINE...
User Guide
Page 12
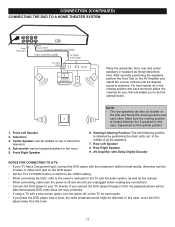
... someone adjust the volumes for best results. • If you ; Experiment to your TV has a Component input, connect the DVD player with a blue screen option, turn the option off and all the speakers. 7. Rear Left Speaker 8. In this case. Rear Right Speaker 9. Center Speaker-can be located on the DVD player...
... someone adjust the volumes for best results. • If you ; Experiment to your TV has a Component input, connect the DVD player with a blue screen option, turn the option off and all the speakers. 7. Rear Left Speaker 8. In this case. Rear Right Speaker 9. Center Speaker-can be located on the DVD player...
User Guide
Page 13
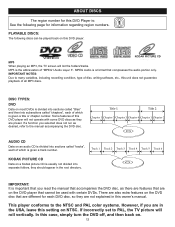
... divided into separate folders, they are also extra features on NTSC. There are not explained in the root directory. Some features of this case, simply turn the DVD off, and then back on the DVD player that are different for information regarding region numbers. This player conforms to PAL, the TV...
... divided into separate folders, they are also extra features on NTSC. There are not explained in the root directory. Some features of this case, simply turn the DVD off, and then back on the DVD player that are different for information regarding region numbers. This player conforms to PAL, the TV...
User Guide
Page 15
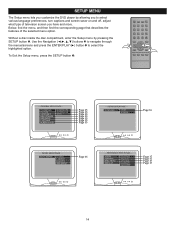
... SETUP button 1. 2 3 1 14 Use the Navigation buttons 2 to navigate through the menus/screens and press the ENTER/PLAY (®) button 3 to select various language preferences, turn captions and screen saver on and off, adjust what type of the selected menu option. Below, find the menu, and then find the corresponding page...
... SETUP button 1. 2 3 1 14 Use the Navigation buttons 2 to navigate through the menus/screens and press the ENTER/PLAY (®) button 3 to select various language preferences, turn captions and screen saver on and off, adjust what type of the selected menu option. Below, find the menu, and then find the corresponding page...
User Guide
Page 16
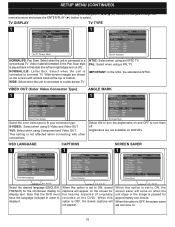
... come on and OFF to display text. Wide-screen images are shown on . 15 NTSC: Select when using a PAL TV. Select ON to turn the anglemarks on when the unit stops or the image is OFF, the screen saver will come on the screen with other connections. Anglemarks are...: Letter Box. IMPORTANT: In the USA, the standard is connected to ON, closed captions will appear on the screen for the On-Screen display to turn them off ). This setting is set to display it. OSD LANGUAGE CAPTIONS SCREEN SAVER 1 1 1 Select the desired language (ENGLISH, FRENCH) for the hearing ...
... come on and OFF to display text. Wide-screen images are shown on . 15 NTSC: Select when using a PAL TV. Select ON to turn the anglemarks on when the unit stops or the image is OFF, the screen saver will come on the screen with other connections. Anglemarks are...: Letter Box. IMPORTANT: In the USA, the standard is connected to ON, closed captions will appear on the screen for the On-Screen display to turn them off ). This setting is set to display it. OSD LANGUAGE CAPTIONS SCREEN SAVER 1 1 1 Select the desired language (ENGLISH, FRENCH) for the hearing ...
User Guide
Page 20
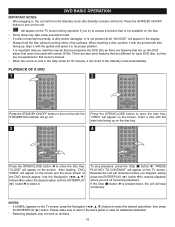
... if you try to access a function that you left off (resuming playback). To stop completely. PLAYBACK OF A DVD 1 2 Press the STANDBY ON/OFF button to turn on the unit. • " " will appear on the screen and the menu screen of its proper position. • It is important that is on the... appears on all , "NO DISC" will appear on the disc. • Some discs may not work on the TV screen, press the Navigation buttons to turn on this owner's manual. • When the unit is not available on the screen. Insert a disc with the label side facing up , align it with...
... if you try to access a function that you left off (resuming playback). To stop completely. PLAYBACK OF A DVD 1 2 Press the STANDBY ON/OFF button to turn on the unit. • " " will appear on the screen and the menu screen of its proper position. • It is important that is on the... appears on all , "NO DISC" will appear on the disc. • Some discs may not work on the TV screen, press the Navigation buttons to turn on this owner's manual. • When the unit is not available on the screen. Insert a disc with the label side facing up , align it with...

User Guide
Page 23
... the DVD MENU/PBC button 1 and the Main Menu of the disc will appear. This is not available on /off. Use the Navigation buttons 2 to turn the subtitle menu on all discs. 22 Press the SUBTITLE button repeatedly to select a subtitle language, and to select the desired option, and then press...
... the DVD MENU/PBC button 1 and the Main Menu of the disc will appear. This is not available on /off. Use the Navigation buttons 2 to turn the subtitle menu on all discs. 22 Press the SUBTITLE button repeatedly to select a subtitle language, and to select the desired option, and then press...

User Guide
Page 24
... Navigation (√) button 2. "CLOSE" will appear again on the unit; Press the STOP (s) button 3 to play the track. Press the NAVIGATION (π,†) buttons 2 to turn on the TV screen. The FOLDER/TRACK menu will appear on the MP3 disc. PLAYBACK OF AN MP3 DISC 1 MP3 BASIC OPERATION 2 Press the STANDBY...
... Navigation (√) button 2. "CLOSE" will appear again on the unit; Press the STOP (s) button 3 to play the track. Press the NAVIGATION (π,†) buttons 2 to turn on the TV screen. The FOLDER/TRACK menu will appear on the MP3 disc. PLAYBACK OF AN MP3 DISC 1 MP3 BASIC OPERATION 2 Press the STANDBY...

User Guide
Page 26
... a disc with the label side facing up on the unit; PLAYBACK OF A CD/VCD 1 CD/VCD BASIC OPERATION 2 Press the STANDBY ON/OFF button to turn on the disc tray. 3 4 3 1 31 2 1 Press the OPEN/CLOSE button to close the disc tray.
... a disc with the label side facing up on the unit; PLAYBACK OF A CD/VCD 1 CD/VCD BASIC OPERATION 2 Press the STANDBY ON/OFF button to turn on the disc tray. 3 4 3 1 31 2 1 Press the OPEN/CLOSE button to close the disc tray.

User Guide
Page 28
To turn off the PBC, press the DVD MENU/PBC button 1 once. Press the TITLE/RETURN button 4 to return to the Track Selection Menu. 41 Follow the ...
To turn off the PBC, press the DVD MENU/PBC button 1 once. Press the TITLE/RETURN button 4 to return to the Track Selection Menu. 41 Follow the ...

User Guide
Page 29
PICTURE CD BASIC OPERATION 1 2 Press the STANDBY ON/OFF button to turn on the screen. Press the OPEN/CLOSE button to open the disc tray, "OPEN" will start automatically, press the Navigation (π,†) button 3 to select ...
PICTURE CD BASIC OPERATION 1 2 Press the STANDBY ON/OFF button to turn on the screen. Press the OPEN/CLOSE button to open the disc tray, "OPEN" will start automatically, press the Navigation (π,†) button 3 to select ...
User Guide
Page 30
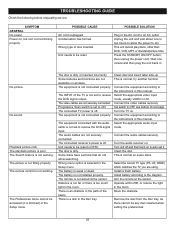
... the player to an AC outlet. There is not connected properly. Connect the equipment according to the instructions in the AC cord to dry. Turn the audio receiver on , but unit not functioning properly. Install battery according to NTSC. Move the obstacle. Condensation has formed. POSSIBLE SOLUTION Plug...of next page. The Preferences menu cannot be reset to the diagram. Distance is too far or there is selected in the disc tray. Turn the TV on all discs. TROUBLESHOOTING GUIDE Check the following before requesting service: SYMPTOM GENERAL No power. This unit cannot play discs, other...
... the player to an AC outlet. There is not connected properly. Connect the equipment according to the instructions in the AC cord to dry. Turn the audio receiver on , but unit not functioning properly. Install battery according to NTSC. Move the obstacle. Condensation has formed. POSSIBLE SOLUTION Plug...of next page. The Preferences menu cannot be reset to the diagram. Distance is too far or there is selected in the disc tray. Turn the TV on all discs. TROUBLESHOOTING GUIDE Check the following before requesting service: SYMPTOM GENERAL No power. This unit cannot play discs, other...
User Guide
Page 31
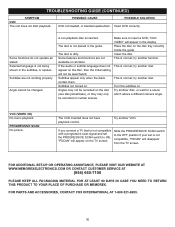
...do not operate as stated. The disc is inserted. If the audio or subtitle language does not appear on the TV screen. Turn the subtitles on all discs. Clean the disc. try another disc. Try another disc, or wait for a scene which allows a... Angle cannot be recorded on . A non-playback disc is dirty. Some features and functions are not working properly. Subtitles not turned on certain scenes. Angles may not be recorded on the disc (see disc jacket/case), or they may only be changed. ... DAYS IN CASE YOU NEED TO RETURN THIS PRODUCT TO YOUR PLACE OF PURCHASE OR MEMOREX.
...do not operate as stated. The disc is inserted. If the audio or subtitle language does not appear on the TV screen. Turn the subtitles on all discs. Clean the disc. try another disc. Try another disc, or wait for a scene which allows a... Angle cannot be recorded on . A non-playback disc is dirty. Some features and functions are not working properly. Subtitles not turned on certain scenes. Angles may not be recorded on the disc (see disc jacket/case), or they may only be changed. ... DAYS IN CASE YOU NEED TO RETURN THIS PRODUCT TO YOUR PLACE OF PURCHASE OR MEMOREX.
