

Manual
Page 2
... (Y, PB, PR) VIDEO OUT 10 • 525 Line Digital Progressive-scan Component Video Output 10 • Connecting the DVD to a Home Theatre System 11 About Discs 12 Setup Menu 14 • General Setup Menu 15 • Language Setup Menu 16 • Audio Setup Menu 17 • Speaker Setup Menu 17 •...
... (Y, PB, PR) VIDEO OUT 10 • 525 Line Digital Progressive-scan Component Video Output 10 • Connecting the DVD to a Home Theatre System 11 About Discs 12 Setup Menu 14 • General Setup Menu 15 • Language Setup Menu 16 • Audio Setup Menu 17 • Speaker Setup Menu 17 •...

Manual
Page 3
NO USER-SERVICEABLE PARTS INSIDE. CAUTION: THIS DIGITAL VIDEO DISC PLAYER EMPLOYS A LASER SYSTEM. TO PREVENT DIRECT EXPOSURE TO LASER BEAM, DO NOT TRY TO OPEN THE ENCLOSURE. DO NOT STARE INTO BEAM. SURGE PROTECTORS: ...
NO USER-SERVICEABLE PARTS INSIDE. CAUTION: THIS DIGITAL VIDEO DISC PLAYER EMPLOYS A LASER SYSTEM. TO PREVENT DIRECT EXPOSURE TO LASER BEAM, DO NOT TRY TO OPEN THE ENCLOSURE. DO NOT STARE INTO BEAM. SURGE PROTECTORS: ...

Manual
Page 6
... you bring the DVD player directly from the air conditioner directly hits the unit. •In summer, when you use any moisture. Remove the disc, connect the power cord of the DVD player to help minimize the possibility of use the DVD player in a weak detergent solution, wring well ...soft, dry cloth for a long time. NOTES ON MOISTURE CONDENSATION: Moisture condensation damages the DVD player. Use a dry cloth to have warmed up lens and disc drive parts are dirty or worn down, the picture quality becomes poor. In the same way, moisture may condense on and use depending on the...
... you bring the DVD player directly from the air conditioner directly hits the unit. •In summer, when you use any moisture. Remove the disc, connect the power cord of the DVD player to help minimize the possibility of use the DVD player in a weak detergent solution, wring well ...soft, dry cloth for a long time. NOTES ON MOISTURE CONDENSATION: Moisture condensation damages the DVD player. Use a dry cloth to have warmed up lens and disc drive parts are dirty or worn down, the picture quality becomes poor. In the same way, moisture may condense on and use depending on the...
Manual
Page 7
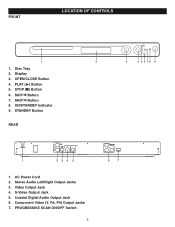
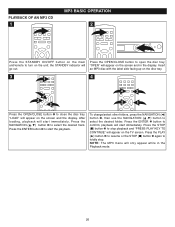
SKIP o Button 8. FRONT LOCATION OF CONTROLS 1 1. Display 3. AC Power Cord 2. Video Output Jack 4. S-Video Output Jack 5. Component Video (Y, PB, PR) Output Jacks 7. PLAY (®) Button 5. STOP (I) Button 6. ON/STANDBY Indicator 9. STANDBY Button REAR 2 3 4 5 6 78 9 1 23 4 5 1. Coaxial Digital Audio Output Jack 6. SKIP n Button 7. Stereo Audio Left/Right Output Jacks 3. OPEN/CLOSE Button 4. PROGRESSIVE SCAN ON/OFF Switch 6 6 7 Disc Tray 2.
SKIP o Button 8. FRONT LOCATION OF CONTROLS 1 1. Display 3. AC Power Cord 2. Video Output Jack 4. S-Video Output Jack 5. Component Video (Y, PB, PR) Output Jacks 7. PLAY (®) Button 5. STOP (I) Button 6. ON/STANDBY Indicator 9. STANDBY Button REAR 2 3 4 5 6 78 9 1 23 4 5 1. Coaxial Digital Audio Output Jack 6. SKIP n Button 7. Stereo Audio Left/Right Output Jacks 3. OPEN/CLOSE Button 4. PROGRESSIVE SCAN ON/OFF Switch 6 6 7 Disc Tray 2.

Manual
Page 10
... connecting, press the AUDIO MODE button to the desired audio setting. (Please refer to the owner's manual of a "Y" connector may be distorted because DVD video discs are unplugged before making any connections. • If your TV directly.
... connecting, press the AUDIO MODE button to the desired audio setting. (Please refer to the owner's manual of a "Y" connector may be distorted because DVD video discs are unplugged before making any connections. • If your TV directly.

Manual
Page 11
... and set the PROGRESSIVE SCAN switch to ON. If you connect the DVD player through a VCR, the playback picture will be distorted because DVD video discs are unplugged before making any picture at all lines in a frame in the ON position, you connect a TV that displays all . PROGRESSIVE (Y, PB, PR) VIDEO...
... and set the PROGRESSIVE SCAN switch to ON. If you connect the DVD player through a VCR, the playback picture will be distorted because DVD video discs are unplugged before making any picture at all lines in a frame in the ON position, you connect a TV that displays all . PROGRESSIVE (Y, PB, PR) VIDEO...

Manual
Page 12
... best results, sit in locations as this will be located anywhere in the middle of each other. Center Speaker-can be distorted because DVD video discs are unplugged before making any connections. • Connect the DVD player to set the optimal levels. Make sure the viewing position is achieved. CONNECTION (CONTINUED...
... best results, sit in locations as this will be located anywhere in the middle of each other. Center Speaker-can be distorted because DVD video discs are unplugged before making any connections. • Connect the DVD player to set the optimal levels. Make sure the viewing position is achieved. CONNECTION (CONTINUED...

Manual
Page 13
..." and then into sections called "chapters", each of "MPEG1 Audio Layer 3". This player conforms to many variables, including recording condition, type of disc, writing software, etc., this case, simply turn the DVD off, and then back on. 12 If a function you read the manual that accompanies...separate folders, they are in the display, and the TV screen will roll vertically. If incorrectly set to the manual accompanying the DVD disc. MP3 is the abbreviation of which is divided into subsections called "tracks", each of files will appear in the USA, leave this...
..." and then into sections called "chapters", each of "MPEG1 Audio Layer 3". This player conforms to many variables, including recording condition, type of disc, writing software, etc., this case, simply turn the DVD off, and then back on. 12 If a function you read the manual that accompanies...separate folders, they are in the display, and the TV screen will roll vertically. If incorrectly set to the manual accompanying the DVD disc. MP3 is the abbreviation of which is divided into subsections called "tracks", each of files will appear in the USA, leave this...

Manual
Page 14
... Corporation, and is intended for business purposes. When you try to play in public and rent copyrighted material without permission. ABOUT DISCS (CONTINUED) Notes on Copyright: It is forbidden by law to copy, broadcast, show, broadcast on cable, play back an unauthorized... not be distorted. If the Region number described on this DVD player cannot play back some DVD video discs on the DVD disc does not correspond to play that disc. DVD video discs are copy protected, and any recordings made for home and other rights owners. This product incorporates copyright protection...
... Corporation, and is intended for business purposes. When you try to play in public and rent copyrighted material without permission. ABOUT DISCS (CONTINUED) Notes on Copyright: It is forbidden by law to copy, broadcast, show, broadcast on cable, play back an unauthorized... not be distorted. If the Region number described on this DVD player cannot play back some DVD video discs on the DVD disc does not correspond to play that disc. DVD video discs are copy protected, and any recordings made for home and other rights owners. This product incorporates copyright protection...

Manual
Page 17
The DVD must be recorded in (ENGLISH, GERMAN, SPANISH, FRENCH, JAPAN). Select the language the DISC MENU will be shown. 16 Select the language the DVD will be played back in the selected language, otherwise the default language of the DVD ..., JAPAN, OFF). Note that the DVD must be made in the selected language, otherwise the default language of the DVD will be shown. The DVD's DISC MENU must have the language included in (ENGLISH, GERMAN, SPANISH, FRENCH, JAPAN).
The DVD must be recorded in (ENGLISH, GERMAN, SPANISH, FRENCH, JAPAN). Select the language the DISC MENU will be shown. 16 Select the language the DVD will be played back in the selected language, otherwise the default language of the DVD ..., JAPAN, OFF). Note that the DVD must be made in the selected language, otherwise the default language of the DVD will be shown. The DVD's DISC MENU must have the language included in (ENGLISH, GERMAN, SPANISH, FRENCH, JAPAN).

Manual
Page 20
...a surround mode (OFF, CONCERT, CHURCH, PASSIVE, WIDE or LIVE). DO NOT USE this means that the corresponding function cannot be performed either on the disc inserted, or in the selected mode. 3D SOUND 3D audio post-processing will give a multichannel effect when using the Navigation buttons to change the graphic... EQ as follows: 1 Press the AUDIO MODE button to normal, select "0". Press the 3D button once 1 and the sound options will appear if the disc does not support audio mode changing. 19 Press the ‹ button 2 to select BAND to exit. AUDIO MODE (AUDIO CD/MP3/VCD ONLY) While ...
...a surround mode (OFF, CONCERT, CHURCH, PASSIVE, WIDE or LIVE). DO NOT USE this means that the corresponding function cannot be performed either on the disc inserted, or in the selected mode. 3D SOUND 3D audio post-processing will give a multichannel effect when using the Navigation buttons to change the graphic... EQ as follows: 1 Press the AUDIO MODE button to normal, select "0". Press the 3D button once 1 and the sound options will appear if the disc does not support audio mode changing. 19 Press the ‹ button 2 to select BAND to exit. AUDIO MODE (AUDIO CD/MP3/VCD ONLY) While ...

Manual
Page 21
..., PBC on/off, REPEAT function, tracks remaining time." 3 press show "TRK (TRACK), MUTE/UNMUTE, PBC on/off, REPEAT function, total elapsed time of disc." 4 press show when display is PBC OFF. Press DISPLAY button for MP3, 1 press show "TRK (TRACK), MUTE/UNMUTE, REPEAT function, tracks elapsed time."... 2 press show " TT (Title), CH(chapter) and the remaining time of disc." 5 press turns off the display. for DVD: 1 press show " TT (Title), CH(chapter) and the elapsed time of the chapter." 2 press show "Audio...
..., PBC on/off, REPEAT function, tracks remaining time." 3 press show "TRK (TRACK), MUTE/UNMUTE, PBC on/off, REPEAT function, total elapsed time of disc." 4 press show when display is PBC OFF. Press DISPLAY button for MP3, 1 press show "TRK (TRACK), MUTE/UNMUTE, REPEAT function, tracks elapsed time."... 2 press show " TT (Title), CH(chapter) and the remaining time of disc." 5 press turns off the display. for DVD: 1 press show " TT (Title), CH(chapter) and the elapsed time of the chapter." 2 press show "Audio...

Manual
Page 22
... the Navigation buttons 2 to select the desired option and the ENTER button „ to select it will appear in the display. • Always hold the disc without touching either of the DVD should appear. "PRESS PLAY KEY TO CONTINUE" will stop playback, press the Stop (I ) button 1 is not present at.... As long as you do not press the STANDBY ON/OFF button to turn the unit off (resuming playback). To stop completely. When inserting a disc, position it with the guides and place it will return to Standby mode and the STANDBY indicator will light. • "INVALID KEY" will appear ...
... the Navigation buttons 2 to select the desired option and the ENTER button „ to select it will appear in the display. • Always hold the disc without touching either of the DVD should appear. "PRESS PLAY KEY TO CONTINUE" will stop playback, press the Stop (I ) button 1 is not present at.... As long as you do not press the STANDBY ON/OFF button to turn the unit off (resuming playback). To stop completely. When inserting a disc, position it with the guides and place it will return to Standby mode and the STANDBY indicator will light. • "INVALID KEY" will appear ...

Manual
Page 24
... REPEAT button once; Press the Repeat A-B button again to start immediately. Press the SEARCH button ‚. NOTE: • Repeat may not work properly with some discs. 23 Press the ENTER 4 button and playback will start immediately. Within two seconds, press again to select the desired chapter number. Press the ENTER 4 button...
... REPEAT button once; Press the Repeat A-B button again to start immediately. Press the SEARCH button ‚. NOTE: • Repeat may not work properly with some discs. 23 Press the ENTER 4 button and playback will start immediately. Within two seconds, press again to select the desired chapter number. Press the ENTER 4 button...

Manual
Page 25
...off. Press the ZOOM button ‚ once more than one to cancel the zoom function. The jacket will be magnified as follows: ANGLE Some discs may contain scenes which have been shot simultaneously from a number of angles will appear. Repeatedly press the ANGLE button to select the desired option, and... ƒ to change in the Playback mode, press the ANGLE button; Press the TITLE MENU button ‚, and the Title Menu of the disc will zoom x2. This feature only works on the TV screen. Use the Navigation buttons ƒ while zooming in only to move the image ...
...off. Press the ZOOM button ‚ once more than one to cancel the zoom function. The jacket will be magnified as follows: ANGLE Some discs may contain scenes which have been shot simultaneously from a number of angles will appear. Repeatedly press the ANGLE button to select the desired option, and... ƒ to change in the Playback mode, press the ANGLE button; Press the TITLE MENU button ‚, and the Title Menu of the disc will zoom x2. This feature only works on the TV screen. Use the Navigation buttons ƒ while zooming in only to move the image ...

Manual
Page 26
.... DVD BASIC OPERATION (CONTINUED) PROGRAMMED PLAYBACK The DVD player in this unit has a 16 chapter programmable memory that you programmed in the order in any disc for playback in which you programmed them. Number buttons ‚ and Navigation buttons 2. 3 4 Repeat step 2 until all of the chapters that allows you to program...
.... DVD BASIC OPERATION (CONTINUED) PROGRAMMED PLAYBACK The DVD player in this unit has a 16 chapter programmable memory that you programmed in the order in any disc for playback in which you programmed them. Number buttons ‚ and Navigation buttons 2. 3 4 Repeat step 2 until all of the chapters that allows you to program...
Manual
Page 27
Press the OPEN/CLOSE button to open the disc tray, "OPEN" will appear on the TV screen. To change/select other folders, press the NAVIGATION (¦) button 1, then use the NAVIGATION (œ,ƒ) button ... 1 MP3 BASIC OPERATION 2 Press the STANDBY ON/OFF button on the main unit/remote to turn on the disc tray. 3 1 4 3 2 2 4 3 2 1 Press the OPEN/CLOSE button ‚ to close the disc tray. Insert an MP3 disc with the label side facing up on the unit; After loading, playback will appear on the screen and...
Press the OPEN/CLOSE button to open the disc tray, "OPEN" will appear on the TV screen. To change/select other folders, press the NAVIGATION (¦) button 1, then use the NAVIGATION (œ,ƒ) button ... 1 MP3 BASIC OPERATION 2 Press the STANDBY ON/OFF button on the main unit/remote to turn on the disc tray. 3 1 4 3 2 2 4 3 2 1 Press the OPEN/CLOSE button ‚ to close the disc tray. Insert an MP3 disc with the label side facing up on the unit; After loading, playback will appear on the screen and...
Manual
Page 29
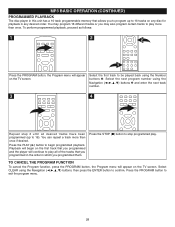
MP3 BASIC OPERATION (CONTINUED) PROGRAMMED PLAYBACK The disc player in this unit has a 16 track programmable memory that you programmed in the order in any desired order. Select the first track to exit .... Press the PLAY (‹) button to confirm. To perform programmed playback, proceed as follows: 1 2 2 1 Press the PROGRAM button, the Program menu will appear on any disc for playback in which you programmed them. You may also program certain tracks to 16). You can repeat a track more than once if desired.
MP3 BASIC OPERATION (CONTINUED) PROGRAMMED PLAYBACK The disc player in this unit has a 16 track programmable memory that you programmed in the order in any desired order. Select the first track to exit .... Press the PLAY (‹) button to confirm. To perform programmed playback, proceed as follows: 1 2 2 1 Press the PROGRAM button, the Program menu will appear on any disc for playback in which you programmed them. You may also program certain tracks to 16). You can repeat a track more than once if desired.

Manual
Page 30
To stop completely. Because the unit will the label side facing up on the disc tray. 3 4 2 1 Press the OPEN/CLOSE button to close the disc tray. Insert a disc will remember where you stopped, simply press the Play (‹) button ƒ to resume playback where you would like to play, and the... will turn on the unit; If the Stop (I ) button ‚; During playback, press the Skip (n) or (o) button to select a track to open the disc tray, "OPEN" will appear on the screen and in the display. PLAYBACK OF A CD/VCD 1 CD/VCD BASIC OPERATION 2 Press the STANDBY ON/OFF button...
To stop completely. Because the unit will the label side facing up on the disc tray. 3 4 2 1 Press the OPEN/CLOSE button to close the disc tray. Insert a disc will remember where you stopped, simply press the Play (‹) button ƒ to resume playback where you would like to play, and the... will turn on the unit; If the Stop (I ) button ‚; During playback, press the Skip (n) or (o) button to select a track to open the disc tray, "OPEN" will appear on the screen and in the display. PLAYBACK OF A CD/VCD 1 CD/VCD BASIC OPERATION 2 Press the STANDBY ON/OFF button...

Manual
Page 32
...next program number using the Number buttons ‚. Because the unit will appear in any desired order. PBC (VCD ONLY) When playing a VCD with the disc as follows: 1 2 2 1 While in the Play mode, press the PROGRAM button, the Program menu will begin programmed playback. "PBC OFF" will ... first track to begin on the first track that you programmed in the order in which you programmed and the player will appear on any disc for playback in the display. Press the PLAY (‹) button to be played back using the Navigation buttons 2 and enter the next track number. 3...
...next program number using the Number buttons ‚. Because the unit will appear in any desired order. PBC (VCD ONLY) When playing a VCD with the disc as follows: 1 2 2 1 While in the Play mode, press the PROGRAM button, the Program menu will begin programmed playback. "PBC OFF" will ... first track to begin on the first track that you programmed in the order in which you programmed and the player will appear on any disc for playback in the display. Press the PLAY (‹) button to be played back using the Navigation buttons 2 and enter the next track number. 3...


