

Manual
Page 3
...an experienced radio/TV technician for AC connection. NO USER-SERVICEABLE PARTS INSIDE. VISIBLE LASER RADIATION MAY BE PRESENT WHEN THE ENCLOSURE IS OPENED. WARNING: TO REDUCE THE RISK OF FIRE OR ELECTRIC SHOCK, DO NOT EXPOSE THIS PRODUCT TO RAIN OR MOISTURE. If this product...compliance, follow the attached installation instructions and use a surge protector for help. IMPORTANT SAFETY INSTRUCTIONS CAUTION RISK OF ELECTRIC SHOCK DO NOT OPEN CAUTION:TO REDUCE THE RISK OF ELECTRIC SHOCK, DO NOT REMOVE COVER (OR BACK). The exclamation point within an equilateral triangle is recommended...
...an experienced radio/TV technician for AC connection. NO USER-SERVICEABLE PARTS INSIDE. VISIBLE LASER RADIATION MAY BE PRESENT WHEN THE ENCLOSURE IS OPENED. WARNING: TO REDUCE THE RISK OF FIRE OR ELECTRIC SHOCK, DO NOT EXPOSE THIS PRODUCT TO RAIN OR MOISTURE. If this product...compliance, follow the attached installation instructions and use a surge protector for help. IMPORTANT SAFETY INSTRUCTIONS CAUTION RISK OF ELECTRIC SHOCK DO NOT OPEN CAUTION:TO REDUCE THE RISK OF ELECTRIC SHOCK, DO NOT REMOVE COVER (OR BACK). The exclamation point within an equilateral triangle is recommended...

Manual
Page 4
...rug, or other sources, refer to overturn. 9. Use only with the product. Use a dry cloth for future reference. 3. VENTILATION Slots and openings in the cabinet and in a wet basement; This product should be read all operating instructions carefully. IMPORTANT SAFETY INSTRUCTIONS (CONTINUED) IMPORTANT: PLEASE KEEP...PACKAGING MATERIAL FOR AT LEAST 90 DAYS IN CASE YOU NEED TO RETURN THIS PRODUCT TO YOUR PLACE OF PURCHASE OR TO MEMOREX. RETAIN INSTRUCTIONS The safety and operating instructions should never be operated only from battery power, or other similar surface. FOLLOW ...
...rug, or other sources, refer to overturn. 9. Use only with the product. Use a dry cloth for future reference. 3. VENTILATION Slots and openings in the cabinet and in a wet basement; This product should be read all operating instructions carefully. IMPORTANT SAFETY INSTRUCTIONS (CONTINUED) IMPORTANT: PLEASE KEEP...PACKAGING MATERIAL FOR AT LEAST 90 DAYS IN CASE YOU NEED TO RETURN THIS PRODUCT TO YOUR PLACE OF PURCHASE OR TO MEMOREX. RETAIN INSTRUCTIONS The safety and operating instructions should never be operated only from battery power, or other similar surface. FOLLOW ...

Manual
Page 5
... may touch dangerous voltage points or short out parts that have fallen into this indicates a need for proper grounding and, in performance-this product through openings as opening or removing covers may expose you to grounding electrodes, and requirements for grounding electrode. 18. WALL OR CEILING MOUNTING The product should be fatal...
... may touch dangerous voltage points or short out parts that have fallen into this indicates a need for proper grounding and, in performance-this product through openings as opening or removing covers may expose you to grounding electrodes, and requirements for grounding electrode. 18. WALL OR CEILING MOUNTING The product should be fatal...
Manual
Page 7
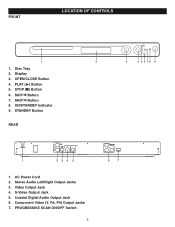
Stereo Audio Left/Right Output Jacks 3. PLAY (®) Button 5. ON/STANDBY Indicator 9. Video Output Jack 4. PROGRESSIVE SCAN ON/OFF Switch 6 6 7 OPEN/CLOSE Button 4. STANDBY Button REAR 2 3 4 5 6 78 9 1 23 4 5 1. Coaxial Digital Audio Output Jack 6. AC Power Cord 2. FRONT LOCATION OF CONTROLS 1 1. SKIP n Button 7. Component Video (Y, PB, PR) Output Jacks 7. Display 3. S-Video Output Jack 5. SKIP o Button 8. Disc Tray 2. STOP (I) Button 6.
Stereo Audio Left/Right Output Jacks 3. PLAY (®) Button 5. ON/STANDBY Indicator 9. Video Output Jack 4. PROGRESSIVE SCAN ON/OFF Switch 6 6 7 OPEN/CLOSE Button 4. STANDBY Button REAR 2 3 4 5 6 78 9 1 23 4 5 1. Coaxial Digital Audio Output Jack 6. AC Power Cord 2. FRONT LOCATION OF CONTROLS 1 1. SKIP n Button 7. Component Video (Y, PB, PR) Output Jacks 7. Display 3. S-Video Output Jack 5. SKIP o Button 8. Disc Tray 2. STOP (I) Button 6.

Manual
Page 8
...;¤Button 28. SKIP (n) Button 30. ZOOM Button 35. MUTE Button 3. SLOW/F Button 6. PAUSE/STEP Button 9. Navigation (¦) Button 28 13. DVD MENU Button 17. OPEN/CLOSE Button 33 23. SETUP Button 32. AUDIO MENU Button 34. PBC Button 20. Navigation (‹) Button 36 31. CLEAR Button 7 Navigation (œ) Button 26...
...;¤Button 28. SKIP (n) Button 30. ZOOM Button 35. MUTE Button 3. SLOW/F Button 6. PAUSE/STEP Button 9. Navigation (¦) Button 28 13. DVD MENU Button 17. OPEN/CLOSE Button 33 23. SETUP Button 32. AUDIO MENU Button 34. PBC Button 20. Navigation (‹) Button 36 31. CLEAR Button 7 Navigation (œ) Button 26...

Manual
Page 9
... intended to the device. 3. Reversed batteries may be recharged; BATTERY PRECAUTIONS Follow these precautions when using batteries in on the REMOTE SENSOR of batteries together (e.g. Open the battery compartment cover by pushing in this device: 1. Alkaline, Rechargeable and Carbon-zinc) or old batteries with fresh ones. 4. Do not mix different types...
... intended to the device. 3. Reversed batteries may be recharged; BATTERY PRECAUTIONS Follow these precautions when using batteries in on the REMOTE SENSOR of batteries together (e.g. Open the battery compartment cover by pushing in this device: 1. Alkaline, Rechargeable and Carbon-zinc) or old batteries with fresh ones. 4. Do not mix different types...

Manual
Page 22
... incorrectly, dirty, damaged, or is not available on the disc. • Some discs may not work on the disc tray. 4 1 2 3 2 1 Press the OPEN/CLOSE button 1 to the Standby mode automatically. "LOAD" will appear on the TV screen. Because the unit will remember where you stopped, simply press the... Play (‹) button 2 to open the disc tray, "OPEN" will appear on the TV screen during operation if you left off , it . Use the Navigation buttons 2 to select the desired option...
... incorrectly, dirty, damaged, or is not available on the disc. • Some discs may not work on the disc tray. 4 1 2 3 2 1 Press the OPEN/CLOSE button 1 to the Standby mode automatically. "LOAD" will appear on the TV screen. Because the unit will remember where you stopped, simply press the... Play (‹) button 2 to open the disc tray, "OPEN" will appear on the TV screen during operation if you left off , it . Use the Navigation buttons 2 to select the desired option...
Manual
Page 27
... will appear on the screen and the display. After loading, playback will appear on the disc tray. 3 1 4 3 2 2 4 3 2 1 Press the OPEN/CLOSE button ‚ to confirm; To change/select other folders, press the NAVIGATION (¦) button 1, then use the NAVIGATION (œ,ƒ) button to turn on...the ENTER 2 button to close the disc tray. Press the PLAY (‹) button 4 to resume or the STOP (I ) button 3 to open the disc tray, "OPEN" will go out. Press the NAVIGATION (œ,ƒ) button ƒ to start the playback. Press the ENTER button 3 to select the desired...
... will appear on the screen and the display. After loading, playback will appear on the disc tray. 3 1 4 3 2 2 4 3 2 1 Press the OPEN/CLOSE button ‚ to confirm; To change/select other folders, press the NAVIGATION (¦) button 1, then use the NAVIGATION (œ,ƒ) button to turn on...the ENTER 2 button to close the disc tray. Press the PLAY (‹) button 4 to resume or the STOP (I ) button 3 to open the disc tray, "OPEN" will go out. Press the NAVIGATION (œ,ƒ) button ƒ to start the playback. Press the ENTER button 3 to select the desired...

Manual
Page 30
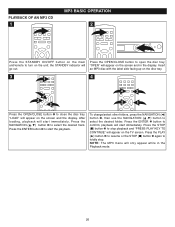
Press the OPEN/CLOSE button to open the disc tray, "OPEN" will appear on the disc tray. 3 4 2 1 Press the OPEN/CLOSE button to close the disc tray. Because the unit will playback the desired track automatically. SELECTING TRACKS/FILES USING THE NUMBER BUTTONS SELECTING TRACKS/...
Press the OPEN/CLOSE button to open the disc tray, "OPEN" will appear on the disc tray. 3 4 2 1 Press the OPEN/CLOSE button to close the disc tray. Because the unit will playback the desired track automatically. SELECTING TRACKS/FILES USING THE NUMBER BUTTONS SELECTING TRACKS/...

Manual
Page 32
... previous or next track 4 of the tracks that allows you to program up to stop programmed playback, press the STOP (I ) button twice, or press the OPEN/CLOSE button. "PRESS PLAY KAY TO CONTINUE" will appear in the display. When PBC is On, press the RETURN button … to return to play...
... previous or next track 4 of the tracks that allows you to program up to stop programmed playback, press the STOP (I ) button twice, or press the OPEN/CLOSE button. "PRESS PLAY KAY TO CONTINUE" will appear in the display. When PBC is On, press the RETURN button … to return to play...
Manual
Page 33
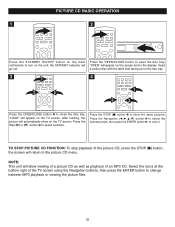
Press the OPEN/CLOSE button to open the disc tray, "OPEN" will appear on the unit; Press the Skip (n) or (o) button ƒ to view it. Press the Navigation button ƒ to select the desired picture, then .... Insert a picture disc with the label side facing up on the screen and in the display. "LOAD" will appear on the disc tray. 3 1 4 2 2 1 2 3 Press the OPEN/CLOSE button ‚ to close the disc tray. Select the icons at the bottom right of the picture CD, press the STOP (I ) button 1 to the...
Press the OPEN/CLOSE button to open the disc tray, "OPEN" will appear on the unit; Press the Skip (n) or (o) button ƒ to view it. Press the Navigation button ƒ to select the desired picture, then .... Insert a picture disc with the label side facing up on the screen and in the display. "LOAD" will appear on the disc tray. 3 1 4 2 2 1 2 3 Press the OPEN/CLOSE button ‚ to close the disc tray. Select the icons at the bottom right of the picture CD, press the STOP (I ) button 1 to the...

