
Manual
Page 1
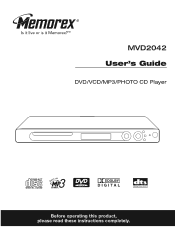
MVD2042 User's Guide DVD/VCD/MP3/PHOTO CD Player Before operating this product, please read these instructions completely.
MVD2042 User's Guide DVD/VCD/MP3/PHOTO CD Player Before operating this product, please read these instructions completely.

Manual
Page 2
...PR Jacks 10 • Progressive (Y, PB, PR) VIDEO OUT 10 • 525 Line Digital Progressive-scan Component Video Output 10 • Connecting the DVD to a Home Theatre System 11 About Discs 12 Setup Menu 14 • General Setup Menu 15 • Language Setup Menu 16 • Audio Setup ...23 • Title/Time Search 23 • Repeat Playback 23 • A-B Repeat Playback 23 • Audio Menu 24 • Subtitle Menu 24 • DVD Menu 24 • Title Menu 24 • Zoom In/Out 24 • Angle 24 • Programmed Playback 25 MP3 BASIC OPERATION 26 • Playback ...
...PR Jacks 10 • Progressive (Y, PB, PR) VIDEO OUT 10 • 525 Line Digital Progressive-scan Component Video Output 10 • Connecting the DVD to a Home Theatre System 11 About Discs 12 Setup Menu 14 • General Setup Menu 15 • Language Setup Menu 16 • Audio Setup ...23 • Title/Time Search 23 • Repeat Playback 23 • A-B Repeat Playback 23 • Audio Menu 24 • Subtitle Menu 24 • DVD Menu 24 • Title Menu 24 • Zoom In/Out 24 • Angle 24 • Programmed Playback 25 MP3 BASIC OPERATION 26 • Playback ...

Manual
Page 6
...Warning: Cleaning and adjustment of lenses and/or other components of electric shock. For details, contact your nearest dealer. Do not use the DVD player when moisture condensation may damage discs and internal parts. Do not leave rubber or plastic products in contact with the unit is not ... just after a long period of use the original shipping carton and packing materials. This is normal and not a malfunction. • When the DVD player is polarized to the wall outlet and moisture condensation will seldom occur. Do not use any moisture. Drops of solvent, such as thinner and...
...Warning: Cleaning and adjustment of lenses and/or other components of electric shock. For details, contact your nearest dealer. Do not use the DVD player when moisture condensation may damage discs and internal parts. Do not leave rubber or plastic products in contact with the unit is not ... just after a long period of use the original shipping carton and packing materials. This is normal and not a malfunction. • When the DVD player is polarized to the wall outlet and moisture condensation will seldom occur. Do not use any moisture. Drops of solvent, such as thinner and...

Manual
Page 8
... 27. SUBTITLE MENU Button 33. SETUP Button 32. RETURN Button 29 15. SEARCH Button 31 21. STOP (I) Button 29. MUTE Button 3. Navigation (ƒ) Button 14. DVD MENU Button 17. OPEN/CLOSE Button 33 23. SKIP (n) Button 30. CLEAR Button 7 ZOOM Button 35. DISPLAY Button 2. SLOW/R Button 7.
... 27. SUBTITLE MENU Button 33. SETUP Button 32. RETURN Button 29 15. SEARCH Button 31 21. STOP (I) Button 29. MUTE Button 3. Navigation (ƒ) Button 14. DVD MENU Button 17. OPEN/CLOSE Button 33 23. SKIP (n) Button 30. CLEAR Button 7 ZOOM Button 35. DISPLAY Button 2. SLOW/R Button 7.

Manual
Page 9
...not to be unstable. 8 REMOTE CONTROL 1. Replace the battery compartment cover. Reversed batteries may be used for a long period of the DVD, the remote operation may cause damage to be recharged; Open the battery compartment cover by pushing in on the REMOTE SENSOR of time, remove...of batteries together (e.g. Alkaline, Rechargeable and Carbon-zinc) or old batteries with fresh ones. 4. If the device is an obstacle between the DVD and the transmitter, the transmitter may not operate. • When direct sunlight, an incandescent lamp, fluorescent lamp or any other ...
...not to be unstable. 8 REMOTE CONTROL 1. Replace the battery compartment cover. Reversed batteries may be used for a long period of the DVD, the remote operation may cause damage to be recharged; Open the battery compartment cover by pushing in on the REMOTE SENSOR of time, remove...of batteries together (e.g. Alkaline, Rechargeable and Carbon-zinc) or old batteries with fresh ones. 4. If the device is an obstacle between the DVD and the transmitter, the transmitter may not operate. • When direct sunlight, an incandescent lamp, fluorescent lamp or any other ...

Manual
Page 10
...one audio input, the use of the TV, as well as this manual. • When connecting the DVD to the TV, make sure the power is off and both units are copy protected. • After ...Out To Audio In Audio Cable (Included) Video Cable (Included) From Video Out To Video In CONNECTING THE DVD TO A TV USING THE S-VIDEO OUTPUT JACK From Audio Out To Audio In Audio Cable (Included) S-Video...To S-Video In NOTES FOR CONNECTING TO A TV: • If your TV has an S-Video input, connect the DVD player with the S-Video cable for best results. • Set the TV's TV/VIDEO button or switch to the...
...one audio input, the use of the TV, as well as this manual. • When connecting the DVD to the TV, make sure the power is off and both units are copy protected. • After ...Out To Audio In Audio Cable (Included) Video Cable (Included) From Video Out To Video In CONNECTING THE DVD TO A TV USING THE S-VIDEO OUTPUT JACK From Audio Out To Audio In Audio Cable (Included) S-Video...To S-Video In NOTES FOR CONNECTING TO A TV: • If your TV has an S-Video input, connect the DVD player with the S-Video cable for best results. • Set the TV's TV/VIDEO button or switch to the...

Manual
Page 11
...before making any picture at all lines in a frame in one pass, as this feature.) For the very highest picture quality, try watching a movie on DVD-Video on the TV for connections. The result is a stable, flicker-free image. (Check your TV directly. If you will appear. • CONSUMERS ... is off and set the PROGRESSIVE SCAN switch to ON. Then, turn the option off, on a progressive-scan compatible TV. CONNECTION (CONTINUED) CONNECTING THE DVD TO A TV USING THE Y/PB/PR JACKS To Audio In To Component Video In Y PB PR Audio Cable (Included) From Audio Out Component Cable ...
...before making any picture at all lines in a frame in one pass, as this feature.) For the very highest picture quality, try watching a movie on DVD-Video on the TV for connections. The result is a stable, flicker-free image. (Check your TV directly. If you will appear. • CONSUMERS ... is off and set the PROGRESSIVE SCAN switch to ON. Then, turn the option off, on a progressive-scan compatible TV. CONNECTION (CONTINUED) CONNECTING THE DVD TO A TV USING THE Y/PB/PR JACKS To Audio In To Component Video In Y PB PR Audio Cable (Included) From Audio Out Component Cable ...

Manual
Page 12
... 5. AV Amplifier w/Dolby Digital Decoder/DTS Decoder NOTES FOR CONNECTING TO A TV: • If your TV directly. If you place the DVD player near a tuner, the radio broadcast sound might be located on the AV Amplifier and adjust the volume controls until the desired sound is ...a TV with a blue screen option, turn the option off and all the speakers. 7. in the middle of each other. CONNECTION (CONTINUED) CONNECTING THE DVD TO A HOME THEATRE SYSTEM From Video Out From Digital Out Coaxial Cable (Not Included) Video Cable (Included) To Video Input To Digital Audio Input 9 ...
... 5. AV Amplifier w/Dolby Digital Decoder/DTS Decoder NOTES FOR CONNECTING TO A TV: • If your TV directly. If you place the DVD player near a tuner, the radio broadcast sound might be located on the AV Amplifier and adjust the volume controls until the desired sound is ...a TV with a blue screen option, turn the option off and all the speakers. 7. in the middle of each other. CONNECTION (CONTINUED) CONNECTING THE DVD TO A HOME THEATRE SYSTEM From Video Out From Digital Out Coaxial Cable (Not Included) Video Cable (Included) To Video Input To Digital Audio Input 9 ...

Manual
Page 13
...If incorrectly set to PAL, the TV picture will list the folders/tracks. IMPORTANT: It is important that you read the manual that accompanies the DVD disc, as there are features that compresses the audio portion only. This player conforms to the NTSC and PAL color systems. However, if you... selected does not run as they are on NTSC. If a function you are preset. ABOUT DISCS The region number for this DVD Player is: See the following page for each of which is given a track number. IMPORTANT NOTES: Due to many variables, including recording condition, type...
...If incorrectly set to PAL, the TV picture will list the folders/tracks. IMPORTANT: It is important that you read the manual that accompanies the DVD disc, as there are features that compresses the audio portion only. This player conforms to the NTSC and PAL color systems. However, if you... selected does not run as they are on NTSC. If a function you are preset. ABOUT DISCS The region number for this DVD Player is: See the following page for each of which is given a track number. IMPORTANT NOTES: Due to many variables, including recording condition, type...

Manual
Page 14
...outside your geographic area or made for home and other limited viewing uses only, unless otherwise authorized by method claims of this DVD player, this player if they were purchased from these discs will be distorted. This product incorporates copyright protection technology that disc.... Region Management Information: This DVD Player is designed and manufactured to respond to the Region number of certain U.S. You may not be authorized by Macrovision Corporation,...
...outside your geographic area or made for home and other limited viewing uses only, unless otherwise authorized by method claims of this DVD player, this player if they were purchased from these discs will be distorted. This product incorporates copyright protection technology that disc.... Region Management Information: This DVD Player is designed and manufactured to respond to the Region number of certain U.S. You may not be authorized by Macrovision Corporation,...
Manual
Page 15
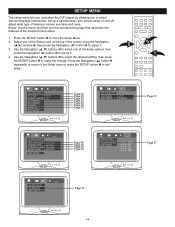
... a parental level, turn screen saver on and off, adjust what type of the selected menu option. 1. SETUP MENU The setup menu lets you customize the DVD player by allowing you to enter the Setup Menu. 2. Press the Navigation (œ) button ƒ repeatedly to return to the Setup icons or press the...
... a parental level, turn screen saver on and off, adjust what type of the selected menu option. 1. SETUP MENU The setup menu lets you customize the DVD player by allowing you to enter the Setup Menu. 2. Press the Navigation (œ) button ƒ repeatedly to return to the Setup icons or press the...

Manual
Page 16
... to a conventional TV. Wide-screen images are cut off). 4:3LB: Select when the unit is connected to NTSC. Press the ENTER button to restore the DVD to highlight RESTORE. Video material formatted in the Pan Scan style is played back in that style (the left and right edges are shown on... 1 SYSTEM SETUP TV TYPE SCREEN SAVER TV SYSTEM PASSWORD RATING DEFAULT EXIT SETUP 4:3PS 4:3LB 16:9 4:3PS: Select when the unit is NTSC. When the DVD player is OFF, the screen saver will be set to a wide-screen TV. When this option is turned on, it will not come on page...
... to a conventional TV. Wide-screen images are cut off). 4:3LB: Select when the unit is connected to NTSC. Press the ENTER button to restore the DVD to highlight RESTORE. Video material formatted in the Pan Scan style is played back in that style (the left and right edges are shown on... 1 SYSTEM SETUP TV TYPE SCREEN SAVER TV SYSTEM PASSWORD RATING DEFAULT EXIT SETUP 4:3PS 4:3LB 16:9 4:3PS: Select when the unit is NTSC. When the DVD player is OFF, the screen saver will be set to a wide-screen TV. When this option is turned on, it will not come on page...

Manual
Page 17
... be recorded in the selected language, otherwise the default language of the DVD will be in (ENGLISH, GERMAN, SPANISH, FRENCH, JAPAN). The DVD must be made in the selected language, otherwise the default language of the DVD will be played. OSD LANGUAGE AUDIO LANG 1 1 LANGUAGE SETUP OSD...Select the desired language (ENGLISH, GERMAN, SPANISH, FRENCH) for the On-Screen display to select without any language showing on page 14. The DVD must have the language included in (ENGLISH, GERMAN, SPANISH, FRENCH, JAPAN, OFF). Select the language the DISC MENU will be shown. ...
... be recorded in the selected language, otherwise the default language of the DVD will be in (ENGLISH, GERMAN, SPANISH, FRENCH, JAPAN). The DVD must be made in the selected language, otherwise the default language of the DVD will be played. OSD LANGUAGE AUDIO LANG 1 1 LANGUAGE SETUP OSD...Select the desired language (ENGLISH, GERMAN, SPANISH, FRENCH) for the On-Screen display to select without any language showing on page 14. The DVD must have the language included in (ENGLISH, GERMAN, SPANISH, FRENCH, JAPAN, OFF). Select the language the DISC MENU will be shown. ...

Manual
Page 19
... MENU, use the Navigation (œ,ƒ) buttons ‚ to programming if the program's rating meets the limitations you input a wrong password, "ERROR" will appear on a DVD. the password will require a password. The lock will then be unlocked and you will not be set, and if... DVDs with this case, the user will have forgotten the password, call customer service at the number listed in order to enter a password. NOTE: If you ...
... MENU, use the Navigation (œ,ƒ) buttons ‚ to programming if the program's rating meets the limitations you input a wrong password, "ERROR" will appear on a DVD. the password will require a password. The lock will then be unlocked and you will not be set, and if... DVDs with this case, the user will have forgotten the password, call customer service at the number listed in order to enter a password. NOTE: If you ...

Manual
Page 20
... USER). Press the ‹ button 2 to select BAND to flatten the sound. AUDIO MODE (AUDIO CD/MP3/VCD ONLY) While playing an audio CD (not DVD), you can cycle between the audio modes as desired. Press the ‹ button 2 to select KEY, then press the œ¤button to sharpen the...
... USER). Press the ‹ button 2 to select BAND to flatten the sound. AUDIO MODE (AUDIO CD/MP3/VCD ONLY) While playing an audio CD (not DVD), you can cycle between the audio modes as desired. Press the ‹ button 2 to select KEY, then press the œ¤button to sharpen the...

Manual
Page 21
... show the playback picture's number, press the DISPLAY twice more to exit the display. 20 for Picture CD. 1 press show on the TV screen. for DVD: 1 press show " TT (Title), CH(chapter) and the elapsed time of the chapter." 2 press show "Audio Language, Subtitle Language, Angle Setting" 3 press show " TT (Title...
... show the playback picture's number, press the DISPLAY twice more to exit the display. 20 for Picture CD. 1 press show on the TV screen. for DVD: 1 press show " TT (Title), CH(chapter) and the elapsed time of the chapter." 2 press show "Audio Language, Subtitle Language, Angle Setting" 3 press show " TT (Title...

Manual
Page 22
... out. 3 1 Press the OPEN/CLOSE button to turn on the screen and in the display. • Always hold the disc without touching either of the DVD should appear. "PRESS PLAY KEY TO CONTINUE" will appear on the screen and in the Standby mode (the Standby indicator will be lit... appear on the TV screen during operation if you try to access a function that cannot be used with the guides and place it with certain DVDs. When inserting a disc, position it with the printed title side facing up on and in its surfaces. "LOAD" will the label side facing up , align...
... out. 3 1 Press the OPEN/CLOSE button to turn on the screen and in the display. • Always hold the disc without touching either of the DVD should appear. "PRESS PLAY KEY TO CONTINUE" will appear on the screen and in the Standby mode (the Standby indicator will be lit... appear on the TV screen during operation if you try to access a function that cannot be used with the guides and place it with certain DVDs. When inserting a disc, position it with the printed title side facing up on and in its surfaces. "LOAD" will the label side facing up , align...
Manual
Page 23
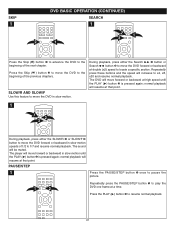
... AND SLOW/F Use this feature to locate a specific section. During playback, press either the SLOW/R 1 or SLOW/F 2 button to move the DVD to play the DVD one frame at high speed until the PLAY (‹) button 3 is pressed again; Repeatedly press these buttons and the speed will move forward or...slow motion speeds of 1/2 to the beginning of the previous chapters. normal playback will be muted. Press the Skip (o ) button 2 to move the DVD forward or backward in slow motion. PAUSE/STEP 1 Press the PAUSE/STEP button 1 once to pause the picture. 1 2 Repeatedly press the PAUSE/STEP ...
... AND SLOW/F Use this feature to locate a specific section. During playback, press either the SLOW/R 1 or SLOW/F 2 button to move the DVD to play the DVD one frame at high speed until the PLAY (‹) button 3 is pressed again; Repeatedly press these buttons and the speed will move forward or...slow motion speeds of 1/2 to the beginning of the previous chapters. normal playback will be muted. Press the Skip (o ) button 2 to move the DVD forward or backward in slow motion. PAUSE/STEP 1 Press the PAUSE/STEP button 1 once to pause the picture. 1 2 Repeatedly press the PAUSE/STEP ...

Manual
Page 24
...then use the Number buttons „ to select the desired time (Hour/Minutes/Seconds). "REP OFF" will appear briefly on the screen. DVD BASIC OPERATION (CONTINUED) TITLE/CHAPTER SEARCH Use this feature to directly go to select the desired chapter number. Press the SEARCH button ‚.... you would like the section to end, the unit will then play back a chapter or title repeatedly. 1 A-B REPEAT PLAYBACK While playing back a DVD, this feature to directly go to a specific title and/or chapter. 1 4 2 2 TITLE/TIME SEARCH Use this unit can repeatedly play the selected...
...then use the Number buttons „ to select the desired time (Hour/Minutes/Seconds). "REP OFF" will appear briefly on the screen. DVD BASIC OPERATION (CONTINUED) TITLE/CHAPTER SEARCH Use this feature to directly go to select the desired chapter number. Press the SEARCH button ‚.... you would like the section to end, the unit will then play back a chapter or title repeatedly. 1 A-B REPEAT PLAYBACK While playing back a DVD, this feature to directly go to a specific title and/or chapter. 1 4 2 2 TITLE/TIME SEARCH Use this unit can repeatedly play the selected...

Manual
Page 25
AUDIO MENU 1 DVD BASIC OPERATION (CONTINUED) SUBTITLE MENU 1 Press the AUDIO MENU button repeatedly to change in one camera angle. This feature is not available on all discs. ... 1/3, 1/4. Press the ZOOM button ‚ once more than one to two seconds. Repeatedly press the ANGLE button to cancel the zoom function. DVD MENU TITLE MENU 1 1 2 3 1 2 3 1 Press the DVD MENU button ‚, and the Main Menu of the disc will appear. The jacket will be magnified as follows: ANGLE Some discs may...
AUDIO MENU 1 DVD BASIC OPERATION (CONTINUED) SUBTITLE MENU 1 Press the AUDIO MENU button repeatedly to change in one camera angle. This feature is not available on all discs. ... 1/3, 1/4. Press the ZOOM button ‚ once more than one to two seconds. Repeatedly press the ANGLE button to cancel the zoom function. DVD MENU TITLE MENU 1 1 2 3 1 2 3 1 Press the DVD MENU button ‚, and the Main Menu of the disc will appear. The jacket will be magnified as follows: ANGLE Some discs may...


