

Manual
Page 2
CONTENTS Contents 1 Important Safety Instructions 2 Precautions 5 Power Source 5 Location of Controls 6 • Front 6 • Rear 6 • Remote 7 Remote Control 8 • Battery Installation 8 • Effective Distance of the Remote Control Transmitter 8 Connection 9 • Connecting the DVD to a TV Using the Audio/Video Output Jacks 9 • Connecting the DVD to a TV Using the S-Video Output ...
CONTENTS Contents 1 Important Safety Instructions 2 Precautions 5 Power Source 5 Location of Controls 6 • Front 6 • Rear 6 • Remote 7 Remote Control 8 • Battery Installation 8 • Effective Distance of the Remote Control Transmitter 8 Connection 9 • Connecting the DVD to a TV Using the Audio/Video Output Jacks 9 • Connecting the DVD to a TV Using the S-Video Output ...

Manual
Page 8
REMOTE 1 2 3 4 5 6 7 8 9 10 11 12 13 14 15 16 17 18 19 20 21 LOCATION OF CONTROLS (CONTINUED) 1. SLOW/F Button 6. PLAY (‹) Button 22 23 24 8. TITLE ...
REMOTE 1 2 3 4 5 6 7 8 9 10 11 12 13 14 15 16 17 18 19 20 21 LOCATION OF CONTROLS (CONTINUED) 1. SLOW/F Button 6. PLAY (‹) Button 22 23 24 8. TITLE ...

Manual
Page 9
..., the transmitter may be unstable. 8 Do not try to recharge batteries not intended to be used for a long period of the DVD, the remote operation may not operate. • When direct sunlight, an incandescent lamp, fluorescent lamp or any other strong light shines on the tab and... next to the device. 3. Replace the battery compartment cover. they can overheat and rupture. (Follow battery manufacturer's directions.) EFFECTIVE DISTANCE OF THE REMOTE CONTROL TRANSMITTER 20ft 45 45 NOTES: • When there is not to prevent damage or injury from possible battery leakage...
..., the transmitter may be unstable. 8 Do not try to recharge batteries not intended to be used for a long period of the DVD, the remote operation may not operate. • When direct sunlight, an incandescent lamp, fluorescent lamp or any other strong light shines on the tab and... next to the device. 3. Replace the battery compartment cover. they can overheat and rupture. (Follow battery manufacturer's directions.) EFFECTIVE DISTANCE OF THE REMOTE CONTROL TRANSMITTER 20ft 45 45 NOTES: • When there is not to prevent damage or injury from possible battery leakage...

Manual
Page 22
Press the STANDBY ON/OFF button on the main unit or the remote to turn on the disc tray. 4 1 2 3 2 1 Press the OPEN/CLOSE button 1 to close the disc tray. As long as you do not press the STANDBY ..., simply press the Play (‹) button 2 to turn on the TV screen. PLAYBACK OF A DVD 1 2 Press the STANDBY ON/OFF button on the main unit/remote to open the disc tray, "OPEN" will appear on this owner's manual. • When the unit is pressed twice, the TV screen shows "STOP" and...
Press the STANDBY ON/OFF button on the main unit or the remote to turn on the disc tray. 4 1 2 3 2 1 Press the OPEN/CLOSE button 1 to close the disc tray. As long as you do not press the STANDBY ..., simply press the Play (‹) button 2 to turn on the TV screen. PLAYBACK OF A DVD 1 2 Press the STANDBY ON/OFF button on the main unit/remote to open the disc tray, "OPEN" will appear on this owner's manual. • When the unit is pressed twice, the TV screen shows "STOP" and...
Manual
Page 27
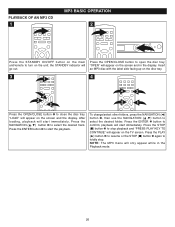
.... 26 After loading, playback will start immediately. PLAYBACK OF AN MP3 CD 1 MP3 BASIC OPERATION 2 Press the STANDBY ON/OFF button on the main unit/remote to turn on the screen and the display. "LOAD" will start immediately. playback will appear on the unit; Press the PLAY (‹) button 4 to resume...
.... 26 After loading, playback will start immediately. PLAYBACK OF AN MP3 CD 1 MP3 BASIC OPERATION 2 Press the STANDBY ON/OFF button on the main unit/remote to turn on the screen and the display. "LOAD" will start immediately. playback will appear on the unit; Press the PLAY (‹) button 4 to resume...

Manual
Page 30
... on the screen and in the display. PLAYBACK OF A CD/VCD 1 CD/VCD BASIC OPERATION 2 Press the STANDBY ON/OFF button on the main unit/remote to be played. 29 the STANDBY indicator will go out and the Backlights will appear on the unit; "LOAD" will turn on the screen and...
... on the screen and in the display. PLAYBACK OF A CD/VCD 1 CD/VCD BASIC OPERATION 2 Press the STANDBY ON/OFF button on the main unit/remote to be played. 29 the STANDBY indicator will go out and the Backlights will appear on the unit; "LOAD" will turn on the screen and...
Manual
Page 33
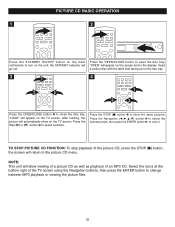
...; to change between MP3 playback or viewing the picture files. 32 PICTURE CD BASIC OPERATION 1 2 Press the STANDBY ON/OFF button on the main unit/remote to close the disc tray. Insert a picture disc with the label side facing up on the disc tray. 3 1 4 2 2 1 2 3 Press the OPEN/CLOSE button ‚ to...
...; to change between MP3 playback or viewing the picture files. 32 PICTURE CD BASIC OPERATION 1 2 Press the STANDBY ON/OFF button on the main unit/remote to close the disc tray. Insert a picture disc with the label side facing up on the disc tray. 3 1 4 2 2 1 2 3 Press the OPEN/CLOSE button ‚ to...

Manual
Page 34
...Connect the video cables securely. Select the appropriate audio input mode. Turn unit off and then back on all discs. Install fresh batteries. Aim the remote at the sensor. Unit needs to be reset to allow searching. Wait one to two hours to NTSC. The playback picture is off . Some ...rolls. The equipment connected with the audio cable is not aimed at the sensor. Wrong menu option is an obstacle in the SETUP MENU. The remote is not set to be reset. There is selected in the path of next page. Set switch to the diagram. Condensation has formed. The...
...Connect the video cables securely. Select the appropriate audio input mode. Turn unit off and then back on all discs. Install fresh batteries. Aim the remote at the sensor. Unit needs to be reset to allow searching. Wait one to two hours to NTSC. The playback picture is off . Some ...rolls. The equipment connected with the audio cable is not aimed at the sensor. Wrong menu option is an obstacle in the SETUP MENU. The remote is not set to be reset. There is selected in the path of next page. Set switch to the diagram. Condensation has formed. The...

Manual
Page 37
...°C Operating Humidity Range 5% to change without notice. 36 SPECIFICATIONS Power Requirements...AC120V, 60Hz Power Consumption 15W (approx. 5W when set to Standby mode by remote) Weight...3.75 Lbs Dimensions 17 (L) x 9 (W) x 1.7 (H) inches Weight and dimensions are subject to 90% (no condensation) Discs Played: DVD-VIDEO Disc 12cm single-sided, single layer...
...°C Operating Humidity Range 5% to change without notice. 36 SPECIFICATIONS Power Requirements...AC120V, 60Hz Power Consumption 15W (approx. 5W when set to Standby mode by remote) Weight...3.75 Lbs Dimensions 17 (L) x 9 (W) x 1.7 (H) inches Weight and dimensions are subject to 90% (no condensation) Discs Played: DVD-VIDEO Disc 12cm single-sided, single layer...

Info Sheet
Page 2
...) • Component output • S-Video output Dimensions • Main unit (WDH): 16.9" x 9.84" x 1.5" Accessories • Full function remote control (2 "AA" batteries included) • Audio/Video cable • User manual & warranty card Packing Information UPC CODE: 749720-00314-3 PACKAGING: full...t 954 660 7000 f 954 660 7085 www.memorexelectronics.com Preliminary specifications and features subject to change. MVD2042 progressive scan DVD player with built-in MP3 decoder Specifications FORMAT COMPATIBILITY • Progressive scan DVD/VCD/CD player with your sales representative....
...) • Component output • S-Video output Dimensions • Main unit (WDH): 16.9" x 9.84" x 1.5" Accessories • Full function remote control (2 "AA" batteries included) • Audio/Video cable • User manual & warranty card Packing Information UPC CODE: 749720-00314-3 PACKAGING: full...t 954 660 7000 f 954 660 7085 www.memorexelectronics.com Preliminary specifications and features subject to change. MVD2042 progressive scan DVD player with built-in MP3 decoder Specifications FORMAT COMPATIBILITY • Progressive scan DVD/VCD/CD player with your sales representative....

