

Manual
Page 2
CONTENTS Contents 1 Important Safety Instructions 2 Precautions 5 Power Source 5 Location of Controls 6 • Front 6 • Rear 6 • Remote 7 Remote Control 8 • Battery Installation 8 • Effective Distance of the Remote Control Transmitter 8 Connection 9 • ...
CONTENTS Contents 1 Important Safety Instructions 2 Precautions 5 Power Source 5 Location of Controls 6 • Front 6 • Rear 6 • Remote 7 Remote Control 8 • Battery Installation 8 • Effective Distance of the Remote Control Transmitter 8 Connection 9 • ...

Manual
Page 3
... to operate the equipment. Manufactured under warranty for help. TO PREVENT DIRECT EXPOSURE TO LASER BEAM, DO NOT TRY TO OPEN THE ENCLOSURE. Lightning and power surges ARE NOT covered under license from that interference will not occur in accordance with the limits for compliance could void the user's authority to...
... to operate the equipment. Manufactured under warranty for help. TO PREVENT DIRECT EXPOSURE TO LASER BEAM, DO NOT TRY TO OPEN THE ENCLOSURE. Lightning and power surges ARE NOT covered under license from that interference will not occur in accordance with the limits for compliance could void the user's authority to...

Manual
Page 4
... system should be sure to . 4. Do not use a mounting accessory recommended by RETAC) in installation such as they exit from battery power, or other similar surface. S3126A 8A. These openings must not be blocked by items placed upon or against them, paying particular attention to...AT LEAST 90 DAYS IN CASE YOU NEED TO RETURN THIS PRODUCT TO YOUR PLACE OF PURCHASE OR TO MEMOREX. PORTABLE CART WARNING (symbol provided by the manufacturer. POWER LINES An outside antenna system, extreme care 3 READ INSTRUCTIONS All the safety and operating instructions should not be...
... system should be sure to . 4. Do not use a mounting accessory recommended by RETAC) in installation such as they exit from battery power, or other similar surface. S3126A 8A. These openings must not be blocked by items placed upon or against them, paying particular attention to...AT LEAST 90 DAYS IN CASE YOU NEED TO RETURN THIS PRODUCT TO YOUR PLACE OF PURCHASE OR TO MEMOREX. PORTABLE CART WARNING (symbol provided by the manufacturer. POWER LINES An outside antenna system, extreme care 3 READ INSTRUCTIONS All the safety and operating instructions should not be...

Manual
Page 5
... or electric shock. 16. HEAT The product should be sure the antenna system is in proper operating condition. 21. NATIONAL ELECTRICAL CODE POWER SERVICE GROUNDING ELECTRODE SYSTEM (NEC ART 250, PART H) S28E98XAAMPLE OF ANTENNA GROUNDING AS PER NATIONAL ELECTRICAL CODE 4 SAFETY CHECK Upon completion ... of grounding conductors, location of antenna discharge product, connection to grounding electrodes, and requirements for grounding electrode. 18. When the power-supply cord or plug is provided to call the CATV system installer's attention to Article 820-40 of the NEC that provides ...
... or electric shock. 16. HEAT The product should be sure the antenna system is in proper operating condition. 21. NATIONAL ELECTRICAL CODE POWER SERVICE GROUNDING ELECTRODE SYSTEM (NEC ART 250, PART H) S28E98XAAMPLE OF ANTENNA GROUNDING AS PER NATIONAL ELECTRICAL CODE 4 SAFETY CHECK Upon completion ... of grounding conductors, location of antenna discharge product, connection to grounding electrodes, and requirements for grounding electrode. 18. When the power-supply cord or plug is provided to call the CATV system installer's attention to Article 820-40 of the NEC that provides ...

Manual
Page 6
...OBTAIN A CLEAR PICTURE: The DVD player is the user's responsibility to clean the unit, follow that product's instructions. Remove the disc, connect the power cord of the DVD player to a warm place. •When you use the DVD player in a room where you just turned on the ... weak detergent solution, wring well and wipe. Warning: Cleaning and adjustment of lenses and/or other components of playback mechanism should be distorted. POWER SOURCE Insert the AC plug (with the unit is not in use the original shipping carton and packing materials. NOTES ON LOCATING THE DVD...
...OBTAIN A CLEAR PICTURE: The DVD player is the user's responsibility to clean the unit, follow that product's instructions. Remove the disc, connect the power cord of the DVD player to a warm place. •When you use the DVD player in a room where you just turned on the ... weak detergent solution, wring well and wipe. Warning: Cleaning and adjustment of lenses and/or other components of playback mechanism should be distorted. POWER SOURCE Insert the AC plug (with the unit is not in use the original shipping carton and packing materials. NOTES ON LOCATING THE DVD...
Manual
Page 7
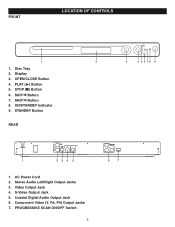
Display 3. STOP (I) Button 6. STANDBY Button REAR 2 3 4 5 6 78 9 1 23 4 5 1. AC Power Cord 2. SKIP n Button 7. Component Video (Y, PB, PR) Output Jacks 7. PROGRESSIVE SCAN ON/OFF Switch 6 6 7 Disc Tray 2. OPEN/CLOSE Button 4. Video Output Jack 4. Coaxial Digital Audio Output Jack 6. ON/STANDBY Indicator 9. S-Video Output Jack 5. PLAY (®) Button 5. Stereo Audio Left/Right Output Jacks 3. FRONT LOCATION OF CONTROLS 1 1. SKIP o Button 8.
Display 3. STOP (I) Button 6. STANDBY Button REAR 2 3 4 5 6 78 9 1 23 4 5 1. AC Power Cord 2. SKIP n Button 7. Component Video (Y, PB, PR) Output Jacks 7. PROGRESSIVE SCAN ON/OFF Switch 6 6 7 Disc Tray 2. OPEN/CLOSE Button 4. Video Output Jack 4. Coaxial Digital Audio Output Jack 6. ON/STANDBY Indicator 9. S-Video Output Jack 5. PLAY (®) Button 5. Stereo Audio Left/Right Output Jacks 3. FRONT LOCATION OF CONTROLS 1 1. SKIP o Button 8.

Manual
Page 10
... discs are copy protected. • After connecting, press the AUDIO MODE button to the desired audio setting. (Please refer to the TV, make sure the power is off and both units are unplugged before making any connections. • If your TV only has one audio input, the use of the TV...
... discs are copy protected. • After connecting, press the AUDIO MODE button to the desired audio setting. (Please refer to the TV, make sure the power is off and both units are unplugged before making any connections. • If your TV only has one audio input, the use of the TV...

Manual
Page 11
Note that it is in one pass, as this manual. • When connecting the DVD to the TV, make sure the power is a stable, flicker-free image. (Check your TV/monitor for compatibility with this feature.) For the very highest picture quality, try watching a movie on DVD-...
Note that it is in one pass, as this manual. • When connecting the DVD to the TV, make sure the power is a stable, flicker-free image. (Check your TV/monitor for compatibility with this feature.) For the very highest picture quality, try watching a movie on DVD-...

Manual
Page 12
... Input To Digital Audio Input 9 1 23 4 Place the subwoofer, front, rear and center speakers in locations as this manual. • When connecting, make sure the power is off , on top or below the Television. 4. this will be located on the DVD player. • Set the TV's TV/VIDEO button or switch...
... Input To Digital Audio Input 9 1 23 4 Place the subwoofer, front, rear and center speakers in locations as this manual. • When connecting, make sure the power is off , on top or below the Television. 4. this will be located on the DVD player. • Set the TV's TV/VIDEO button or switch...

Manual
Page 34
...Unplug the unit and wait about one minute and then plug the unit back in this manual. Press the STANDBY button, then unplug the power cord. The INPUT of next page. Connect the equipment according to allow searching. The batteries are not available on , but unit not functioning...DVD signal output. This is not set to dry. Install fresh batteries. TROUBLESHOOTING GUIDE Check the following before requesting service: SYMPTOM GENERAL No power. Wait one to two hours to the instructions in . No sound. Progressive Scan switch is selected in the path of CD inserted. Wrong...
...Unplug the unit and wait about one minute and then plug the unit back in this manual. Press the STANDBY button, then unplug the power cord. The INPUT of next page. Connect the equipment according to allow searching. The batteries are not available on , but unit not functioning...DVD signal output. This is not set to dry. Install fresh batteries. TROUBLESHOOTING GUIDE Check the following before requesting service: SYMPTOM GENERAL No power. Wait one to two hours to the instructions in . No sound. Progressive Scan switch is selected in the path of CD inserted. Wrong...

Manual
Page 36
... hazard, disconnect your unit from the center of the disc to the outer edge of the disc. Never wipe in straight lines from the AC power source when cleaning. • The finish on either side of the disc. • Do not attach adhesive tape, stickers, etc. BENZENE CLEANER • Discs...
... hazard, disconnect your unit from the center of the disc to the outer edge of the disc. Never wipe in straight lines from the AC power source when cleaning. • The finish on either side of the disc. • Do not attach adhesive tape, stickers, etc. BENZENE CLEANER • Discs...

Manual
Page 37
SPECIFICATIONS Power Requirements...AC120V, 60Hz Power Consumption 15W (approx. 5W when set to Standby mode by remote) Weight...3.75 Lbs Dimensions 17 (L) x 9 (W) x 1.7 (H) inches Weight and dimensions are subject to 90% (no ... Responses: DVD (Linear Audio 20Hz-20KHz (48KHz/96KHz sampling) CD Audio ...20Hz-20KHz S/N Ratio...70dB Wow and Flutter Below Measurable Level Pickup: Wavelength ...655nm Laser Power ...Class 1 Specifications are approximate. Signal System ...NTSC/PAL Operating Temperature ...+5° to +35°C Operating Humidity Range 5% to change without notice. 36
SPECIFICATIONS Power Requirements...AC120V, 60Hz Power Consumption 15W (approx. 5W when set to Standby mode by remote) Weight...3.75 Lbs Dimensions 17 (L) x 9 (W) x 1.7 (H) inches Weight and dimensions are subject to 90% (no ... Responses: DVD (Linear Audio 20Hz-20KHz (48KHz/96KHz sampling) CD Audio ...20Hz-20KHz S/N Ratio...70dB Wow and Flutter Below Measurable Level Pickup: Wavelength ...655nm Laser Power ...Class 1 Specifications are approximate. Signal System ...NTSC/PAL Operating Temperature ...+5° to +35°C Operating Humidity Range 5% to change without notice. 36
