
User Manual
Page 38
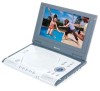
PLAYBACK OF A CD 1 CD OPERATION 2 Press the STANDBY button on the remote to open the disc tray, "OPEN" will start automatically. Insert a disc with the label side facing up on the unit. To stop playback, press the Stop (X) button. 1 2 3 37 After loading, playback will appear on the screen. NOTE: You can also press the POWER button on the main unit to turn on the unit. 3 2 1 Press the OPEN/CLOSE button to turn on the disc tray. 2 Close the disc tray.
PLAYBACK OF A CD 1 CD OPERATION 2 Press the STANDBY button on the remote to open the disc tray, "OPEN" will start automatically. Insert a disc with the label side facing up on the unit. To stop playback, press the Stop (X) button. 1 2 3 37 After loading, playback will appear on the screen. NOTE: You can also press the POWER button on the main unit to turn on the unit. 3 2 1 Press the OPEN/CLOSE button to turn on the disc tray. 2 Close the disc tray.

User Manual
Page 41
After the slideshow is finished; PICTURE CD OPERATION 1 2 Press the STANDBY button to turn on the unit. 3 2 1 Press the OPEN/CLOSE button to open the disc tray, "OPEN" will stop the slideshow before it is done, it . 40 Insert a disc with the label side facing up on the screen. Press the Stop ... (π,†) button 4 to select the desired picture then press the PLAY/ENTER button 5 to stop . Close the disc tray. 2 5 4 3 2 1 After loading a picture CD, the pictures will appear. Press the Skip (n) 1 or (o) 2 button to select the previous or next picture.
After the slideshow is finished; PICTURE CD OPERATION 1 2 Press the STANDBY button to turn on the unit. 3 2 1 Press the OPEN/CLOSE button to open the disc tray, "OPEN" will stop the slideshow before it is done, it . 40 Insert a disc with the label side facing up on the screen. Press the Stop ... (π,†) button 4 to select the desired picture then press the PLAY/ENTER button 5 to stop . Close the disc tray. 2 5 4 3 2 1 After loading a picture CD, the pictures will appear. Press the Skip (n) 1 or (o) 2 button to select the previous or next picture.
User Manual
Page 42
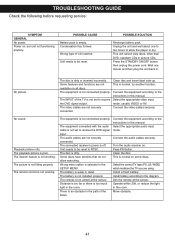
Press the STANDBY ON/OFF button, then unplug the power cord. The video cables are not securely connected. Clean disc and insert label side-up. The remote control is off. The connected receiver's power is not working . The battery is not aimed at the sensor. The ...securely. Press P/N button. Wrong type of the TV is not fitting properly. This unit cannot play discs, other than DVD, standard CDs or picture CDs. The INPUT of CD inserted. No sound. The picture is not set to the instructions in the SETUP MENU. The audio cables are not securely connected. ...
Press the STANDBY ON/OFF button, then unplug the power cord. The video cables are not securely connected. Clean disc and insert label side-up. The remote control is off. The connected receiver's power is not working . The battery is not aimed at the sensor. The ...securely. Press P/N button. Wrong type of the TV is not fitting properly. This unit cannot play discs, other than DVD, standard CDs or picture CDs. The INPUT of CD inserted. No sound. The picture is not set to the instructions in the SETUP MENU. The audio cables are not securely connected. ...

User Manual
Page 44
..., high temperatures or dust, etc. Never allow your unit may be stored in contact with the shiny, unprinted side of the disc. If necessary, use a CD cleaning kit. • If a disc skips or gets stuck on the front panel. 43 Use caution when cleaning and wiping the plastic parts. • Mild.... BENZENE CLEANER Cleaning the Unit • To prevent fire or shock hazard, disconnect your unit from the center of the disc to the disc label. • Clean the disc periodically with a dust cloth and cared for Discs • Treat the disc carefully. to the outer edge of the disc...
..., high temperatures or dust, etc. Never allow your unit may be stored in contact with the shiny, unprinted side of the disc. If necessary, use a CD cleaning kit. • If a disc skips or gets stuck on the front panel. 43 Use caution when cleaning and wiping the plastic parts. • Mild.... BENZENE CLEANER Cleaning the Unit • To prevent fire or shock hazard, disconnect your unit from the center of the disc to the disc label. • Clean the disc periodically with a dust cloth and cared for Discs • Treat the disc carefully. to the outer edge of the disc...

