Specs
Page 2
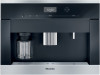
...; Dishwasher-safe milk flask • Automatic rinsing and cleaning programs • Up to 10 user profiles • The coffee pot function allows up to 8 cups of coffee to navigate through the different levels. • OneTouch function prepares beverage with a single touch of one time • ... Milk System simply clicks the milk reservoir into and out of place at one of the symbols on the left of 7 Whole Bean Coffee System CVA 6405 CVA 6405 Features: • DirectSensor controls: choose an operating mode with the touch of a button • OneTouch for easy cleaning • ...
...; Dishwasher-safe milk flask • Automatic rinsing and cleaning programs • Up to 10 user profiles • The coffee pot function allows up to 8 cups of coffee to navigate through the different levels. • OneTouch function prepares beverage with a single touch of one time • ... Milk System simply clicks the milk reservoir into and out of place at one of the symbols on the left of 7 Whole Bean Coffee System CVA 6405 CVA 6405 Features: • DirectSensor controls: choose an operating mode with the touch of a button • OneTouch for easy cleaning • ...
Specs
Page 3
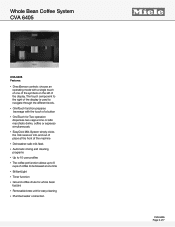
Excluding Fascia Dimension Overall Height - Excluding Fascia Dimension Overall Unit Depth - Whole Bean Coffee System CVA 6405 SPECIFICATIONS CVA 6405 - Excluding Fascia Dimension Depth with Door Open Overall Fascia Dimensions Built-In Minimum Cabinet Width Minimum Cabinet Depth ...Minimum 3" square 1.2kW (120V) 10A on 120V 70 lbs 235/8" W x 221/16" H x 26" L 800.843.7231 82020technologies.com FOREVER BETTER CVA 6405 Page 3 of 7 inches Plumbing Do not Connect to Reverse Osmosis (RO) System Plumbed Hose Electrical Electrical Requirements Power Cord Cut out for power cord Electrical...
Excluding Fascia Dimension Overall Height - Excluding Fascia Dimension Overall Unit Depth - Whole Bean Coffee System CVA 6405 SPECIFICATIONS CVA 6405 - Excluding Fascia Dimension Depth with Door Open Overall Fascia Dimensions Built-In Minimum Cabinet Width Minimum Cabinet Depth ...Minimum 3" square 1.2kW (120V) 10A on 120V 70 lbs 235/8" W x 221/16" H x 26" L 800.843.7231 82020technologies.com FOREVER BETTER CVA 6405 Page 3 of 7 inches Plumbing Do not Connect to Reverse Osmosis (RO) System Plumbed Hose Electrical Electrical Requirements Power Cord Cut out for power cord Electrical...
Specs
Page 4
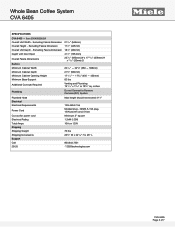
Whole Bean Coffee System CVA 6405 PRODUCT VIEWS Isometric View FOREVER BETTER Top View, Door Open CVA 6405 Page 4 of 7
Whole Bean Coffee System CVA 6405 PRODUCT VIEWS Isometric View FOREVER BETTER Top View, Door Open CVA 6405 Page 4 of 7
Specs
Page 6
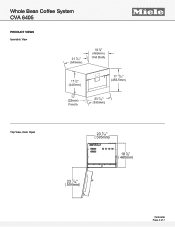
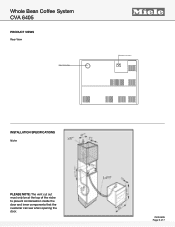
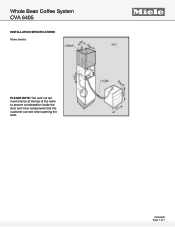
CVA 6405 Page 6 of the niche to prevent condensation inside the door and inner components that the customer can see when opening the door. Whole Bean Coffee System CVA 6405 PRODUCT VIEWS Rear View FOREVER BETTER INSTALLATION SPECIFICATIONS Niche PLEASE NOTE: The vent cut out must only be at the top of 7
CVA 6405 Page 6 of the niche to prevent condensation inside the door and inner components that the customer can see when opening the door. Whole Bean Coffee System CVA 6405 PRODUCT VIEWS Rear View FOREVER BETTER INSTALLATION SPECIFICATIONS Niche PLEASE NOTE: The vent cut out must only be at the top of 7
Specs
Page 7
FOREVER BETTER CVA 6405 Page 7 of the niche to prevent condensation inside the door and inner components that the customer can see when opening the door. Whole Bean Coffee System CVA 6405 INSTALLATION SPECIFICATIONS Niche (metric) PLEASE NOTE: The vent cut out must only be at the top of 7
FOREVER BETTER CVA 6405 Page 7 of the niche to prevent condensation inside the door and inner components that the customer can see when opening the door. Whole Bean Coffee System CVA 6405 INSTALLATION SPECIFICATIONS Niche (metric) PLEASE NOTE: The vent cut out must only be at the top of 7

Product Manual
Page 1
US, CA M.-Nr. 09 741 560 Operating and Installation Instructions Coffee System To prevent accidents and appliance damage read these instructions before installation or use. en -
US, CA M.-Nr. 09 741 560 Operating and Installation Instructions Coffee System To prevent accidents and appliance damage read these instructions before installation or use. en -

Product Manual
Page 2
...the cup height 21 Preparing beverages 22 Preparing espresso, coffee or lungo (large) coffee 22 Preparing double portions 22 Cancel preparation 23 Preparing multiple cups of coffee, one directly after another (coffee pot 23 Preparing coffee beverages from ground coffee 23 Beverages with milk 25 Instructions for the milk ... beverages with milk 26 Preparing hot water 26 Preparing beverages from a profile 26 After use 26 Customizing your coffee 27 Grinder setting 27 Displaying and adjusting the parameters for a beverage 28 Ground amount 28 Brewing temperature 28 Pre-brewing ground...
...the cup height 21 Preparing beverages 22 Preparing espresso, coffee or lungo (large) coffee 22 Preparing double portions 22 Cancel preparation 23 Preparing multiple cups of coffee, one directly after another (coffee pot 23 Preparing coffee beverages from ground coffee 23 Beverages with milk 25 Instructions for the milk ... beverages with milk 26 Preparing hot water 26 Preparing beverages from a profile 26 After use 26 Customizing your coffee 27 Grinder setting 27 Displaying and adjusting the parameters for a beverage 28 Ground amount 28 Brewing temperature 28 Pre-brewing ground...

Product Manual
Page 3
... of possible settings 37 Language 39 Time of day 39 Date 39 Timer 39 Eco mode 41 Lighting 41 Info (displaying information 42 Locking the coffee system (System lock 0 42 Water hardness 42 Display brightness 42 Volume 42 Activating and deactivating the plumbed water connection 42 Factory default settings 43 Showroom...
... of possible settings 37 Language 39 Time of day 39 Date 39 Timer 39 Eco mode 41 Lighting 41 Info (displaying information 42 Locking the coffee system (System lock 0 42 Water hardness 42 Display brightness 42 Volume 42 Activating and deactivating the plumbed water connection 42 Factory default settings 43 Showroom...

Product Manual
Page 5
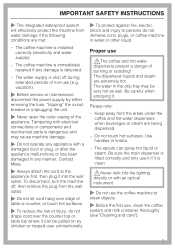
.... - cling film) while playing or pull it without supervision or instruction by improper use of the appliance. Proper use ~ This coffee system is not suitable for outdoor use. ~ Use this appliance other type of use is for household use only, to high temperatures...IMPORTANT SAFETY INSTRUCTIONS When using electrical appliances basic safety precautions should not use it over their bodies to the dispensers. ~ Keep the coffee system out of reach of children. ~ Always supervise children in packaging (e.g. Children in standard household environments only for household use ....
.... - cling film) while playing or pull it without supervision or instruction by improper use of the appliance. Proper use ~ This coffee system is not suitable for outdoor use. ~ Use this appliance other type of use is for household use only, to high temperatures...IMPORTANT SAFETY INSTRUCTIONS When using electrical appliances basic safety precautions should not use it over their bodies to the dispensers. ~ Keep the coffee system out of reach of children. ~ Always supervise children in packaging (e.g. Children in standard household environments only for household use ....

Product Manual
Page 6
... then can form, causing damage to the coffee machine, make sure that there is sufficient ventilation around the coffee machine. If in doubt, contact a qualified electrician. ~ Do not use Miele original spare parts. Do not close the cabinet door when the coffee machine is in operation. ~ The water ..., of this basic safety requirement be met. To guarantee the electrical safety of an effective grounding system. ~ To prevent damage to the coffee machine or the surrounding cabinets. ~ Do not place on the data plate (fuse rating, voltage and frequency) matches the electrical power supply...
... then can form, causing damage to the coffee machine, make sure that there is sufficient ventilation around the coffee machine. If in doubt, contact a qualified electrician. ~ Do not use Miele original spare parts. Do not close the cabinet door when the coffee machine is in operation. ~ The water ..., of this basic safety requirement be met. To guarantee the electrical safety of an effective grounding system. ~ To prevent damage to the coffee machine or the surrounding cabinets. ~ Do not place on the data plate (fuse rating, voltage and frequency) matches the electrical power supply...
Product Manual
Page 7
...when emptying it can spray hot liquid or steam. Be sure the main dispenser is immediately repaired if any manner. Proper use , clean the coffee system and milk container thoroughly (see "Cleaning and care"). 7 Use handles or knobs. - vacation). ~ Before service or maintenance disconnect the...away from water damage if the following conditions are extremely hot. The water in water or other liquid. Please note: - The coffee machine is detected. - Contact Miele. ~ Always attach the cord to persons do not drape cord over edge of table or counter, or touch hot surfaces. ~...
...when emptying it can spray hot liquid or steam. Be sure the main dispenser is immediately repaired if any manner. Proper use , clean the coffee system and milk container thoroughly (see "Cleaning and care"). 7 Use handles or knobs. - vacation). ~ Before service or maintenance disconnect the...away from water damage if the following conditions are extremely hot. The water in water or other liquid. Please note: - The coffee machine is detected. - Contact Miele. ~ Always attach the cord to persons do not drape cord over edge of table or counter, or touch hot surfaces. ~...

Product Manual
Page 8
...note the following with roasted whole coffee beans only. Clean the coffee system and milk container daily (see "Cleaning and care"). - Hot water or other liquids that contain sugar. ~ Do not fill anything into the ground coffee chute except ground coffee or a Miele cleaning tablet for degreasing the brew... unit. ~ Only use of Miele descaling tablets for the water hardness level in areas with ground coffee. ~ Sugar will destroy the system! Do not fill...
...note the following with roasted whole coffee beans only. Clean the coffee system and milk container daily (see "Cleaning and care"). - Hot water or other liquids that contain sugar. ~ Do not fill anything into the ground coffee chute except ground coffee or a Miele cleaning tablet for degreasing the brew... unit. ~ Only use of Miele descaling tablets for the water hardness level in areas with ground coffee. ~ Sugar will destroy the system! Do not fill...

Product Manual
Page 10
Guide to the coffee system Front view a On/Off touch control K b Control and display elements c Door grip d Hot water dispenser e Drip tray f Main dispenser, height-adjustable, with lighting g Milk container with lid 10
Guide to the coffee system Front view a On/Off touch control K b Control and display elements c Door grip d Hot water dispenser e Drip tray f Main dispenser, height-adjustable, with lighting g Milk container with lid 10

Product Manual
Page 11
Interior view Guide to the coffee system h Ground coffee chute cover i Brew unit j Ground coffee chute k Grind control lever l Coffee bean container m Water tank with inlet n Drip tray with no-spill grid o Waste unit p Drip catcher cup q Main dispenser connector cap r Service cover 11
Interior view Guide to the coffee system h Ground coffee chute cover i Brew unit j Ground coffee chute k Grind control lever l Coffee bean container m Water tank with inlet n Drip tray with no-spill grid o Waste unit p Drip catcher cup q Main dispenser connector cap r Service cover 11
Product Manual
Page 12
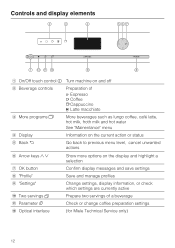
...and manage profiles Change settings, display information, or check which settings are currently active Prepare two servings of . Espresso / Coffee H Cappuccino k Latte macchiato c More programs x More beverages such as lungo coffee, café latte, hot milk, froth milk and hot water See "Mainentance" menu d Display Information on the ...g OK button h "Profile" i "Settings" j Two servings ° k Parameter , l Optical interface Show more options on and off b Beverage controls Preparation of a beverage Check or change coffee preparation settings (for Miele Technical Service only) 12
...and manage profiles Change settings, display information, or check which settings are currently active Prepare two servings of . Espresso / Coffee H Cappuccino k Latte macchiato c More programs x More beverages such as lungo coffee, café latte, hot milk, froth milk and hot water See "Mainentance" menu d Display Information on the ...g OK button h "Profile" i "Settings" j Two servings ° k Parameter , l Optical interface Show more options on and off b Beverage controls Preparation of a beverage Check or change coffee preparation settings (for Miele Technical Service only) 12

Product Manual
Page 13
... water pipes - Descaling tablets for storage in the fridge - Coffee scoop for your coffee machine. - Milk pipework angle section spare part Optional accessories Miele offers a range of useful accessories, as well as cleaning and conditioning products for measuring ground coffee - Contact Miele or visit the Miele website for cleaning and care - Milk pipework cleaning agent for...
... water pipes - Descaling tablets for storage in the fridge - Coffee scoop for your coffee machine. - Milk pipework angle section spare part Optional accessories Miele offers a range of useful accessories, as well as cleaning and conditioning products for measuring ground coffee - Contact Miele or visit the Miele website for cleaning and care - Milk pipework cleaning agent for...
Product Manual
Page 14
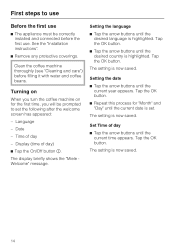
Clean the coffee machine thoroughly (see "Cleaning and care") before the first use ^ The appliance must be prompted to use Before the first... the arrow buttons until the current year appears. The setting is highlighted. Language - The display briefly shows the "Miele Welcome" message. Turning on When you turn the coffee machine on for "Month" and "Day" until the desired country is set the following after the welcome screen has... this process for the first time, you will be correctly installed and connected before filling it with water and coffee beans. Tap the OK button.
Clean the coffee machine thoroughly (see "Cleaning and care") before the first use ^ The appliance must be prompted to use Before the first... the arrow buttons until the current year appears. The setting is highlighted. Language - The display briefly shows the "Miele Welcome" message. Turning on When you turn the coffee machine on for "Month" and "Day" until the desired country is set the following after the welcome screen has... this process for the first time, you will be correctly installed and connected before filling it with water and coffee beans. Tap the OK button.

Product Manual
Page 15
... machine will need to be descaled will then show the message "Set-up successful". Tap the OK button. This is indicated by a message on the coffee machine to the water hardness level for the local area to ensure that can be dispensed before the machine needs to be descaled. The... soon as the machine is turned off . - Water hardness Water hardness is highlighted. You can program four hardness levels on which option you select, the coffee machine may consume more than hard 21.9 gr/gal (21°dH) very hard 4 15 The higher the mineral content, the harder the water. The...
... machine will need to be descaled will then show the message "Set-up successful". Tap the OK button. This is indicated by a message on the coffee machine to the water hardness level for the local area to ensure that can be dispensed before the machine needs to be descaled. The... soon as the machine is turned off . - Water hardness Water hardness is highlighted. You can program four hardness levels on which option you select, the coffee machine may consume more than hard 21.9 gr/gal (21°dH) very hard 4 15 The higher the mineral content, the harder the water. The...

Product Manual
Page 16
Tap the OK button. ^ Tap the arrow buttons until "Water hardness" is highlighted. The result will be visible after about one minute. Tap the OK button. You can also determine the water hardness with the supplied test strips. ^ Dip the test strip in water for the coffee machine. First steps to use Determine water hardness You can now set the water hardness level for about one second. Setting the water hardness ^ Tap "Settings". ^ Tap the arrow buttons until the desired hardness level is now saved. 16 The setting is highlighted. Then shake off any excess water.
Tap the OK button. ^ Tap the arrow buttons until "Water hardness" is highlighted. The result will be visible after about one minute. Tap the OK button. You can also determine the water hardness with the supplied test strips. ^ Dip the test strip in water for the coffee machine. First steps to use Determine water hardness You can now set the water hardness level for about one second. Setting the water hardness ^ Tap "Settings". ^ Tap the arrow buttons until the desired hardness level is now saved. 16 The setting is highlighted. Then shake off any excess water.

Product Manual
Page 17
Operation You can operate the coffee machine by using the arrow keys. You can display these by tapping the touch buttons with your finger. You can find more beverages in the ... shows: If you want to start actions or alter settings in the menu "More programs" x. To confirm the selection, tap the OK button. { Miele Select drink To prepare a coffee beverage, tap one of the display shows that additional options or text is available. If a button has not been pressed for a while, the...
Operation You can operate the coffee machine by using the arrow keys. You can display these by tapping the touch buttons with your finger. You can find more beverages in the ... shows: If you want to start actions or alter settings in the menu "More programs" x. To confirm the selection, tap the OK button. { Miele Select drink To prepare a coffee beverage, tap one of the display shows that additional options or text is available. If a button has not been pressed for a while, the...


