Specs
Page 2
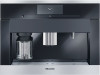
... two hot beverages in succession when pressing the button twice • OneTouch for easy cleaning • Plumbed water connection FOREVER BETTER CVA 6805 Page 2 of coffee to operate and navigate. Whole Bean Coffee System CVA 6805 CVA 6805 Features: • M Touch innovative and revolutionary controls are both easy to be brewed at one time • BrilliantLight • Timer...
... two hot beverages in succession when pressing the button twice • OneTouch for easy cleaning • Plumbed water connection FOREVER BETTER CVA 6805 Page 2 of coffee to operate and navigate. Whole Bean Coffee System CVA 6805 CVA 6805 Features: • M Touch innovative and revolutionary controls are both easy to be brewed at one time • BrilliantLight • Timer...
Specs
Page 3
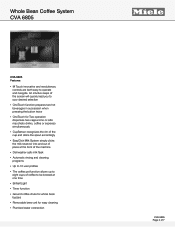
Whole Bean Coffee System CVA 6805 SPECIFICATIONS CVA 6805 - NEMA 5-15A plug, 120V power cord, 5 foot Minimum 3" square 1.2kW (120V) 10A on 120V 70 lbs 235/8" W x 221/16" H x 26" L 800.843.7231 82020technologies.com FOREVER BETTER CVA 6805 Page 3 of 7 Excluding Fascia Dimension Depth with Door Open Overall Fascia Dimensions Built-In Minimum Cabinet Width Minimum Cabinet Depth...
Whole Bean Coffee System CVA 6805 SPECIFICATIONS CVA 6805 - NEMA 5-15A plug, 120V power cord, 5 foot Minimum 3" square 1.2kW (120V) 10A on 120V 70 lbs 235/8" W x 221/16" H x 26" L 800.843.7231 82020technologies.com FOREVER BETTER CVA 6805 Page 3 of 7 Excluding Fascia Dimension Depth with Door Open Overall Fascia Dimensions Built-In Minimum Cabinet Width Minimum Cabinet Depth...
Specs
Page 4
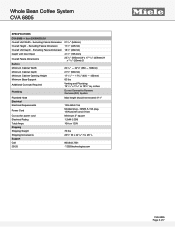
Whole Bean Coffee System CVA 6805 PRODUCT VIEWS Isometric View FOREVER BETTER Top View, Door Open CVA 6805 Page 4 of 7
Whole Bean Coffee System CVA 6805 PRODUCT VIEWS Isometric View FOREVER BETTER Top View, Door Open CVA 6805 Page 4 of 7
Specs
Page 6
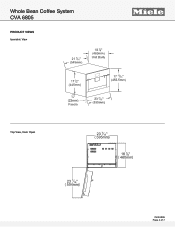
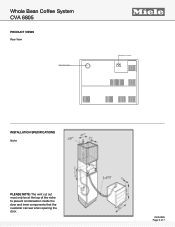
Whole Bean Coffee System CVA 6805 PRODUCT VIEWS Rear View FOREVER BETTER INSTALLATION SPECIFICATIONS Niche PLEASE NOTE: The vent cut out must only be at the top of 7 CVA 6805 Page 6 of the niche to prevent condensation inside the door and inner components that the customer can see when opening the door.
Whole Bean Coffee System CVA 6805 PRODUCT VIEWS Rear View FOREVER BETTER INSTALLATION SPECIFICATIONS Niche PLEASE NOTE: The vent cut out must only be at the top of 7 CVA 6805 Page 6 of the niche to prevent condensation inside the door and inner components that the customer can see when opening the door.
Specs
Page 7
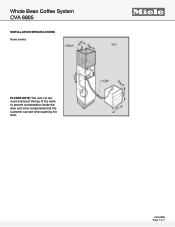
Whole Bean Coffee System CVA 6805 INSTALLATION SPECIFICATIONS Niche (metric) PLEASE NOTE: The vent cut out must only be at the top of 7 FOREVER BETTER CVA 6805 Page 7 of the niche to prevent condensation inside the door and inner components that the customer can see when opening the door.
Whole Bean Coffee System CVA 6805 INSTALLATION SPECIFICATIONS Niche (metric) PLEASE NOTE: The vent cut out must only be at the top of 7 FOREVER BETTER CVA 6805 Page 7 of the niche to prevent condensation inside the door and inner components that the customer can see when opening the door.

Product Manual
Page 1
en - US, CA M.-Nr. 09 741 680 Operating and Installation Instructions Coffee System To prevent accidents and appliance damage read these instructions before installation or use.
en - US, CA M.-Nr. 09 741 680 Operating and Installation Instructions Coffee System To prevent accidents and appliance damage read these instructions before installation or use.

Product Manual
Page 2
... on and off 22 Dispenser adjustment 23 Preparing beverages 24 Espresso, Coffee or Lungo coffee 24 Preparing two portions 24 Canceling preparation 25 Preparing multiple cups of coffee, one directly after another (Coffee pot 25 Preparing coffee drinks from ground coffee 25 Beverages with milk 27 Instructions for the milk container 27 Preparing hot water 28...
... on and off 22 Dispenser adjustment 23 Preparing beverages 24 Espresso, Coffee or Lungo coffee 24 Preparing two portions 24 Canceling preparation 25 Preparing multiple cups of coffee, one directly after another (Coffee pot 25 Preparing coffee drinks from ground coffee 25 Beverages with milk 27 Instructions for the milk container 27 Preparing hot water 28...

Product Manual
Page 3
... Setting options 40 Language 42 Time 42 Date 42 Timers 43 Eco mode 44 Lighting 45 Starting screen 45 Info (displaying information 45 Locking the coffee system (System lock 0 45 Water hardness 46 Brightness 46 Volume 46 Activating and deactivating the plumbed water supply 46 Warming drawer 46 Adjusting the dispensers...
... Setting options 40 Language 42 Time 42 Date 42 Timers 43 Eco mode 44 Lighting 45 Starting screen 45 Info (displaying information 45 Locking the coffee system (System lock 0 45 Water hardness 46 Brightness 46 Volume 46 Activating and deactivating the plumbed water supply 46 Warming drawer 46 Adjusting the dispensers...

Product Manual
Page 5
.... 5 The manufacturer cannot be held responsible for household use of the coffee machine. dard household environments for household use of the coffee system. Proper use ~ This coffee system is for making coffee beverages such as espresso, cappuccino, latte macchiato, etc. Keep children from...use and similar indoor environments only. Do not use . Please read these instructions carefully to prepare espresso, cappuccino and coffee. Any other than that of burning or scalding! This appliance complies with current safety requirements. IMPORTANT SAFETY INSTRUCTIONS When...
.... 5 The manufacturer cannot be held responsible for household use of the coffee machine. dard household environments for household use of the coffee system. Proper use ~ This coffee system is for making coffee beverages such as espresso, cappuccino, latte macchiato, etc. Keep children from...use and similar indoor environments only. Do not use . Please read these instructions carefully to prepare espresso, cappuccino and coffee. Any other than that of burning or scalding! This appliance complies with current safety requirements. IMPORTANT SAFETY INSTRUCTIONS When...

Product Manual
Page 6
...mobile installations such as boats. ~ Only use it has been safely installed. ~ If the machine is sufficient ventilation around the coffee machine. The ventilation openings in the surrounding cabinets and the space below the ceiling must exist between the appliance and an effective grounding...do not guarantee the required safety of the appliance (danger of an effective grounding system. ~ To prevent damage to electricity. Before installing the coffee machine, check for damages caused by the lack, or inadequacy, of overheating). ~ For safety reasons, this basic safety requirement be at ...
...mobile installations such as boats. ~ Only use it has been safely installed. ~ If the machine is sufficient ventilation around the coffee machine. The ventilation openings in the surrounding cabinets and the space below the ceiling must exist between the appliance and an effective grounding...do not guarantee the required safety of the appliance (danger of an effective grounding system. ~ To prevent damage to electricity. Before installing the coffee machine, check for damages caused by the lack, or inadequacy, of overheating). ~ For safety reasons, this basic safety requirement be at ...

Product Manual
Page 7
...of the appliance. The spouts can the manufacturer guarantee the safety of this machine. ~ Do not damage or kink the cover of non-use Miele original spare parts. Only then can spray hot liquid or steam. Do not touch hot surfaces. Use handles or knobs. - Be sure the... off during extended periods of the water intake hose. ~ The integrated waterproof system will effectively protect the machine from the areas under the coffee and hot water dispensers when beverages or steam are extremely hot. The water in water or other liquid. Tampering with electrical connections or components...
...of the appliance. The spouts can the manufacturer guarantee the safety of this machine. ~ Do not damage or kink the cover of non-use Miele original spare parts. Only then can spray hot liquid or steam. Do not touch hot surfaces. Use handles or knobs. - Be sure the... off during extended periods of the water intake hose. ~ The integrated waterproof system will effectively protect the machine from the areas under the coffee and hot water dispensers when beverages or steam are extremely hot. The water in water or other liquid. Tampering with electrical connections or components...

Product Manual
Page 8
... tablets. Do not use of Miele descaling tablets for degreasing the brew unit. ~ Only use a steam cleaner to it . ~ Never place a cup with other liquids can become blocked quite quickly. 8 Otherwise, the coffee machine could damage the appliance. - Change the water every day to... following regarding water: - Hot water or other liquids that contain sugar. ~ Do not fill anything into the ground coffee chute except ground coffee or a Miele cleaning tablet for the water hardness level in your area. Most additives contain sugar, which have been treated or with ...
... tablets. Do not use of Miele descaling tablets for degreasing the brew unit. ~ Only use a steam cleaner to it . ~ Never place a cup with other liquids can become blocked quite quickly. 8 Otherwise, the coffee machine could damage the appliance. - Change the water every day to... following regarding water: - Hot water or other liquids that contain sugar. ~ Do not fill anything into the ground coffee chute except ground coffee or a Miele cleaning tablet for the water hardness level in your area. Most additives contain sugar, which have been treated or with ...

Product Manual
Page 10
Guide to the coffee system Front view a On/Off touch control K b Touch display c "Back" sensor d Door handle e Hot water dispenser f Drip tray g Main dispenser, with automatic height-adjustment and lighting h Milk container with lid 10
Guide to the coffee system Front view a On/Off touch control K b Touch display c "Back" sensor d Door handle e Hot water dispenser f Drip tray g Main dispenser, with automatic height-adjustment and lighting h Milk container with lid 10

Product Manual
Page 11
Interior view Guide to the coffee system i Ground coffee chute cover j Brew unit k Ground coffee chute l Grind control lever m Coffee bean container n Water container with inlet o Drip tray with no-spill grid p Waste unit q Drip catcher r Main dispenser connector cap s Service cover 11
Interior view Guide to the coffee system i Ground coffee chute cover j Brew unit k Ground coffee chute l Grind control lever m Coffee bean container n Water container with inlet o Drip tray with no-spill grid p Waste unit q Drip catcher r Main dispenser connector cap s Service cover 11

Product Manual
Page 12
...Compact seal Milk container lid for measuring ground coffee - Cleaning tablets for storing and preparing milk - Milk container with lid for cleaning the milk system - Milk pipework angle section spare part Optional accessories Miele offers a range of useful accessories, as well... as cleaning and conditioning products for descaling the water pipes - Descaling tablets for your coffee machine. - Milk pipework cleaning agent for cleaning the milk system...
...Compact seal Milk container lid for measuring ground coffee - Cleaning tablets for storing and preparing milk - Milk container with lid for cleaning the milk system - Milk pipework angle section spare part Optional accessories Miele offers a range of useful accessories, as well... as cleaning and conditioning products for descaling the water pipes - Descaling tablets for your coffee machine. - Milk pipework cleaning agent for cleaning the milk system...
Product Manual
Page 13
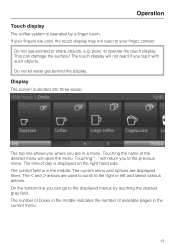
... of boxes in the middle indicates the number of available pages in a menu. Touching "..." will return you can damage the surface! Operation Touch display The coffee system is operated by touching the desired gray field. Display The screen is displayed on the right hand side. The touch display will open the...
... of boxes in the middle indicates the number of available pages in a menu. Touching "..." will return you can damage the surface! Operation Touch display The coffee system is operated by touching the desired gray field. Display The screen is displayed on the right hand side. The touch display will open the...

Product Manual
Page 16
... "On" or "Night dimming" is activated for the time display. Timer"). Operation The following symbols may appear in the display 23:59 hours before the coffee system is due to turn on, as long as the brightness of the display or the volume of the audio signals are selected via a bar...being cleaned. (The symbol is also on the water tank: Fill the water tank up to this mark). Indicates information and instructions about operating the coffee system. Confirm the messages with "OK". This symbol appears when the milk pipework is being carried out. (The symbol is active (see "Settings...
... "On" or "Night dimming" is activated for the time display. Timer"). Operation The following symbols may appear in the display 23:59 hours before the coffee system is due to turn on, as long as the brightness of the display or the volume of the audio signals are selected via a bar...being cleaned. (The symbol is also on the water tank: Fill the water tank up to this mark). Indicates information and instructions about operating the coffee system. Confirm the messages with "OK". This symbol appears when the milk pipework is being carried out. (The symbol is active (see "Settings...

Product Manual
Page 17
See the "Installation instructions". ^ Remove any protective coverings. The display briefly shows the "Miele Welcome" message. Setting the time (of day is set. ^ Touch "OK". Date - Language - Time of day) ^ Touch the On/Off button K. Setting the date ^ Swipe ...the "Day" field in the display until the current date is now saved. 17 The setting is now saved. Clean the coffee machine thoroughly (see "Cleaning and care") before the first use ^ The appliance must be prompted to set the following after the welcome screen has appeared...
See the "Installation instructions". ^ Remove any protective coverings. The display briefly shows the "Miele Welcome" message. Setting the time (of day is set. ^ Touch "OK". Date - Language - Time of day) ^ Touch the On/Off button K. Setting the date ^ Swipe ...the "Day" field in the display until the current date is now saved. 17 The setting is now saved. Clean the coffee machine thoroughly (see "Cleaning and care") before the first use ^ The appliance must be prompted to set the following after the welcome screen has appeared...
Product Manual
Page 18
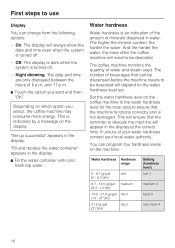
..." appears in the display. This will depend on the water hardness level set. and 11 p.m. ^ Touch the option you select, the coffee machine may consume more often the coffee machine will need to be descaled will ensure that the reminder to ensure that can be dispensed before the machine needs to... On: The display will appear in water. Off: The display is dark when the system is turned off . - This is indicated by a message on the coffee machine to the water hardness level for the local area to descale the machine will always show the date and time even when the system...
..." appears in the display. This will depend on the water hardness level set. and 11 p.m. ^ Touch the option you select, the coffee machine may consume more often the coffee machine will need to be descaled will ensure that the reminder to ensure that can be dispensed before the machine needs to... On: The display will appear in water. Off: The display is dark when the system is turned off . - This is indicated by a message on the coffee machine to the water hardness level for the local area to descale the machine will always show the date and time even when the system...

Product Manual
Page 19
Then shake off any excess water. You can check the water hardness level using the supplied test strips. The setting is now saved. 19 The result will be visible after about one minute. First steps to use ^ Dip the test strip into your tap water for the coffee system. Setting the water hardness ^ Touch "Settings" %. ^ Swipe the display until "Water hardness" appears, and then touch it. ^ Touch the hardness level you want and then "OK". Checking water hardness level You can now set the water hardness level for about one second.
Then shake off any excess water. You can check the water hardness level using the supplied test strips. The setting is now saved. 19 The result will be visible after about one minute. First steps to use ^ Dip the test strip into your tap water for the coffee system. Setting the water hardness ^ Touch "Settings" %. ^ Swipe the display until "Water hardness" appears, and then touch it. ^ Touch the hardness level you want and then "OK". Checking water hardness level You can now set the water hardness level for about one second.


