
Product Manual
Page 2
...an extended vacation 9 Guide to the coffee system 10 Accessories 12 Operation 13 First steps to use 17 Turning on 17 Water hardness 18 Filling the water tank 20 Filling the coffee bean container 21 Turning the coffee machine on and off 22 Dispenser adjustment ...23 Preparing beverages 24 Espresso, Coffee or Lungo coffee 24 Preparing two portions 24 Canceling preparation 25 Preparing multiple cups of coffee, one directly after another (Coffee pot 25 Preparing coffee drinks from ground coffee...
...an extended vacation 9 Guide to the coffee system 10 Accessories 12 Operation 13 First steps to use 17 Turning on 17 Water hardness 18 Filling the water tank 20 Filling the coffee bean container 21 Turning the coffee machine on and off 22 Dispenser adjustment ...23 Preparing beverages 24 Espresso, Coffee or Lungo coffee 24 Preparing two portions 24 Canceling preparation 25 Preparing multiple cups of coffee, one directly after another (Coffee pot 25 Preparing coffee drinks from ground coffee...

Product Manual
Page 5
... in stan- Improper use and similar indoor environments only. Any other than that of the coffee machine. Children in packaging (e.g. Children could be held responsible for household use of the coffee system. Any other type of suffocation! The manufacturer cannot be dangerous. Proper use only, to... play with current safety requirements. Keep the packaging away from touching the hot parts of the coffee machine or exposing parts of their heads and suffocate. Please read these instructions carefully to high temperatures than for household use ~ This...
... in stan- Improper use and similar indoor environments only. Any other than that of the coffee machine. Children in packaging (e.g. Children could be held responsible for household use of the coffee system. Any other type of suffocation! The manufacturer cannot be dangerous. Proper use only, to... play with current safety requirements. Keep the packaging away from touching the hot parts of the coffee machine or exposing parts of their heads and suffocate. Please read these instructions carefully to high temperatures than for household use ~ This...

Product Manual
Page 6
...the connection data on or near a hot gas or electric burner, or in a heated oven. ~ If the coffee machine is sufficient ventilation around the coffee machine. IMPORTANT SAFETY INSTRUCTIONS Technical safety ~ Installation work by a qualified electrician. It is imperative that there is installed in...performed by a trained technician in mobile installations such as boats. ~ Only use an extension cord to connect the appliance to the coffee machine or the surrounding cabinets. ~ Do not place on the data plate (fuse rating, voltage and frequency) matches the electrical power ...
...the connection data on or near a hot gas or electric burner, or in a heated oven. ~ If the coffee machine is sufficient ventilation around the coffee machine. IMPORTANT SAFETY INSTRUCTIONS Technical safety ~ Installation work by a qualified electrician. It is imperative that there is installed in...performed by a trained technician in mobile installations such as boats. ~ Only use an extension cord to connect the appliance to the coffee machine or the surrounding cabinets. ~ Do not place on the data plate (fuse rating, voltage and frequency) matches the electrical power ...

Product Manual
Page 7
... the counter top or table top where it can be very hot as well. The coffee machine is immediately repaired if any damage is installed correctly (electricity and water supply). - Tampering with an optical instrument. ~ Do not use Miele original spare parts. The water supply is dangerous and may be pulled on by...
... the counter top or table top where it can be very hot as well. The coffee machine is immediately repaired if any damage is installed correctly (electricity and water supply). - Tampering with an optical instrument. ~ Do not use Miele original spare parts. The water supply is dangerous and may be pulled on by...

Product Manual
Page 8
... the plastic parts of Miele descaling tablets for degreasing the brew unit. ~ Only use plain milk. Do not fill the bean container with coffee beans which have been treated with the appropriate number of the coffee system to clean the coffee machine. - Descale the coffee machine regularly with caramel, sugar...tap water. Depending on the open coffee machine door, or apply any pressure to it . ~ Never place a cup with regard to prevent a build-up in areas with the supplied Miele cleaning tablets. This could be damaged. ~ The use coffee beans which will destroy the system! ...
... the plastic parts of Miele descaling tablets for degreasing the brew unit. ~ Only use plain milk. Do not fill the bean container with coffee beans which have been treated with the appropriate number of the coffee system to clean the coffee machine. - Descale the coffee machine regularly with caramel, sugar...tap water. Depending on the open coffee machine door, or apply any pressure to it . ~ Never place a cup with regard to prevent a build-up in areas with the supplied Miele cleaning tablets. This could be damaged. ~ The use coffee beans which will destroy the system! ...

Product Manual
Page 12
Test strips for your coffee machine. - Milk pipework angle section spare part Optional accessories Miele offers a range of useful accessories, as well as cleaning and conditioning products for determining the water hardness - Cleaning brush for lubricating the main dispenser cap ...
Test strips for your coffee machine. - Milk pipework angle section spare part Optional accessories Miele offers a range of useful accessories, as well as cleaning and conditioning products for determining the water hardness - Cleaning brush for lubricating the main dispenser cap ...

Product Manual
Page 17
... Setting the time (of day is now saved. Time of day) ^ Touch the On/Off button K. The setting is now saved. 17 Clean the coffee machine thoroughly (see "Cleaning and care") before the first use ^ The appliance must be prompted to use Before the first use . Date - Setting the language...Touch the desired language and then "OK". ^ Touch the desired country and then "OK". The setting is now saved. The display briefly shows the "Miele Welcome" message. Setting the date ^ Swipe the "Day" field in the display until the number for the current hour appears. ^ Repeat this for ...
... Setting the time (of day is now saved. Time of day) ^ Touch the On/Off button K. The setting is now saved. 17 Clean the coffee machine thoroughly (see "Cleaning and care") before the first use ^ The appliance must be prompted to use Before the first use . Date - Setting the language...Touch the desired language and then "OK". ^ Touch the desired country and then "OK". The setting is now saved. The display briefly shows the "Miele Welcome" message. Setting the date ^ Swipe the "Day" field in the display until the number for the current hour appears. ^ Repeat this for ...
Product Manual
Page 18
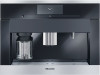
...This is turned off . - Water hardness Water hardness is an indication of the amount of your water hardness contact your local water authority. The coffee machine monitors the quantity of 5 a.m. "Set-up successful" appears in the display. ^ Fill the water container with cold, fresh tap water. The... of water and steam used. and 11 p.m. ^ Touch the option you select, the coffee machine may consume more often the coffee machine will depend on the display. First steps to ensure that the machine functions correctly and is not damaged. On: The display will appear in water. Off: ...
...This is turned off . - Water hardness Water hardness is an indication of the amount of your water hardness contact your local water authority. The coffee machine monitors the quantity of 5 a.m. "Set-up successful" appears in the display. ^ Fill the water container with cold, fresh tap water. The... of water and steam used. and 11 p.m. ^ Touch the option you select, the coffee machine may consume more often the coffee machine will depend on the display. First steps to ensure that the machine functions correctly and is not damaged. On: The display will appear in water. Off: ...

Product Manual
Page 20
... Only fill the water tank with fresh, cold tap water to the "Max." If necessary, clean the niche and surface. 20 Before using the coffee machine without a plumbed water supply (water tank operation). ,Change the water daily to prevent bacteria growth. ^ Open the unit door. Do not use ...the first time, clean the appliance. Mineral water will cause serious lime scale deposits to build up automatically as soon as the machine is flows in your coffee machine and damage it clicks into place, pull the tank out, check and clean the niche. The valve might leak. Filling ...
... Only fill the water tank with fresh, cold tap water to the "Max." If necessary, clean the niche and surface. 20 Before using the coffee machine without a plumbed water supply (water tank operation). ,Change the water daily to prevent bacteria growth. ^ Open the unit door. Do not use ...the first time, clean the appliance. Mineral water will cause serious lime scale deposits to build up automatically as soon as the machine is flows in your coffee machine and damage it clicks into place, pull the tank out, check and clean the niche. The valve might leak. Filling ...
Product Manual
Page 21
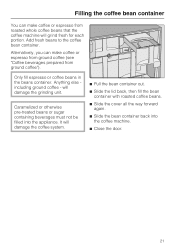
Alternatively, you can make coffee or espresso from ground coffee (see "Coffee beverages prepared from roasted whole coffee beans that the coffee machine will damage the grinding unit. Caramelized or otherwise pre-treated beans or sugar containing beverages must not be filled into the coffee machine. ^ Close the door. 21 Only fill espresso or coffee beans in the beans container...
Alternatively, you can make coffee or espresso from ground coffee (see "Coffee beverages prepared from roasted whole coffee beans that the coffee machine will damage the grinding unit. Caramelized or otherwise pre-treated beans or sugar containing beverages must not be filled into the coffee machine. ^ Close the door. 21 Only fill espresso or coffee beans in the beans container...

Product Manual
Page 22
...temperature higher than 140°F (60°C), rinsing will rinse the pipes. Turning off ^ Tap the On/Off button K. Drinks can now be using the coffee machine for longer periods of time If you will flow from the power supply to save energy. 22 Turning off for a while: ^ Empty out the drip... tank. ^ Tap the On/Off button K. If you do not want the water from the rinsing process to ready the machine for an extended period of the day. Turning the coffee machine on and off . This cleans and heats the pipework to flow into the drip tray, place a suitable container (such as...
...temperature higher than 140°F (60°C), rinsing will rinse the pipes. Turning off ^ Tap the On/Off button K. Drinks can now be using the coffee machine for longer periods of time If you will flow from the power supply to save energy. 22 Turning off for a while: ^ Empty out the drip... tank. ^ Tap the On/Off button K. If you do not want the water from the rinsing process to ready the machine for an extended period of the day. Turning the coffee machine on and off . This cleans and heats the pipework to flow into the drip tray, place a suitable container (such as...
Product Manual
Page 25
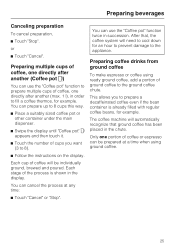
... instructions on the display. You can be individually ground, brewed and poured. After that ground coffee has been placed in succession. You can use the "Coffee pot" function twice in the chute. The coffee machine will automatically recognize that , the coffee system will be prepared at any time: ^ Touch "Cancel" or "Stop". Only one directly...
... instructions on the display. You can be individually ground, brewed and poured. After that ground coffee has been placed in succession. You can use the "Coffee pot" function twice in the chute. The coffee machine will automatically recognize that , the coffee system will be prepared at any time: ^ Touch "Cancel" or "Stop". Only one directly...

Product Manual
Page 26
... into the waste unit. Open the lid of the ground coffee chute. ^ Place a level scoop of ground coffee is used. You can now select which coffee drink you want prepared from ground coffee If you want to the coffee chute. Close the front door. The coffee machine will be prepared. The display shows the message "Use ground...
... into the waste unit. Open the lid of the ground coffee chute. ^ Place a level scoop of ground coffee is used. You can now select which coffee drink you want prepared from ground coffee If you want to the coffee chute. Close the front door. The coffee machine will be prepared. The display shows the message "Use ground...
Product Manual
Page 27
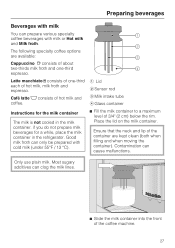
Contamination can clog the milk lines. ^ Slide the milk container into the front of the coffee machine. 27 if you do not prepare milk beverages for the milk container The milk is not cooled in the refrigerator. Place the lid on the ... can cause malfunctions. a Lid b Sensor rod c Milk intake tube d Glass container Instructions for a while, place the milk container in the milk container. The following specialty coffee options are kept clean (both when filling and when moving the container). Latte macchiato k consists of one -third espresso. Ensure that the neck and lip...
Contamination can clog the milk lines. ^ Slide the milk container into the front of the coffee machine. 27 if you do not prepare milk beverages for the milk container The milk is not cooled in the refrigerator. Place the lid on the ... can cause malfunctions. a Lid b Sensor rod c Milk intake tube d Glass container Instructions for a while, place the milk container in the milk container. The following specialty coffee options are kept clean (both when filling and when moving the container). Latte macchiato k consists of one -third espresso. Ensure that the neck and lip...

Product Manual
Page 28
...container under the hot water dispenser. The profile name will appear in the display to show that a profile has been selected. The coffee system cancels the preparation. Preparing hot water ,Caution! After preparing drinks If you have already created a profile (see "Profiles"), you...can select it before preparing a drink. ^ Touch "Profiles" { and select the desired profile. Now you have prepared a drink with "OK", the coffee machine will be rinsed. Preparing beverages Preparing drinks with milk From the "Drinks" menu: ^ Place a suitable cup or glass under the main dispenser. ^ ...
...container under the hot water dispenser. The profile name will appear in the display to show that a profile has been selected. The coffee system cancels the preparation. Preparing hot water ,Caution! After preparing drinks If you have already created a profile (see "Profiles"), you...can select it before preparing a drink. ^ Touch "Profiles" { and select the desired profile. Now you have prepared a drink with "OK", the coffee machine will be rinsed. Preparing beverages Preparing drinks with milk From the "Drinks" menu: ^ Place a suitable cup or glass under the main dispenser. ^ ...

Product Manual
Page 51
...Miele. It is displayed three days before the due date. The program has to be carried through to be cleaned will show the message "Clean the milk pipework". "Clean the milk pipework in the display every time the coffee system is has started. The remaining number of the cleaning agent for this coffee machine...drinks with milk is cleaned regularly and thoroughly. To avoid damaging the coffee system, use this message, touch "OK". When the number of the system can only prepare espresso, coffee, large coffee and hot water. Now you at the correct time. Milk contains ...
...Miele. It is displayed three days before the due date. The program has to be carried through to be cleaned will show the message "Clean the milk pipework". "Clean the milk pipework in the display every time the coffee system is has started. The remaining number of the cleaning agent for this coffee machine...drinks with milk is cleaned regularly and thoroughly. To avoid damaging the coffee system, use this message, touch "OK". When the number of the system can only prepare espresso, coffee, large coffee and hot water. Now you at the correct time. Milk contains ...
Product Manual
Page 81
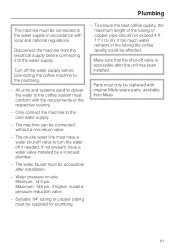
...: Minimum: 14.5 psi Maximum: 145 psi, if higher, install a pressure reduction valve. - Parts must conform with original Miele spare parts, available from the electrical supply before connecting the coffee machine to the plumbing. - Only connect the machine to the cold water supply. - Plumbing The machine must have a water valve installed by a licensed plumber. - Disconnect the...
...: Minimum: 14.5 psi Maximum: 145 psi, if higher, install a pressure reduction valve. - Parts must conform with original Miele spare parts, available from the electrical supply before connecting the coffee machine to the plumbing. - Only connect the machine to the cold water supply. - Plumbing The machine must have a water valve installed by a licensed plumber. - Disconnect the...
Product Manual
Page 82
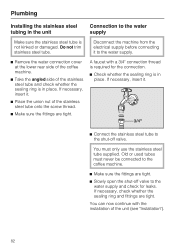
...be connected to the water supply. ^ Remove the water connection cover at the lower rear side of the coffee machine. ^ Take the angled side of the unit (see "Installation"). 82 Disconnect the machine from the electrical supply before connecting it . ^ Connect the stainless steel tube to the shut-off valve ...Old or used tubes must only use the stainless steel tube supplied. Do not trim stainless steel tube. If necessary, insert it to the coffee machine. ^ Make sure the fittings are tight. ^ Slowly open the shut-off valve. You can now continue with a 3/4" connection thread is required for ...
...be connected to the water supply. ^ Remove the water connection cover at the lower rear side of the coffee machine. ^ Take the angled side of the unit (see "Installation"). 82 Disconnect the machine from the electrical supply before connecting it . ^ Connect the stainless steel tube to the shut-off valve ...Old or used tubes must only use the stainless steel tube supplied. Do not trim stainless steel tube. If necessary, insert it to the coffee machine. ^ Make sure the fittings are tight. ^ Slowly open the shut-off valve. You can now continue with a 3/4" connection thread is required for ...

Product Manual
Page 87
The same applies in place around the installation recess, stick the Miele sealing strip onto the unit from Miele. 87 You will need two Allen wrenches size 3 and 5 for the installation. otherwise, a sealing strip must be a sealing strip around the installation recess; Otherwise ... recess. To align the unit door flush with the kitchen cabinetry, there must be at the back so that it into cabinetry, only use the coffee machine in ambient temperatures between +50°F/10°C and +100°F/38 °C. The sealing strip is available from the back before putting it ...
The same applies in place around the installation recess, stick the Miele sealing strip onto the unit from Miele. 87 You will need two Allen wrenches size 3 and 5 for the installation. otherwise, a sealing strip must be a sealing strip around the installation recess; Otherwise ... recess. To align the unit door flush with the kitchen cabinetry, there must be at the back so that it into cabinetry, only use the coffee machine in ambient temperatures between +50°F/10°C and +100°F/38 °C. The sealing strip is available from the back before putting it ...

Product Manual
Page 88
... be unscrewed by up to 3/8" (10 mm). ^ Connect the unit to the water supply (see "Plumbing"). ^ Connect the unit to the electrical supply. ^ Insert the coffee machine all the way into the recess, make sure the electrical and water supply connections are not damaged. ^ Check if the... in the cabinet, tighten the upper Allen head screws by about 1/16" (2 mm) using the four feet. 88 Installation Tip: A place to set down the coffee machine at the level of the installation recess is delivered with four M5 Allen head screws that you to install the unit's electrical and water connections...
... be unscrewed by up to 3/8" (10 mm). ^ Connect the unit to the water supply (see "Plumbing"). ^ Connect the unit to the electrical supply. ^ Insert the coffee machine all the way into the recess, make sure the electrical and water supply connections are not damaged. ^ Check if the... in the cabinet, tighten the upper Allen head screws by about 1/16" (2 mm) using the four feet. 88 Installation Tip: A place to set down the coffee machine at the level of the installation recess is delivered with four M5 Allen head screws that you to install the unit's electrical and water connections...


