
Merging Kits
Page 2
...thickness from the "Merging Kit" to 6 5/16" (160 mm) between the adjacent appliances, then each other (without partition en . . . This will only need to be installed. F 14x1 SF, F 18x1 SF, F 19x1 SF F 14x3 SF, F 18x3 SF, F 19x3 SF - without a partition), they need the heating mat from 5/8" (16... mm) to avoid condensation and prevent damages. 4 3 Page 2 of 12 If the appliances are installed directly next to each appliance should be used for side-by-side installation of the partition is 5/8" (16 mm). K 18x1 SF, K 19x1 SF, K 18x3 SF, K 19x3 SF - KWT...
...thickness from the "Merging Kit" to 6 5/16" (160 mm) between the adjacent appliances, then each other (without partition en . . . This will only need to be installed. F 14x1 SF, F 18x1 SF, F 19x1 SF F 14x3 SF, F 18x3 SF, F 19x3 SF - without a partition), they need the heating mat from 5/8" (16... mm) to avoid condensation and prevent damages. 4 3 Page 2 of 12 If the appliances are installed directly next to each appliance should be used for side-by-side installation of the partition is 5/8" (16 mm). K 18x1 SF, K 19x1 SF, K 18x3 SF, K 19x3 SF - KWT...

Merging Kits
Page 3
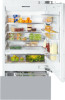
One (1) Standard NEMA 5-15 Duplex Outlet - locate less than 9" above finished floor Notes • KSK1002 Merging kit must be used when combining units • All Installations must be done in accordance with local codes Page 3 of 12 Product and Cut-out Dimensions 48" Side-by-Side Combination F14X3 & K18X3 FOR PROUD INSTALLATION 24" min. 17 3/4" 24 5/8" 29 3/4" 84" 83 1/2" - 85 3/8" 3 1/2" - 5 3/8" O 48" E 10 1/4" 1 1/8" Location Codes E - 5 foot - 120 Volt - 15 Amp 3-wire molded plug power supply connects lower left rear O -
One (1) Standard NEMA 5-15 Duplex Outlet - locate less than 9" above finished floor Notes • KSK1002 Merging kit must be used when combining units • All Installations must be done in accordance with local codes Page 3 of 12 Product and Cut-out Dimensions 48" Side-by-Side Combination F14X3 & K18X3 FOR PROUD INSTALLATION 24" min. 17 3/4" 24 5/8" 29 3/4" 84" 83 1/2" - 85 3/8" 3 1/2" - 5 3/8" O 48" E 10 1/4" 1 1/8" Location Codes E - 5 foot - 120 Volt - 15 Amp 3-wire molded plug power supply connects lower left rear O -
Merging Kits
Page 4
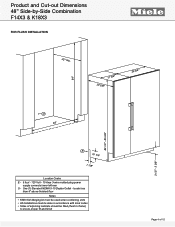
locate less than 9" above finished floor Notes • KSK1002 Merging kit must be used when combining units • All Installations must be done in accordance with local codes • Sides of adjoining cabinets should be filled (flush to frame) to insure proper ...fit and finish Page 4 of 12 Product and Cut-out Dimensions 48" Side-by-Side Combination F14X3 & K18X3 FOR FLUSH INSTALLATION 25" min. 17 3/4" 24 5/8" 29 3/4" 84" 83 1/2" - 85 3/8" 3 1/2" - 5 3/8" O 48" E 10 1/4" 1 1/8" Location Codes E - 5 foot - 120 Volt - 15 Amp 3-wire molded plug power supply ...
locate less than 9" above finished floor Notes • KSK1002 Merging kit must be used when combining units • All Installations must be done in accordance with local codes • Sides of adjoining cabinets should be filled (flush to frame) to insure proper ...fit and finish Page 4 of 12 Product and Cut-out Dimensions 48" Side-by-Side Combination F14X3 & K18X3 FOR FLUSH INSTALLATION 25" min. 17 3/4" 24 5/8" 29 3/4" 84" 83 1/2" - 85 3/8" 3 1/2" - 5 3/8" O 48" E 10 1/4" 1 1/8" Location Codes E - 5 foot - 120 Volt - 15 Amp 3-wire molded plug power supply ...

Merging Kits
Page 5
One (1) Standard NEMA 5-15 Duplex Outlet - locate less than 9" above finished floor Notes • KSK1002 Merging kit must be used when combining units • All Installations must be done in accordance with local codes Page 5 of 12 Product and Cut-out Dimensions 54" Side-by-Side Combination F14X3 & K19X3 FOR PROUD INSTALLATION 24" min. 17 3/4" 24 5/8" 35 3/4" 84" 83 1/2" - 85 3/8" 3 1/2" - 5 3/8" O 54" E 10 1/4" 1 1/8" Location Codes E - 5 foot - 120 Volt - 15 Amp 3-wire molded plug power supply connects lower left rear O -
One (1) Standard NEMA 5-15 Duplex Outlet - locate less than 9" above finished floor Notes • KSK1002 Merging kit must be used when combining units • All Installations must be done in accordance with local codes Page 5 of 12 Product and Cut-out Dimensions 54" Side-by-Side Combination F14X3 & K19X3 FOR PROUD INSTALLATION 24" min. 17 3/4" 24 5/8" 35 3/4" 84" 83 1/2" - 85 3/8" 3 1/2" - 5 3/8" O 54" E 10 1/4" 1 1/8" Location Codes E - 5 foot - 120 Volt - 15 Amp 3-wire molded plug power supply connects lower left rear O -
Merging Kits
Page 6
Product and Cut-out Dimensions 54" Side-by-Side Combination F14X3 & K19X3 FOR FLUSH INSTALLATION 25" min. 17 3/4" 24 5/8" 35 3/4" 84" 83 1/2" - 85 3/8" 3 1/2" - 5 3/8" O 54" E 10 1/4" 1 1/8" Location Codes E - 5 foot - 120 Volt - 15 Amp 3-wire molded plug power supply ... (1) Standard NEMA 5-15 Duplex Outlet - locate less than 9" above finished floor Notes • KSK1002 Merging kit must be used when combining units • All Installations must be done in accordance with local codes • Sides of adjoining cabinets should be filled (flush to frame) to insure proper fit and finish...
Product and Cut-out Dimensions 54" Side-by-Side Combination F14X3 & K19X3 FOR FLUSH INSTALLATION 25" min. 17 3/4" 24 5/8" 35 3/4" 84" 83 1/2" - 85 3/8" 3 1/2" - 5 3/8" O 54" E 10 1/4" 1 1/8" Location Codes E - 5 foot - 120 Volt - 15 Amp 3-wire molded plug power supply ... (1) Standard NEMA 5-15 Duplex Outlet - locate less than 9" above finished floor Notes • KSK1002 Merging kit must be used when combining units • All Installations must be done in accordance with local codes • Sides of adjoining cabinets should be filled (flush to frame) to insure proper fit and finish...
Merging Kits
Page 7
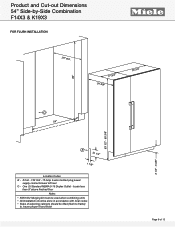
Product and Cut-out Dimensions 60" Side-by-Side Combination F18X3 & K18X3 FOR PROUD INSTALLATION 24" min. 24 5/8" 29 3/4" 29 3/4" 84" 83 1/2" - 85 3/8" 3 1/2" - 5 3/8" O 60" E 10 1/4" 1 1/8" Location Codes E - 5 foot - 120 Volt - 15 Amp 3-wire molded plug power supply connects lower left rear O - locate less than 9" above finished floor Notes • KSK1002 Merging kit must be used when combining units • All Installations must be done in accordance with local codes Page 7 of 12 One (1) Standard NEMA 5-15 Duplex Outlet -
Product and Cut-out Dimensions 60" Side-by-Side Combination F18X3 & K18X3 FOR PROUD INSTALLATION 24" min. 24 5/8" 29 3/4" 29 3/4" 84" 83 1/2" - 85 3/8" 3 1/2" - 5 3/8" O 60" E 10 1/4" 1 1/8" Location Codes E - 5 foot - 120 Volt - 15 Amp 3-wire molded plug power supply connects lower left rear O - locate less than 9" above finished floor Notes • KSK1002 Merging kit must be used when combining units • All Installations must be done in accordance with local codes Page 7 of 12 One (1) Standard NEMA 5-15 Duplex Outlet -

Merging Kits
Page 8
locate less than 9" above finished floor Notes • KSK1002 Merging kit must be used when combining units • All Installations must be done in accordance with local codes • Sides of adjoining cabinets should be filled (flush to frame) to insure ... and finish Page 8 of 12 One (1) Standard NEMA 5-15 Duplex Outlet - Product and Cut-out Dimensions 60" Side-by-Side Combination F18X3 & K18X3 FOR FLUSH INSTALLATION 25" min. 24 5/8" 29 3/4" 29 3/4" 84" 83 1/2" - 85 3/8" 3 1/2" - 5 3/8" O 60" E 10 1/4" 1 1/8" Location Codes E - 5 foot - 120 Volt - 15 Amp 3-wire molded plug power...
locate less than 9" above finished floor Notes • KSK1002 Merging kit must be used when combining units • All Installations must be done in accordance with local codes • Sides of adjoining cabinets should be filled (flush to frame) to insure ... and finish Page 8 of 12 One (1) Standard NEMA 5-15 Duplex Outlet - Product and Cut-out Dimensions 60" Side-by-Side Combination F18X3 & K18X3 FOR FLUSH INSTALLATION 25" min. 24 5/8" 29 3/4" 29 3/4" 84" 83 1/2" - 85 3/8" 3 1/2" - 5 3/8" O 60" E 10 1/4" 1 1/8" Location Codes E - 5 foot - 120 Volt - 15 Amp 3-wire molded plug power...

Merging Kits
Page 9
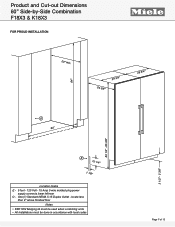
locate less than 9" above finished floor Notes • KSK1002 Merging kit must be used when combining units • All Installations must be done in accordance with local codes Page 9 of 12 Product and Cut-out Dimensions 66" Side-by-Side Combination F18X3 & K19X3 FOR PROUD INSTALLATION 24" min. 24 5/8" 29 3/4" 35 3/4" 84" 83 1/2" - 85 3/8" 3 1/2" - 5 3/8" O 66" E 10 1/4" 1 1/8" Location Codes E - 5 foot - 120 Volt - 15 Amp 3-wire molded plug power supply connects lower left rear O - One (1) Standard NEMA 5-15 Duplex Outlet -
locate less than 9" above finished floor Notes • KSK1002 Merging kit must be used when combining units • All Installations must be done in accordance with local codes Page 9 of 12 Product and Cut-out Dimensions 66" Side-by-Side Combination F18X3 & K19X3 FOR PROUD INSTALLATION 24" min. 24 5/8" 29 3/4" 35 3/4" 84" 83 1/2" - 85 3/8" 3 1/2" - 5 3/8" O 66" E 10 1/4" 1 1/8" Location Codes E - 5 foot - 120 Volt - 15 Amp 3-wire molded plug power supply connects lower left rear O - One (1) Standard NEMA 5-15 Duplex Outlet -

Merging Kits
Page 10
One (1) Standard NEMA 5-15 Duplex Outlet - Product and Cut-out Dimensions 66" Side-by-Side Combination F18X3 & K19X3 FOR FLUSH INSTALLATION 25" min. 24 5/8" 29 3/4" 35 3/4" 84" 83 1/2" - 85 3/8" 3 1/2" - 5 3/8" O 66" E 10 1/4" 1 1/8" Location Codes E - 5 foot - 120 Volt - 15 Amp 3-wire molded plug ... left rear O - locate less than 9" above finished floor Notes • KSK1002 Merging kit must be used when combining units • All Installations must be done in accordance with local codes • Sides of adjoining cabinets should be filled (flush to frame) to insure proper fit and ...
One (1) Standard NEMA 5-15 Duplex Outlet - Product and Cut-out Dimensions 66" Side-by-Side Combination F18X3 & K19X3 FOR FLUSH INSTALLATION 25" min. 24 5/8" 29 3/4" 35 3/4" 84" 83 1/2" - 85 3/8" 3 1/2" - 5 3/8" O 66" E 10 1/4" 1 1/8" Location Codes E - 5 foot - 120 Volt - 15 Amp 3-wire molded plug ... left rear O - locate less than 9" above finished floor Notes • KSK1002 Merging kit must be used when combining units • All Installations must be done in accordance with local codes • Sides of adjoining cabinets should be filled (flush to frame) to insure proper fit and ...

Merging Kits
Page 11
One (1) Standard NEMA 5-15 Duplex Outlet - locate less than 9" above finished floor Notes • KSK1002 Merging kit must be used when combining units • All Installations must be done in accordance with local codes Page 11 of 12 Product and Cut-out Dimensions 72" Side-by-Side Combination F19X3 & K19X3 FOR PROUD INSTALLATION 24" min. 24 5/8" 35 3/4" 35 3/4" 84" 83 1/2" - 85 3/8" 3 1/2" - 5 3/8" O 72" E 10 1/4" 1 1/8" Location Codes E - 5 foot - 120 Volt - 15 Amp 3-wire molded plug power supply connects lower left rear O -
One (1) Standard NEMA 5-15 Duplex Outlet - locate less than 9" above finished floor Notes • KSK1002 Merging kit must be used when combining units • All Installations must be done in accordance with local codes Page 11 of 12 Product and Cut-out Dimensions 72" Side-by-Side Combination F19X3 & K19X3 FOR PROUD INSTALLATION 24" min. 24 5/8" 35 3/4" 35 3/4" 84" 83 1/2" - 85 3/8" 3 1/2" - 5 3/8" O 72" E 10 1/4" 1 1/8" Location Codes E - 5 foot - 120 Volt - 15 Amp 3-wire molded plug power supply connects lower left rear O -

Merging Kits
Page 12
locate less than 9" above finished floor Notes • KSK1002 Merging kit must be used when combining units • All Installations must be done in accordance with local codes • Sides of adjoining cabinets should be filled (flush to frame) to insure proper ...fit and finish Page 12 of 12 Product and Cut-out Dimensions 72" Side-by-Side Combination K19X3 & F19X3 FOR FLUSH INSTALLATION 25" min. 24 5/8" 35 3/4" 35 3/4" 84" 83 1/2" - 85 3/8" 3 1/2" - 5 3/8" O 72" E 10 1/4" 1 1/8" Location Codes E - 5 foot - 120 Volt - 15 Amp 3-wire molded plug power supply ...
locate less than 9" above finished floor Notes • KSK1002 Merging kit must be used when combining units • All Installations must be done in accordance with local codes • Sides of adjoining cabinets should be filled (flush to frame) to insure proper ...fit and finish Page 12 of 12 Product and Cut-out Dimensions 72" Side-by-Side Combination K19X3 & F19X3 FOR FLUSH INSTALLATION 25" min. 24 5/8" 35 3/4" 35 3/4" 84" 83 1/2" - 85 3/8" 3 1/2" - 5 3/8" O 72" E 10 1/4" 1 1/8" Location Codes E - 5 foot - 120 Volt - 15 Amp 3-wire molded plug power supply ...

Specs
Page 2
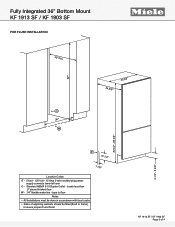
Standard NEMA 5-15 Duplex Outlet - locate less than 9" above finished floor W - 1/4" flexible water line - tape to floor Notes • All Installations must be done in accordance with local codes KF 1913 SF / KF 1903 SF Page 2 of 4 O 36" W 24 5/8" 35 3/4" E 10 1/4" 1 1/8" Location Codes E - 5 foot - 120 Volt - 15 Amp 3-wire molded plug power supply connects lower left rear O - Fully Integrated 36" Bottom Mount KF 1913 SF / KF 1903 SF FOR PROUD INSTALLATION 84" 83 1/2" - 85 3/8" 3 1/2" - 5 3/8" 24" min.
Standard NEMA 5-15 Duplex Outlet - locate less than 9" above finished floor W - 1/4" flexible water line - tape to floor Notes • All Installations must be done in accordance with local codes KF 1913 SF / KF 1903 SF Page 2 of 4 O 36" W 24 5/8" 35 3/4" E 10 1/4" 1 1/8" Location Codes E - 5 foot - 120 Volt - 15 Amp 3-wire molded plug power supply connects lower left rear O - Fully Integrated 36" Bottom Mount KF 1913 SF / KF 1903 SF FOR PROUD INSTALLATION 84" 83 1/2" - 85 3/8" 3 1/2" - 5 3/8" 24" min.
Specs
Page 3
Fully Integrated 36" Bottom Mount KF 1913 SF / KF 1903 SF FOR FLUSH INSTALLATION 84" 83 1/2" - 85 3/8" 3 1/2" - 5 3/8" 25" min. Standard NEMA 5-15 Duplex Outlet - O 36" W 24 5/8" 35 3/4" E 10 1/4" 1 1/8" Location Codes E - 5 foot - 120 Volt - 15 Amp 3-wire molded ...plug power supply connects lower left rear O - locate less than 9" above finished floor W - 1/4" flexible water line - tape to floor Notes • All Installations must be done in accordance with local codes • Sides of adjoining cabinets should be filled (flush to frame) to insure proper fit and finish...
Fully Integrated 36" Bottom Mount KF 1913 SF / KF 1903 SF FOR FLUSH INSTALLATION 84" 83 1/2" - 85 3/8" 3 1/2" - 5 3/8" 25" min. Standard NEMA 5-15 Duplex Outlet - O 36" W 24 5/8" 35 3/4" E 10 1/4" 1 1/8" Location Codes E - 5 foot - 120 Volt - 15 Amp 3-wire molded ...plug power supply connects lower left rear O - locate less than 9" above finished floor W - 1/4" flexible water line - tape to floor Notes • All Installations must be done in accordance with local codes • Sides of adjoining cabinets should be filled (flush to frame) to insure proper fit and finish...

Product Manual
Page 1
en - In this way, you protect yourself and prevent damage to read the operating and installation instructions before it is installed and used for the first time. US, CA M.-Nr. 09 920 880 Operating and installation instructions Refrigerator-freezer combination To avoid the risk of accidents or damage to the appliance it is essential to your device.
en - In this way, you protect yourself and prevent damage to read the operating and installation instructions before it is installed and used for the first time. US, CA M.-Nr. 09 920 880 Operating and installation instructions Refrigerator-freezer combination To avoid the risk of accidents or damage to the appliance it is essential to your device.
Product Manual
Page 3
... Adjusting the door opening angle (optional accessory 59 Dimensions 60 Installing the appliance 63 Before you begin 63 RemoteVision module installation 65 Preparing the installation niche 66 Sliding the appliance into the installation niche 70 Aligning the appliance 72 Attaching the appliance to the installation niche 73 Plumbing 76 Electrical connection 79 RemoteVision (optional accessory...
... Adjusting the door opening angle (optional accessory 59 Dimensions 60 Installing the appliance 63 Before you begin 63 RemoteVision module installation 65 Preparing the installation niche 66 Sliding the appliance into the installation niche 70 Aligning the appliance 72 Attaching the appliance to the installation niche 73 Plumbing 76 Electrical connection 79 RemoteVision (optional accessory...
Product Manual
Page 4
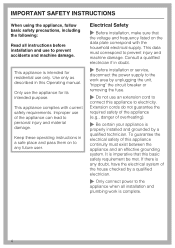
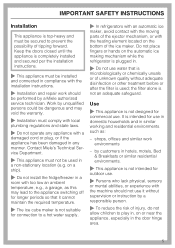
...an extension cord to electricity. This appliance complies with the household electrical supply. Keep these operating instructions in doubt. ~ Before installation or service, disconnect the power supply to the work is imperative that the voltage and frequency listed on to any doubt, ...do not guarantee the required safety of the appliance (e.g., danger of the appliance can lead to the appliance when all instructions before installation and use of overheating). ~ Be certain your appliance is intended for its intended purpose. IMPORTANT SAFETY INSTRUCTIONS When using the appliance...
...an extension cord to electricity. This appliance complies with the household electrical supply. Keep these operating instructions in doubt. ~ Before installation or service, disconnect the power supply to the work is imperative that the voltage and frequency listed on to any doubt, ...do not guarantee the required safety of the appliance (e.g., danger of the appliance can lead to the appliance when all instructions before installation and use of overheating). ~ Be certain your appliance is intended for its intended purpose. IMPORTANT SAFETY INSTRUCTIONS When using the appliance...
Product Manual
Page 5
... commercial use in domestic households and in similar working and residential environments such as this may void the warranty. ~ Installation must be installed and connected in , on the bottom of tipping forward. Contact Miele's Technical Service Department. ~ This appliance must not be dangerous and may lead to the appliance switching off for longer...
... commercial use in domestic households and in similar working and residential environments such as this may void the warranty. ~ Installation must be installed and connected in , on the bottom of tipping forward. Contact Miele's Technical Service Department. ~ This appliance must not be dangerous and may lead to the appliance switching off for longer...
Product Manual
Page 10
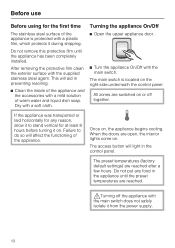
If the appliance was transported or laid horizontally for any food in the appliance until the appliance has been completely installed. All zones are reached. ,Turning off together. Failure to stand vertical for at least 8 hours before turning it from the power supply. 10 Do not ...
If the appliance was transported or laid horizontally for any food in the appliance until the appliance has been completely installed. All zones are reached. ,Turning off together. Failure to stand vertical for at least 8 hours before turning it from the power supply. 10 Do not ...
Product Manual
Page 15
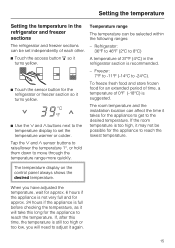
... can be set the temperature warmer or colder. Setting the temperature Setting the temperature in the refrigerator section is recommended. - The room temperature and the installation location can be selected within the following ranges: The refrigerator and freezer sections - The temperature display on the control panel always shows the desired temperature...
... can be set the temperature warmer or colder. Setting the temperature Setting the temperature in the refrigerator section is recommended. - The room temperature and the installation location can be selected within the following ranges: The refrigerator and freezer sections - The temperature display on the control panel always shows the desired temperature...
Product Manual
Page 36
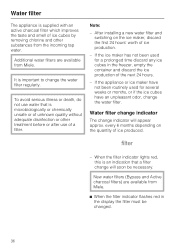
... a prolonged time discard any ice cubes in the display the filter must be necessary. New water filters (Bypass and Active charcoal filters) are available from Miele. After installing a new water filter and switching on the quantity of ice produced. - When the filter indicator lights red, this is an indication that is microbiologically...
... a prolonged time discard any ice cubes in the display the filter must be necessary. New water filters (Bypass and Active charcoal filters) are available from Miele. After installing a new water filter and switching on the quantity of ice produced. - When the filter indicator lights red, this is an indication that is microbiologically...