
Merging Kits
Page 2
... Vi, F 19x3 Vi - KF 18x1 Vi, KF 19x1 Vi, KF 18x3 Vi, KF 19x3 Vi - A heating mat must also be used for side-by-side installation of 7 In this case, you will help avoid condensation and prevent damages. If there is 5/8" (16 mm). If the appliances are... installed directly next to be individually installed within its own niche using the mounting accessories included. KWT 16x1 Vi, KWT 16x3 Vi en Side-by-side . . . K 18x1 Vi, K 19x1 Vi, K 18x3 Vi...
... Vi, F 19x3 Vi - KF 18x1 Vi, KF 19x1 Vi, KF 18x3 Vi, KF 19x3 Vi - A heating mat must also be used for side-by-side installation of 7 In this case, you will help avoid condensation and prevent damages. If there is 5/8" (16 mm). If the appliances are... installed directly next to be individually installed within its own niche using the mounting accessories included. KWT 16x1 Vi, KWT 16x3 Vi en Side-by-side . . . K 18x1 Vi, K 19x1 Vi, K 18x3 Vi...

Merging Kits
Page 3
... less than 9" above finished floor Notes • KSK1002 Merging kit must be used when combining units • All Installations must be done in accordance with local codes • Sides of adjoining cabinets should be filled (flush to frame) to custom panel... 1 1/8" 4 1/8" 6 5/8" - 8 1/2" 2" - 8 3/8" Page 3 of 7 Product and Cut-out Dimensions 48" Side-by-Side Combination F14X3 & K18X3 FOR FLUSH INSTALLATION 25" min.* O 48" 84" 17 3/4" 24 5/8" 29 3/4" SeUeNiInTdSFivRAidOCuNCalTEsPPpTAecNCfEUilLeSSsTfOorMdetails 83 1/2" - 85 3/8" E 10 1/4" Location Codes E - 5 foot - 120 Volt - 15...
... less than 9" above finished floor Notes • KSK1002 Merging kit must be used when combining units • All Installations must be done in accordance with local codes • Sides of adjoining cabinets should be filled (flush to frame) to custom panel... 1 1/8" 4 1/8" 6 5/8" - 8 1/2" 2" - 8 3/8" Page 3 of 7 Product and Cut-out Dimensions 48" Side-by-Side Combination F14X3 & K18X3 FOR FLUSH INSTALLATION 25" min.* O 48" 84" 17 3/4" 24 5/8" 29 3/4" SeUeNiInTdSFivRAidOCuNCalTEsPPpTAecNCfEUilLeSSsTfOorMdetails 83 1/2" - 85 3/8" E 10 1/4" Location Codes E - 5 foot - 120 Volt - 15...

Merging Kits
Page 4
locate less than 9" above finished floor Notes • KSK1002 Merging kit must be used when combining units • All Installations must be filled (flush to frame) to custom panel thickness 1 1/8" 4 1/8" 6 5/8" - 8 1/2" 2" - 8 3/8" Page 4 of adjoining ...should be done in accordance with local codes • Sides of 7 Product and Cut-out Dimensions 54" Side-by-Side Combination F14X3 & K19X3 FOR FLUSH INSTALLATION 25" min.* O 54" 84" 17 3/4" 24 5/8" 35 3/4" SeUeNiInTdSFivRAidOCuNCalTEsPPpTAecNCfEUilLeSSsTfOorMdetails 83 1/2" - 85 3/8" E 10 1/4" Location Codes E - 5 foot ...
locate less than 9" above finished floor Notes • KSK1002 Merging kit must be used when combining units • All Installations must be filled (flush to frame) to custom panel thickness 1 1/8" 4 1/8" 6 5/8" - 8 1/2" 2" - 8 3/8" Page 4 of adjoining ...should be done in accordance with local codes • Sides of 7 Product and Cut-out Dimensions 54" Side-by-Side Combination F14X3 & K19X3 FOR FLUSH INSTALLATION 25" min.* O 54" 84" 17 3/4" 24 5/8" 35 3/4" SeUeNiInTdSFivRAidOCuNCalTEsPPpTAecNCfEUilLeSSsTfOorMdetails 83 1/2" - 85 3/8" E 10 1/4" Location Codes E - 5 foot ...

Merging Kits
Page 5
... Page 5 of adjoining cabinets should be filled (flush to frame) to insure proper fit and finish • For Proud Installation - One (1)Standard NEMA 5-15 Duplex Outlet - locate less than 9" above finished floor Notes • KSK1002 Merging kit must... be done in accordance with local codes • Sides of 7 Product and Cut-out Dimensions 60" Side-by-Side Combination F18X3 & K18X3 FOR FLUSH INSTALLATION 84" 83 1/2" - 85 3/8" 3 1/2" - 5 3/8" 25" min.* 24 5/8" 29 3/4" 29 3/4" SeUeNiInTdSFivRAidOCuNCalTEsPPpTAecNCfEUilLeSSsTfOorMdetails O 60" (Panel/handle shown is not included.) E...
... Page 5 of adjoining cabinets should be filled (flush to frame) to insure proper fit and finish • For Proud Installation - One (1)Standard NEMA 5-15 Duplex Outlet - locate less than 9" above finished floor Notes • KSK1002 Merging kit must... be done in accordance with local codes • Sides of 7 Product and Cut-out Dimensions 60" Side-by-Side Combination F18X3 & K18X3 FOR FLUSH INSTALLATION 84" 83 1/2" - 85 3/8" 3 1/2" - 5 3/8" 25" min.* 24 5/8" 29 3/4" 29 3/4" SeUeNiInTdSFivRAidOCuNCalTEsPPpTAecNCfEUilLeSSsTfOorMdetails O 60" (Panel/handle shown is not included.) E...

Merging Kits
Page 6
...adjust accordingly *Depth assumes a 3/4" panel, please adjust according to insure proper fit and finish • For Proud Installation - Product and Cut-out Dimensions 66" Side-by-Side Combination F18X3 & K19X3 FOR FLUSH INSTALLATION 84" 83 1/2" - 85 3/8" 3 1/2" - 5 3/8" 25" min.* 24 5/8" 29 3/4" 35 3/4" ... locate less than 9" above finished floor Notes • KSK1002 Merging kit must be used when combining units • All Installations must be filled (flush to frame) to custom panel thickness 1 1/8" Page 6 of adjoining cabinets should be done in ...
...adjust accordingly *Depth assumes a 3/4" panel, please adjust according to insure proper fit and finish • For Proud Installation - Product and Cut-out Dimensions 66" Side-by-Side Combination F18X3 & K19X3 FOR FLUSH INSTALLATION 84" 83 1/2" - 85 3/8" 3 1/2" - 5 3/8" 25" min.* 24 5/8" 29 3/4" 35 3/4" ... locate less than 9" above finished floor Notes • KSK1002 Merging kit must be used when combining units • All Installations must be filled (flush to frame) to custom panel thickness 1 1/8" Page 6 of adjoining cabinets should be done in ...

Merging Kits
Page 7
Product and Cut-out Dimensions 72" Side-by-Side Combination F19X3 & K19X3 FOR FLUSH INSTALLATION 84" 83 1/2" - 85 3/8" 3 1/2" - 5 3/8" 25" min.* 24 5/8" 35 3/4" 35 3/4" SeUeNiInTdSFivRAidOCuNCalTEsPPpTAecNCfEUilLeSSsTfOorMdetails O 72" E 10 1/4" Location Codes E - 5 foot - 120 Volt - 15 Amp 3-wire... 5-15 Duplex Outlet - please adjust accordingly *Depth assumes a 3/4" panel, please adjust according to insure proper fit and finish • For Proud Installation - locate less than 9" above finished floor Notes • KSK1002 Merging kit must be used when combining units • All...
Product and Cut-out Dimensions 72" Side-by-Side Combination F19X3 & K19X3 FOR FLUSH INSTALLATION 84" 83 1/2" - 85 3/8" 3 1/2" - 5 3/8" 25" min.* 24 5/8" 35 3/4" 35 3/4" SeUeNiInTdSFivRAidOCuNCalTEsPPpTAecNCfEUilLeSSsTfOorMdetails O 72" E 10 1/4" Location Codes E - 5 foot - 120 Volt - 15 Amp 3-wire... 5-15 Duplex Outlet - please adjust accordingly *Depth assumes a 3/4" panel, please adjust according to insure proper fit and finish • For Proud Installation - locate less than 9" above finished floor Notes • KSK1002 Merging kit must be used when combining units • All...

Specs
Page 2
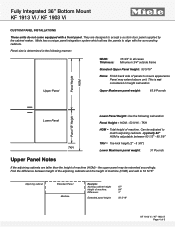
please adjust accordingly * Depth assumes a 3/4" panel, please adjust according to insure proper fit and finish • For Proud Installation - tape to floor Notes • All Installations must be filled (flush to frame) to custom panel thickness 4 1/8" 6 5/8" - 8 1/2" 2" - 8 3/8" KF ...Outlet - locate less than 9" above finished floor W - 1/4" flexible water line - Fully Integrated 36" Bottom Mount KF 1913 Vi / KF 1903 Vi FOR FLUSH INSTALLATION 25" min.* O 36" W 84" 24 5/8" 35 3/4" TUWFNROITO(AN2C)TCCPUEASPNTTEOSLMS 83 1/2" - 85 3/8" E 10 1/4" 1 1/8" Location Codes E - 5 ...
please adjust accordingly * Depth assumes a 3/4" panel, please adjust according to insure proper fit and finish • For Proud Installation - tape to floor Notes • All Installations must be filled (flush to frame) to custom panel thickness 4 1/8" 6 5/8" - 8 1/2" 2" - 8 3/8" KF ...Outlet - locate less than 9" above finished floor W - 1/4" flexible water line - Fully Integrated 36" Bottom Mount KF 1913 Vi / KF 1903 Vi FOR FLUSH INSTALLATION 25" min.* O 36" W 84" 24 5/8" 35 3/4" TUWFNROITO(AN2C)TCCPUEASPNTTEOSLMS 83 1/2" - 85 3/8" E 10 1/4" 1 1/8" Location Codes E - 5 ...
Specs
Page 4
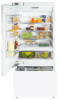
... - the upper panel may extend above unit. Fully Integrated 36" Bottom Mount KF 1913 Vi / KF 1903 Vi CUSTOM PANEL INSTALLATIONS These units do not come equipped with the surrounding cabinets. Miele has a unique panel integration system which allows the panels to align with a front panel. Panel size is adjustable between height...
... - the upper panel may extend above unit. Fully Integrated 36" Bottom Mount KF 1913 Vi / KF 1903 Vi CUSTOM PANEL INSTALLATIONS These units do not come equipped with the surrounding cabinets. Miele has a unique panel integration system which allows the panels to align with a front panel. Panel size is adjustable between height...

Product Manual
Page 1
US, CA M.-Nr. 09 920 660 en - Operating and Installation Instructions Fridge-Freezer Combination To prevent accidents and appliance damage read these instructions before installation or use.
US, CA M.-Nr. 09 920 660 en - Operating and Installation Instructions Fridge-Freezer Combination To prevent accidents and appliance damage read these instructions before installation or use.
Product Manual
Page 3
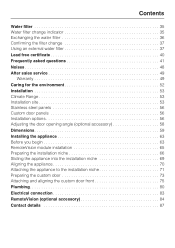
... Adjusting the door opening angle (optional accessory 58 Dimensions 59 Installing the appliance 63 Before you begin 63 RemoteVision module installation 65 Preparing the installation niche 66 Sliding the appliance into the installation niche 69 Aligning the appliance 70 Attaching the appliance to the installation niche 71 Preparing the custom door 73 Attaching and aligning...
... Adjusting the door opening angle (optional accessory 58 Dimensions 59 Installing the appliance 63 Before you begin 63 RemoteVision module installation 65 Preparing the installation niche 66 Sliding the appliance into the installation niche 69 Aligning the appliance 70 Attaching the appliance to the installation niche 71 Preparing the custom door 73 Attaching and aligning...
Product Manual
Page 4
...cord to connect this appliance continuity must correspond to prevent injury and machine damage. Consult a qualified electrician if in doubt. ~ Before installation or service, disconnect the power supply to the work is complete. 4 Extension cords do not guarantee the required safety of the ...as described in a safe place and pass them on the data plate correspond with current safety requirements. Electrical Safety ~ Before installation, make sure that this Operating manual. This appliance complies with the household electrical supply. It is imperative that the voltage and...
...cord to connect this appliance continuity must correspond to prevent injury and machine damage. Consult a qualified electrician if in doubt. ~ Before installation or service, disconnect the power supply to the work is complete. 4 Extension cords do not guarantee the required safety of the ...as described in a safe place and pass them on the data plate correspond with current safety requirements. Electrical Safety ~ Before installation, make sure that this Operating manual. This appliance complies with the household electrical supply. It is imperative that the voltage and...
Product Manual
Page 5
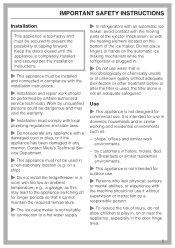
...Miele's Technical Service Department. ~ This appliance must comply with local plumbing regulations and state laws. ~ Do not operate any appliance with the installation instructions. ~ Installation and repair work environments - the filter alone is completely installed and secured per the installation instructions. ~ This appliance must be installed... with an automatic ice maker, avoid contact with the moving parts of tipping forward. IMPORTANT SAFETY INSTRUCTIONS Installation This appliance is not intended for connection to play in, on or near the appliance, especially in the...
...Miele's Technical Service Department. ~ This appliance must comply with local plumbing regulations and state laws. ~ Do not operate any appliance with the installation instructions. ~ Installation and repair work environments - the filter alone is completely installed and secured per the installation instructions. ~ This appliance must be installed... with an automatic ice maker, avoid contact with the moving parts of tipping forward. IMPORTANT SAFETY INSTRUCTIONS Installation This appliance is not intended for connection to play in, on or near the appliance, especially in the...
Product Manual
Page 15
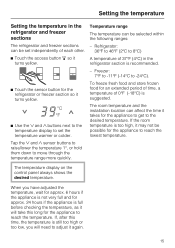
... takes for the refrigerator or freezer section so it may not be possible for the appliance to the desired temperature. The room temperature and the installation location can be selected within the following ranges: The refrigerator and freezer sections - A temperature of each other. 36°F to 46°F (2°C to move...
... takes for the refrigerator or freezer section so it may not be possible for the appliance to the desired temperature. The room temperature and the installation location can be selected within the following ranges: The refrigerator and freezer sections - A temperature of each other. 36°F to 46°F (2°C to move...
Product Manual
Page 35
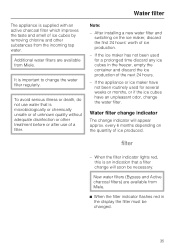
... is microbiologically or chemically unsafe or of unknown quality without adequate disinfection or other substances from Miele. After installing a new water filter and switching on the quantity of ice produced. - Additional water filters are available from Miele. ^ When the filter indicator flashes red in the freezer, empty the container and discard the ice...
... is microbiologically or chemically unsafe or of unknown quality without adequate disinfection or other substances from Miele. After installing a new water filter and switching on the quantity of ice produced. - Additional water filters are available from Miele. ^ When the filter indicator flashes red in the freezer, empty the container and discard the ice...
Product Manual
Page 37
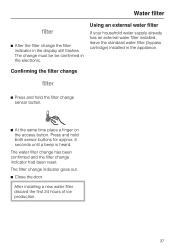
...display still flashes. Using an external water filter If your household water supply already has an external water filter installed, leave the standard water filter (bypass cartridge) installed in the appliance. Water filter ^ After the filter change must be be confirmed in the electronic. The ...filter change indicator goes out. ^ Close the door. Press and hold the filter change indicator had been reset. After installing a new water filter ...
...display still flashes. Using an external water filter If your household water supply already has an external water filter installed, leave the standard water filter (bypass cartridge) installed in the appliance. Water filter ^ After the filter change must be be confirmed in the electronic. The ...filter change indicator goes out. ^ Close the door. Press and hold the filter change indicator had been reset. After installing a new water filter ...
Product Manual
Page 39
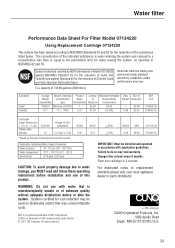
... leaving the system, as specified in Model 07134220 against NSF/ANSI Standard 53 for the reduction of unknown quality without adequate disinfection before installation and use with application guidelines. Note that while the testing was reduced to a concentration less than or equal to < 1 um ...* Based on disinfected waters that is microbiologically unsafe or of Cysts and Turbidity and against Standard 42 for cyst reduction may be installed and operated in accordance with water that may contain filterable cysts. Flush new cartridge for the reduction of this product. CAUTION: To...
... leaving the system, as specified in Model 07134220 against NSF/ANSI Standard 53 for the reduction of unknown quality without adequate disinfection before installation and use with application guidelines. Note that while the testing was reduced to a concentration less than or equal to < 1 um ...* Based on disinfected waters that is microbiologically unsafe or of Cysts and Turbidity and against Standard 42 for cyst reduction may be installed and operated in accordance with water that may contain filterable cysts. Flush new cartridge for the reduction of this product. CAUTION: To...
Product Manual
Page 43
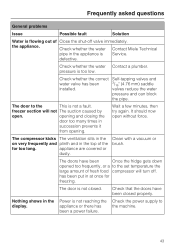
Check whether the water Contact Miele Technical pipe in the appliance is too low. pressure is Service. Check whether the correct water valve has been installed. opening and closing the door too many times in the top of the for freezing. The compressor kicks The ventilation slits in the on very ...
Check whether the water Contact Miele Technical pipe in the appliance is too low. pressure is Service. Check whether the correct water valve has been installed. opening and closing the door too many times in the top of the for freezing. The compressor kicks The ventilation slits in the on very ...
Product Manual
Page 45
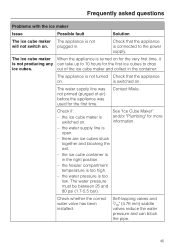
...the ice cube maker and collect in the container. The water supply line was used for the first ice cubes to drop ice cubes. Contact Miele. the ice cube maker is too high. - there are ice cubes stuck together and blocking the exit. - the freezer compartment temperature is ...switched on. Check whether the correct water valve has been installed. Check that the appliance is not turned Check that the appliance on . The appliance is connected to 10 hours for the first time. Check ...
...the ice cube maker and collect in the container. The water supply line was used for the first ice cubes to drop ice cubes. Contact Miele. the ice cube maker is too high. - there are ice cubes stuck together and blocking the exit. - the freezer compartment temperature is ...switched on. Check whether the correct water valve has been installed. Check that the appliance is not turned Check that the appliance on . The appliance is connected to 10 hours for the first time. Check ...
Product Manual
Page 46
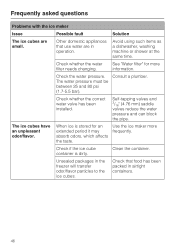
Avoid using such items as a dishwasher, washing machine or shower at the same time. Check whether the correct water valve has been installed. Check the water pressure. Check that use water are small. Consult a plumber. Self-tapping valves and 3/16" (4.76 mm) saddle valves reduce the water pressure ...
Avoid using such items as a dishwasher, washing machine or shower at the same time. Check whether the correct water valve has been installed. Check the water pressure. Check that use water are small. Consult a plumber. Self-tapping valves and 3/16" (4.76 mm) saddle valves reduce the water pressure ...

Product Manual
Page 49
... Service, please quote the model and serial number of your Miele dealer or - See the end of these operating and installation instructions for Miele products will not be recognized by a Miele Authorized Service Provider using genuine Miele parts. MieleCare is to prevent unauthorized (and untrained) service personnel from working on the data plate inside your...
... Service, please quote the model and serial number of your Miele dealer or - See the end of these operating and installation instructions for Miele products will not be recognized by a Miele Authorized Service Provider using genuine Miele parts. MieleCare is to prevent unauthorized (and untrained) service personnel from working on the data plate inside your...