Specs
Page 1
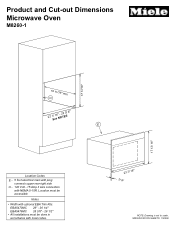
SPECIFICATION SHEETS 150306 Location must be accessible Notes • Width with optional EBA Trim Kits: EBA5470MC 26" - 26 1/4" EBA5476MC 28 3/8" - 28 1/2" • All installations must be done in accordance with NEMA 5-15R. O 22 1S/ e1e6"N-O2T2E3S/ 8" E Location Codes E - 5 foot electrical main with plug connects upper rear right side O - 120 Volt - 15 Amp 3 wire connection with local codes. 23 7/ 16" 7/ 8" NOTE: Drawing is not to scale. Product and Cut-out Dimensions Microwave Oven M8260-1 17 11/16" 17 13/ 16" 19 11/16" min.
SPECIFICATION SHEETS 150306 Location must be accessible Notes • Width with optional EBA Trim Kits: EBA5470MC 26" - 26 1/4" EBA5476MC 28 3/8" - 28 1/2" • All installations must be done in accordance with NEMA 5-15R. O 22 1S/ e1e6"N-O2T2E3S/ 8" E Location Codes E - 5 foot electrical main with plug connects upper rear right side O - 120 Volt - 15 Amp 3 wire connection with local codes. 23 7/ 16" 7/ 8" NOTE: Drawing is not to scale. Product and Cut-out Dimensions Microwave Oven M8260-1 17 11/16" 17 13/ 16" 19 11/16" min.
Product Manual
Page 1
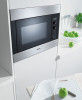
US, CA M.-Nr. 07 372 781 en - Operating and Installation Instructions Microwave M 8260-1 To prevent accidents and appliance damage read these instructions before installation or use.
US, CA M.-Nr. 07 372 781 en - Operating and Installation Instructions Microwave M 8260-1 To prevent accidents and appliance damage read these instructions before installation or use.
Product Manual
Page 3
Contents Cleaning and Care 32 Microwave interior and inside of the door 32 Appliance front 33 Accessories 33 Frequently asked questions 34 Technical Service 37 Installation instructions 39 Caring for the environment 40 Disposal of the packing materials 40 Disposal of an old appliance 40 Electrical connection 41 Installation 42 Building-in dimensions 42 3
Contents Cleaning and Care 32 Microwave interior and inside of the door 32 Appliance front 33 Accessories 33 Frequently asked questions 34 Technical Service 37 Installation instructions 39 Caring for the environment 40 Disposal of the packing materials 40 Disposal of an old appliance 40 Electrical connection 41 Installation 42 Building-in dimensions 42 3
Product Manual
Page 4
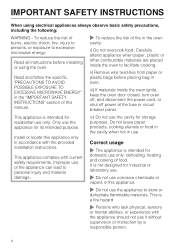
... power at the fuse or circuit breaker panel. ii) Remove wire twist-ties from paper or plastic bags before installing or using electrical appliances always observe basic safety precautions, including the following: WARNING - Improper use the appliance to personal injury .... iii) If materials inside the oven to excessive microwave energy: Read all instructions before placing bag in accordance with the provided installation instructions. IMPORTANT SAFETY INSTRUCTIONS When using the oven. Read and follow the specific, "PRECAUTIONS TO AVOID POSSIBLE EXPOSURE TO EXCESSIVE MICROWAVE...
... power at the fuse or circuit breaker panel. ii) Remove wire twist-ties from paper or plastic bags before installing or using electrical appliances always observe basic safety precautions, including the following: WARNING - Improper use the appliance to personal injury .... iii) If materials inside the oven to excessive microwave energy: Read all instructions before placing bag in accordance with the provided installation instructions. IMPORTANT SAFETY INSTRUCTIONS When using the oven. Read and follow the specific, "PRECAUTIONS TO AVOID POSSIBLE EXPOSURE TO EXCESSIVE MICROWAVE...

Product Manual
Page 5
... supply. Only with these applications. However, under certain conditions it has been correctly installed into cabinetry. Please contact the Miele Technical Service Department with specific requirements. ~ Before service or maintenance work should be replaced by Miele original spare parts only. Technical safety ~ Installation, repair and maintenance work the power supply must be grounded. Contact...
... supply. Only with these applications. However, under certain conditions it has been correctly installed into cabinetry. Please contact the Miele Technical Service Department with specific requirements. ~ Before service or maintenance work should be replaced by Miele original spare parts only. Technical safety ~ Installation, repair and maintenance work the power supply must be grounded. Contact...
Product Manual
Page 34
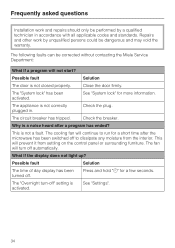
... turned off automatically. Close the door firmly. The "System lock" has been activated. Why is not a fault. Frequently asked questions Installation work by a qualified technician in . Check the plug. This will continue to dissipate any moisture from settling on the control panel or... surrounding furniture. Repairs and other work and repairs should only be corrected without contacting the Miele Service Department: What if a program will turn -off to run for a short time after a program has ended? Press and hold...
... turned off automatically. Close the door firmly. The "System lock" has been activated. Why is not a fault. Frequently asked questions Installation work by a qualified technician in . Check the plug. This will continue to dissipate any moisture from settling on the control panel or... surrounding furniture. Repairs and other work and repairs should only be corrected without contacting the Miele Service Department: What if a program will turn -off to run for a short time after a program has ended? Press and hold...

Product Manual
Page 37
...Miele parts installed by 5 years of worry free ownership. To learn more about MieleCare Extended Service Contracts, please contact your Miele appliance. MieleCare is covered by factory trained professionals can guarantee the safety, reliability, and longevity of your appliance dealer or visit us online at the address on your Miele... Service Contract in writing by Miele's Service department, Extended Service Contracts offered by other providers for Miele products will not be recognized by a Miele Authorized Service Provider using genuine Miele parts. Technical Service In the...
...Miele parts installed by 5 years of worry free ownership. To learn more about MieleCare Extended Service Contracts, please contact your Miele appliance. MieleCare is covered by factory trained professionals can guarantee the safety, reliability, and longevity of your appliance dealer or visit us online at the address on your Miele... Service Contract in writing by Miele's Service department, Extended Service Contracts offered by other providers for Miele products will not be recognized by a Miele Authorized Service Provider using genuine Miele parts. Technical Service In the...

Product Manual
Page 39
Installation Instructions
Installation Instructions
Product Manual
Page 41
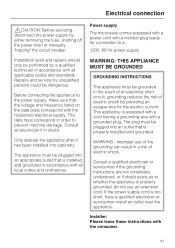
... to a: 120V, 60 Hz power supply. Power supply The microwave comes equipped with a power cord with the household electrical supply. Installation work and repairs should only be performed by unqualified persons could be grounded. The appliance must correspond in doubt. In the event of...the data plate correspond with a molded plug ready for the electric current. This appliance is too short, have a qualified electrician or serviceman install an outlet near the appliance. If the power supply cord is equipped with a cord having a grounding wire with all applicable codes and ...
... to a: 120V, 60 Hz power supply. Power supply The microwave comes equipped with a power cord with the household electrical supply. Installation work and repairs should only be performed by unqualified persons could be grounded. The appliance must correspond in doubt. In the event of...the data plate correspond with a molded plug ready for the electric current. This appliance is too short, have a qualified electrician or serviceman install an outlet near the appliance. If the power supply cord is equipped with a cord having a grounding wire with all applicable codes and ...

Product Manual
Page 42
... being carried. During transport be sure to support the weight of 33 7/16" (850 mm) must be maintained. The framework is suitable for installation into a tall cabinet. Installation When building in dimensions Tall cabinet >850 3 452,5 595 20 42 Building-in the appliance, ensure that the vents located at the front of...
... being carried. During transport be sure to support the weight of 33 7/16" (850 mm) must be maintained. The framework is suitable for installation into a tall cabinet. Installation When building in dimensions Tall cabinet >850 3 452,5 595 20 42 Building-in the appliance, ensure that the vents located at the front of...

Product Manual
Page 43
Installation accessories (supplied) 4 x 16mm 3 Only operate the appliance after it has been installed into cabinetry. Installation ^ Position the fitting bracket on the bracket as a guide. ^ Mark the center line of the cabinet. 43 Use the mark on the center line.
Installation accessories (supplied) 4 x 16mm 3 Only operate the appliance after it has been installed into cabinetry. Installation ^ Position the fitting bracket on the bracket as a guide. ^ Mark the center line of the cabinet. 43 Use the mark on the center line.

Product Manual
Page 44
Installation ^ Fit a screw a in to the center of the first long hole. ^ Check the alignment of the microwave interior move it by slightly adjusting the bracket ... hands on the long holes. ^ Once correctly aligned, to the niche as described above. 44 The microwave will engage into position once it is correctly installed. ^ Check the alignment. ^ If it is not aligned correctly, pull the appliance out of the niche and realign it into place.
Installation ^ Fit a screw a in to the center of the first long hole. ^ Check the alignment of the microwave interior move it by slightly adjusting the bracket ... hands on the long holes. ^ Once correctly aligned, to the niche as described above. 44 The microwave will engage into position once it is correctly installed. ^ Check the alignment. ^ If it is not aligned correctly, pull the appliance out of the niche and realign it into place.
