
Operating manual
Page 1
Operating Instructions Upright Vacuum Cleaner S 7000 To prevent accidents and machine damage, read these instructions before installation and use. en - US, CA M.-Nr. 07 450 381
Operating Instructions Upright Vacuum Cleaner S 7000 To prevent accidents and machine damage, read these instructions before installation and use. en - US, CA M.-Nr. 07 450 381

Operating manual
Page 9
Assembly ^ Put the vacuum cleaner in an upright position. ^ Push the handle down into the body of the vacuum cleaner until it engages (see illustration). Before the first use 9
Assembly ^ Put the vacuum cleaner in an upright position. ^ Push the handle down into the body of the vacuum cleaner until it engages (see illustration). Before the first use 9

Operating manual
Page 18
Risk of the vacuum cleaner, slip the elbow over the vacuum hose so it engages. The rim could be damaged and injuries could result from sharp edges. Injury can occur. For regular vacuuming, you will need to snap the handle back into the telescopic wand and place the wand ...back into the bracket (see the upper illustration). 18 Vacuum hose ^ Place the vacuum in an upright position. ^ Press the release button on a lower step. When vacuuming stairs, ensure that the vacuum is placed on the telescopic wand and pull the vacuum hose handle upwards. ^ To increase the stability of injury...
Risk of the vacuum cleaner, slip the elbow over the vacuum hose so it engages. The rim could be damaged and injuries could result from sharp edges. Injury can occur. For regular vacuuming, you will need to snap the handle back into the telescopic wand and place the wand ...back into the bracket (see the upper illustration). 18 Vacuum hose ^ Place the vacuum in an upright position. ^ Press the release button on a lower step. When vacuuming stairs, ensure that the vacuum is placed on the telescopic wand and pull the vacuum hose handle upwards. ^ To increase the stability of injury...
Operating manual
Page 19
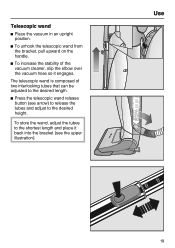
Telescopic wand ^ Place the vacuum in an upright position. ^ To unhook the telescopic wand from the bracket, pull upward on the handle. ^ To increase the stability of two interlocking tubes that can be adjusted to the shortest length and place it engages. To store the wand, adjust the tubes to the desired length. ^ Press the telescopic wand release button (see the upper illustration). Use 19 The telescopic wand is composed of the vacuum cleaner, slip the elbow over the vacuum hose so it back into the bracket (see arrow) to release the tubes and adjust to the desired height.
Telescopic wand ^ Place the vacuum in an upright position. ^ To unhook the telescopic wand from the bracket, pull upward on the handle. ^ To increase the stability of two interlocking tubes that can be adjusted to the shortest length and place it engages. To store the wand, adjust the tubes to the desired length. ^ Press the telescopic wand release button (see the upper illustration). Use 19 The telescopic wand is composed of the vacuum cleaner, slip the elbow over the vacuum hose so it back into the bracket (see arrow) to release the tubes and adjust to the desired height.

Operating manual
Page 21
...the Powerbrush is placed into the full upright position. ^ For best results, move the Powerbrush slowly back and forth over the area you wish to hard floors. The Powerbrush turns on. The Powerbrush automatically shuts off anytime the body of the vacuum cleaner is driven by a separate motor, ...which can also use the button to switch off the Powerbrush while vacuuming, for example when moving from carpet to clean.
...the Powerbrush is placed into the full upright position. ^ For best results, move the Powerbrush slowly back and forth over the area you wish to hard floors. The Powerbrush turns on. The Powerbrush automatically shuts off anytime the body of the vacuum cleaner is driven by a separate motor, ...which can also use the button to switch off the Powerbrush while vacuuming, for example when moving from carpet to clean.
Operating manual
Page 23
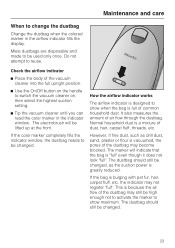
...used only once. If the bag is "full" even though it does not look "full". Miele dustbags are disposable and made to show when the bag is because the air flow of the vacuum cleaner into the full upright position. ^ Use the On/Off button on , then select the highest suction setting. ^ Tip... the vacuum cleaner until you can read the color marker in the airflow indicator fills the display. If...
...used only once. If the bag is "full" even though it does not look "full". Miele dustbags are disposable and made to show when the bag is because the air flow of the vacuum cleaner into the full upright position. ^ Use the On/Off button on , then select the highest suction setting. ^ Tip... the vacuum cleaner until you can read the color marker in the airflow indicator fills the display. If...

Operating manual
Page 24
... the new dustbag as far as it will go into the holder. ^ Unfold the dustbag in the lid. The dustbag is automatically aligned with the vacuum hole. ,An empty-operation-barrier blocks the dust compartment lid from closing if no dustbag is inserted or if it is removed. ^ Do not unfold... when you first remove it clicks into place, taking care not to prevent dust from the suction socket before taking it out of the vacuum cleaner into the full upright position. ^ Lift the release button for the dust compartment lid and open until it closed. 24 Maintenance and care Changing the dustbag ^ Place...
... the new dustbag as far as it will go into the holder. ^ Unfold the dustbag in the lid. The dustbag is automatically aligned with the vacuum hole. ,An empty-operation-barrier blocks the dust compartment lid from closing if no dustbag is inserted or if it is removed. ^ Do not unfold... when you first remove it clicks into place, taking care not to prevent dust from the suction socket before taking it out of the vacuum cleaner into the full upright position. ^ Lift the release button for the dust compartment lid and open until it closed. 24 Maintenance and care Changing the dustbag ^ Place...

Operating manual
Page 31
... 31 If there are large particles or other blockages at the end of the suction hose over the catch hooks, to increase the stability the vacuum cleaner. Put the service flap back on the bottom rear of the arrow. B Pull the suction hose connector off the swivel elbow. ^ Remove all blockages.... Open the service flap on and screw into the full upright position. ^ Press the release button on the telescopic wand and remove the handle from the suction hose ^ Guide the swivel elbow at the base of...
... 31 If there are large particles or other blockages at the end of the suction hose over the catch hooks, to increase the stability the vacuum cleaner. Put the service flap back on the bottom rear of the arrow. B Pull the suction hose connector off the swivel elbow. ^ Remove all blockages.... Open the service flap on and screw into the full upright position. ^ Press the release button on the telescopic wand and remove the handle from the suction hose ^ Guide the swivel elbow at the base of...


