Operating manual
Page 1
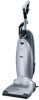
Operating Instructions Upright Vacuum Cleaner S 7000 To prevent accidents and machine damage, read these instructions before installation and use. US, CA M.-Nr. 07 450 381 en -
Operating Instructions Upright Vacuum Cleaner S 7000 To prevent accidents and machine damage, read these instructions before installation and use. US, CA M.-Nr. 07 450 381 en -
Operating manual
Page 2
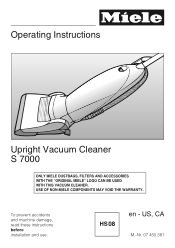
... or directly on the dustbag. Purchasing new dustbags and filters Original Miele dustbags and filters can be used with this vacuum. Only Miele dustbags, filters and accessories with the "Original Miele" logo can be purchased from an authorized Miele vacuum dealer or by visiting the Miele store at www.mieleusa.com. 2 Only then can the suction power...
... or directly on the dustbag. Purchasing new dustbags and filters Original Miele dustbags and filters can be used with this vacuum. Only Miele dustbags, filters and accessories with the "Original Miele" logo can be purchased from an authorized Miele vacuum dealer or by visiting the Miele store at www.mieleusa.com. 2 Only then can the suction power...
Operating manual
Page 3
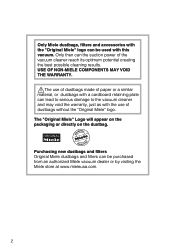
... 7 Before the first use 9 Included accessories 10 Use 12 Power cord 12 Turning the vacuum cleaner On/Off 14 Selecting the suction power setting 15 "Automatic" setting 17 Vacuum hose 18 Telescopic wand 19 Powerbrush 20 Maintenance and care 22 Purchasing new dustbags and filters 22 Which dustbags and filters are the...
... 7 Before the first use 9 Included accessories 10 Use 12 Power cord 12 Turning the vacuum cleaner On/Off 14 Selecting the suction power setting 15 "Automatic" setting 17 Vacuum hose 18 Telescopic wand 19 Powerbrush 20 Maintenance and care 22 Purchasing new dustbags and filters 22 Which dustbags and filters are the...
Operating manual
Page 4
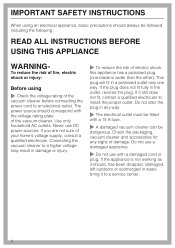
... If the plug does not fit fully in the outlet, reverse the plug. The power source should correspond with a 15 A fuse. ~ A damaged vacuum cleaner can be followed, including the following: READ ALL INSTRUCTIONS BEFORE USING THIS APPLIANCE WARNING- If you are not sure of the...voltage may result in damage or injury. ~ To reduce the risk of electric shock, this appliance has a polarized plug (one way. Check the packaging, vacuum cleaner and accessories for any way. ~ The electrical outlet must be fitted with the voltage rating plate of your home's voltage supply, consult a qualified ...
... If the plug does not fit fully in the outlet, reverse the plug. The power source should correspond with a 15 A fuse. ~ A damaged vacuum cleaner can be followed, including the following: READ ALL INSTRUCTIONS BEFORE USING THIS APPLIANCE WARNING- If you are not sure of the...voltage may result in damage or injury. ~ To reduce the risk of electric shock, this appliance has a polarized plug (one way. Check the packaging, vacuum cleaner and accessories for any way. ~ The electrical outlet must be fitted with the voltage rating plate of your home's voltage supply, consult a qualified ...
Operating manual
Page 5
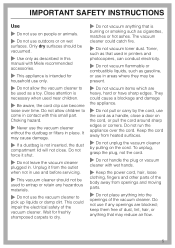
...To unplug, grasp the plug, not the cord. ~ Do not handle the plug or vacuum cleaner with Miele recommended accessories. ~ This appliance is intended for freshly shampooed carpets to dry. ~ Do not vacuum anything that is necessary when used near children. ~ Be aware, the cord clip can... conduct electricity. ~ Do not vacuum flammable or combustible liquids, such as gasoline, or use only...
...To unplug, grasp the plug, not the cord. ~ Do not handle the plug or vacuum cleaner with Miele recommended accessories. ~ This appliance is intended for freshly shampooed carpets to dry. ~ Do not vacuum anything that is necessary when used near children. ~ Be aware, the cord clip can... conduct electricity. ~ Do not vacuum flammable or combustible liquids, such as gasoline, or use only...

Operating manual
Page 6
... replaced with a dry or slightly damp cloth when disconnected from the outlet. ~ Never submerge the vacuum cleaner in accordance with the Miele quality signet and original Miele filter and accessories. Disposing of the vacuum cleaner. ~ Only use genuine Miele dustbags with national and local safety regulations. Ensure the appliance presents no danger to be performed...
... replaced with a dry or slightly damp cloth when disconnected from the outlet. ~ Never submerge the vacuum cleaner in accordance with the Miele quality signet and original Miele filter and accessories. Disposing of the vacuum cleaner. ~ Only use genuine Miele dustbags with national and local safety regulations. Ensure the appliance presents no danger to be performed...
Operating manual
Page 7
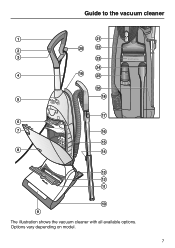
Guide to the vacuum cleaner The illustration shows the vacuum cleaner with all available options. Options vary depending on model. 7
Guide to the vacuum cleaner The illustration shows the vacuum cleaner with all available options. Options vary depending on model. 7
Operating manual
Page 8
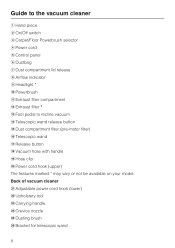
...indicator i Headlight * j Powerbrush k Exhaust filter compartment l Exhaust filter * m Foot pedal to recline vacuum n Telescopic wand release button o Dust compartment filter (pre-motor filter) p Telescopic wand q Release button r Vacuum hose with handle s Hose clip t Power cord hook (upper) The features marked * may vary ...or not be available on your model. Back of vacuum cleaner u Adjustable power cord hook (lower) v Upholstery tool w ...
...indicator i Headlight * j Powerbrush k Exhaust filter compartment l Exhaust filter * m Foot pedal to recline vacuum n Telescopic wand release button o Dust compartment filter (pre-motor filter) p Telescopic wand q Release button r Vacuum hose with handle s Hose clip t Power cord hook (upper) The features marked * may vary ...or not be available on your model. Back of vacuum cleaner u Adjustable power cord hook (lower) v Upholstery tool w ...

Operating manual
Page 9
Before the first use 9 Assembly ^ Put the vacuum cleaner in an upright position. ^ Push the handle down into the body of the vacuum cleaner until it engages (see illustration).
Before the first use 9 Assembly ^ Put the vacuum cleaner in an upright position. ^ Push the handle down into the body of the vacuum cleaner until it engages (see illustration).

Operating manual
Page 10
Upholstery tool For cleaning upholstery, mattresses, cushions, draperies, etc. 10 Included accessories The following accessories are mounted on the vacuum hose or the telescopic wand. a Upholstery tool b Crevice nozzle, 12" (300 mm) c Dusting brush with natural bristles Attach the accessory you wish to use to the handle on the rear of the vacuum cleaner.
Upholstery tool For cleaning upholstery, mattresses, cushions, draperies, etc. 10 Included accessories The following accessories are mounted on the vacuum hose or the telescopic wand. a Upholstery tool b Crevice nozzle, 12" (300 mm) c Dusting brush with natural bristles Attach the accessory you wish to use to the handle on the rear of the vacuum cleaner.

Operating manual
Page 12
Use Power cord The lower cord hook can be rotated. ^ Rotate the hook upward to release the power cord. Rewinding the power cord When the vacuum cleaner is not in use, the power cord can be wound around the two cord hooks. ^ To prevent the cord from unwinding press it into the locking groove of the plug (see insert). 12
Use Power cord The lower cord hook can be rotated. ^ Rotate the hook upward to release the power cord. Rewinding the power cord When the vacuum cleaner is not in use, the power cord can be wound around the two cord hooks. ^ To prevent the cord from unwinding press it into the locking groove of the plug (see insert). 12

Operating manual
Page 13
It also keeps the power cord from becoming caught in the vacuum cleaner ^ Guide the power cord through the notch at the side and over the upper cord hook (see illustration). Plug in the handle. Release the vacuum cleaner ^ Briefly press the foot pedal and recline the body of the vacuum cleaner to a comfortable position. Use 13 This will keep the cord in an optimal position so that it will not interfere with vacuuming.
It also keeps the power cord from becoming caught in the vacuum cleaner ^ Guide the power cord through the notch at the side and over the upper cord hook (see illustration). Plug in the handle. Release the vacuum cleaner ^ Briefly press the foot pedal and recline the body of the vacuum cleaner to a comfortable position. Use 13 This will keep the cord in an optimal position so that it will not interfere with vacuuming.

Operating manual
Page 14
ComfortLine Models: The "On" indicator on automatically. 14 Lighting (depending on model) The headlight turns on the control panel lights yellow. Use Turning the vacuum cleaner On/Off Always follow the flooring manufacturer's cleaning and care instructions. ^ Press the On/Off button on the control panel light yellow. PremiumLine Models: The suction power levels on the handle. The vacuum cleaner turns on.
ComfortLine Models: The "On" indicator on automatically. 14 Lighting (depending on model) The headlight turns on the control panel lights yellow. Use Turning the vacuum cleaner On/Off Always follow the flooring manufacturer's cleaning and care instructions. ^ Press the On/Off button on the control panel light yellow. PremiumLine Models: The suction power levels on the handle. The vacuum cleaner turns on.

Operating manual
Page 15
Depending on the hand piece. ComfortLine Models a Vacuum "On" indicator b Operation/Blockage protection indicator Yellow: the Powerbrush was turned on using the Carpet/Floor button on the model, your preference. Red: the beater bar is blocked c Rotary selector Selecting the suction power setting You can adjust the suction power to the desired setting. Rotary selector ^ Turn the suction power selector to suit your vacuum cleaner will include one of the following control panels. Use eep Pile Low P Curtains D ile Smooth 15
Depending on the hand piece. ComfortLine Models a Vacuum "On" indicator b Operation/Blockage protection indicator Yellow: the Powerbrush was turned on using the Carpet/Floor button on the model, your preference. Red: the beater bar is blocked c Rotary selector Selecting the suction power setting You can adjust the suction power to the desired setting. Rotary selector ^ Turn the suction power selector to suit your vacuum cleaner will include one of the following control panels. Use eep Pile Low P Curtains D ile Smooth 15

Operating manual
Page 16
The selected power level is recommended for: a curtains, lightweight fabrics b upholstery, cushions c thick pile carpets, rugs and runners ( energy saving, daily vacuuming with a yellow light. 16 Controls The symbols on the hand piece. +/- controls, to set the desired suction power setting c § "Thermo" indicator d Blockage protection indicator e ...
The selected power level is recommended for: a curtains, lightweight fabrics b upholstery, cushions c thick pile carpets, rugs and runners ( energy saving, daily vacuuming with a yellow light. 16 Controls The symbols on the hand piece. +/- controls, to set the desired suction power setting c § "Thermo" indicator d Blockage protection indicator e ...

Operating manual
Page 17
controls) If the "Automatic" setting is selected, the vacuum cleaner will automatically adjust the suction power level to vacuum draperies or other lightweight fabrics. To deactivate the setting, press the "Automatic" button again. ,Do not use the this setting to ...suit the surface being cleaned. ^ Press the "Automatic" button. Note: To adjust to raise the front of the vacuum cleaner. carpet edges, thresholds, etc., briefly step on the release button to changing floor heights, e.g. Use 17 "Automatic" setting (models with +/- Excessive suction...
controls) If the "Automatic" setting is selected, the vacuum cleaner will automatically adjust the suction power level to vacuum draperies or other lightweight fabrics. To deactivate the setting, press the "Automatic" button again. ,Do not use the this setting to ...suit the surface being cleaned. ^ Press the "Automatic" button. Note: To adjust to raise the front of the vacuum cleaner. carpet edges, thresholds, etc., briefly step on the release button to changing floor heights, e.g. Use 17 "Automatic" setting (models with +/- Excessive suction...

Operating manual
Page 18
...from sharp edges. When vacuuming stairs, ensure that the vacuum is placed on the telescopic wand and pull the vacuum hose handle upwards. ^ To increase the stability of injury. Do not use the vacuum hose or wand at head level. Injury can occur. Vacuum hose ^ Place the vacuum in an upright position.... ^ Press the release button on a lower step. For regular vacuuming, you will need to snap the handle back into the ...
...from sharp edges. When vacuuming stairs, ensure that the vacuum is placed on the telescopic wand and pull the vacuum hose handle upwards. ^ To increase the stability of injury. Do not use the vacuum hose or wand at head level. Injury can occur. Vacuum hose ^ Place the vacuum in an upright position.... ^ Press the release button on a lower step. For regular vacuuming, you will need to snap the handle back into the ...
Operating manual
Page 19
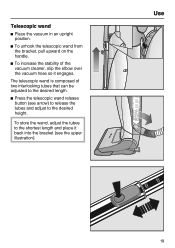
To store the wand, adjust the tubes to the shortest length and place it engages. The telescopic wand is composed of the vacuum cleaner, slip the elbow over the vacuum hose so it back into the bracket (see arrow) to release the tubes and adjust to the desired length. ^ Press the telescopic wand release button (see the upper illustration). Use 19 Telescopic wand ^ Place the vacuum in an upright position. ^ To unhook the telescopic wand from the bracket, pull upward on the handle. ^ To increase the stability of two interlocking tubes that can be adjusted to the desired height.
To store the wand, adjust the tubes to the shortest length and place it engages. The telescopic wand is composed of the vacuum cleaner, slip the elbow over the vacuum hose so it back into the bracket (see arrow) to release the tubes and adjust to the desired length. ^ Press the telescopic wand release button (see the upper illustration). Use 19 Telescopic wand ^ Place the vacuum in an upright position. ^ To unhook the telescopic wand from the bracket, pull upward on the handle. ^ To increase the stability of two interlocking tubes that can be adjusted to the desired height.

Operating manual
Page 20
... to hard wear, especially in contact with a variable or uneven surface. The Powerbrush is a danger of wall to wall carpeting and floor coverings subject to vacuum high quality, hand knotted rugs, for cleaning and restoring crushed carpet pile of the threads being pulled out. There is particularly suitable for example Berber...
... to hard wear, especially in contact with a variable or uneven surface. The Powerbrush is a danger of wall to wall carpeting and floor coverings subject to vacuum high quality, hand knotted rugs, for cleaning and restoring crushed carpet pile of the threads being pulled out. There is particularly suitable for example Berber...

Operating manual
Page 21
... control panel lights yellow. You can be switched on and off anytime the body of the vacuum cleaner is driven by a separate motor, which can also use the button to switch off the Powerbrush while vacuuming, for example when moving from carpet to clean. The Powerbrush automatically shuts off . ^ Press the "Carpet...
... control panel lights yellow. You can be switched on and off anytime the body of the vacuum cleaner is driven by a separate motor, which can also use the button to switch off the Powerbrush while vacuuming, for example when moving from carpet to clean. The Powerbrush automatically shuts off . ^ Press the "Carpet...


