
Operating manual
Page 1
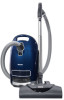
To prevent accidents and machine damage, read these instructions before installation and use. Only then can be used with the "Original Miele" logo can the suction power of the vacuum cleaner reach its optimum potential creating the best possible cleaning results. US, CA HS15 M.-Nr. 09 257 881 en - Operating Instructions Vacuum Cleaner S 8000 Only Miele dustbags, filters and accessories with this vacuum.
To prevent accidents and machine damage, read these instructions before installation and use. Only then can be used with the "Original Miele" logo can the suction power of the vacuum cleaner reach its optimum potential creating the best possible cleaning results. US, CA HS15 M.-Nr. 09 257 881 en - Operating Instructions Vacuum Cleaner S 8000 Only Miele dustbags, filters and accessories with this vacuum.

Operating manual
Page 2
... material, or dustbags with a cardboard retaining plate can be used with the use of the vacuum cleaner reach its optimum potential creating the best possible cleaning results. Purchasing new dustbags and filters Original Miele dustbags and filters can lead to serious damage to the vacuum cleaner and may void the warranty, just as with this...
... material, or dustbags with a cardboard retaining plate can be used with the use of the vacuum cleaner reach its optimum potential creating the best possible cleaning results. Purchasing new dustbags and filters Original Miele dustbags and filters can lead to serious damage to the vacuum cleaner and may void the warranty, just as with this...

Operating manual
Page 3
Contents IMPORTANT SAFETY INSTRUCTIONS 4 Guide to the vacuum 8 Before using the vacuum cleaner 10 Using the included accessories 15 Use 17 Power cord 17 Turning the vacuum cleaner on and off 18 Selecting the suction power 18 Opening the auxiliary air regulator 20 Parking, transport and storage 22 Maintenance and care 24 Purchasing ...
Contents IMPORTANT SAFETY INSTRUCTIONS 4 Guide to the vacuum 8 Before using the vacuum cleaner 10 Using the included accessories 15 Use 17 Power cord 17 Turning the vacuum cleaner on and off 18 Selecting the suction power 18 Opening the auxiliary air regulator 20 Parking, transport and storage 22 Maintenance and care 24 Purchasing ...

Operating manual
Page 4
...If the plug does not fit fully in any signs of the vacuum cleaner before connecting the power cord to install the proper outlet. Check the packaging, vacuum cleaner and accessories for any way. ~ A damaged vacuum cleaner can be dangerous. Your power source should correspond with the voltage ... not working as it should, has been dropped, damaged, left outdoors or submerged in damage to any future user. WARNING- Connecting the vacuum cleaner to a higher voltage than indicated in these operating instructions in a safe place and pass them on the underside of your home's voltage...
...If the plug does not fit fully in any signs of the vacuum cleaner before connecting the power cord to install the proper outlet. Check the packaging, vacuum cleaner and accessories for any way. ~ A damaged vacuum cleaner can be dangerous. Your power source should correspond with the voltage ... not working as it should, has been dropped, damaged, left outdoors or submerged in damage to any future user. WARNING- Connecting the vacuum cleaner to a higher voltage than indicated in these operating instructions in a safe place and pass them on the underside of your home's voltage...

Operating manual
Page 5
... supervision or instruction by a responsible person. ~ Unwind the cord completely to aid the vacuum cleaner in dissipating heat. ~ This vacuum should be vacuumed. ~ Use only as a toy. Use only Miele recommended accessories. ~ Do not alter or modify the vacuum cleaner. ~ This appliance is intended for freshly shampooed carpets to be present. Unplug it shut. ~ Do not leave...
... supervision or instruction by a responsible person. ~ Unwind the cord completely to aid the vacuum cleaner in dissipating heat. ~ This vacuum should be vacuumed. ~ Use only as a toy. Use only Miele recommended accessories. ~ Do not alter or modify the vacuum cleaner. ~ This appliance is intended for freshly shampooed carpets to be present. Unplug it shut. ~ Do not leave...

Operating manual
Page 6
...cord, or pull the cord around sharp edges or corners. For best performance, the filter bag and filters should be used with Miele vacuum cleaners. Hold plug when rewinding onto cord reel. Do not use if any openings are disposable and intended to be used at head ... of the body away from sharp edges. ~ Miele filter bags are blocked; Do not allow plug to be replaced when necessary. A full bag or blocked filter will reduce the efficiency of the vacuum cleaner. A temperature limiter automatically switches the vacuum cleaner off all filters regularly. An over the cord....
...cord, or pull the cord around sharp edges or corners. For best performance, the filter bag and filters should be used with Miele vacuum cleaners. Hold plug when rewinding onto cord reel. Do not use if any openings are disposable and intended to be used at head ... of the body away from sharp edges. ~ Miele filter bags are blocked; Do not allow plug to be replaced when necessary. A full bag or blocked filter will reduce the efficiency of the vacuum cleaner. A temperature limiter automatically switches the vacuum cleaner off all filters regularly. An over the cord....

Operating manual
Page 7
... bags with a dry cloth or slightly damp cloth when disconnected from the outlet. ~ Never submerge the vacuum cleaner in accordance with national and local safety regulations. Only use genuine Miele filter bags with a new cable reel by an authorized service agent in water. Disposing of electric shock. ~ Repairs must only be replaced along...
... bags with a dry cloth or slightly damp cloth when disconnected from the outlet. ~ Never submerge the vacuum cleaner in accordance with national and local safety regulations. Only use genuine Miele filter bags with a new cable reel by an authorized service agent in water. Disposing of electric shock. ~ Repairs must only be replaced along...
Operating manual
Page 8
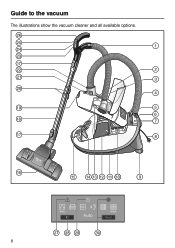
Guide to the vacuum The illustrations show the vacuum cleaner and all available options. 8
Guide to the vacuum The illustrations show the vacuum cleaner and all available options. 8

Operating manual
Page 10
Before using the vacuum cleaner Attaching the suction hose ^ Insert the elbow into the suction socket until it clicks into place. Disconnecting the hose ^ Press the release buttons on the sides of the elbow and lift the hose from the socket. 10
Before using the vacuum cleaner Attaching the suction hose ^ Insert the elbow into the suction socket until it clicks into place. Disconnecting the hose ^ Press the release buttons on the sides of the elbow and lift the hose from the socket. 10

Operating manual
Page 11
... hose at the factory. Connecting the telescopic wand and handpiece ^ Insert the handpiece into the telescopic wand until it clicks into place. Before using the vacuum cleaner Connecting the suction hose and handpiece Depending on the model, the handpiece is separate, it just needs to be connected to direct insertion. ^ To separate...
... hose at the factory. Connecting the telescopic wand and handpiece ^ Insert the handpiece into the telescopic wand until it clicks into place. Before using the vacuum cleaner Connecting the suction hose and handpiece Depending on the model, the handpiece is separate, it just needs to be connected to direct insertion. ^ To separate...

Operating manual
Page 12
... button and slide the tubes to scratching. For other floor coverings, we recommend using the vacuum cleaner Adjusting the two-piece telescopic wand This telescopic wand is not susceptible to the desired length. Before using the special Miele brushes (see the section on the telescopic wand and twist back and forth until it...
... button and slide the tubes to scratching. For other floor coverings, we recommend using the vacuum cleaner Adjusting the two-piece telescopic wand This telescopic wand is not susceptible to the desired length. Before using the special Miele brushes (see the section on the telescopic wand and twist back and forth until it...

Operating manual
Page 13
Always use the floor tool with the bristles raised to achieve good cleaning results with very deep joints or gaps. Before using the vacuum cleaner Adjusting the floor brush Observe the cleaning instructions of the floor manufacturer. To clean hard flooring, raise the tool by ^ pressing the foot switch marked ...
Always use the floor tool with the bristles raised to achieve good cleaning results with very deep joints or gaps. Before using the vacuum cleaner Adjusting the floor brush Observe the cleaning instructions of the floor manufacturer. To clean hard flooring, raise the tool by ^ pressing the foot switch marked ...

Operating manual
Page 14
d Replace the batter holder in the direction of the cover to remove. c Take out the battery holder and insert the three batteries supplied making sure they are inserted correctly. e Replace the cover and tighten the screws. 14 Before using the vacuum cleaner Inserting batteries into the LED handle a Loosen the screws on the holder and battery compartment, so that both sides of the arrows on the cover. b Press down on both line up.
d Replace the batter holder in the direction of the cover to remove. c Take out the battery holder and insert the three batteries supplied making sure they are inserted correctly. e Replace the cover and tighten the screws. 14 Before using the vacuum cleaner Inserting batteries into the LED handle a Loosen the screws on the holder and battery compartment, so that both sides of the arrows on the cover. b Press down on both line up.

Operating manual
Page 15
... with natural bristles For cleaning moldings, ornate, carved or especially sensitive items. The brush head can be swiveled to the optimal cleaning position. Turbobrush These vacuum cleaners have separate operating instructions for the corresponding accessory. 15 c Upholstery tool For cleaning upholstery, mattresses, cushions, curtains, covers, etc. Powerbrush - b Dust brush with one of...
... with natural bristles For cleaning moldings, ornate, carved or especially sensitive items. The brush head can be swiveled to the optimal cleaning position. Turbobrush These vacuum cleaners have separate operating instructions for the corresponding accessory. 15 c Upholstery tool For cleaning upholstery, mattresses, cushions, curtains, covers, etc. Powerbrush - b Dust brush with one of...

Operating manual
Page 17
... to whip when rewinding. Hold the plug when rewinding onto cord reel. Do not unplug by the cord, use the vacuum cleaner for more than 30 minutes, you intend to aid the vacuum in dissipating heat. Do not allow plug to the desired length (max. This appliance is to help prevent overheating and...
... to whip when rewinding. Hold the plug when rewinding onto cord reel. Do not unplug by the cord, use the vacuum cleaner for more than 30 minutes, you intend to aid the vacuum in dissipating heat. Do not allow plug to the desired length (max. This appliance is to help prevent overheating and...

Operating manual
Page 18
On the vacuum cleaner you reduce the suction power, the floor brush can adjust the suction power to move across the carpeting reduce the suction power. 18 Thick pile ... situation. Hard flooring and intensive cleaning of which power level is recommended for which purpose. Use Turning the vacuum cleaner on and off ^ Press the On/Off foot switch s. Draperies, fabrics $ - Energy-efficient everyday vacuuming, low noise ( - Upholstery, pillows % - When you will see various symbols showing examples of carpets. ,If the floor tool...
On the vacuum cleaner you reduce the suction power, the floor brush can adjust the suction power to move across the carpeting reduce the suction power. 18 Thick pile ... situation. Hard flooring and intensive cleaning of which power level is recommended for which purpose. Use Turning the vacuum cleaner on and off ^ Press the On/Off foot switch s. Draperies, fabrics $ - Energy-efficient everyday vacuuming, low noise ( - Upholstery, pillows % - When you will see various symbols showing examples of carpets. ,If the floor tool...

Operating manual
Page 19
... higher power setting, press the + foot switch. ^ To select a lower power setting, press the - The next time it is used for the first time, the vacuum cleaner will turn on to such items. ^ To select a higher power setting, press the + foot switch. ^ To select a lower power setting, press the - Automatic foot... one of the suction power to the flooring ,Do NOT use the "Auto" power level to vacuum draperies or other lightweight fabrics. The next time it is used for the first time, the vacuum cleaner turns on to the "Auto" power level. Foot switches When used , it turns on to ...
... higher power setting, press the + foot switch. ^ To select a lower power setting, press the - The next time it is used for the first time, the vacuum cleaner will turn on to such items. ^ To select a higher power setting, press the + foot switch. ^ To select a lower power setting, press the - Automatic foot... one of the suction power to the flooring ,Do NOT use the "Auto" power level to vacuum draperies or other lightweight fabrics. The next time it is used for the first time, the vacuum cleaner turns on to the "Auto" power level. Foot switches When used , it turns on to ...

Operating manual
Page 20
...vacuuming The vacuum cleaner can easily reduce the suction power briefly to prevent the brush from sticking to push. Be certain to continuously touch this inlay when vacuuming fine dust, flour or sawdust as these materials are more likely to hold the handpiece in the other hand. 20 To further prevent static discharge while vacuuming..., pull the vacuum along by the hose with one hand while continuing to create a static electricity. This reduces the suction so the...
...vacuuming The vacuum cleaner can easily reduce the suction power briefly to prevent the brush from sticking to push. Be certain to continuously touch this inlay when vacuuming fine dust, flour or sawdust as these materials are more likely to hold the handpiece in the other hand. 20 To further prevent static discharge while vacuuming..., pull the vacuum along by the hose with one hand while continuing to create a static electricity. This reduces the suction so the...

Operating manual
Page 21
It will turn itself off automatically after approx. 30 seconds. Use 21 Illuminating the work area Your vacuum cleaner is equipped with an LED on the handle to illuminate the work area (depending on model). ^ Press the I button on the LED handle.
It will turn itself off automatically after approx. 30 seconds. Use 21 Illuminating the work area Your vacuum cleaner is equipped with an LED on the handle to illuminate the work area (depending on model). ^ Press the I button on the LED handle.

Operating manual
Page 22
a ramp, slide the tube sections of the telescopic wand all the way in. Lifting the suction unit out turns the vacuum cleaner automatically back on model) The vacuum cleaner is on the suction unit into the Park-System. Turning on and off if you to park the telescopic wand and the ...suction unit on the vacuum cleaner during brief pauses. ^ Insert the parking clip attachment on an incline, e.g. If the vacuum is automatically turned off with the Park-System (depending on using the last selected power level. 22...
a ramp, slide the tube sections of the telescopic wand all the way in. Lifting the suction unit out turns the vacuum cleaner automatically back on model) The vacuum cleaner is on the suction unit into the Park-System. Turning on and off if you to park the telescopic wand and the ...suction unit on the vacuum cleaner during brief pauses. ^ Insert the parking clip attachment on an incline, e.g. If the vacuum is automatically turned off with the Park-System (depending on using the last selected power level. 22...


