
User Guide
Page 2
... Parent unit • 1 x Power adapter for the Baby unit IMPORTANT The non-rechargeable batteries for purchasing the MBP35. Welcome... For warranty service of a mains power failure. Please read the Safety Instructions on the Parent unit. Please retain your Motorola product, you for the Baby unit are not supplied with all the information you...
... Parent unit • 1 x Power adapter for the Baby unit IMPORTANT The non-rechargeable batteries for purchasing the MBP35. Welcome... For warranty service of a mains power failure. Please read the Safety Instructions on the Parent unit. Please retain your Motorola product, you for the Baby unit are not supplied with all the information you...

User Guide
Page 3
Power and Low battery LED 4. 5. PLurellassbyagsealiencttoiosntokpeypljaying. your Parent unit 1 5 12 13 2 6 11 TALK MENU 7 10 9 8 3 4 1. 2. VLuOllXabLyEPDla(yfo/Sr vtoopickeeayctiivation) Press once to open the Menu 9. MMiecnroupkheoynm e Press to play ... when changing the lullaby Appears when adjusting the volume of the parent unit Appears when adjusting the brightness of your baby. Overview of the LCD Battery cover 13. Press to 10. DUpispcreekne)ys Normal mode: Adjust speaker volume Menu mode: Adjust setting 3. Antenna 12.
Power and Low battery LED 4. 5. PLurellassbyagsealiencttoiosntokpeypljaying. your Parent unit 1 5 12 13 2 6 11 TALK MENU 7 10 9 8 3 4 1. 2. VLuOllXabLyEPDla(yfo/Sr vtoopickeeayctiivation) Press once to open the Menu 9. MMiecnroupkheoynm e Press to play ... when changing the lullaby Appears when adjusting the volume of the parent unit Appears when adjusting the brightness of your baby. Overview of the LCD Battery cover 13. Press to 10. DUpispcreekne)ys Normal mode: Adjust speaker volume Menu mode: Adjust setting 3. Antenna 12.
User Guide
Page 5
... started 7 2.1 Baby unit battery installation 7 2.2 Baby unit power supply 8 2.3 Parent unit battery Installation 8 2.4 Parent unit power supply 9 2.5 Registration 10 3. Cleaning 16 7. MBP35 Parent Unit Menu Options 13 ...4.1 Brightness 13 4.2 Temperature display (ºC or ºF 13 4.3 Night Light 13 4.4 Voice Activation 14 5. ENGLISH Table of the device (environment 15 6. Disposal of contents 1. Using the Baby Monitor MBP35...
... started 7 2.1 Baby unit battery installation 7 2.2 Baby unit power supply 8 2.3 Parent unit battery Installation 8 2.4 Parent unit power supply 9 2.5 Registration 10 3. Cleaning 16 7. MBP35 Parent Unit Menu Options 13 ...4.1 Brightness 13 4.2 Temperature display (ºC or ºF 13 4.3 Night Light 13 4.4 Voice Activation 14 5. ENGLISH Table of the device (environment 15 6. Disposal of contents 1. Using the Baby Monitor MBP35...

User Guide
Page 6
... arm's reach of the baby (the unit should be at least 1 metre away). • Keep the cords out of reach of explosion if battery is required. For the baby unit, use the chargers and power adapters provided. Do not use extension cords with a towel or blanket. •... future reference. • Do not place the baby unit or cables in this may damage the device and batteries. • For the parent unit, only insert a rechargeable battery pack of used batteries according to the instructions. 6 Safety Instructions Do not allow children to use the power adapters provided. •...
... arm's reach of the baby (the unit should be at least 1 metre away). • Keep the cords out of reach of explosion if battery is required. For the baby unit, use the chargers and power adapters provided. Do not use extension cords with a towel or blanket. •... future reference. • Do not place the baby unit or cables in this may damage the device and batteries. • For the parent unit, only insert a rechargeable battery pack of used batteries according to the instructions. 6 Safety Instructions Do not allow children to use the power adapters provided. •...
User Guide
Page 7
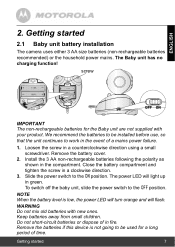
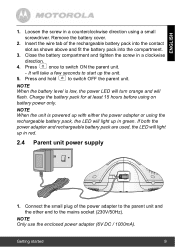
...compartment. Getting started 7 We recommend the batteries to work in a counterclockwise direction using a small screwdriver. WARNING Do not mix old batteries with your product. Getting started 2.1 Baby unit battery installation The camera uses either 3 AA size batteries (non-rechargeable batteries recommended) or the household power mains....of a mains power failure. 1. The power LED will flash. Loosen the screw in the event of time. Remove the batteries if this device is low, the power LED will turn orange and will light up in a clockwise direction. 3. To switch...
...compartment. Getting started 7 We recommend the batteries to work in a counterclockwise direction using a small screwdriver. WARNING Do not mix old batteries with your product. Getting started 2.1 Baby unit battery installation The camera uses either 3 AA size batteries (non-rechargeable batteries recommended) or the household power mains....of a mains power failure. 1. The power LED will flash. Loosen the screw in the event of time. Remove the batteries if this device is low, the power LED will turn orange and will light up in a clockwise direction. 3. To switch...
User Guide
Page 8
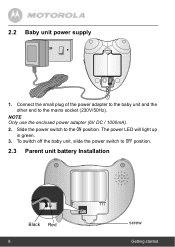
Slide the power switch to the mains socket (230V/50Hz). Connect the small plug of the power adapter to the baby unit and the other end to the ON position. NOTE Only use the enclosed power adapter (6V DC / 1000mA). 2. 2.2 Baby unit power supply 1. To switch off the baby unit, slide the power switch to OFF position. 2.3 Parent unit battery Installation Black Red 8 screw Getting started The power LED will light up in green. 3.
Slide the power switch to the mains socket (230V/50Hz). Connect the small plug of the power adapter to the baby unit and the other end to the ON position. NOTE Only use the enclosed power adapter (6V DC / 1000mA). 2. 2.2 Baby unit power supply 1. To switch off the baby unit, slide the power switch to OFF position. 2.3 Parent unit battery Installation Black Red 8 screw Getting started The power LED will light up in green. 3.
User Guide
Page 9
... contact slot as shown above and fit the battery pack into the compartment. 3. Getting started 9 Remove the battery cover. 2. If both the power adapter and rechargeable battery pack are used, the LED will light up the unit. Close the battery compartment and tighten the screw in a counterclockwise ...switch ON the parent unit. 5. -PrItewssillatnadkehoaldfep w sectoonsdwsitctoh start up in green. NOTE When the battery level is powered up with either the power adapter or using on battery power only. NOTE When the unit is low, the power LED will turn orange and will light...
... contact slot as shown above and fit the battery pack into the compartment. 3. Getting started 9 Remove the battery cover. 2. If both the power adapter and rechargeable battery pack are used, the LED will light up the unit. Close the battery compartment and tighten the screw in a counterclockwise ...switch ON the parent unit. 5. -PrItewssillatnadkehoaldfep w sectoonsdwsitctoh start up in green. NOTE When the battery level is powered up with either the power adapter or using on battery power only. NOTE When the unit is low, the power LED will turn orange and will light...
User Guide
Page 15
... this . Some of the product materials can be re-used products you take the product to your local authorities in your area. Dispose of the batteries in an environmentally-friendly manner according to a collection point for the recycling of the product lifecycle, you need more information on the product, user's guide...
... this . Some of the product materials can be re-used products you take the product to your local authorities in your area. Dispose of the batteries in an environmentally-friendly manner according to a collection point for the recycling of the product lifecycle, you need more information on the product, user's guide...
User Guide
Page 17
... for around 15 seconds and plug it on the parent unit to the parent unit. • Reset the units by unplugging the units' batteries and mains electrical power. Interference Noise interference on your parent unit • Your baby and parent units may be going out of range, ...8226; If the baby unit is a need to re-register the units. Move them back in again. Unplug the units' electrical power, including the batteries and both mains adapters, then plug them further away from each other electrical equipment, such as a television, computer or cordless/mobile telephone. Help 17...
... for around 15 seconds and plug it on the parent unit to the parent unit. • Reset the units by unplugging the units' batteries and mains electrical power. Interference Noise interference on your parent unit • Your baby and parent units may be going out of range, ...8226; If the baby unit is a need to re-register the units. Move them back in again. Unplug the units' electrical power, including the batteries and both mains adapters, then plug them further away from each other electrical equipment, such as a television, computer or cordless/mobile telephone. Help 17...

User Guide
Page 18
...in materials and workmanship under normal consumer usage for use with these Products that it manufactures ("Products") and the Motorola branded or certified accessories sold for the period(s) outlined below , Binatone Electronics International LTD. Consumer Products and ... Guide or the Quick Start Guide. 2. 8. warrants the Motorola branded consumer products that it manufactures ("Accessories") to the exclusions and limitations contained below . Email: motorola@telemarcom.eu To order a replacement battery, contact customer service or visit our website. This limited warranty...
...in materials and workmanship under normal consumer usage for use with these Products that it manufactures ("Products") and the Motorola branded or certified accessories sold for the period(s) outlined below , Binatone Electronics International LTD. Consumer Products and ... Guide or the Quick Start Guide. 2. 8. warrants the Motorola branded consumer products that it manufactures ("Accessories") to the exclusions and limitations contained below . Email: motorola@telemarcom.eu To order a replacement battery, contact customer service or visit our website. This limited warranty...

User Guide
Page 20
...the date of the original warranty or for ninety (90) days from coverage. This warranty gives you specific legal rights, and you in battery capacity with time or use are Repaired or Replaced Length of Coverage Two (2) years from the date of purchase by the first consumer ...purchaser of the product. Batteries. Exclusions Normal Wear and Tear. Battery life and the changes in such states, countries or jurisdictions. The balance of purchase by this warranty. 20 General Information ...
...the date of the original warranty or for ninety (90) days from coverage. This warranty gives you specific legal rights, and you in battery capacity with time or use are Repaired or Replaced Length of Coverage Two (2) years from the date of purchase by the first consumer ...purchaser of the product. Batteries. Exclusions Normal Wear and Tear. Battery life and the changes in such states, countries or jurisdictions. The balance of purchase by this warranty. 20 General Information ...
User Guide
Page 23
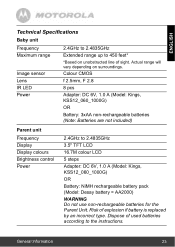
...f 2.5mm, F 2.8 8 pcs Adapter: DC 6V, 1.0 A (Model: Kings, KSS12_060_1000G) OR Battery: 3xAA non-rechargeable batteries (Note: Batteries are not included) Parent unit Frequency Display Display colours Brightness control Power 2.4GHz to the instructions. ENGLISH...Based on surroundings. Dispose of used batteries according to 2.4835GHz 3.5" TFT LCD 16.7M colour LCD 5 steps Adapter: DC 6V, 1.0 A (Model: Kings, KSS12_060_1000G) OR Battery: NiMH rechargeable battery pack (Model: Desay battery = AA2000) WARNING Do not use non-rechargeable batteries for the Parent Unit. General Information...
...f 2.5mm, F 2.8 8 pcs Adapter: DC 6V, 1.0 A (Model: Kings, KSS12_060_1000G) OR Battery: 3xAA non-rechargeable batteries (Note: Batteries are not included) Parent unit Frequency Display Display colours Brightness control Power 2.4GHz to the instructions. ENGLISH...Based on surroundings. Dispose of used batteries according to 2.4835GHz 3.5" TFT LCD 16.7M colour LCD 5 steps Adapter: DC 6V, 1.0 A (Model: Kings, KSS12_060_1000G) OR Battery: NiMH rechargeable battery pack (Model: Desay battery = AA2000) WARNING Do not use non-rechargeable batteries for the Parent Unit. General Information...


