Quick Start Guide
Page 4
... Guide. 2. Press to your product is not working properly... 1. Slide the power switch forward to pan the camera left / right in normal mode. General Information If your baby. MOTOROLA and the Stylized M Logo, are used under license. Printed in normal mode. Press to switch on the Unit....LCD display on /off the Unit. 3. Read this product. 2. Press to switch off the Unit. and are trademarks or registered trademarks of Motorola Trademark Holdings, LLC. All other trademarks are the property of the keys US EN Parent Unit P Power ON/OFF button +- Slide the power...
... Guide. 2. Press to your product is not working properly... 1. Slide the power switch forward to pan the camera left / right in normal mode. General Information If your baby. MOTOROLA and the Stylized M Logo, are used under license. Printed in normal mode. Press to switch on the Unit....LCD display on /off the Unit. 3. Read this product. 2. Press to switch off the Unit. and are trademarks or registered trademarks of Motorola Trademark Holdings, LLC. All other trademarks are the property of the keys US EN Parent Unit P Power ON/OFF button +- Slide the power...
User Guide
Page 2
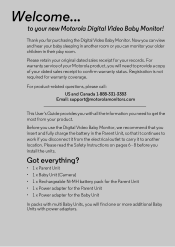
...so that it continues to work if you can view and hear your baby sleeping in their play room. For warranty service of your Motorola product, you will find one or more additional Baby Units with multi Baby Units, you can monitor your records. Please read the Safety ... the electrical outlet to another room or you disconnect it to carry it from your product. Got everything? • 1 x Parent Unit • 1 x Baby Unit (Camera) • 1 x Rechargeable Ni-MH battery pack for the Parent Unit • 1 x Power adapter for the Parent Unit • 1 x Power adapter for warranty ...
...so that it continues to work if you can view and hear your baby sleeping in their play room. For warranty service of your Motorola product, you will find one or more additional Baby Units with multi Baby Units, you can monitor your records. Please read the Safety ... the electrical outlet to another room or you disconnect it to carry it from your product. Got everything? • 1 x Parent Unit • 1 x Baby Unit (Camera) • 1 x Rechargeable Ni-MH battery pack for the Parent Unit • 1 x Power adapter for the Parent Unit • 1 x Power adapter for warranty ...
User Guide
Page 4
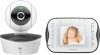
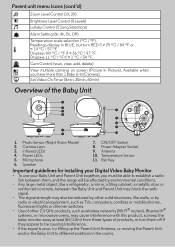
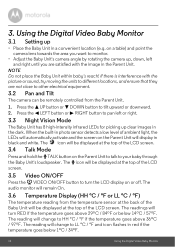
... Important guidelines for installing your Digital Video Baby Monitor • To use your Baby Unit and Parent Unit together, you have more than 1 Baby Unit (Camera). Microphone 6. ON/OFF Switch 8. Speaker 7. Displays HH ºC / ºF if > 36 ºC / 97 ºF. Displays LL ºC / ... the baby monitor away at least 5ft (1.5m) from these types of the Baby Unit 1 2 3 9 4 6 11 8 7 5 10 1. Camera Lens 3. Power Adapter Socket 9. Temperature Sensor 11. Antenna 10. Parent unit menu icons (cont'd) Zoom Level Control (1X, 2X) & Brightness Level Control...
... Important guidelines for installing your Digital Video Baby Monitor • To use your Baby Unit and Parent Unit together, you have more than 1 Baby Unit (Camera). Microphone 6. ON/OFF Switch 8. Speaker 7. Displays HH ºC / ºF if > 36 ºC / 97 ºF. Displays LL ºC / ... the baby monitor away at least 5ft (1.5m) from these types of the Baby Unit 1 2 3 9 4 6 11 8 7 5 10 1. Camera Lens 3. Power Adapter Socket 9. Temperature Sensor 11. Antenna 10. Parent unit menu icons (cont'd) Zoom Level Control (1X, 2X) & Brightness Level Control...
User Guide
Page 5
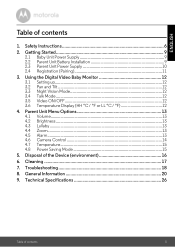
Parent Unit Menu Options 13 4.1 Volume...13 4.2 Brightness 13 4.3 Lullaby...13 4.4 Zoom...13 4.5 Alarm...13 4.6 Camera Control 14 4.7 Temperature 15 4.8 Power Saving Mode 15 5. Troubleshooting 18 8. Disposal of contents 5 Cleaning 17 7. Getting Started 9 2.1 Baby Unit Power Supply 9 2.2 Parent Unit Battery Installation 9 2.3 ...
Parent Unit Menu Options 13 4.1 Volume...13 4.2 Brightness 13 4.3 Lullaby...13 4.4 Zoom...13 4.5 Alarm...13 4.6 Camera Control 14 4.7 Temperature 15 4.8 Power Saving Mode 15 5. Troubleshooting 18 8. Disposal of contents 5 Cleaning 17 7. Getting Started 9 2.1 Baby Unit Power Supply 9 2.2 Parent Unit Battery Installation 9 2.3 ...

User Guide
Page 11
...Parent Unit and the menu bar will pop up . 3. Press the < LEFT button or > RIGHT button until the Parent Unit finds the camera, beeps and the video from the camera appears. The menu will pop up to indicate that the battery is displayed for 5 seconds, followed by a battery icon for...16 seconds to indicate that the power adapter is plugged in. 2.4 Registration (Pairing) The Baby Unit is highlighted. DOWN button to select the desired Camera and press the O button to be recharged. Press the O button to register it is charging. If the Parent Unit is powered off the Parent...
...Parent Unit and the menu bar will pop up . 3. Press the < LEFT button or > RIGHT button until the Parent Unit finds the camera, beeps and the video from the camera appears. The menu will pop up to indicate that the battery is displayed for 5 seconds, followed by a battery icon for...16 seconds to indicate that the power adapter is plugged in. 2.4 Registration (Pairing) The Baby Unit is highlighted. DOWN button to select the desired Camera and press the O button to be recharged. Press the O button to register it is charging. If the Parent Unit is powered off the Parent...
User Guide
Page 12
... LCD screen. 3.4 Talk Mode Press and hold the T TALK button on a table) and point the camera lens towards the area you are not close to other electrical equipment. 3.2 Pan and Tilt The camera can be displayed at the top of ambient light, the LEDs will automatically activate and the screen... on or off. on the Parent Unit to talk to monitor. • Adjust the Baby Unit's camera angle by rotating the camera up clear images in black and white. The reading will display in the dark. The readings will change to HH °C / °...
... LCD screen. 3.4 Talk Mode Press and hold the T TALK button on a table) and point the camera lens towards the area you are not close to other electrical equipment. 3.2 Pan and Tilt The camera can be displayed at the top of ambient light, the LEDs will automatically activate and the screen... on or off. on the Parent Unit to talk to monitor. • Adjust the Baby Unit's camera angle by rotating the camera up clear images in black and white. The reading will display in the dark. The readings will change to HH °C / °...

User Guide
Page 14
...hold the PAIR button underneath the Baby Unit until is highlighted. Press the < LEFT button or > RIGHT button until the Parent Unit finds the camera, beeps and the picture from that registration. 14 Parent Unit Menu Options Press the + UP button or - DOWN button to select , and...LED will pop up. 2. will pop up . 4. Press the M button and the menu bar will pop up . 2. NOTE A camera can only be registered to start searching for a camera unit. will pop up . 4. Press the < LEFT button or > RIGHT button until is highlighted. Press the + UP button or -...
...hold the PAIR button underneath the Baby Unit until is highlighted. Press the < LEFT button or > RIGHT button until the Parent Unit finds the camera, beeps and the picture from that registration. 14 Parent Unit Menu Options Press the + UP button or - DOWN button to select , and...LED will pop up. 2. will pop up . 4. Press the M button and the menu bar will pop up . 2. NOTE A camera can only be registered to start searching for a camera unit. will pop up . 4. Press the < LEFT button or > RIGHT button until is highlighted. Press the + UP button or -...
User Guide
Page 15
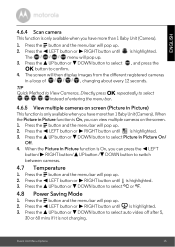
...button until V is only available when you have more than 1 Baby Unit (Camera). 1. The menu will then display images from the different registered cameras in Picture) This function is highlighted. 3. TIP Quick Method to switch between cameras. 4.7 Temperature 1. Press the + UP button or - Press the < ...pop up . 3. When the Picture in Picture function is only available when you can view multiple cameras on screen (Picture in a loop of entering the menu bar. 4.6.5 View multiple cameras on the screen. 1. When the Picture in Picture On/ Off. 4. Press the + UP button...
...button until V is only available when you have more than 1 Baby Unit (Camera). 1. The menu will then display images from the different registered cameras in Picture) This function is highlighted. 3. TIP Quick Method to switch between cameras. 4.7 Temperature 1. Press the + UP button or - Press the < ...pop up . 3. When the Picture in Picture function is only available when you can view multiple cameras on screen (Picture in a loop of entering the menu bar. 4.6.5 View multiple cameras on the screen. 1. When the Picture in Picture On/ Off. 4. Press the + UP button...
User Guide
Page 18
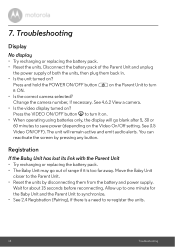
... emit audio alerts. Disconnect the battery pack of the Parent Unit and unplug the power supply of range if it ON. • Is the correct camera selected? The unit will go out of both the units, then plug them from the battery and power supply. See 4.6.2 View...
... emit audio alerts. Disconnect the battery pack of the Parent Unit and unplug the power supply of range if it ON. • Is the correct camera selected? The unit will go out of both the units, then plug them from the battery and power supply. See 4.6.2 View...
