User Guide
Page 2
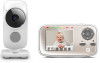
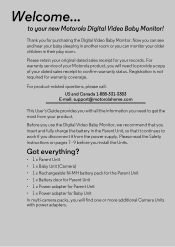
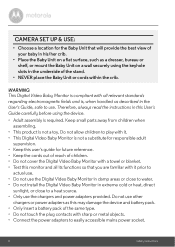
... required for your new Motorola Digital Video Baby Monitor! Please read the Safety Instructions on pages 7 - 9 before you can see and hear your product. Got everything? • 1 x Parent Unit • 1 x Baby Unit (Camera) • 1 x Rechargeable Ni-MH battery pack for the Parent Unit • 1 x Battery door for Parent Unit ...coverage. Before you use the Digital Video Baby Monitor, we recommend that you insert and fully charge the battery in another room or you install the Units. Thank you disconnect it continues to confirm warranty status. For warranty service of your...
... required for your new Motorola Digital Video Baby Monitor! Please read the Safety Instructions on pages 7 - 9 before you can see and hear your product. Got everything? • 1 x Parent Unit • 1 x Baby Unit (Camera) • 1 x Rechargeable Ni-MH battery pack for the Parent Unit • 1 x Battery door for Parent Unit ...coverage. Before you use the Digital Video Baby Monitor, we recommend that you insert and fully charge the battery in another room or you install the Units. Thank you disconnect it continues to confirm warranty status. For warranty service of your...
User Guide
Page 3
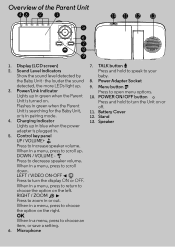
TALK button T 2. the louder the sound 8. Battery Cover 12. Control key panel UP / VOLUME+ Press to scroll down. When in a menu, press to increase speaker volume. Sound Level indicators Press and hold ...
TALK button T 2. the louder the sound 8. Battery Cover 12. Control key panel UP / VOLUME+ Press to scroll down. When in a menu, press to increase speaker volume. Sound Level indicators Press and hold ...

User Guide
Page 4
Parent Unit menu icons Signal Level Indication (4 Levels) Night Vision Mode (Video also changes to Black/White) Battery Level Indication (4 Levels) Volume Level Control (5 Levels) Camera Control (scan, view, add, delete) Set Video On Timer (OFF, 5min, 30min, 60min) Brightness Level Control (5 Levels) ...
Parent Unit menu icons Signal Level Indication (4 Levels) Night Vision Mode (Video also changes to Black/White) Battery Level Indication (4 Levels) Volume Level Control (5 Levels) Camera Control (scan, view, add, delete) Set Video On Timer (OFF, 5min, 30min, 60min) Brightness Level Control (5 Levels) ...
User Guide
Page 6
... and Replace a Baby Unit 17 4.9 Multi-Camera Use 18 5. General Information 45 10. Help...37 9. Getting Started 10 2.1 Baby Unit Power Supply 10 2.2 Parent Unit Battery Installation 10 2.3 Parent Unit Power Supply 11 2.4 Registration (Pairing 12 3. Table of contents 1.
... and Replace a Baby Unit 17 4.9 Multi-Camera Use 18 5. General Information 45 10. Help...37 9. Getting Started 10 2.1 Baby Unit Power Supply 10 2.2 Parent Unit Battery Installation 10 2.3 Parent Unit Power Supply 11 2.4 Registration (Pairing 12 3. Table of contents 1.
User Guide
Page 8
... play with it prior to actual use. • Do not use other chargers or power adapters as this may damage the device and battery pack. • Only insert a battery pack of children. • Do not cover the Digital Video Baby Monitor with a towel or blanket. • Test this user's guide for the...
... play with it prior to actual use. • Do not use other chargers or power adapters as this may damage the device and battery pack. • Only insert a battery pack of children. • Do not cover the Digital Video Baby Monitor with a towel or blanket. • Test this user's guide for the...
User Guide
Page 9
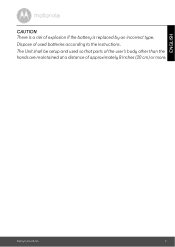
ENGLISH CAUTION There is replaced by an incorrect type. Dispose of explosion if the battery is a risk of used so that parts of the user's body other than the hands are maintained at a distance of approximately 8 inches (20 cm) or more. The Unit shall be setup and used batteries according to the instructions. Safety Instructions 9
ENGLISH CAUTION There is replaced by an incorrect type. Dispose of explosion if the battery is a risk of used so that parts of the user's body other than the hands are maintained at a distance of approximately 8 inches (20 cm) or more. The Unit shall be setup and used batteries according to the instructions. Safety Instructions 9
User Guide
Page 11
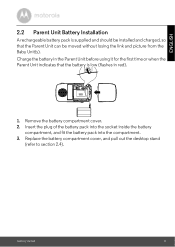
... 2.4). Getting Started 11 Remove the battery compartment cover. 2. Charge the battery in the Parent Unit before using it for the first time or when the Parent Unit indicates that the Parent Unit can be installed and charged, so that the battery is low (flashes in red). ...1. Insert the plug of the battery pack into the socket inside the battery compartment, and fit the battery pack into the compartment. 3. ENGLISH 2.2 Parent Unit Battery Installation A rechargeable battery pack is supplied and should be moved...
... 2.4). Getting Started 11 Remove the battery compartment cover. 2. Charge the battery in the Parent Unit before using it for the first time or when the Parent Unit indicates that the Parent Unit can be installed and charged, so that the battery is low (flashes in red). ...1. Insert the plug of the battery pack into the socket inside the battery compartment, and fit the battery pack into the compartment. 3. ENGLISH 2.2 Parent Unit Battery Installation A rechargeable battery pack is supplied and should be moved...
User Guide
Page 12
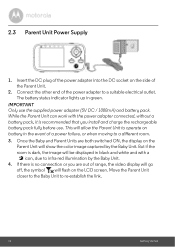
... you are both switched ON, the display on the side of a power failure, or when moving to infra-red illumination by the Baby Unit. The battery status indicator lights up in the event of the Parent Unit. 2. Insert the DC plug of the power adapter to re-establish the link. 12... the power adapter into the DC socket on the Parent Unit will be displayed in black and white and with the power adapter connected, without a battery pack, it is dark, the image will show the color image captured by the Baby Unit. 4. Move the Parent Unit closer to the Baby Unit...
... you are both switched ON, the display on the side of a power failure, or when moving to infra-red illumination by the Baby Unit. The battery status indicator lights up in the event of the Parent Unit. 2. Insert the DC plug of the power adapter to re-establish the link. 12... the power adapter into the DC socket on the Parent Unit will be displayed in black and white and with the power adapter connected, without a battery pack, it is dark, the image will show the color image captured by the Baby Unit. 4. Move the Parent Unit closer to the Baby Unit...
User Guide
Page 35
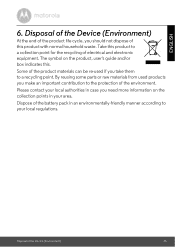
.../or box indicates this. ENGLISH 6. Some of the environment. By reusing some parts or raw materials from used if you should not dispose of the battery pack in your local regulations. Dispose of this product to the protection of the product materials can be re-used products you make an important...
.../or box indicates this. ENGLISH 6. Some of the environment. By reusing some parts or raw materials from used if you should not dispose of the battery pack in your local regulations. Dispose of this product to the protection of the product materials can be re-used products you make an important...
User Guide
Page 37
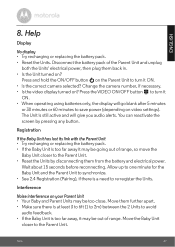
.... • Is the Unit turned on video settings). Press the VIDEO ON/OFF button to turn it ON. • When operating using batteries only, the display will give you audio alerts. You can reactivate the screen by disconnecting them further apart. • Make sure there is ...close. ENGLISH 8. Interference Noise interference on the Parent Unit to re-register the Units. Wait about 15 seconds before reconnecting. Move them from the battery and electrical power. Move the Baby Unit closer to synchronize. • See 2.4 Registration (Pairing), if there is too far away it may...
.... • Is the Unit turned on video settings). Press the VIDEO ON/OFF button to turn it ON. • When operating using batteries only, the display will give you audio alerts. You can reactivate the screen by disconnecting them further apart. • Make sure there is ...close. ENGLISH 8. Interference Noise interference on the Parent Unit to re-register the Units. Wait about 15 seconds before reconnecting. Move them from the battery and electrical power. Move the Baby Unit closer to synchronize. • See 2.4 Registration (Pairing), if there is too far away it may...
User Guide
Page 45
...product is not transferable. What will at US and Canada 1-888-331-3383 E-mail: [email protected] To order a replacement battery pack for the period outlined below , BINATONE warrants that it manufactured to the exclusions contained below . ENGLISH 9. BINATONE or its... Warranty. Visit our website: www.motorolastore.com 3. Who is not transferable. This Warranty extends only to this product that this Motorola branded product ("Product") or certified accessory ("Accessory") sold for use functionally equivalent reconditioned/ refurbished/ pre-owned or new Products, ...
...product is not transferable. What will at US and Canada 1-888-331-3383 E-mail: [email protected] To order a replacement battery pack for the period outlined below , BINATONE warrants that it manufactured to the exclusions contained below . ENGLISH 9. BINATONE or its... Warranty. Visit our website: www.motorolastore.com 3. Who is not transferable. This Warranty extends only to this product that this Motorola branded product ("Product") or certified accessory ("Accessory") sold for use functionally equivalent reconditioned/ refurbished/ pre-owned or new Products, ...
User Guide
Page 47
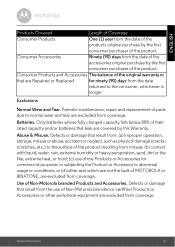
...Periodic maintenance, repair and replacement of parts due to normal wear and tear are excluded from coverage. Only batteries whose fully charged capacity falls below 80% of their rated capacity and/or batteries that result from: (a) improper operation, storage, misuse or abuse, accident or neglect, such as physical... for ninety (90) days from the date of the products original purchase by this Warranty. Use of the product. Batteries. or (d) other peripheral equipment are covered by the first consumer purchaser of Non-Motorola branded Products and Accessories. Abuse & Misuse.
...Periodic maintenance, repair and replacement of parts due to normal wear and tear are excluded from coverage. Only batteries whose fully charged capacity falls below 80% of their rated capacity and/or batteries that result from: (a) improper operation, storage, misuse or abuse, accident or neglect, such as physical... for ninety (90) days from the date of the products original purchase by this Warranty. Use of the product. Batteries. or (d) other peripheral equipment are covered by the first consumer purchaser of Non-Motorola branded Products and Accessories. Abuse & Misuse.
User Guide
Page 52
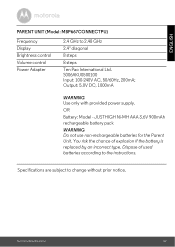
JUSTHIGH Ni-MH AAA 3.6V 900mAh rechargeable battery pack WARNING Do not use non-rechargeable batteries for the Parent Unit. ENGLISH PARENT UNIT (Model: MBP667CONNECTPU) Frequency Display Brightness control Volume control Power Adapter 2.4 GHz to change without prior... provided power supply. S006AKU0500100 Input: 100-240V AC, 50/60Hz, 200mA; You risk the chance of used batteries according to the instructions. Technical Specifications 52 Dispose of explosion if the battery is replaced by an incorrect type. Specifications are subject to 2.48 GHz 2.4" diagonal 8 steps 8 steps Ten...
JUSTHIGH Ni-MH AAA 3.6V 900mAh rechargeable battery pack WARNING Do not use non-rechargeable batteries for the Parent Unit. ENGLISH PARENT UNIT (Model: MBP667CONNECTPU) Frequency Display Brightness control Volume control Power Adapter 2.4 GHz to change without prior... provided power supply. S006AKU0500100 Input: 100-240V AC, 50/60Hz, 200mA; You risk the chance of used batteries according to the instructions. Technical Specifications 52 Dispose of explosion if the battery is replaced by an incorrect type. Specifications are subject to 2.48 GHz 2.4" diagonal 8 steps 8 steps Ten...
Quick Start Guide
Page 1
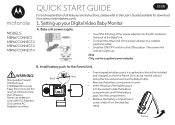
... a suitable electrical outlet. • Slide the ON/OFF switch to the User's Guide (available for the Parent Unit. MODELS: MBP667CONNECT MBP667CONNECT-2 MBP667CONNECT-3 MBP667CONNECT-4 • Insert the DC plug of the power adapter into the compartment. • Replace the battery compartment cover, and pull out the desktop stand. Only use the AC Adapters provided. • A rechargeable...
... a suitable electrical outlet. • Slide the ON/OFF switch to the User's Guide (available for the Parent Unit. MODELS: MBP667CONNECT MBP667CONNECT-2 MBP667CONNECT-3 MBP667CONNECT-4 • Insert the DC plug of the power adapter into the compartment. • Replace the battery compartment cover, and pull out the desktop stand. Only use the AC Adapters provided. • A rechargeable...
Quick Start Guide
Page 2
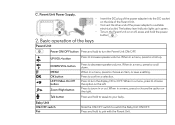
When in a menu, press to scroll up in a menu, press to your baby. The battery level indicator lights up . button MENU OK button LEFT/Video On-Off button Zoom/Right button Talk button Press to confirm a selection. Press to decrease ...
When in a menu, press to scroll up in a menu, press to your baby. The battery level indicator lights up . button MENU OK button LEFT/Video On-Off button Zoom/Right button Talk button Press to confirm a selection. Press to decrease ...
Quick Start Guide
Page 6
...to normal wear and tear are excluded from coverage. Communication Services. Batteries. Defects or damage that result from the use of MOTOROLA or BINATONE, are excluded from coverage. or (d) other than MOTOROLA, BINATONE or its authorized service centers, are excluded from coverage. Unauthorized... from coverage. Altered Products. Defects, damages, or the failure of their rated capacity and batteries that show evidence of Non-Motorola branded Products and Accessories. Only batteries whose fully charged capacity falls below 80% of Products or Accessories due to any way by...
...to normal wear and tear are excluded from coverage. Communication Services. Batteries. Defects or damage that result from the use of MOTOROLA or BINATONE, are excluded from coverage. or (d) other than MOTOROLA, BINATONE or its authorized service centers, are excluded from coverage. Unauthorized... from coverage. Altered Products. Defects, damages, or the failure of their rated capacity and batteries that show evidence of Non-Motorola branded Products and Accessories. Only batteries whose fully charged capacity falls below 80% of Products or Accessories due to any way by...