
User Guide
Page 5
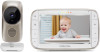
... (6) 9. Temperature Sensor 4. Power/Link indicator Lights up in Blue when the Baby Unit is weak, try moving the Parent and/or the Baby Unit to pair with this product, so keep the Baby Monitor at least 5ft (1.5m) away from these types of Your Baby Unit 2 33 5 14 6 7 8 9 1. Microphone... them off if they appear to be causing interference. • If the signal is switched on or Press and hold to different positions in pairing mode. Important guidelines for the Parent Unit, or flashes in red when the Baby Unit is powered off . Power Adapter Socket 3. Off when...
... (6) 9. Temperature Sensor 4. Power/Link indicator Lights up in Blue when the Baby Unit is weak, try moving the Parent and/or the Baby Unit to pair with this product, so keep the Baby Monitor at least 5ft (1.5m) away from these types of Your Baby Unit 2 33 5 14 6 7 8 9 1. Microphone... them off if they appear to be causing interference. • If the signal is switched on or Press and hold to different positions in pairing mode. Important guidelines for the Parent Unit, or flashes in red when the Baby Unit is powered off . Power Adapter Socket 3. Off when...

User Guide
Page 6
...Saving Mode 18 4.9 View multiple cameras on iPhone®/iPad 25 5.4.1 Power ON and Connect the Camera 25 5.4.2 Download Hubble for Motorola Monitors App on Android™ device 21 5.3.4 Add the Camera to your account 22 5.4 User Account and Camera Setup on screen... App 21 5.3.3 Run Hubble for Motorola Monitors App 25 6 Table of contents 1. Getting Started 11 2.1 Baby Unit Power Supply 11 2.2 Parent Unit Power Supply 12 2.3 Registration (Pairing 13 3. Safety Instructions 8 2. Wi-Fi® Internet Viewing 19 5.1 Minimum System Requirements 19 5.2 Getting Started - ...
...Saving Mode 18 4.9 View multiple cameras on iPhone®/iPad 25 5.4.1 Power ON and Connect the Camera 25 5.4.2 Download Hubble for Motorola Monitors App on Android™ device 21 5.3.4 Add the Camera to your account 22 5.4 User Account and Camera Setup on screen... App 21 5.3.3 Run Hubble for Motorola Monitors App 25 6 Table of contents 1. Getting Started 11 2.1 Baby Unit Power Supply 11 2.2 Parent Unit Power Supply 12 2.3 Registration (Pairing 13 3. Safety Instructions 8 2. Wi-Fi® Internet Viewing 19 5.1 Minimum System Requirements 19 5.2 Getting Started - ...

User Guide
Page 13
... a * against it) cannot be registered to confirm. + 4. NOTE A camera can only be selected for a camera unit. Press and hold the PAIR button on the screen. Getting Started 13 DOWN button to select add, and press the O button to one Parent Unit at any one time. DOWN... old registration. You do not need to start searching for a new registration. 5. Press the M button of the Baby Unit until is currently paired with the Parent Unit, its camera location (with the Parent Unit. If a particular Baby Unit was registered previously, registering this current Baby Unit...
... a * against it) cannot be registered to confirm. + 4. NOTE A camera can only be selected for a camera unit. Press and hold the PAIR button on the screen. Getting Started 13 DOWN button to select add, and press the O button to one Parent Unit at any one time. DOWN... old registration. You do not need to start searching for a new registration. 5. Press the M button of the Baby Unit until is currently paired with the Parent Unit, its camera location (with the Parent Unit. If a particular Baby Unit was registered previously, registering this current Baby Unit...

User Guide
Page 16
... . 2. Press the M button and the menu bar will pop up . 3. Press the + UP button or - Press and hold the PAIR button on the underside of the Baby Unit until is currently paired with the Parent Unit, its camera location (with a * can be registered to view the picture from scan. 16 Parent Unit... is highlighted, and the del/ add/ view/ scan menu will then appear. NOTE A camera can also press the O button repeatedly to confirm. + 4. 4.6 Camera Control 4.6.1 Add (pair) a camera 1. Press the < LEFT button or > RIGHT button until the Parent Unit finds the camera, beeps and...
... . 2. Press the M button and the menu bar will pop up . 3. Press the + UP button or - Press and hold the PAIR button on the underside of the Baby Unit until is currently paired with the Parent Unit, its camera location (with a * can be registered to view the picture from scan. 16 Parent Unit... is highlighted, and the del/ add/ view/ scan menu will then appear. NOTE A camera can also press the O button repeatedly to confirm. + 4. 4.6 Camera Control 4.6.1 Add (pair) a camera 1. Press the < LEFT button or > RIGHT button until the Parent Unit finds the camera, beeps and...
User Guide
Page 20
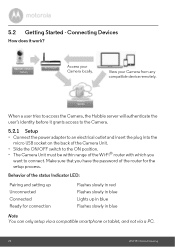
MBP845CONNECT Camera Wi-Fi Router Access your Camera from any compatible device remotely. View your Camera locally. Behavior of the router for connection Flashes slowly in .... • The Camera Unit must be within range of the Wi-Fi® router with which you have the password of the status Indicator LED: Pairing and setting up in blue Flashes slowly in blue Lights up Unconnected Connected Ready for the setup process. Hubble Service When a user tries to connect...
MBP845CONNECT Camera Wi-Fi Router Access your Camera from any compatible device remotely. View your Camera locally. Behavior of the router for connection Flashes slowly in .... • The Camera Unit must be within range of the Wi-Fi® router with which you have the password of the status Indicator LED: Pairing and setting up in blue Flashes slowly in blue Lights up Unconnected Connected Ready for the setup process. Hubble Service When a user tries to connect...

User Guide
Page 23
A5 Wi-Fi® Internet Viewing A6 23 You will then hear a beep tone, followed by a voice prompt indicating that the Camera is ready for pairing. • Tap Continue. • The App will flash. • The following setup instructions will appear on the screen. (Picture A4) ENGLISH A4 • Press and hold the PAIR button on the Camera Unit for and connect to your Camera as shown in the pictures below. (Pictures A5, A6) • The blue/red color LED on the Camera Unit will automatically search for 3 seconds.
A5 Wi-Fi® Internet Viewing A6 23 You will then hear a beep tone, followed by a voice prompt indicating that the Camera is ready for pairing. • Tap Continue. • The App will flash. • The following setup instructions will appear on the screen. (Picture A4) ENGLISH A4 • Press and hold the PAIR button on the Camera Unit for and connect to your Camera as shown in the pictures below. (Pictures A5, A6) • The blue/red color LED on the Camera Unit will automatically search for 3 seconds.
User Guide
Page 34
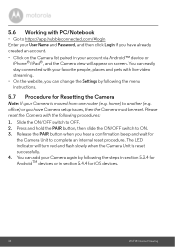
.... 5.7 Procedure for the Camera Unit to complete an internal reset procedure. Slide the ON/OFF switch to ON. 3. Press and hold the PAIR button, then slide the ON/OFF switch to OFF. 2. You can change the Settings by following the steps in section 5.3.4 for AndroidTM devices... wait for Resetting the Camera Note: If your Camera is reset successfully. 4. The LED indicator will appear on the Camera list paired in your Camera again by following procedures: 1. Release the PAIR button when you have already created an account. • Click on screen. home) to another (e.g.
.... 5.7 Procedure for the Camera Unit to complete an internal reset procedure. Slide the ON/OFF switch to ON. 3. Press and hold the PAIR button, then slide the ON/OFF switch to OFF. 2. You can change the Settings by following the steps in section 5.3.4 for AndroidTM devices... wait for Resetting the Camera Note: If your Camera is reset successfully. 4. The LED indicator will appear on the Camera list paired in your Camera again by following procedures: 1. Release the PAIR button when you have already created an account. • Click on screen. home) to another (e.g.

User Guide
Page 37
... ON. • Is the correct camera selected? Allow up to one minute for the Baby Unit and the Parent Unit to synchronize. • See 2.3 Registration (Pairing), if there is still active and will go blank after 5 minutes or 30 minutes or 60 minutes to avoid audio feedback. • lf the Baby...
... ON. • Is the correct camera selected? Allow up to one minute for the Baby Unit and the Parent Unit to synchronize. • See 2.3 Registration (Pairing), if there is still active and will go blank after 5 minutes or 30 minutes or 60 minutes to avoid audio feedback. • lf the Baby...
User Guide
Page 40
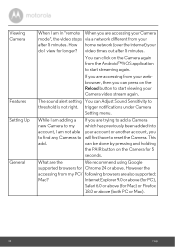
.... What are accessing your Camera mode", the video stops via a network different from your webbrowser, then you can be done by pressing and holding the PAIR button on the Reload button to start streaming again. If you are also supported: Mac? However the accessing from my PC/ following browsers are accessing...
.... What are accessing your Camera mode", the video stops via a network different from your webbrowser, then you can be done by pressing and holding the PAIR button on the Reload button to start streaming again. If you are also supported: Mac? However the accessing from my PC/ following browsers are accessing...

User Guide
Page 41
... hear a beep. LED is stable: The Camera is either connecting to the router or has lost the link to the router. Press and hold the PAIR button on the bottom of the box, the Camera is in setup mode. Connectivity I am not able to access Please check if the Camera is... Issues my Camera. When the Camera LED is flashing, this mode. To reset to Setup mode, press and hold and iOS, I am not able the PAIR button on the bottom of LED flashing? Please ensure that it is in this indicates that the Camera is in setup mode. Setting Up During...
... hear a beep. LED is stable: The Camera is either connecting to the router or has lost the link to the router. Press and hold the PAIR button on the bottom of the box, the Camera is in setup mode. Connectivity I am not able to access Please check if the Camera is... Issues my Camera. When the Camera LED is flashing, this mode. To reset to Setup mode, press and hold and iOS, I am not able the PAIR button on the bottom of LED flashing? Please ensure that it is in this indicates that the Camera is in setup mode. Setting Up During...