User Guide
Page 2
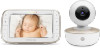
...x Power adapter for Parent Unit • 1 x Power adapter for purchasing the Digital Video Baby Monitor. For warranty service of your Motorola product, you will find one or more additional Camera Units with all the information you need to provide a copy of your dated sales receipt to get the most from the power... supply. to work if you can monitor your older children in the Parent Unit, so that it from your new Motorola Digital Video Baby...
...x Power adapter for Parent Unit • 1 x Power adapter for purchasing the Digital Video Baby Monitor. For warranty service of your Motorola product, you will find one or more additional Camera Units with all the information you need to provide a copy of your dated sales receipt to get the most from the power... supply. to work if you can monitor your older children in the Parent Unit, so that it from your new Motorola Digital Video Baby...

User Guide
Page 3
DOWN button - Parent Unit ON/OFF LED (Green) 14. Power button 0 Press and Hold to turn the LCD screen ON/ OFF. 3. Normal Mode: Tilt camera Down Menu Mode: Move Down menu options 7. Speaker Overview of the Parent Unit 1 12 13 14 15 16 17 2 7 3 8 4 9 5 10 6 11 1....LEDs (Green, Amber, Red, Red) 15. Stand 19. RESET button (recessed - UP button + Normal Mode: Tilt camera Up Menu Mode: Move Up menu options 6. LEFT button < Normal Mode: Pan camera Left Menu Mode: Move Left along menu options 12. Micro USB power adapter socket 10. Display (LCD screen) 2. ...
DOWN button - Parent Unit ON/OFF LED (Green) 14. Power button 0 Press and Hold to turn the LCD screen ON/ OFF. 3. Normal Mode: Tilt camera Down Menu Mode: Move Down menu options 7. Speaker Overview of the Parent Unit 1 12 13 14 15 16 17 2 7 3 8 4 9 5 10 6 11 1....LEDs (Green, Amber, Red, Red) 15. Stand 19. RESET button (recessed - UP button + Normal Mode: Tilt camera Up Menu Mode: Move Up menu options 6. LEFT button < Normal Mode: Pan camera Left Menu Mode: Move Left along menu options 12. Micro USB power adapter socket 10. Display (LCD screen) 2. ...

User Guide
Page 4
... (5 Levels) Night Vision Mode (Video also changes to Black/White) T Talk Mode On Volume Level Indication (4 Levels) Panning Camera Left Panning Camera Right Tilting Camera Up Tilting Camera Down Zoom Level Control (1X, 2X) Brightness Level Control (8 Levels) Lullaby Control (5 Sound Selections) Alarm Setting (6h, 4h...screen off timer is set , and when flashing, that alarm time has been reached or missed. Available when you have more than 1 Baby Unit (Camera). Temperature scale select (oC / oF) Readings display in BLUE, but turn RED > 29ºC / 84ºF, or < 14ºC ...
... (5 Levels) Night Vision Mode (Video also changes to Black/White) T Talk Mode On Volume Level Indication (4 Levels) Panning Camera Left Panning Camera Right Tilting Camera Up Tilting Camera Down Zoom Level Control (1X, 2X) Brightness Level Control (8 Levels) Lullaby Control (5 Sound Selections) Alarm Setting (6h, 4h...screen off timer is set , and when flashing, that alarm time has been reached or missed. Available when you have more than 1 Baby Unit (Camera). Temperature scale select (oC / oF) Readings display in BLUE, but turn RED > 29ºC / 84ºF, or < 14ºC ...

User Guide
Page 5
... to be causing interference • If the signal is weak, try moving the Parent and/or the Baby Unit to camera. Power Adapter Outlet 10. PAIR Button 11. Overview of the camera is connected to different positions in the room(s). Temperature Sensor 9. Photo Sensor (Night Vision Mode) 2. Infrared LEDs (x 8, for night vision...
... to be causing interference • If the signal is weak, try moving the Parent and/or the Baby Unit to camera. Power Adapter Outlet 10. PAIR Button 11. Overview of the camera is connected to different positions in the room(s). Temperature Sensor 9. Photo Sensor (Night Vision Mode) 2. Infrared LEDs (x 8, for night vision...

User Guide
Page 6
...;C / °F 15 4. Table of contents Connecting Devices 21 5.2.1 Setup 21 5.3 User Account and Camera Setup on Android™ Devices 22 5.3.1 Power ON and Connect the Camera 22 5.3.2 Download Hubble for Motorola Monitors App 22 5.3.3 Run Hubble for Motorola Monitors App on Android™ device 22 5.3.4 Add the Camera to your account 23 5.4 User Account and...
...;C / °F 15 4. Table of contents Connecting Devices 21 5.2.1 Setup 21 5.3 User Account and Camera Setup on Android™ Devices 22 5.3.1 Power ON and Connect the Camera 22 5.3.2 Download Hubble for Motorola Monitors App 22 5.3.3 Run Hubble for Motorola Monitors App on Android™ device 22 5.3.4 Add the Camera to your account 23 5.4 User Account and...
User Guide
Page 7
Cleaning 37 8. Disposal of contents 7 Help ...38 9. Technical Specifications 53 Table of the Device (Environment 36 7. General Information 46 10. ENGLISH 5.4.2 Download Hubble for Motorola Monitors App 26 5.4.3 Run Hubble for Motorola Monitors App on iPhone®/iPad®... 26 5.4.4 Add the Camera to your account 27 5.5 Camera Functions 32 5.5.1 Connecting the Camera Unit to power 32 5.5.2 Overview of the Features on Hubble App 32 5.6 Working with PC/Notebook 35 5.7 Procedure for Resetting the Camera 35 6.
Cleaning 37 8. Disposal of contents 7 Help ...38 9. Technical Specifications 53 Table of the Device (Environment 36 7. General Information 46 10. ENGLISH 5.4.2 Download Hubble for Motorola Monitors App 26 5.4.3 Run Hubble for Motorola Monitors App on iPhone®/iPad®... 26 5.4.4 Add the Camera to your account 27 5.5 Camera Functions 32 5.5.1 Connecting the Camera Unit to power 32 5.5.2 Overview of the Features on Hubble App 32 5.6 Working with PC/Notebook 35 5.7 Procedure for Resetting the Camera 35 6.
User Guide
Page 9
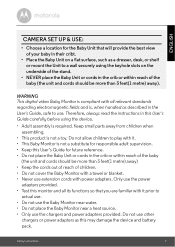
... or power adapters as a dresser, desk, or shelf or mount the Unit to a wall securely using the device. • Adult assembly is not a toy. ENGLISH CAMERA SET UP & USE: • Choose a location for future reference. • Do not place the Baby Unit or cords in the User's Guide, safe to use...
... or power adapters as a dresser, desk, or shelf or mount the Unit to a wall securely using the device. • Adult assembly is not a toy. ENGLISH CAMERA SET UP & USE: • Choose a location for future reference. • Do not place the Baby Unit or cords in the User's Guide, safe to use...

User Guide
Page 11
... IMPORTANT The Baby Unit is able to operate without power connection up to 3 hours with the support of the power adapter to the Baby Unit (camera) and the other end to turn the Baby Unit off.
... IMPORTANT The Baby Unit is able to operate without power connection up to 3 hours with the support of the power adapter to the Baby Unit (camera) and the other end to turn the Baby Unit off.

User Guide
Page 14
...Press the < LEFT button or > RIGHT button until the Parent Unit finds the camera, beeps and PAIR OK appears on cam" shown. Camera will pop up , press the + UP button or - DOWN button to select the desired Camera, and press the O button to start searching for a new registration. 5. The... video from the camera will cancel its link with "press PAIR on the screen. Note: If a camera is currently paired with the Parent Unit, its camera location (with a * against it again unless the Baby Unit loses its old ...
...Press the < LEFT button or > RIGHT button until the Parent Unit finds the camera, beeps and PAIR OK appears on cam" shown. Camera will pop up , press the + UP button or - DOWN button to select the desired Camera, and press the O button to start searching for a new registration. 5. The... video from the camera will cancel its link with "press PAIR on the screen. Note: If a camera is currently paired with the Parent Unit, its camera location (with a * against it again unless the Baby Unit loses its old ...

User Guide
Page 15
... 8 high-intensity infrared LEDs for picking up or down , left and right until you are not close to other electrical equipment. 3.2 Pan and Tilt The camera can be remotely controlled from the Parent Unit, to move up, down . 2. Using the Baby Monitor 15 Using the Baby Monitor 3.1 Setting Up • ...Place the Baby Unit in a camera viewing mode. 1. The icon will be displayed at the top of the screen. 3.4 Talk Mode Press and hold the TALK button T on . If there is...
... 8 high-intensity infrared LEDs for picking up or down , left and right until you are not close to other electrical equipment. 3.2 Pan and Tilt The camera can be remotely controlled from the Parent Unit, to move up, down . 2. Using the Baby Monitor 15 Using the Baby Monitor 3.1 Setting Up • ...Place the Baby Unit in a camera viewing mode. 1. The icon will be displayed at the top of the screen. 3.4 Talk Mode Press and hold the TALK button T on . If there is...

User Guide
Page 18
... the M button and the menu bar will pop up , press the + UP button or - DOWN button to select add, and press the O button to View Cameras instead of the Baby Unit until is highlighted, and the del/ add/ view/ scan menu will pop up . Press the M button and the menu bar... will pop up . 3. TIP Quick Method to confirm. + 4. Note: If a camera is highlighted, and the del/ add/ view/ scan menu will pop up . 2. Press the < LEFT button or > RIGHT button until is currently paired with the...
... the M button and the menu bar will pop up , press the + UP button or - DOWN button to select add, and press the O button to View Cameras instead of the Baby Unit until is highlighted, and the del/ add/ view/ scan menu will pop up . Press the M button and the menu bar... will pop up . 3. TIP Quick Method to confirm. + 4. Note: If a camera is highlighted, and the del/ add/ view/ scan menu will pop up . 2. Press the < LEFT button or > RIGHT button until is currently paired with the...

User Guide
Page 19
...Method to confirm. 4. Press the M button and the menu bar will pop up . 3. Press the < LEFT button or > RIGHT button until is only one registered camera in a loop of entering into the menu bar. Press the ++UP button or - Directly press the O button repeatedly to delete that registration. Press the M button... the menu bar will pop up . 3. Press the < LEFT button or > RIGHT button until is only available when you have more than 1 Baby Unit (Camera). 1. Camera will pop up . 2. Press the + UP button or - DOWN button to select °C or °F. DOWN button to select the desired...
...Method to confirm. 4. Press the M button and the menu bar will pop up . 3. Press the < LEFT button or > RIGHT button until is only one registered camera in a loop of entering into the menu bar. Press the ++UP button or - Directly press the O button repeatedly to delete that registration. Press the M button... the menu bar will pop up . 3. Press the < LEFT button or > RIGHT button until is only available when you have more than 1 Baby Unit (Camera). 1. Camera will pop up . 2. Press the + UP button or - DOWN button to select °C or °F. DOWN button to select the desired...

User Guide
Page 20
... key to hear the audio from one screen at a time. 1. Zoom does not work in multi-screen mode the TALK button operates with the selected camera. Press the + UP button or - DOWN button to select auto video off after 5 mins, 30 mins or 60 mins if operating on screen This function... Options DOWN button to select Split Screen On / Off . 4. Press the < LEFT button or > RIGHT button until V is On, you have more than 1 Baby Unit (Camera). Press the M button and the menu bar will remain and you must set this before selecting the multi-screen mode. Press the M button and the...
... key to hear the audio from one screen at a time. 1. Zoom does not work in multi-screen mode the TALK button operates with the selected camera. Press the + UP button or - DOWN button to select auto video off after 5 mins, 30 mins or 60 mins if operating on screen This function... Options DOWN button to select Split Screen On / Off . 4. Press the < LEFT button or > RIGHT button until V is On, you have more than 1 Baby Unit (Camera). Press the M button and the menu bar will remain and you must set this before selecting the multi-screen mode. Press the M button and the...

User Guide
Page 21
...; Version 4.2 or above iPhone®/iPad® iOS • Version 7.0 or above High Speed (Wi-Fi®) Internet • At least 0.6 Mbps upload bandwidth per camera (you can test your internet speed on this site: http://www.speedtest.net) Wi-Fi® Internet Viewing 21
...; Version 4.2 or above iPhone®/iPad® iOS • Version 7.0 or above High Speed (Wi-Fi®) Internet • At least 0.6 Mbps upload bandwidth per camera (you can test your internet speed on this site: http://www.speedtest.net) Wi-Fi® Internet Viewing 21
User Guide
Page 22
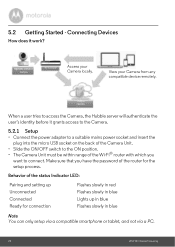
5.2 Getting Started - Hubble Service When a user tries to access the Camera, the Hubble server will authenticate the user's identity before it work? MBP855CONNECT Camera Wi-Fi Router Access your Camera from any compatible device remotely. Behavior of the Wi-Fi® router with which you have the ... a compatible smartphone or tablet, and not via a PC. 22 Wi-Fi® Internet Viewing View your Camera locally. Connecting Devices How does it grants access to the Camera. 5.2.1 Setup • Connect the power adapter to a suitable mains power socket and insert the plug into ...
5.2 Getting Started - Hubble Service When a user tries to access the Camera, the Hubble server will authenticate the user's identity before it work? MBP855CONNECT Camera Wi-Fi Router Access your Camera from any compatible device remotely. Behavior of the Wi-Fi® router with which you have the ... a compatible smartphone or tablet, and not via a PC. 22 Wi-Fi® Internet Viewing View your Camera locally. Connecting Devices How does it grants access to the Camera. 5.2.1 Setup • Connect the power adapter to a suitable mains power socket and insert the plug into ...
User Guide
Page 23
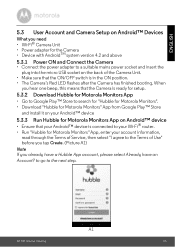
... USB socket on the back of the Camera Unit. • Make sure that your Android™ device is connected to your Wi-Fi® router. • Run "Hubble for Motorola Monitors" App, enter your Android™ device 5.3.3 Run Hubble for Motorola Monitors App on Android™ device &#... Ensure that the ON/OFF switch is ready for setup. 5.3.2 Download Hubble for Motorola Monitors App • Go to Google Play™ Store to search for "Hubble for Motorola Monitors". • Download "Hubble for Motorola Monitors" App from Google Play™ Store and install it on your account information...
... USB socket on the back of the Camera Unit. • Make sure that your Android™ device is connected to your Wi-Fi® router. • Run "Hubble for Motorola Monitors" App, enter your Android™ device 5.3.3 Run Hubble for Motorola Monitors App on Android™ device &#... Ensure that the ON/OFF switch is ready for setup. 5.3.2 Download Hubble for Motorola Monitors App • Go to Google Play™ Store to search for "Hubble for Motorola Monitors". • Download "Hubble for Motorola Monitors" App from Google Play™ Store and install it on your account information...

User Guide
Page 24
5.3.4 Add the Camera to your account • Tap on the top right corner of the screen to add camera. (Picture A2) A2 • The following setup instructions will appear on the screen. (Picture A3) A3 • Plug in and switch on the camera, and wait for a couple of minutes for it to warm up. • Tap Continue when the Camera LED starts to blink. 24 Wi-Fi® Internet Viewing
5.3.4 Add the Camera to your account • Tap on the top right corner of the screen to add camera. (Picture A2) A2 • The following setup instructions will appear on the screen. (Picture A3) A3 • Plug in and switch on the camera, and wait for a couple of minutes for it to warm up. • Tap Continue when the Camera LED starts to blink. 24 Wi-Fi® Internet Viewing

User Guide
Page 25
• The following setup instructions will appear on the screen. (Picture A4) ENGLISH A4 • Press and hold the PAIR button on the bottom left edge of the Camera Unit for and connect to your Camera as shown in the pictures below. (Pictures A5, A6) • The blue/red colour LED on the Camera Unit will automatically search for 3 seconds. A5 Wi-Fi® Internet Viewing A6 25 You will then hear a beep tone, followed by a voice prompt indicating that the Camera is ready for pairing. • Tap Continue. • The App will flash.
• The following setup instructions will appear on the screen. (Picture A4) ENGLISH A4 • Press and hold the PAIR button on the bottom left edge of the Camera Unit for and connect to your Camera as shown in the pictures below. (Pictures A5, A6) • The blue/red colour LED on the Camera Unit will automatically search for 3 seconds. A5 Wi-Fi® Internet Viewing A6 25 You will then hear a beep tone, followed by a voice prompt indicating that the Camera is ready for pairing. • Tap Continue. • The App will flash.

User Guide
Page 26
The LED indicator on the Camera Unit will take a few minutes for the Camera to connect to view the video captured by the Camera Unit. A9 A10 • Tap View Camera to the Wi-Fi® network before showing the connection status. (Pictures A9, A10) • If connection fails, please tap Retry and repeat the steps starting from 5.3.4. • Select your Wi-Fi® Network, enter your password and then tap Connect. (Pictures A7, A8) A7 A8 • It will light up in blue. 26 Wi-Fi® Internet Viewing
The LED indicator on the Camera Unit will take a few minutes for the Camera to connect to view the video captured by the Camera Unit. A9 A10 • Tap View Camera to the Wi-Fi® network before showing the connection status. (Pictures A9, A10) • If connection fails, please tap Retry and repeat the steps starting from 5.3.4. • Select your Wi-Fi® Network, enter your password and then tap Connect. (Pictures A7, A8) A7 A8 • It will light up in blue. 26 Wi-Fi® Internet Viewing
User Guide
Page 27
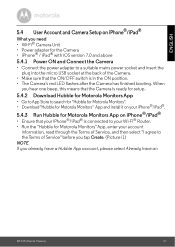
... select Already have an Wi-Fi® Internet Viewing 27 ENGLISH 5.4 User Account and Camera Setup on iPhone®/iPad® What you need • Wi-Fi® Camera Unit • Power adapter for Motorola Monitors" App, enter your account information, read through the Terms of Service, and then... i1) NOTE If you hear one beep, this means that the Camera is ready for setup. 5.4.2 Download Hubble for Motorola Monitors App • Go to App Store to search for "Hubble for Motorola Monitors". • Download "Hubble for Motorola Monitors" App and install it on your iPhone®/iPad®. ...
... select Already have an Wi-Fi® Internet Viewing 27 ENGLISH 5.4 User Account and Camera Setup on iPhone®/iPad® What you need • Wi-Fi® Camera Unit • Power adapter for Motorola Monitors" App, enter your account information, read through the Terms of Service, and then... i1) NOTE If you hear one beep, this means that the Camera is ready for setup. 5.4.2 Download Hubble for Motorola Monitors App • Go to App Store to search for "Hubble for Motorola Monitors". • Download "Hubble for Motorola Monitors" App and install it on your iPhone®/iPad®. ...
