

MP300CM Installation Manual
Page 1
NEC Display Solutions of 10 Max UL Load Capacity: 50 lb (22.7 kg) ISSUED: 10-01-10 SHEET #: 056-9034-4 07-29-11 For customer care call 1-800-865-2112 Installation and Assembly Manual: Custom Ceiling Mount for NEC M260X, M260W, M271X, M300X, M300W M300XS, M300WS, M311X, M311W, P350X, P350W, P420X Projectors Model: MP300CM Features: • ImageLockTM alignment prevents picture sag or drift • Wrench access slot for easier flush mount installations • Exclusive aluminum track quick release Visit the Peerless Web Site at www.peerlessmounts.com 1 of America, Inc.
NEC Display Solutions of 10 Max UL Load Capacity: 50 lb (22.7 kg) ISSUED: 10-01-10 SHEET #: 056-9034-4 07-29-11 For customer care call 1-800-865-2112 Installation and Assembly Manual: Custom Ceiling Mount for NEC M260X, M260W, M271X, M300X, M300W M300XS, M300WS, M311X, M311W, P350X, P350W, P420X Projectors Model: MP300CM Features: • ImageLockTM alignment prevents picture sag or drift • Wrench access slot for easier flush mount installations • Exclusive aluminum track quick release Visit the Peerless Web Site at www.peerlessmounts.com 1 of America, Inc.

PJ control command reference manual appendixes
Page 1
... / NP-PX550W NP-U300X / NP-U250X / NP-U310W / NP-U260W NP-UM330X / NP-UM280X / NP-UM330W / NP-UM280W NP-V311W / NP-V281W / NP-V311X NP-V300X / NP-V260X / NP-V300W / NP-V260W / NP-V230X / NP-V260 / NP-V230 / NP-V260R NP-VE281X / NP-VE280X / NP-VE281 / NP-VE280 Contents 1. Connecting an External Device 2 2. ECO MODE REQUEST] [098-8. BASIC INFORMATION REQUEST] Sub input 10 [097-198. Standby Mode setting for receiving commands 3 3. Projector Control Command Reference Manual...
... / NP-PX550W NP-U300X / NP-U250X / NP-U310W / NP-U260W NP-UM330X / NP-UM280X / NP-UM330W / NP-UM280W NP-V311W / NP-V281W / NP-V311X NP-V300X / NP-V260X / NP-V300W / NP-V260W / NP-V230X / NP-V260 / NP-V230 / NP-V260R NP-VE281X / NP-VE280X / NP-VE281 / NP-VE280 Contents 1. Connecting an External Device 2 2. ECO MODE REQUEST] [098-8. BASIC INFORMATION REQUEST] Sub input 10 [097-198. Standby Mode setting for receiving commands 3 3. Projector Control Command Reference Manual...

Users Manual
Page 1
NP-ME401W/NP-ME361W/NP-ME331W/NP-ME301W/NP-ME401X/NP-ME361X/NP-ME331X/NP-ME301X Projector ME401W/ME361W/ME331W/ME301W ME401X/ME361X/ME331X/ME301X User's Manual Please visit our web site for User's Manual in the latest version: http//www.nec-display.com/dl/en/pj_manual/lineup.html Model No.
NP-ME401W/NP-ME361W/NP-ME331W/NP-ME301W/NP-ME401X/NP-ME361X/NP-ME331X/NP-ME301X Projector ME401W/ME361W/ME331W/ME301W ME401X/ME361X/ME331X/ME301X User's Manual Please visit our web site for User's Manual in the latest version: http//www.nec-display.com/dl/en/pj_manual/lineup.html Model No.
Users Manual
Page 2
...other countries. • AccuBlend, NaViSet, MultiPresenter, and Virtual Remote are subject to result from using the Projector. NOTES (1) The contents of this user's manual are trademarks or registered trademarks of Cisco in the "about GPL&LGPL" folder on loss of Crestron Electronics.... • Trademark PJLink is a trademark applied for any questionable points, errors or omissions, please contact us. (4) Notwithstanding article (3), NEC will not be the trademarks or registered trademarks of Apple Inc. registered in Japan, the United States of America and other countries and ...
...other countries. • AccuBlend, NaViSet, MultiPresenter, and Virtual Remote are subject to result from using the Projector. NOTES (1) The contents of this user's manual are trademarks or registered trademarks of Cisco in the "about GPL&LGPL" folder on loss of Crestron Electronics.... • Trademark PJLink is a trademark applied for any questionable points, errors or omissions, please contact us. (4) Notwithstanding article (3), NEC will not be the trademarks or registered trademarks of Apple Inc. registered in Japan, the United States of America and other countries and ...

Users Manual
Page 3
...treatment and recycling in each Member State requires that used electrical and electronic products outside the European union, please contact your NEC projector and keep the manual handy for the correct method of the LCD panel. CAUTION TO PREVENT SHOCK, DO NOT OPEN THE CABINET. DO NOT ... prolonged period of used batteries should be easily accessible. If this manual carefully before using your local authority and ask for future reference. When you dispose of such products, please follow the guidance of your projector. The battery shall be sure to remove the plug from power ...
...treatment and recycling in each Member State requires that used electrical and electronic products outside the European union, please contact your NEC projector and keep the manual handy for the correct method of the LCD panel. CAUTION TO PREVENT SHOCK, DO NOT OPEN THE CABINET. DO NOT ... prolonged period of used batteries should be easily accessible. If this manual carefully before using your local authority and ask for future reference. When you dispose of such products, please follow the guidance of your projector. The battery shall be sure to remove the plug from power ...
Users Manual
Page 4
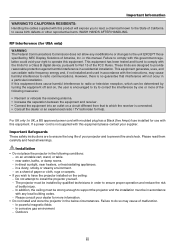
...or steamy environment. - RF Interference (for use with any modifications or changes to the unit EXCEPT those specified by NEC Display Solutions of California to cause birth defects or other reproductive harm. If this equipment does cause harmful interference to ...an outlet on a circuit different from that interference will expose you wish to provide reasonable protection against harmful interference in this manual. The projector must be in the below circumstances. In corrosive gas environment - Important Information WARNING TO CALIFORNIA RESIDENTS: Handling the cables supplied...
...or steamy environment. - RF Interference (for use with any modifications or changes to the unit EXCEPT those specified by NEC Display Solutions of California to cause birth defects or other reproductive harm. If this equipment does cause harmful interference to ...an outlet on a circuit different from that interference will expose you wish to provide reasonable protection against harmful interference in this manual. The projector must be in the below circumstances. In corrosive gas environment - Important Information WARNING TO CALIFORNIA RESIDENTS: Handling the cables supplied...

Users Manual
Page 6
...; Do not short, heat, or take apart batteries. • Do not throw batteries into the projector, or if it has been exposed to rain or water. - FOR MORE INFORMATION, CONTACT: NEC Display Solutions of America, Inc. 500 Park Boulevard, Suite 1100, Itasca, Illinois 60143-1248 TELEPHONE 800... user's manual. - When the power cord or plug is damaged or frayed. - Please dispose according to your hands burned from the heat that is emitted from the exhaust. • Do not splash water over the projector. If the projector exhibits a distinct change in front of a projector exhaust vent...
...; Do not short, heat, or take apart batteries. • Do not throw batteries into the projector, or if it has been exposed to rain or water. - FOR MORE INFORMATION, CONTACT: NEC Display Solutions of America, Inc. 500 Park Boulevard, Suite 1100, Itasca, Illinois 60143-1248 TELEPHONE 800... user's manual. - When the power cord or plug is damaged or frayed. - Please dispose according to your hands burned from the heat that is emitted from the exhaust. • Do not splash water over the projector. If the projector exhibits a distinct change in front of a projector exhaust vent...

Users Manual
Page 9
... Using Eco Mode [ECO MODE 24 Checking Energy-Saving Effect [CARBON METER 25 ❺ Using 4-Point Corner to the Projector 2 Features you'll enjoy 2 About this user's manual 3 ❸ Part Names of the Projector 4 Front/Top...4 Rear...5 Top Features...6 Terminal Panel Features 7 ❹ Part Names of Contents Important Information i 1. Convenient Features 23 ❶...
... Using Eco Mode [ECO MODE 24 Checking Energy-Saving Effect [CARBON METER 25 ❺ Using 4-Point Corner to the Projector 2 Features you'll enjoy 2 About this user's manual 3 ❸ Part Names of the Projector 4 Front/Top...4 Rear...5 Top Features...6 Terminal Panel Features 7 ❹ Part Names of Contents Important Information i 1. Convenient Features 23 ❶...

Users Manual
Page 12
... (AAA × 2) Power cord (US: 7N080236/7N080242) (EU: 7N080022/7N080028) Computer cable (VGA) (7N520089) • Important Infomation (7N8N7551) • Quick Setup Guide (7N8N7561) NEC Projector CD-ROM User's manual (PDF) (7N952531) Strap × 1 (24J41711) For North America only Limited warranty For customers in Europe: You will find our current valid Guarantee Policy on...
... (AAA × 2) Power cord (US: 7N080236/7N080242) (EU: 7N080022/7N080028) Computer cable (VGA) (7N520089) • Important Infomation (7N8N7551) • Quick Setup Guide (7N8N7561) NEC Projector CD-ROM User's manual (PDF) (7N952531) Strap × 1 (24J41711) For North America only Limited warranty For customers in Europe: You will find our current valid Guarantee Policy on...

Users Manual
Page 14
... lower resolution than the projector's native resolution (ME401W/ME361W/ME331W/ ME301W: 1280 × 800 / ME401X/ME361X/ME331X/ME301X: 1024 × 768) will be managed and controlled from a commercially available USB memory or SD card without the need to always use of the manual you control the projector by a virtual remote ... High resolution display - Virtual Remote Tool helps you time later on your time and do everything right the first time. URL: http://www.nec-display.com/dl/en/index.html • AUTO POWER ON and AUTO POWER OFF features The DIRECT POWER ON, AUTO POWER ON, AUTO ...
... lower resolution than the projector's native resolution (ME401W/ME361W/ME331W/ ME301W: 1280 × 800 / ME401X/ME361X/ME331X/ME301X: 1024 × 768) will be managed and controlled from a commercially available USB memory or SD card without the need to always use of the manual you control the projector by a virtual remote ... High resolution display - Virtual Remote Tool helps you time later on your time and do everything right the first time. URL: http://www.nec-display.com/dl/en/index.html • AUTO POWER ON and AUTO POWER OFF features The DIRECT POWER ON, AUTO POWER ON, AUTO ...
Users Manual
Page 31
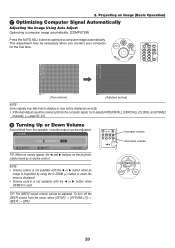
... a computer image automatically. 2. Increase volume Decrease volume TIP: When no menus appear, the ◀ and ▶ buttons on the projector cabinet work as a volume control. button to adjust [HORIZONTAL], [VERTICAL], [CLOCK], and [PHASE] manually. (→ page 62, 63) ❽ Turning Up or Down Volume Sound level from the menu, select [SETUP] →...
... a computer image automatically. 2. Increase volume Decrease volume TIP: When no menus appear, the ◀ and ▶ buttons on the projector cabinet work as a volume control. button to adjust [HORIZONTAL], [VERTICAL], [CLOCK], and [PHASE] manually. (→ page 62, 63) ❽ Turning Up or Down Volume Sound level from the menu, select [SETUP] →...
Users Manual
Page 56
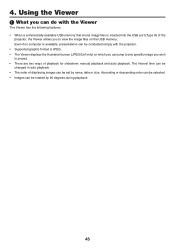
... in auto playback. • The order of displaying images can be conducted simply with the projector. • Supported graphic format is inserted into the USB port (Type A) of playback for slideshow: manual playback and auto playback. Even if no computer is available, presentations can jump to any specific... image you wish to project. • There are two ways of the projector, the Viewer allows you to view the image files on...
... in auto playback. • The order of displaying images can be conducted simply with the projector. • Supported graphic format is inserted into the USB port (Type A) of playback for slideshow: manual playback and auto playback. Even if no computer is available, presentations can jump to any specific... image you wish to project. • There are two ways of the projector, the Viewer allows you to view the image files on...
Users Manual
Page 61
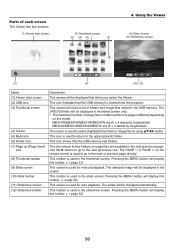
...) This screen is used to return to the next (previous) row. ME401W/ME361W/ME331W/ME301W are (6 × 4 lateral by longitudinal) ME401X/ME361X/ME331X/ME301X are available in full... page directly. Pressing the MENU button will be changed automatically. This toolbar is used for manual playback. This screen will show a list of each screen The Viewer has four screens. ... screen only. • The maximum number of image files or folders within one page is inserted into the projector. The JPEG Exif files will display this toolbar. (→ page 52) 50 Using the Viewer (3) Thumbnail...
...) This screen is used to return to the next (previous) row. ME401W/ME361W/ME331W/ME301W are (6 × 4 lateral by longitudinal) ME401X/ME361X/ME331X/ME301X are available in full... page directly. Pressing the MENU button will be changed automatically. This toolbar is used for manual playback. This screen will show a list of each screen The Viewer has four screens. ... screen only. • The maximum number of image files or folders within one page is inserted into the projector. The JPEG Exif files will display this toolbar. (→ page 52) 50 Using the Viewer (3) Thumbnail...
Users Manual
Page 78
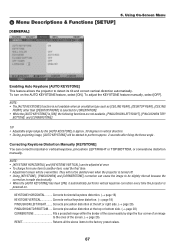
... To change from one item to the factory preset values. 67 Correcting Keystone Distortion Manually [KEYSTONE] You can be overwritten. They will be started to be deleted even when the projector is made electronically. • When the [AUTO KEYSTONE] has been [ON]. ...cause the image to perform approx. 2 seconds after fixing the throw angle . To adjust the KEYSTONE feature manually, select [OFF]. it automatically performs vertical keystone correction every time the projector is [ON], the following functions are not available, [PINCUSHION LEFT/RIGHT], [PIN CUSHION TOP/ BOTTOM],...
... To change from one item to the factory preset values. 67 Correcting Keystone Distortion Manually [KEYSTONE] You can be overwritten. They will be started to be deleted even when the projector is made electronically. • When the [AUTO KEYSTONE] has been [ON]. ...cause the image to perform approx. 2 seconds after fixing the throw angle . To adjust the KEYSTONE feature manually, select [OFF]. it automatically performs vertical keystone correction every time the projector is [ON], the following functions are not available, [PINCUSHION LEFT/RIGHT], [PIN CUSHION TOP/ BOTTOM],...
Users Manual
Page 81
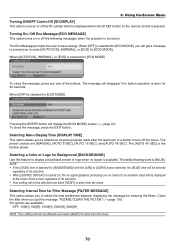
... [NORMAL], or [ECO] is done from the menu. 70 Selecting Menu Display Time [DISPLAY TIME] This option allows you to select how long the projector waits after the last touch of the buttons. The [AUTO 45 SEC] is pressed. When [OFF] is [BLUE]. The preset choices are available: OFF... factory preset. 5. The Eco Message prompts the user to prompt you get the message "PLEASE CLEAN THE FILTER." (→ page 100) Six options are [MANUAL], [AUTO 5 SEC], [AUTO 15 SEC], and [AUTO 45 SEC]. The default background is selected for [ECO MODE], you to check for Background [BACKGROUND...
... [NORMAL], or [ECO] is done from the menu. 70 Selecting Menu Display Time [DISPLAY TIME] This option allows you to select how long the projector waits after the last touch of the buttons. The [AUTO 45 SEC] is pressed. When [OFF] is [BLUE]. The preset choices are available: OFF... factory preset. 5. The Eco Message prompts the user to prompt you get the message "PLEASE CLEAN THE FILTER." (→ page 100) Six options are [MANUAL], [AUTO 5 SEC], [AUTO 15 SEC], and [AUTO 45 SEC]. The default background is selected for [ECO MODE], you to check for Background [BACKGROUND...
Users Manual
Page 84
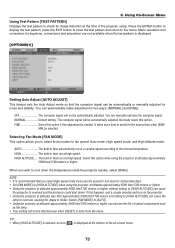
... for consecutive days. • Set [FAN MODE] to overheat and the protector could shut down the temperature inside the projector quickly, select [HIGH]. MAL]is recommended that the computer signal can manually optimize the computer signal. HIGH ALTITUDE The built-in fans run at altitudes approximately 5500 feet/1700 meters or higher...
... for consecutive days. • Set [FAN MODE] to overheat and the protector could shut down the temperature inside the projector quickly, select [HIGH]. MAL]is recommended that the computer signal can manually optimize the computer signal. HIGH ALTITUDE The built-in fans run at altitudes approximately 5500 feet/1700 meters or higher...
Users Manual
Page 85
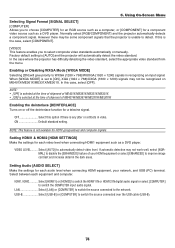
.... Enabling the deinterlace [DEINTERLACE] Turns on ME401X/ME361X/ME331X/ME301X. Factory default setting is unable to select composite video standards automatically or manually. In this case, select [OFF]. ON Default standard setting. VIDEO LEVEL Select [AUTO] to switch the COMPUTER input audio signal. ... [AUTO] and the projector will give priority to [ON], XGA (1024 × 768)/UXGA (1600 × 1200) signals may not work well, select [NORMAL] to disable the [ENHANCED] feature of ME401W/ME361W/ME331W/ME301W. Enabling or Disabling WXGA Mode [WXGA MODE] Selecting [ON] will ...
.... Enabling the deinterlace [DEINTERLACE] Turns on ME401X/ME361X/ME331X/ME301X. Factory default setting is unable to select composite video standards automatically or manually. In this case, select [OFF]. ON Default standard setting. VIDEO LEVEL Select [AUTO] to switch the COMPUTER input audio signal. ... [AUTO] and the projector will give priority to [ON], XGA (1024 × 768)/UXGA (1600 × 1200) signals may not work well, select [NORMAL] to disable the [ENHANCED] feature of ME401W/ME361W/ME331W/ME301W. Enabling or Disabling WXGA Mode [WXGA MODE] Selecting [ON] will ...
Users Manual
Page 104
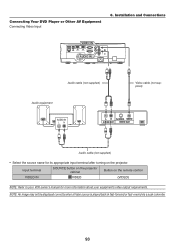
...equipment Video cable (not supplied) Audio cable (not supplied) • Select the source name for more information about your VCR owner's manual for its appropriate input terminal after turning on the remote control VIDEO IN VIDEO (VIDEO) NOTE: Refer to your equipment's video output requirements.... Input terminal SOURCE button on the projector cabinet Button on the projector. NOTE: An image may not be displayed correctly when a Video source is played back in fast-forward or fast-rewind...
...equipment Video cable (not supplied) Audio cable (not supplied) • Select the source name for more information about your VCR owner's manual for its appropriate input terminal after turning on the remote control VIDEO IN VIDEO (VIDEO) NOTE: Refer to your equipment's video output requirements.... Input terminal SOURCE button on the projector cabinet Button on the projector. NOTE: An image may not be displayed correctly when a Video source is played back in fast-forward or fast-rewind...
Users Manual
Page 105
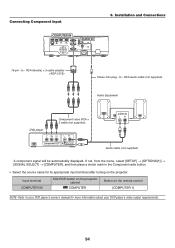
... the Component radio button. • Select the source name for more information about your DVD player's owner's manual for its appropriate input terminal after turning on the projector. Input terminal COMPUTER IN SOURCE button on the projector cabinet COMPUTER Button on the remote control (COMPUTER 1) NOTE: Refer to your DVD player's video output...
... the Component radio button. • Select the source name for more information about your DVD player's owner's manual for its appropriate input terminal after turning on the projector. Input terminal COMPUTER IN SOURCE button on the projector cabinet COMPUTER Button on the remote control (COMPUTER 1) NOTE: Refer to your DVD player's video output...
Users Manual
Page 109
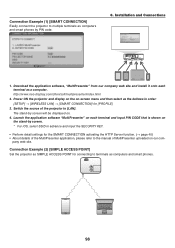
... Connection Example (2) [SIMPLE ACCESS POINT] Set the projector as SIMPLE ACCESS POINT for connecting to [LAN]. pany web site. Installation and Connections 1. Switch the source of MultiPresenter uploaded on our com- http://www.nec-display.com/dl/en/soft/multipresenter/index.html 2. ... • About details of the MultiPresenter application, please refer to the manual of the projector to terminals as computers and smart phones. 98 Connection Example (1) [SMART CONNECTION] Easily connect the projector to multiple terminals as computers and smart phones by screen will be displayed...
... Connection Example (2) [SIMPLE ACCESS POINT] Set the projector as SIMPLE ACCESS POINT for connecting to [LAN]. pany web site. Installation and Connections 1. Switch the source of MultiPresenter uploaded on our com- http://www.nec-display.com/dl/en/soft/multipresenter/index.html 2. ... • About details of the MultiPresenter application, please refer to the manual of the projector to terminals as computers and smart phones. 98 Connection Example (1) [SMART CONNECTION] Easily connect the projector to multiple terminals as computers and smart phones by screen will be displayed...


