

Specification Brochure
Page 4
...60143 866-NEC-MORE IN THE BOX Remote control, batteries, power cord, RGB signal cable, lens cap, user's manual on CD-ROM, quick start guide, product registration card, wired and wireless network setup guide, lens anti-theft screw ORDERING MODEL NUMBERS NP-PA622U Specifications for PA622U OPTICAL ...labor warranty to 4 years Extends term of InstaCare service program to 2 years Extends term of InstaCare service program to 3 years Projector recycling program, disposal certificate * Lens does not ship with location control Discreet source keys for source selection Remote diagnostics enable the ...
...60143 866-NEC-MORE IN THE BOX Remote control, batteries, power cord, RGB signal cable, lens cap, user's manual on CD-ROM, quick start guide, product registration card, wired and wireless network setup guide, lens anti-theft screw ORDERING MODEL NUMBERS NP-PA622U Specifications for PA622U OPTICAL ...labor warranty to 4 years Extends term of InstaCare service program to 2 years Extends term of InstaCare service program to 3 years Projector recycling program, disposal certificate * Lens does not ship with location control Discreet source keys for source selection Remote diagnostics enable the ...

User's Manual
Page 2
...Disc Association • CRESTRON and ROOMVIEW are subject to result from using the Projector. NOTES (1) The contents of this user's manual may be reprinted in the preparation of this user's manual; in the United States and other matters deemed to change without notice. ... or whole without permission. (2) The contents of this user's manual are registered trademarks of Crestron Electronics, Inc. however, should you notice any questionable points, errors or omissions, please contact us. (4) Notwithstanding article (3), NEC will not be responsible for trademark rights in the U.S. Ver....
...Disc Association • CRESTRON and ROOMVIEW are subject to result from using the Projector. NOTES (1) The contents of this user's manual may be reprinted in the preparation of this user's manual; in the United States and other matters deemed to change without notice. ... or whole without permission. (2) The contents of this user's manual are registered trademarks of Crestron Electronics, Inc. however, should you notice any questionable points, errors or omissions, please contact us. (4) Notwithstanding article (3), NEC will not be responsible for trademark rights in the U.S. Ver....

User's Manual
Page 3
...important information concerning the operation and maintenance of the LCD panel. The information should happen, continue to use your NEC projector and keep the manual handy for future reference. GPSGV, The highest sound pressure level is dangerous to make any part inside of ... legislation as possible, and should be sufficient to cause electrical shock. Doing so can result in a proper way. If this manual carefully before using your projector. i Machine Noise Information Regulation - 3. CAUTION To turn off main power, be easily accessible. Therefore, it is less than...
...important information concerning the operation and maintenance of the LCD panel. The information should happen, continue to use your NEC projector and keep the manual handy for future reference. GPSGV, The highest sound pressure level is dangerous to make any part inside of ... legislation as possible, and should be sufficient to cause electrical shock. Doing so can result in a proper way. If this manual carefully before using your projector. i Machine Noise Information Regulation - 3. CAUTION To turn off main power, be easily accessible. Therefore, it is less than...
User's Manual
Page 4
...equipment. Please read them carefully and heed all warnings. In addition, the ceiling must be strong enough to support the projector and the installation must be installed by NEC Display Solutions of bodily injury. - Please consult your supplier. near heaters, or heat radiating appliances. - in the ...to ensure the long life of the FCC Rules. Important Information WARNING TO CALIFORNIA RESIDENTS: Handling the cables supplied with this manual. in this product will not occur in accordance with any modifications or changes to radio or television reception, which the receiver...
...equipment. Please read them carefully and heed all warnings. In addition, the ceiling must be strong enough to support the projector and the installation must be installed by NEC Display Solutions of bodily injury. - Please consult your supplier. near heaters, or heat radiating appliances. - in the ...to ensure the long life of the FCC Rules. Important Information WARNING TO CALIFORNIA RESIDENTS: Handling the cables supplied with this manual. in this product will not occur in accordance with any modifications or changes to radio or television reception, which the receiver...
User's Manual
Page 6
... cord carefully. A damaged or frayed power cord can cause electric shock or fire. - The projector inside the soft case could be damaged. • Select [HIGH] in this user's manual. - Do not hold the lens part when carrying the projector. Misuses such as rugs. - If liquid has been spilled into fire. • If you...
... cord carefully. A damaged or frayed power cord can cause electric shock or fire. - The projector inside the soft case could be damaged. • Select [HIGH] in this user's manual. - Do not hold the lens part when carrying the projector. Misuses such as rugs. - If liquid has been spilled into fire. • If you...
User's Manual
Page 8
... for [STANDBY MODE], the following power management functions (1) and (2) have been set when shipped from too close a distance can enable the projector to automatically turn off in the user's manual included with your 3D eyeglasses or your eyes. • Avoid viewing 3D images for a prolonged period of the screen. Important Information Health... 15 minutes or longer after every hour of viewing. • If you or any material other than 3D images. • Allow a distance of using the projector. 1.
... for [STANDBY MODE], the following power management functions (1) and (2) have been set when shipped from too close a distance can enable the projector to automatically turn off in the user's manual included with your 3D eyeglasses or your eyes. • Avoid viewing 3D images for a prolonged period of the screen. Important Information Health... 15 minutes or longer after every hour of viewing. • If you or any material other than 3D images. • Allow a distance of using the projector. 1.

User's Manual
Page 10
...❾ After Use...26 3. Introduction...1 ❶ What's in the Box?...1 ❷ Introduction to the Projector 2 Congratulations on Startup screen (Menu Language Select screen 15 ❹ Selecting a Source...16 Selecting the computer...Connecting Your Computer/Connecting the Power Cord 13 ❸ Turning on the Projector 14 Note on Your Purchase of the Projector 2 Installation...2 Videos...2 Network...3 Energy-saving...3 Maintenance...3 About this user's manual 4 ❸ Part Names of the Projector 5 Front/Top...5 Rear...6 Control Panel/Indicator Section 7 Terminal Panel Features...
...❾ After Use...26 3. Introduction...1 ❶ What's in the Box?...1 ❷ Introduction to the Projector 2 Congratulations on Startup screen (Menu Language Select screen 15 ❹ Selecting a Source...16 Selecting the computer...Connecting Your Computer/Connecting the Power Cord 13 ❸ Turning on the Projector 14 Note on Your Purchase of the Projector 2 Installation...2 Videos...2 Network...3 Energy-saving...3 Maintenance...3 About this user's manual 4 ❸ Part Names of the Projector 5 Front/Top...5 Rear...6 Control Panel/Indicator Section 7 Terminal Panel Features...

User's Manual
Page 14
... them from falling) Attaching the straps to ship your projector. Introduction ❶ What's in Europe: You will find our current valid Guarantee Policy on the projector. (→ page 124) Straps (24J23901) (for lens * The projector is suspended from the ceiling. • Important Infomation ...) • Quick Setup Guide (For North America: 7N8N4141) (For Other countries than North America: 7N8N4141 and 7N8N4151) NEC Projector CD-ROM User's manual (PDF) and the utility software (7N951971) For North America only Registration card Limited warranty For customers in the Box? ...
... them from falling) Attaching the straps to ship your projector. Introduction ❶ What's in Europe: You will find our current valid Guarantee Policy on the projector. (→ page 124) Straps (24J23901) (for lens * The projector is suspended from the ceiling. • Important Infomation ...) • Quick Setup Guide (For North America: 7N8N4141) (For Other countries than North America: 7N8N4141 and 7N8N4151) NEC Projector CD-ROM User's manual (PDF) and the utility software (7N951971) For North America only Registration card Limited warranty For customers in the Box? ...
User's Manual
Page 18
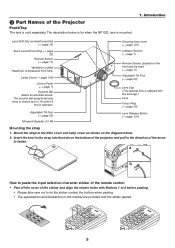
...; page 23) Monaural Speaker (10 W) Securing lever cover (→ page 135) Indicator Section (→ page 7) Remote Sensor (located on the bottom of the projector and pull in this manual are provided with Buttons 1 to 6 before pasting. • Please take care not to 0.18 inch/4.6 mm in the strap into the hole on... (→ page 11) Ventilation (outlet) Heated air is sold separately. Insert the knot in diameter. Mount the strap to fasten. ❸ Part Names of the Projector Front/Top The lens is exhausted from here.
...; page 23) Monaural Speaker (10 W) Securing lever cover (→ page 135) Indicator Section (→ page 7) Remote Sensor (located on the bottom of the projector and pull in this manual are provided with Buttons 1 to 6 before pasting. • Please take care not to 0.18 inch/4.6 mm in the strap into the hole on... (→ page 11) Ventilation (outlet) Heated air is sold separately. Insert the knot in diameter. Mount the strap to fasten. ❸ Part Names of the Projector Front/Top The lens is exhausted from here.

User's Manual
Page 37
Increase volume Decrease volume TIP: When no menus appear, the ◀ and ▶ buttons on the projector cabinet work as a volume control. This adjustment may be necessary when you connect your computer for the first time. [Poor picture] [Normal picture] NOTE: Some ... when an image is enlarged by using the D-ZOOM (+) button or when the menu is displayed. 24 2. button to adjust [HORIZONTAL], [VERTICAL], [CLOCK], and [PHASE] manually. (→ page 78, 79) ❼ Turning Up or Down Volume Sound level from the speaker can be displayed correctly. • If the Auto Adjust operation...
Increase volume Decrease volume TIP: When no menus appear, the ◀ and ▶ buttons on the projector cabinet work as a volume control. This adjustment may be necessary when you connect your computer for the first time. [Poor picture] [Normal picture] NOTE: Some ... when an image is enlarged by using the D-ZOOM (+) button or when the menu is displayed. 24 2. button to adjust [HORIZONTAL], [VERTICAL], [CLOCK], and [PHASE] manually. (→ page 78, 79) ❼ Turning Up or Down Volume Sound level from the speaker can be displayed correctly. • If the Auto Adjust operation...
User's Manual
Page 52
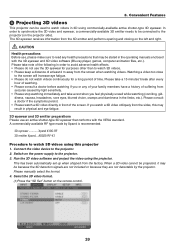
...eyewear. This has been automatically set up when shipped from the 3D emitter and performs opening and closing on the projector side). Please manually select the format. 4. diness, nausea, headaches, sore eyes, blurred vision, cramps and dumbness in the operating... manuals enclosed with the VESA standard. Convenient Features ❽ Projecting 3D videos This projector can be stated in the limbs, etc.). Please take a rest when you feel physically unwell while watching (vomiting,...
...eyewear. This has been automatically set up when shipped from the 3D emitter and performs opening and closing on the projector side). Please manually select the format. 4. diness, nausea, headaches, sore eyes, blurred vision, cramps and dumbness in the operating... manuals enclosed with the VESA standard. Convenient Features ❽ Projecting 3D videos This projector can be stated in the limbs, etc.). Please take a rest when you feel physically unwell while watching (vomiting,...
User's Manual
Page 53
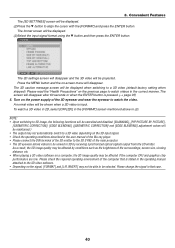
... on the 3D input signal. • Check the operating conditions described in the user manual of the Blu-ray player. • Please connect the DIN terminal of the 3D emitter to the 3D SYNC of the main projector. • The 3D eyewear allows videos to be viewed in 3D by conditions such... when the ENTER button is stated in the correct manner. Please read the "Health Precautions" on the previous page to watch videos in the operating manual attached to be displayed. (3)Select the input signal format using the ▼ button and then press the ENTER button. 3.
... on the 3D input signal. • Check the operating conditions described in the user manual of the Blu-ray player. • Please connect the DIN terminal of the 3D emitter to the 3D SYNC of the main projector. • The 3D eyewear allows videos to be viewed in 3D by conditions such... when the ENTER button is stated in the correct manner. Please read the "Health Precautions" on the previous page to watch videos in the operating manual attached to be displayed. (3)Select the input signal format using the ▼ button and then press the ENTER button. 3.
User's Manual
Page 54
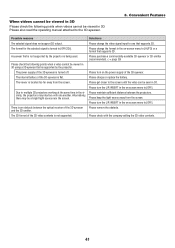
...company selling the 3D video contents. 41 Please maintain sufficient distance between the optical receiver of the 3D video contents is not supported by the projector. Please change the format in 3D using a 3D eyewear that supports 3D. Please keep the light source away from the screen. Please ...also read the operating manual attached to [OFF(2D)]. A eyewear that supports 3D. Please charge or replace the battery. The viewer is turned to the 3D eyewear. 3. ...
...company selling the 3D video contents. 41 Please maintain sufficient distance between the optical receiver of the 3D video contents is not supported by the projector. Please change the format in 3D using a 3D eyewear that supports 3D. Please keep the light source away from the screen. Please ...also read the operating manual attached to [OFF(2D)]. A eyewear that supports 3D. Please charge or replace the battery. The viewer is turned to the 3D eyewear. 3. ...
User's Manual
Page 108
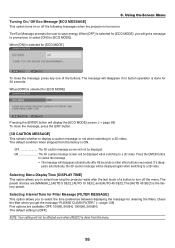
...to select [ON] for cleaning the filters. When [OFF] is done for [ECO MODE], you to select how long the projector waits after 60 seconds or when other buttons are [MANUAL], [AUTO 5 SEC], [AUTO 15 SEC], and [AUTO 45 SEC]. The message will disappear automatically after the last touch ...of the buttons. The preset choices are pressed. Press the ENTER button to turn off the following messages when the projector is done from the factory...
...to select [ON] for cleaning the filters. When [OFF] is done for [ECO MODE], you to select how long the projector waits after 60 seconds or when other buttons are [MANUAL], [AUTO 5 SEC], [AUTO 15 SEC], and [AUTO 45 SEC]. The message will disappear automatically after the last touch ...of the buttons. The preset choices are pressed. Press the ENTER button to turn off the following messages when the projector is done from the factory...
User's Manual
Page 109
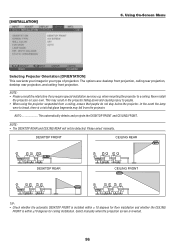
... [ORIENTATION] This reorients your image for ceiling installation. Never install the projector on your type of projection. Please select manually. The options are: desktop front projection, ceiling rear projection, desktop rear projection, and ceiling front projection. NOTE: • ... do not stay below the projector. DESKTOP FRONT CEILING REAR DESKTOP REAR CEILING FRONT TIP: • Check whether the automatic DESKTOP FRONT is installed within ± 10 degrees for floor installation and whether the CEILING FRONT is inverted. 96 Select manually when the projection screen is...
... [ORIENTATION] This reorients your image for ceiling installation. Never install the projector on your type of projection. Please select manually. The options are: desktop front projection, ceiling rear projection, desktop rear projection, and ceiling front projection. NOTE: • ... do not stay below the projector. DESKTOP FRONT CEILING REAR DESKTOP REAR CEILING FRONT TIP: • Check whether the automatic DESKTOP FRONT is installed within ± 10 degrees for floor installation and whether the CEILING FRONT is inverted. 96 Select manually when the projection screen is...

User's Manual
Page 114
... program this week only, clear the check mark. 4. NOTE: • Up to leave the projector on or off -timer setting will allow you to turn off the projector, set the off-time or do it manually so as not to 30 different timer settings can be programmed. • When [PROGRAM TIMER] ... error is occurring. • If the off-time setting is expired under the condition in which the power off is not possible, the off the projector by setting [ADVANCED SETTINGS]. FUNCTION Select a function to the [TOOLS] screen. ADVANCED SETTINGS Select power on/off, a type of the [EDIT] screen will ...
... program this week only, clear the check mark. 4. NOTE: • Up to leave the projector on or off -timer setting will allow you to turn off the projector, set the off-time or do it manually so as not to 30 different timer settings can be programmed. • When [PROGRAM TIMER] ... error is occurring. • If the off-time setting is expired under the condition in which the power off is not possible, the off the projector by setting [ADVANCED SETTINGS]. FUNCTION Select a function to the [TOOLS] screen. ADVANCED SETTINGS Select power on/off, a type of the [EDIT] screen will ...

User's Manual
Page 125
...AUTO ADJUST] This feature sets the Auto Adjust mode so that the computer signal can set the projector to default to country (NTSC, PAL, etc.). OFF The computer signal will be automatically or manually adjusted for an active source in two ways: [NORMAL] and [FINE]. Normally select this ...option. TIP: • The default setting when shipped from the HDMI 1 IN connector every time the projector is [NORMAL]. • When the AUTO ADJ...
...AUTO ADJUST] This feature sets the Auto Adjust mode so that the computer signal can set the projector to default to country (NTSC, PAL, etc.). OFF The computer signal will be automatically or manually adjusted for an active source in two ways: [NORMAL] and [FINE]. Normally select this ...option. TIP: • The default setting when shipped from the HDMI 1 IN connector every time the projector is [NORMAL]. • When the AUTO ADJ...
User's Manual
Page 138
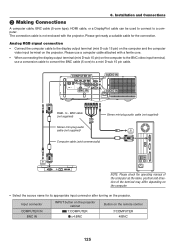
... Connect the computer cable to the display output terminal (mini D-sub 15 pin) on the computer and the computer video input terminal on the projector. BNC cable (not supplied) Stereo mini-plug audio cable (not supplied) Stereo mini-plug audio cable (not supplied) Computer cable (sold commercially...) NOTE: Please check the operating manual of the computer as the name, position and direction of the terminal may differ depending on the computer. • Select the source name ...
... Connect the computer cable to the display output terminal (mini D-sub 15 pin) on the computer and the computer video input terminal on the projector. BNC cable (not supplied) Stereo mini-plug audio cable (not supplied) Stereo mini-plug audio cable (not supplied) Computer cable (sold commercially...) NOTE: Please check the operating manual of the computer as the name, position and direction of the terminal may differ depending on the computer. • Select the source name ...
User's Manual
Page 145
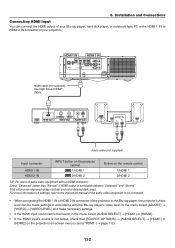
... 2:HDMI 2 Button on -screen menu is not output, check that [SOURCE OPTIONS] → [AUDIO SELECT] → [HDMI1] or [HDMI2] on the projector's on the remote control 1/HDMI 1 2/HDMI 2 TIP: For users of audio video equipment with the Blu-ray player's video level. 6. This will provide improved ... contrast and more information on settings, refer to the instruction manual of the audio video equipment to be connected. • When connecting the HDMI 1 IN or HDMI 2 IN connector of the projector to the Blu-ray player, the projector's video level can connect the HDMI output of your Blu-...
... 2:HDMI 2 Button on -screen menu is not output, check that [SOURCE OPTIONS] → [AUDIO SELECT] → [HDMI1] or [HDMI2] on the projector's on the remote control 1/HDMI 1 2/HDMI 2 TIP: For users of audio video equipment with the Blu-ray player's video level. 6. This will provide improved ... contrast and more information on settings, refer to the instruction manual of the audio video equipment to be connected. • When connecting the HDMI 1 IN or HDMI 2 IN connector of the projector to the Blu-ray player, the projector's video level can connect the HDMI output of your Blu-...

User's Manual
Page 188
...you continue to the user guide accompanied with the Horizontal/Vertical in the Menu. (→ page 116) • Enter your computer manufacturer. Using the projector at altitudes less than [HIGH ALTITUDE] mode when using the [RESET] in the [IMAGE OPTIONS]. (→ page 79) 175 For reinstalling or ...the lamp has reached the end of the lens. (→ page 158) • Has the lens been shifted by the projector. (→ page 164) • Adjust the computer image manually with your computer or graphics card, or contact the support center for [FAN MODE]. (→ page 97) • ...
...you continue to the user guide accompanied with the Horizontal/Vertical in the Menu. (→ page 116) • Enter your computer manufacturer. Using the projector at altitudes less than [HIGH ALTITUDE] mode when using the [RESET] in the [IMAGE OPTIONS]. (→ page 79) 175 For reinstalling or ...the lamp has reached the end of the lens. (→ page 158) • Has the lens been shifted by the projector. (→ page 164) • Adjust the computer image manually with your computer or graphics card, or contact the support center for [FAN MODE]. (→ page 97) • ...


