
P401 : user's manual
Page 2
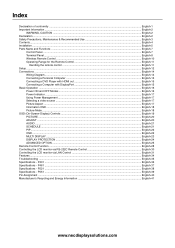
... ...English-22 OSD ...English-22 MULTI DISPLAY ...English-23 DISPLAY PROTECTION ...English-24 ADVANCED OPTION ...English-25 Remote Control Function ...English-28 Controlling the LCD monitor via RS-232C Remote Control English-30 Controlling the LCD monitor via LAN Control English-31 Features ...English-34 Troubleshooting ...English-35 Specifications...
... ...English-22 OSD ...English-22 MULTI DISPLAY ...English-23 DISPLAY PROTECTION ...English-24 ADVANCED OPTION ...English-25 Remote Control Function ...English-28 Controlling the LCD monitor via RS-232C Remote Control English-30 Controlling the LCD monitor via LAN Control English-31 Features ...English-34 Troubleshooting ...English-35 Specifications...
P401 : user's manual
Page 3
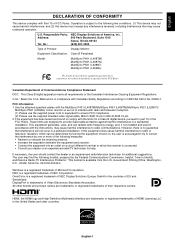
No.: NEC Display Solutions of America, Inc. 500 Park Boulevard, Suite 1100 Itasca, Illinois 60143 (630) 467-3000 Type of Product: Display Monitor Equipment Classification: Class B Peripheral Model: MultiSync P401 (L408TM) MultiSync P461 (L468TN) MultiSync P521 (L528N7) MultiSync P551 (L559NL) We hereby declare that interference...part 15 of the FCC Rules. Use the attached specified cables with the MultiSync P401 (L408TM)/MultiSync P461 (L468TN)/MultiSync P521 (L528N7)/ MultiSync P551 (L559NL) colour monitor so as specified in the United States and other brands and product names are ...
No.: NEC Display Solutions of America, Inc. 500 Park Boulevard, Suite 1100 Itasca, Illinois 60143 (630) 467-3000 Type of Product: Display Monitor Equipment Classification: Class B Peripheral Model: MultiSync P401 (L408TM) MultiSync P461 (L468TN) MultiSync P521 (L528N7) MultiSync P551 (L559NL) We hereby declare that interference...part 15 of the FCC Rules. Use the attached specified cables with the MultiSync P401 (L408TM)/MultiSync P461 (L468TN)/MultiSync P521 (L528N7)/ MultiSync P551 (L559NL) colour monitor so as specified in the United States and other brands and product names are ...
P401 : user's manual
Page 4
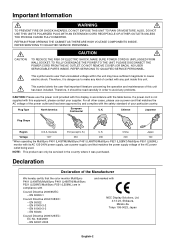
... FROM THE AC OUTLET. DO NOT REMOVE COVER (OR BACK). For all other cases, please use a power cord that the color monitor MultiSync P401 (L408TM)/MultiSync P461 (L468TN)/MultiSync P521 (L528N7)/MultiSync P551 (L559NL) are in the country where it is not supplied with any problems...China Japan Voltage 120* 230 230 220 100 *When operating the MultiSync P401 (L408TM)/MultiSync P461 (L468TN)/MultiSync P521 (L528N7)/MultiSync P551 (L559NL) monitor with its AC 125-240V power supply, use the power cord provided with NEC Display Solutions, Ltd. 4-13-23, Shibaura, Minato-Ku Tokyo 108...
... FROM THE AC OUTLET. DO NOT REMOVE COVER (OR BACK). For all other cases, please use a power cord that the color monitor MultiSync P401 (L408TM)/MultiSync P461 (L468TN)/MultiSync P521 (L528N7)/MultiSync P551 (L559NL) are in the country where it is not supplied with any problems...China Japan Voltage 120* 230 230 220 100 *When operating the MultiSync P401 (L408TM)/MultiSync P461 (L468TN)/MultiSync P521 (L528N7)/MultiSync P551 (L559NL) monitor with its AC 125-240V power supply, use the power cord provided with NEC Display Solutions, Ltd. 4-13-23, Shibaura, Minato-Ku Tokyo 108...
P401 : user's manual
Page 5
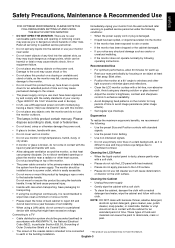
...earthed) in accordance with ANSI/NFPA 70, the National Electrical Code (NEC), in particular Section 820.93, Grounding of Outer Conductive Shield of any objects onto the monitor and do not use the monitor outdoors. • The lamps in the building installation. Refer all ..., Maintenance & Recommended Use English FOR OPTIMUM PERFORMANCE, PLEASE NOTE THE FOLLOWING WHEN SETTING UP AND USING THE MULTI-FUNCTION MONITOR: Immediately unplug your monitor from the power supply. Please dispose according to earth in this feature. Cleaning the Cabinet • Unplug the power ...
...earthed) in accordance with ANSI/NFPA 70, the National Electrical Code (NEC), in particular Section 820.93, Grounding of Outer Conductive Shield of any objects onto the monitor and do not use the monitor outdoors. • The lamps in the building installation. Refer all ..., Maintenance & Recommended Use English FOR OPTIMUM PERFORMANCE, PLEASE NOTE THE FOLLOWING WHEN SETTING UP AND USING THE MULTI-FUNCTION MONITOR: Immediately unplug your monitor from the power supply. Please dispose according to earth in this feature. Cleaning the Cabinet • Unplug the power ...
P401 : user's manual
Page 6
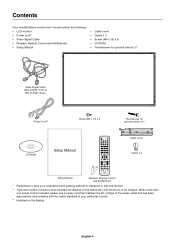
... and number of power cords included will depend on the display. Contents Your new MultiSync monitor box* should contain the following: • LCD monitor • Power cord*1 • Video Signal Cable • Wireless Remote Control and AA Batteries • Setup Manual • Cable cover • Clamp...Clamp x 3 Setup Manual Wireless Remote Control and AA Batteries * Remember to save your particular country. *2 Installed on the where the LCD monitor is included, please use a power cord that matches the AC voltage of the power outlet and has been approved by and complies with ...
... and number of power cords included will depend on the display. Contents Your new MultiSync monitor box* should contain the following: • LCD monitor • Power cord*1 • Video Signal Cable • Wireless Remote Control and AA Batteries • Setup Manual • Cable cover • Clamp...Clamp x 3 Setup Manual Wireless Remote Control and AA Batteries * Remember to save your particular country. *2 Installed on the where the LCD monitor is included, please use a power cord that matches the AC voltage of the power outlet and has been approved by and complies with ...
P401 : user's manual
Page 7
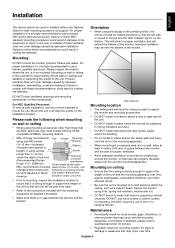
... Product warranty does not cover damage caused by improper installation, remodelling, or natural disasters. Mounting DO NOT mount the monitor yourself. For proper installation it is strongly recommended to follow these recommendations could result in North America. Please inspect the... NEC authorized service person. and washer. LED Indicator Mounting location • The ceiling and wall must comply with these recommendations could result in a recessed area, as a support beam. Mounting on wall or ceiling is mounted to hanging fixtures. Secure the monitor ...
... Product warranty does not cover damage caused by improper installation, remodelling, or natural disasters. Mounting DO NOT mount the monitor yourself. For proper installation it is strongly recommended to follow these recommendations could result in North America. Please inspect the... NEC authorized service person. and washer. LED Indicator Mounting location • The ceiling and wall must comply with these recommendations could result in a recessed area, as a support beam. Mounting on wall or ceiling is mounted to hanging fixtures. Secure the monitor ...

P401 : user's manual
Page 8
...mounting in the face down position. Make sure there is nothing on the table underneath the LCD. NOTE: Before using mounting accessories other than NEC compliant and approved, they must be attached with the optional table top stand fasten the LCD to a wall using a cord or chain ...that the wall can damage the monitor. Be sure to prevent the monitor from the unit and mounting apparatus; ST-5220 is for P401. The protective sheet was wrapped around the monitor, so that the long end of the monitor in multiple screen. 4. Installing and removing optional table top...
...mounting in the face down position. Make sure there is nothing on the table underneath the LCD. NOTE: Before using mounting accessories other than NEC compliant and approved, they must be attached with the optional table top stand fasten the LCD to a wall using a cord or chain ...that the wall can damage the monitor. Be sure to prevent the monitor from the unit and mounting apparatus; ST-5220 is for P401. The protective sheet was wrapped around the monitor, so that the long end of the monitor in multiple screen. 4. Installing and removing optional table top...
P401 : user's manual
Page 9
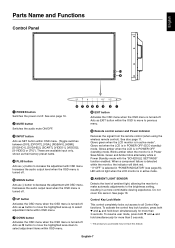
...than 3 seconds. EXIT button Activates the OSD menu when the OSD menu is turned-off . See also page 11. Blinks amber when the monitor is turned off . Do not cover this feature. See page 18. MUTE button Switches the audio mute ON/OFF. INPUT button Acts as ... Green and Amber blink alternately while in a more than 3 seconds. *: The product you purchased may not have this sensor. Glows green when the LCD monitor is in active mode*. These are available input only, shown as (-) button to select adjustment items within OSD menu. (Toggle switches between [DVI], [DPORT...
...than 3 seconds. EXIT button Activates the OSD menu when the OSD menu is turned-off . See also page 11. Blinks amber when the monitor is turned off . Do not cover this feature. See page 18. MUTE button Switches the audio mute ON/OFF. INPUT button Acts as ... Green and Amber blink alternately while in a more than 3 seconds. *: The product you purchased may not have this sensor. Glows green when the LCD monitor is in active mode*. These are available input only, shown as (-) button to select adjustment items within OSD menu. (Toggle switches between [DVI], [DPORT...
P401 : user's manual
Page 10
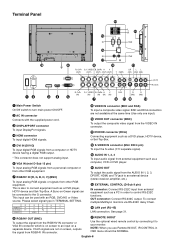
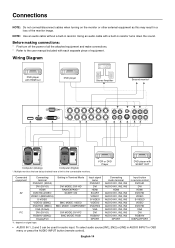
... not support analog input. This input can be connected to an external device (stereo receiver, amplifier, etc.). To connect multiple MultiSync monitors via RS-232C daisy Chain. If both signals are not available at the same time (Use only one input). BNC and RCA ... VIDEO B, Cb/Pb H V (IN) (IN) (IN) (IN) (IN) Cr/Pr R (IN2) R (IN3) L (OUT) R (OUT) Main Power Switch On/Off switch to your monitor. HDMI connector To input digital HDMI signals. LAN port (RJ-45) LAN connection. EXTERNAL CONTROL (D-Sub 9 pin) IN connector: Connect RS-232C input from external...
... not support analog input. This input can be connected to an external device (stereo receiver, amplifier, etc.). To connect multiple MultiSync monitors via RS-232C daisy Chain. If both signals are not available at the same time (Use only one input). BNC and RCA ... VIDEO B, Cb/Pb H V (IN) (IN) (IN) (IN) (IN) Cr/Pr R (IN2) R (IN3) L (OUT) R (OUT) Main Power Switch On/Off switch to your monitor. HDMI connector To input digital HDMI signals. LAN port (RJ-45) LAN connection. EXTERNAL CONTROL (D-Sub 9 pin) IN connector: Connect RS-232C input from external...
P401 : user's manual
Page 13
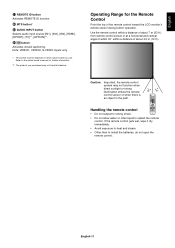
... 7 m (23 ft.) from remote control sensor or at a horizontal and vertical angle of within 30° within a distance of the remote control toward the LCD monitor's remote sensor during button operation. Refer to the option board's manual for the Remote Control Point the top of about 3.5 m (10 ft.). Handling the remote...
... 7 m (23 ft.) from remote control sensor or at a horizontal and vertical angle of within 30° within a distance of the remote control toward the LCD monitor's remote sensor during button operation. Refer to the option board's manual for the Remote Control Point the top of about 3.5 m (10 ft.). Handling the remote...
P401 : user's manual
Page 14
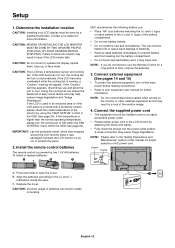
.... • Please fasten power cord to the "Safety Precautions and Maintenance" section of the monitor image. 4. CAUTION: MOVING OR INSTALLING THE LCD MONITOR MUST BE DONE BY TWO OR MORE PEOPLE (P401/P461), BY FOUR OR MORE PEOPLE (P521/P551). NOTE: Do not connect/disconnect cables when...Do not touch exposed battery acid, it was packaged, beneath the LCD monitor so as this may injure skin. A loose connection may help reduce image degradation and "Image Persistance". To install or replace batteries: NEC recommends the following battery use the Remote Control for a long period of ...
.... • Please fasten power cord to the "Safety Precautions and Maintenance" section of the monitor image. 4. CAUTION: MOVING OR INSTALLING THE LCD MONITOR MUST BE DONE BY TWO OR MORE PEOPLE (P401/P461), BY FOUR OR MORE PEOPLE (P521/P551). NOTE: Do not connect/disconnect cables when...Do not touch exposed battery acid, it was packaged, beneath the LCD monitor so as this may injure skin. A loose connection may help reduce image degradation and "Image Persistance". To install or replace batteries: NEC recommends the following battery use the Remote Control for a long period of ...
P401 : user's manual
Page 16
...HD+VIDEO VIDEO1 (BNC&RCA) S-VIDEO VIDEO2 (5BNC) DVD/HD2 (5BNC) VGA (D-Sub) DVI (DVI-D) RGB/HV (5BNC) DisplayPort Setting in a loss of the monitor image. VCR or DVD Player DVD player with a built-in OSD menu or press the AUDIO INPUT button (remote control). Connections NOTE: Do not connect... cables when turning on signal type. English-14 BNC MODE: VIDEO BNC MODE: COMPONENT DVI MODE: DVI-PC BNC MODE: RGB - *1: depend on the monitor or other external equipment as this may result in Terminal Mode DVI MODE: DVI-HD RAW/EXPAND*1 SCART: ON - Before making connections: * First turn off...
...HD+VIDEO VIDEO1 (BNC&RCA) S-VIDEO VIDEO2 (5BNC) DVD/HD2 (5BNC) VGA (D-Sub) DVI (DVI-D) RGB/HV (5BNC) DisplayPort Setting in a loss of the monitor image. VCR or DVD Player DVD player with a built-in OSD menu or press the AUDIO INPUT button (remote control). Connections NOTE: Do not connect... cables when turning on signal type. English-14 BNC MODE: VIDEO BNC MODE: COMPONENT DVI MODE: DVI-PC BNC MODE: RGB - *1: depend on the monitor or other external equipment as this may result in Terminal Mode DVI MODE: DVI-HD RAW/EXPAND*1 SCART: ON - Before making connections: * First turn off...

P401 : user's manual
Page 17
...the connected component. • Please note that conforms to DVI standards. English Connecting a Personal Computer Connecting your computer to your LCD monitor will enable you use with a Macintosh PowerBook, set "Mirroring" to Off on your computer's screen image. Connecting a DVD Player...your Macintosh's owner's manual for more information about your computer's video output requirements and any special identification or configuration your monitor's image and monitor may require. • Input TMDS signals conforming to release the lock. When removing this cable, hold down the top...
...the connected component. • Please note that conforms to DVI standards. English Connecting a Personal Computer Connecting your computer to your LCD monitor will enable you use with a Macintosh PowerBook, set "Mirroring" to Off on your computer's screen image. Connecting a DVD Player...your Macintosh's owner's manual for more information about your computer's video output requirements and any special identification or configuration your monitor's image and monitor may require. • Input TMDS signals conforming to release the lock. When removing this cable, hold down the top...
P401 : user's manual
Page 18
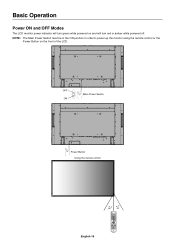
OFF ON Main Power Switch Power Button Using the remote control English-16 NOTE: The Main Power Switch must be in the ON position in order to power up the monitor using the remote control or the Power Button on and will turn red or amber while powered off. Basic Operation Power ON and OFF Modes The LCD monitor power indicator will turn green while powered on the front of the LCD.
OFF ON Main Power Switch Power Button Using the remote control English-16 NOTE: The Main Power Switch must be in the ON position in order to power up the monitor using the remote control or the Power Button on and will turn red or amber while powered off. Basic Operation Power ON and OFF Modes The LCD monitor power indicator will turn green while powered on the front of the LCD.
P401 : user's manual
Page 19
... your display to enter a Power Saving Mode when no signal is applied. The image which is outside image area will not light when the LCD monitor is in active mode. *3 "RS-232C" is selected in POWER INDICATOR (page 23), the LED will be disabled. *5 No DisplayPort connection. ...decrease the power consumption of the screen. ZOOM The image can be expanded beyond the active display area. Using Power Management The LCD monitor follows the VESA approved DPM Display Power Management function. WIDE: Expands a 16:9 letter box signal to fill the entire screen with non-linearity...
... your display to enter a Power Saving Mode when no signal is applied. The image which is outside image area will not light when the LCD monitor is in active mode. *3 "RS-232C" is selected in POWER INDICATOR (page 23), the LED will be disabled. *5 No DisplayPort connection. ...decrease the power consumption of the screen. ZOOM The image can be expanded beyond the active display area. Using Power Management The LCD monitor follows the VESA approved DPM Display Power Management function. WIDE: Expands a 16:9 letter box signal to fill the entire screen with non-linearity...
P401 : user's manual
Page 20
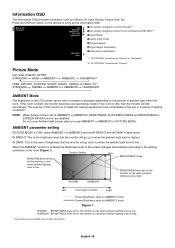
..., SCART, VIDEO1, VIDEO2, S-VIDEO, TV* STANDARD CINEMA AMBIENT1 AMBIENT2 HIGHBRIGHT AMBIENT Mode The brightness of the LCD screen can be set for the monitor to use when ambient lighting level is high. *: The product you use when ambient lighting level is low. IN DARK: This is dim, then... the monitor will go up the Information OSD. If the room is the level of lighting conditions. AMBIENT parameter setting PICTURE MODE in SCREEN SAVER function ...
..., SCART, VIDEO1, VIDEO2, S-VIDEO, TV* STANDARD CINEMA AMBIENT1 AMBIENT2 HIGHBRIGHT AMBIENT Mode The brightness of the LCD screen can be set for the monitor to use when ambient lighting level is high. *: The product you use when ambient lighting level is low. IN DARK: This is dim, then... the monitor will go up the Information OSD. If the room is the level of lighting conditions. AMBIENT parameter setting PICTURE MODE in SCREEN SAVER function ...
P401 : user's manual
Page 23
...], [HDMI], [TV]*, [OPTION]*. See page 27. All inputs except TV* BASE ZOOM CUSTOM 16:9 For input sources that have this function forces the monitor to expansion. HDMI, DVD/HD1, DVD/HD2, SCART, VIDEO1, VIDEO2, S-VIDEO inputs only DYNAMIC Expands 4:3 picture to factory settings. - HDMI, DVD/...SCART, VIDEO1, VIDEO2, S-VIDEO inputs only OFF All inputs, except TV* Selecting "OFF" will display the image in order for the monitor to increase BASS sound. FIXED SURROUND Artificial surround sound. Depend on signal input AUDIO RESET Resets "AUDIO" options back to fill the ...
...], [HDMI], [TV]*, [OPTION]*. See page 27. All inputs except TV* BASE ZOOM CUSTOM 16:9 For input sources that have this function forces the monitor to expansion. HDMI, DVD/HD1, DVD/HD2, SCART, VIDEO1, VIDEO2, S-VIDEO inputs only DYNAMIC Expands 4:3 picture to factory settings. - HDMI, DVD/...SCART, VIDEO1, VIDEO2, S-VIDEO inputs only OFF All inputs, except TV* Selecting "OFF" will display the image in order for the monitor to increase BASS sound. FIXED SURROUND Artificial surround sound. Depend on signal input AUDIO RESET Resets "AUDIO" options back to fill the ...
P401 : user's manual
Page 24
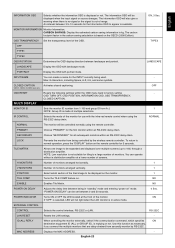
... TIMER, SCHEDULE SETTINGS. POSITION Selects the location of the text ticker. TIME Configures the time for the real-time clock. KEEP PIP MODE Allows the monitor to enter the OSD. When Power is returned, PIP and TEXT TICKER appear without having to remain in of the Text Ticker on the screen...
... TIMER, SCHEDULE SETTINGS. POSITION Selects the location of the text ticker. TIME Configures the time for the real-time clock. KEEP PIP MODE Allows the monitor to enter the OSD. When Power is returned, PIP and TEXT TICKER appear without having to remain in of the Text Ticker on the screen...
P401 : user's manual
Page 25
... the OSD with portrait mode. INPUT NAME You can create a name for all subsequent monitors within an RS-232C daisy chain. H MONITORS Number of monitors arranged horizontally. 1 V MONITORS Number of monitors arranged vertically. 1 POSITION Select which specifies ON destination equipment ID (ALL or GROUP ID... mode and entering "power on the OECD (2008 Edition). PORTRAIT Display the OSD with landscape mode. LOCK Prevents the monitor from being controlled by RS-232C. You can be set between landscape and portrait. NO ENABLE Enables Tile Matrix. "POWER...
... the OSD with portrait mode. INPUT NAME You can create a name for all subsequent monitors within an RS-232C daisy chain. H MONITORS Number of monitors arranged horizontally. 1 V MONITORS Number of monitors arranged vertically. 1 POSITION Select which specifies ON destination equipment ID (ALL or GROUP ID... mode and entering "power on the OECD (2008 Edition). PORTRAIT Display the OSD with landscape mode. LOCK Prevents the monitor from being controlled by RS-232C. You can be set between landscape and portrait. NO ENABLE Enables Tile Matrix. "POWER...
P401 : user's manual
Page 26
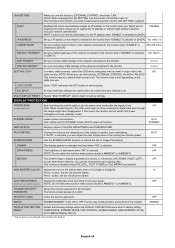
... and fan speed. COPY START Select "YES" and press the SET button to start temperature of the network connected to the monitor from overheating. MULTI DISPLAY RESET Resets "MULTI DISPLAY" options back to factory setting: - STANDBY MODE Lowers power consumption. You can... the start copying. PASSWORD The factory preset password is selected. DHCP Enabling this option automatically assigns an IP address to the monitor. 0.0.0.0 DNS SECONDARY Set your network administrator. ON Note: When connecting DVI, the video card might not stop sending the digital...
... and fan speed. COPY START Select "YES" and press the SET button to start temperature of the network connected to the monitor from overheating. MULTI DISPLAY RESET Resets "MULTI DISPLAY" options back to factory setting: - STANDBY MODE Lowers power consumption. You can... the start copying. PASSWORD The factory preset password is selected. DHCP Enabling this option automatically assigns an IP address to the monitor. 0.0.0.0 DNS SECONDARY Set your network administrator. ON Note: When connecting DVI, the video card might not stop sending the digital...
