PV32-AVT UM
Page 1
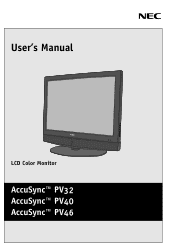
User's Manual LCD Color Monitor AccuSync™ PV32 AccuSync™ PV40 AccuSync™ PV46
User's Manual LCD Color Monitor AccuSync™ PV32 AccuSync™ PV40 AccuSync™ PV46
PV32-AVT UM
Page 5
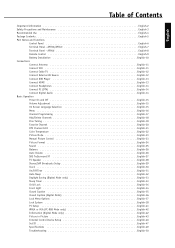
APV46 English-8 Remote Control English-9 Battery Installation English-10 Connections Connect Antenna English-11 Connect VCR English-11 Connect Cable TV English-12 Connect External AV Source English-12 Connect DVD Player English-13 Connect HDMI English-13 Connect Headphones English-14 Connect PC (DTV English-14 Connect Digital Audio English-14 Basic Operation Power On and Off English-15 Volume Adjustment English-15 On Screen Language Selection English-15 Menu English-16 Channel Programming English-17 Add/Delete Channels English-18 Fine Tuning English-19 Favorite Channel ...
APV46 English-8 Remote Control English-9 Battery Installation English-10 Connections Connect Antenna English-11 Connect VCR English-11 Connect Cable TV English-12 Connect External AV Source English-12 Connect DVD Player English-13 Connect HDMI English-13 Connect Headphones English-14 Connect PC (DTV English-14 Connect Digital Audio English-14 Basic Operation Power On and Off English-15 Volume Adjustment English-15 On Screen Language Selection English-15 Menu English-16 Channel Programming English-17 Add/Delete Channels English-18 Fine Tuning English-19 Favorite Channel ...

PV32-AVT UM
Page 6
... different from the U.S. English-2 REFRAIN FROM OPENING THE CABINET AS THERE ARE HIGH VOLTAGE COMPONENTS INSIDE. Use the attached specified cables with the ASPV32-AVT, ASPV40-AVT, or ASPV46-AVT color monitor so as not to CAN/CSA C22.2 No. 60950-1. 2. Important Information WARNING TO PREVENT FIRE OR SHOCK HAZARDS, DO NOT EXPOSE...
... different from the U.S. English-2 REFRAIN FROM OPENING THE CABINET AS THERE ARE HIGH VOLTAGE COMPONENTS INSIDE. Use the attached specified cables with the ASPV32-AVT, ASPV40-AVT, or ASPV46-AVT color monitor so as not to CAN/CSA C22.2 No. 60950-1. 2. Important Information WARNING TO PREVENT FIRE OR SHOCK HAZARDS, DO NOT EXPOSE...
PV32-AVT UM
Page 7
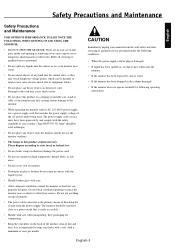
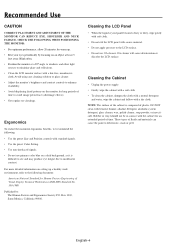
Please dispose according to state, local, or federal law. • Do not bend, crimp or otherwise damage the power cord. • Do not use monitor in high temperature, humid, dusty, or oily areas. • Do not cover vent on monitor. • If monitor or glass is broken, do not use the monitor outdoors. • The lamps in this product on a sloping or unstable cart, stand or table, as the monitor may expose you use must have fallen into the cabinet slots, as they may touch dangerous voltage points, which can properly dissipate. Do not block ventilated openings or place the ...
Please dispose according to state, local, or federal law. • Do not bend, crimp or otherwise damage the power cord. • Do not use monitor in high temperature, humid, dusty, or oily areas. • Do not cover vent on monitor. • If monitor or glass is broken, do not use the monitor outdoors. • The lamps in this product on a sloping or unstable cart, stand or table, as the monitor may expose you use must have fallen into the cabinet slots, as they may touch dangerous voltage points, which can properly dissipate. Do not block ventilated openings or place the ...
PV32-AVT UM
Page 8
OA cleaner will cause deterioration or discolor the LCD surface. CHECK THE FOLLOWING WHEN POSITIONING THE MONITOR: • For optimum performance, allow 20 minutes for warm up a healthy work environment, refer to the following : • Use the preset Size and Position controls with coarse material. • Do not apply pressure to the LCD surface. • Do not use primary color blue on a dark background, as it is composed of time to enhance readability. • Avoid displaying fixed patterns on the monitor for long periods of plastic. Cleaning the LCD Panel • When the ...
OA cleaner will cause deterioration or discolor the LCD surface. CHECK THE FOLLOWING WHEN POSITIONING THE MONITOR: • For optimum performance, allow 20 minutes for warm up a healthy work environment, refer to the following : • Use the preset Size and Position controls with coarse material. • Do not apply pressure to the LCD surface. • Do not use primary color blue on a dark background, as it is composed of time to enhance readability. • Avoid displaying fixed patterns on the monitor for long periods of plastic. Cleaning the LCD Panel • When the ...
PV32-AVT UM
Page 9
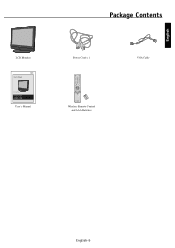
English Package Contents LCD Monitor User's Manual LCD Color Monitor AccuSync™ PV32 AccuSync™ PV40 AccuSync™ PV46 User's Manual Power Cord x 1 POWER ON POWER OFF - TV/DTV PICTURE ASPECT SOUND MENU FAVORITE INPUT MUTE MTS Q.VIEW CH EDIT INFO SLEEP Wireless Remote Control and AAA Batteries VGA Cable English-5
English Package Contents LCD Monitor User's Manual LCD Color Monitor AccuSync™ PV32 AccuSync™ PV40 AccuSync™ PV46 User's Manual Power Cord x 1 POWER ON POWER OFF - TV/DTV PICTURE ASPECT SOUND MENU FAVORITE INPUT MUTE MTS Q.VIEW CH EDIT INFO SLEEP Wireless Remote Control and AAA Batteries VGA Cable English-5
PV32-AVT UM
Page 10
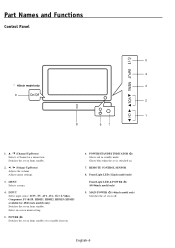
F / G (Volume Up/Down) Adjusts the volume. Switches the set on or off. Front Light LED (32inch model only) Front Light LED & POWER (r) (40/46inch model only) 9. MAIN POWER (r) (46inch model only) Switches the set is switched on -screen menu setting. 5. Glows blue when the set on from standby. 2. Part Names and Functions Control Panel * 46inch model only 9 On/Off 5 4 3 2 1 8 67 1. Adjusts menu settings. 3. English-6 Select on . 7. REMOTE CONTROL SENSOR 8. POWER/STANDBY INDICATOR (r) Glows red in standby mode. D / E (Channel Up/Down) Selects a Channel or a ...
F / G (Volume Up/Down) Adjusts the volume. Switches the set on or off. Front Light LED (32inch model only) Front Light LED & POWER (r) (40/46inch model only) 9. MAIN POWER (r) (46inch model only) Switches the set is switched on -screen menu setting. 5. Glows blue when the set on from standby. 2. Part Names and Functions Control Panel * 46inch model only 9 On/Off 5 4 3 2 1 8 67 1. Adjusts menu settings. 3. English-6 Select on . 7. REMOTE CONTROL SENSOR 8. POWER/STANDBY INDICATOR (r) Glows red in standby mode. D / E (Channel Up/Down) Selects a Channel or a ...
PV32-AVT UM
Page 11
APV32/APV40 English (R) AUDIO (L) VIDEO (R) AUDIO (L) VIDEO AV3 IN 1 5 AV OUT AC IN * 40inch model only HDMI1 IN (DVI) HDMI2 IN (DVI) HDMI3 IN (DVI) 2 3 4 5 HDMI1 IN (DVI) HDMI2 IN (DVI) AUDIO IN (RGB/DVI) RGB IN (PC/DTV) DIGITAL AUDIO (OPTICAL) OUT Y Pb Pr (L) AUDIO (R) COMPONENT IN S-VIDEO IN RS-232 SERVICE VIDEO (L) AUDIO (R) AV1 IN VIDEO (L) AUDIO (R) AV2 IN 10 9 13 12 6 8 7 Air 11 1. DIGITAL AUDIO (OPTICAL) OUT Connect digital audio from various types of the set. 6. VGA Connector Connect the Analog output of a personal computer to this socket. 3. AC IN ...
APV32/APV40 English (R) AUDIO (L) VIDEO (R) AUDIO (L) VIDEO AV3 IN 1 5 AV OUT AC IN * 40inch model only HDMI1 IN (DVI) HDMI2 IN (DVI) HDMI3 IN (DVI) 2 3 4 5 HDMI1 IN (DVI) HDMI2 IN (DVI) AUDIO IN (RGB/DVI) RGB IN (PC/DTV) DIGITAL AUDIO (OPTICAL) OUT Y Pb Pr (L) AUDIO (R) COMPONENT IN S-VIDEO IN RS-232 SERVICE VIDEO (L) AUDIO (R) AV1 IN VIDEO (L) AUDIO (R) AV2 IN 10 9 13 12 6 8 7 Air 11 1. DIGITAL AUDIO (OPTICAL) OUT Connect digital audio from various types of the set. 6. VGA Connector Connect the Analog output of a personal computer to this socket. 3. AC IN ...
PV32-AVT UM
Page 12
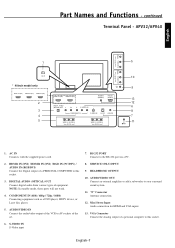
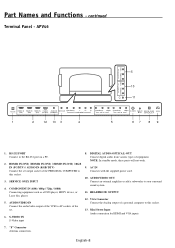
Part Names and Functions - English-8 RS-232 PORT Connect to your surround sound system. 11. S-VIDEO IN S-Video input 8. VGA Connector Connect the Analog output of the PERSONAL COMPUTER to this socket. 13. IN DIGITAL AUDIO AC IN AV1 IN AV2 IN (OPTICAL)OUT 1 2 12 13 3 4 5 67 89 1. AUDIO/VIDEO OUT Connect an external amplifier or add a subwoofer to the RS-232 port on a PC. 2. "F" Connector Antenna connection. continued Terminal Panel - HDMI1 IN (DVI) / HDMI2 IN (DVI) / HDMI3 IN (DVI) / RGB IN (PC/DTV) / AUDIO IN (RGB/ DTV) Connect the set . 6. AC IN Connects ...
Part Names and Functions - English-8 RS-232 PORT Connect to your surround sound system. 11. S-VIDEO IN S-Video input 8. VGA Connector Connect the Analog output of the PERSONAL COMPUTER to this socket. 13. IN DIGITAL AUDIO AC IN AV1 IN AV2 IN (OPTICAL)OUT 1 2 12 13 3 4 5 67 89 1. AUDIO/VIDEO OUT Connect an external amplifier or add a subwoofer to the RS-232 port on a PC. 2. "F" Connector Antenna connection. continued Terminal Panel - HDMI1 IN (DVI) / HDMI2 IN (DVI) / HDMI3 IN (DVI) / RGB IN (PC/DTV) / AUDIO IN (RGB/ DTV) Connect the set . 6. AC IN Connects ...
PV32-AVT UM
Page 13
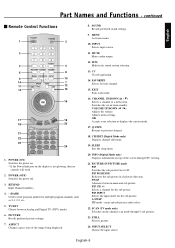
KEYPAD Input Channel numbers. 4. - (DASH) Used to previous channel. 18. SOUND Recalls preferred sound settings. 9. INPUT Selects input source. 11. MUTE Mutes audio output. 12. CC Closed captioning. 14. FAVORITE Selects favorite channel. 15. VOLUME UP/DOWN (F / G) Adjusts the volume. Q.VIEW Returns to enter program number for the sub picture. PICTURE IN PICTURE mode PIP Switches the sub picture On or Off. POWER (OFF) Switches the power off. 3. CHANNEL UP/DOWN (D / E) Selects a channel or a menu item. OK Accepts your selection or displays the current mode. 17. INFO (...
KEYPAD Input Channel numbers. 4. - (DASH) Used to previous channel. 18. SOUND Recalls preferred sound settings. 9. INPUT Selects input source. 11. MUTE Mutes audio output. 12. CC Closed captioning. 14. FAVORITE Selects favorite channel. 15. VOLUME UP/DOWN (F / G) Adjusts the volume. Q.VIEW Returns to enter program number for the sub picture. PICTURE IN PICTURE mode PIP Switches the sub picture On or Off. POWER (OFF) Switches the power off. 3. CHANNEL UP/DOWN (D / E) Selects a channel or a menu item. OK Accepts your selection or displays the current mode. 17. INFO (...
PV32-AVT UM
Page 14
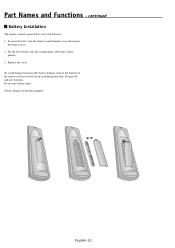
To insert batteries, turn the remote control handset over and remove the battery cover. 2. Put the two batteries into the compartment, observing battery polarity. 3. To avoid damage from possible battery leakage, remove the batteries if the remote will not be used for an extended period time. Do mix old and new batteries. Replace the cover. Always dispose of batteries properly. English-10 continued Battery Installation The remote control is powered by two AAA batteries. 1. Do not mix battery types. Part Names and Functions -
To insert batteries, turn the remote control handset over and remove the battery cover. 2. Put the two batteries into the compartment, observing battery polarity. 3. To avoid damage from possible battery leakage, remove the batteries if the remote will not be used for an extended period time. Do mix old and new batteries. Replace the cover. Always dispose of batteries properly. English-10 continued Battery Installation The remote control is powered by two AAA batteries. 1. Do not mix battery types. Part Names and Functions -

PV32-AVT UM
Page 15
Connection 2 1. Insert a video tape into the VCR and press PLAY on the TV. Unplug the set and all equipment before connecting to avoid damage to the set > RF coaxial wire (75 ohms) ANT VHF antenna UHF antenna outdoor antenna Single-family Dwellings / Houses (Connect to the VCR owner's manual.) 3. Connect the audio/video output jacks on VCR to the corresponding input jacks on the VCR. (Refer to wall jack for specific information. Items shown may be connected to the set will automatically revert to bend the internal wire when connecting the antenna. When connecting the TV to ...
Connection 2 1. Insert a video tape into the VCR and press PLAY on the TV. Unplug the set and all equipment before connecting to avoid damage to the set > RF coaxial wire (75 ohms) ANT VHF antenna UHF antenna outdoor antenna Single-family Dwellings / Houses (Connect to the VCR owner's manual.) 3. Connect the audio/video output jacks on VCR to the corresponding input jacks on the VCR. (Refer to wall jack for specific information. Items shown may be connected to the set will automatically revert to bend the internal wire when connecting the antenna. When connecting the TV to ...
PV32-AVT UM
Page 16
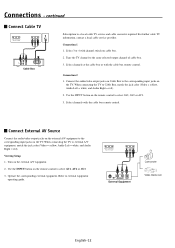
When connecting the TV to external equipment operating guide. Viewing Setup 1. Refer to Cable Box, match the jack color (Video = yellow, Audio Left = white, and Audio Right = red). 2. Select 3 or 4 with the cable box remote control. When connecting the TV to a local cable TV service and cable converter required. Connection 1 1. Select channels at the cable box or with channel switch on the remote control to the corresponding input jacks on the external A/V equipment. 2. Select channels with the cable box remote control. Operate the corresponding external equipment....
When connecting the TV to external equipment operating guide. Viewing Setup 1. Refer to Cable Box, match the jack color (Video = yellow, Audio Left = white, and Audio Right = red). 2. Select 3 or 4 with the cable box remote control. When connecting the TV to a local cable TV service and cable converter required. Connection 1 1. Select channels at the cable box or with channel switch on the remote control to the corresponding input jacks on the external A/V equipment. 2. Select channels with the cable box remote control. Operate the corresponding external equipment....
PV32-AVT UM
Page 17
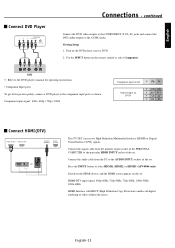
Refer to the DVD player's manual for operating instructions. • Component Input ports To get better picture quality, connect a DVD player to select HDMI1, HDMI2, or HDMI3 (APV40/46 only). Press the INPUT button to the component input ports as shown. Switch on the HDMI device, and the HDMI screen appears on the remote control to the AUDIO jacks. Y PB PR (R) AUDIO (L) DVD 3. HDMI-DTV input signal: 480p-60Hz, 720p-50Hz, 720p-60Hz, 1080i-50Hz, 1080i-60Hz. Use the INPUT button on the set . Connect the signal cable from the PC to the particular HDMI INPUT socket of the set...
Refer to the DVD player's manual for operating instructions. • Component Input ports To get better picture quality, connect a DVD player to select HDMI1, HDMI2, or HDMI3 (APV40/46 only). Press the INPUT button to the component input ports as shown. Switch on the HDMI device, and the HDMI screen appears on the remote control to the AUDIO jacks. Y PB PR (R) AUDIO (L) DVD 3. HDMI-DTV input signal: 480p-60Hz, 720p-50Hz, 720p-60Hz, 1080i-50Hz, 1080i-60Hz. Use the INPUT button on the set . Connect the signal cable from the PC to the particular HDMI INPUT socket of the set...
PV32-AVT UM
Page 18
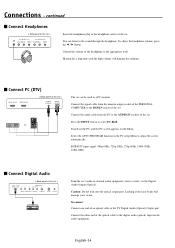
You can be used as a PC monitor. Connect the audio cable from the monitor output socket of the PERSONAL COMPUTER to the headphone socket of the headphone to adjust the screen automatically. Switch on the PC, and the PC screen appears on the audio equipment. Connect Digital Audio < Back panel of the set . Caution: Do not look into the optical output port. To connect Connect one end of the optical cable to select PC-RGB. Connect the other end of an optical cable to external audio equipment (stereo system) via the Digital Audio Output (Optical). Select the AUTO...
You can be used as a PC monitor. Connect the audio cable from the monitor output socket of the PERSONAL COMPUTER to the headphone socket of the headphone to adjust the screen automatically. Switch on the PC, and the PC screen appears on the audio equipment. Connect Digital Audio < Back panel of the set . Caution: Do not look into the optical output port. To connect Connect one end of the optical cable to select PC-RGB. Connect the other end of an optical cable to external audio equipment (stereo system) via the Digital Audio Output (Optical). Select the AUTO...
PV32-AVT UM
Page 19
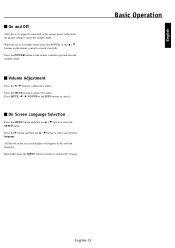
Press the MUTE button to normal TV viewing. On Screen Language Selection Press the MENU button and then use D / E button to select your desired language. Basic Operation English-15 When the set is in the selected language. Press the G button and then use D / E button to select the SETUP menu. Repeatedly press the MENU button to return to silence the audio. Press MUTE, F / G, SOUND or the MTS buttons to go back into the standby mode. Press the POWER button on the remote control to cancel. Volume Adjustment Press the F / G button to adjust the volume. All the text of ...
Press the MUTE button to normal TV viewing. On Screen Language Selection Press the MENU button and then use D / E button to select your desired language. Basic Operation English-15 When the set is in the selected language. Press the G button and then use D / E button to select the SETUP menu. Repeatedly press the MENU button to return to silence the audio. Press MUTE, F / G, SOUND or the MTS buttons to go back into the standby mode. Press the POWER button on the remote control to cancel. Volume Adjustment Press the F / G button to adjust the volume. All the text of ...
PV32-AVT UM
Page 20
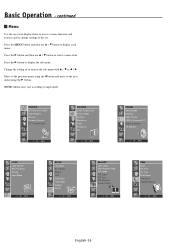
NOTE: Menus may vary according to display the sub menu. STATION DTV Antenna Select Auto Program Manual Favorite Channel DTV Channel Edit OK MENU PICTURE Color Temperature Picture Mode Contrast Brightness Color Sharpness Tint OK MENU SOUND Sound Mode Balance Auto Volume SRS TruSurround XT Audio Language TV Speaker OK MENU LOCK Lock System Set Password Rating Input Block OK MENU SETUP Language PC Control WXGA VGA Child Lock Front Light Caption Set ID OK MENU Main/PIP Main Input Main Aspect Ratio PIP Mode PIP Input PIP Size PIP Position Audio Output OK MENU TIME Clock Off Time On Time...
NOTE: Menus may vary according to display the sub menu. STATION DTV Antenna Select Auto Program Manual Favorite Channel DTV Channel Edit OK MENU PICTURE Color Temperature Picture Mode Contrast Brightness Color Sharpness Tint OK MENU SOUND Sound Mode Balance Auto Volume SRS TruSurround XT Audio Language TV Speaker OK MENU LOCK Lock System Set Password Rating Input Block OK MENU SETUP Language PC Control WXGA VGA Child Lock Front Light Caption Set ID OK MENU Main/PIP Main Input Main Aspect Ratio PIP Mode PIP Input PIP Size PIP Position Audio Output OK MENU TIME Clock Off Time On Time...
PV32-AVT UM
Page 21
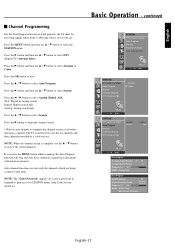
Press the G button and then use D / E button to select System. Press the G button and then use the D / E buttons to STATION menu, if the Look System turued on. ALL: Digital & Analog search Digital: Digital search only Analog: Analog search only Press the D / E button to save. Basic Operation - Press the OK button to select Search. If you press the MENU button while scanning, the Auto Program function will remain in required to gain access to review the stored channels. English Channel Programming For the Auto Program function to work properly, the TV must ...
Press the G button and then use D / E button to select System. Press the G button and then use the D / E buttons to STATION menu, if the Look System turued on. ALL: Digital & Analog search Digital: Digital search only Analog: Analog search only Press the D / E button to save. Basic Operation - Press the OK button to select Search. If you press the MENU button while scanning, the Auto Program function will remain in required to gain access to review the stored channels. English Channel Programming For the Auto Program function to work properly, the TV must ...
PV32-AVT UM
Page 22
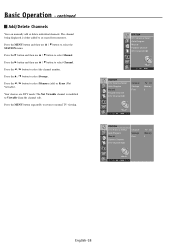
Press the F / G button to normal TV viewing. Press the MENU button repeatedly to return to select the channel number. Press the D / E button to select Memory (add) or Erase (Not Viewable). Press the F / G button to select Storage. Press the MENU button and then use D / E button to select Manual. Basic Operation - STATION DTV Antenna Select Auto Program Manual Favorite Channel DTV Channel Edit OK MENU STATION DTV Antenna Select Auto Program Manual Favorite Channel DTV Channel Edit Channel Storage Fine TV 45 Memory 0 OK MENU STATION DTV Antenna Select Auto Program ...
Press the F / G button to normal TV viewing. Press the MENU button repeatedly to return to select the channel number. Press the D / E button to select Memory (add) or Erase (Not Viewable). Press the F / G button to select Storage. Press the MENU button and then use D / E button to select Manual. Basic Operation - STATION DTV Antenna Select Auto Program Manual Favorite Channel DTV Channel Edit OK MENU STATION DTV Antenna Select Auto Program Manual Favorite Channel DTV Channel Edit Channel Storage Fine TV 45 Memory 0 OK MENU STATION DTV Antenna Select Auto Program ...
PV32-AVT UM
Page 23
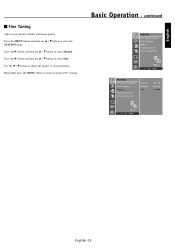
English Fine Tuning Adjusts poor picture stability and image quality. Press the G button and then use D / E button to select Fine. Press the G button and then use D / E button to normal TV viewing. Use the F / G button to adjust the picture to select the STATION menu. continued STATION DTV Antenna Select Auto Program Manual Favorite Channel DTV Channel Edit OK MENU STATION DTV Antenna Select Auto Program Manual Favorite Channel DTV Channel Edit Channel Storage Fine TV 45 Memory +1 GGG OK MENU English-19 Press the MENU button and then use D / E button to your preference. ...
English Fine Tuning Adjusts poor picture stability and image quality. Press the G button and then use D / E button to select Fine. Press the G button and then use D / E button to normal TV viewing. Use the F / G button to adjust the picture to select the STATION menu. continued STATION DTV Antenna Select Auto Program Manual Favorite Channel DTV Channel Edit OK MENU STATION DTV Antenna Select Auto Program Manual Favorite Channel DTV Channel Edit Channel Storage Fine TV 45 Memory +1 GGG OK MENU English-19 Press the MENU button and then use D / E button to your preference. ...