
User Manual
Page 2
...less than 70 dB (A) according to ISO 3744 or ISO 7779. ALL SERVICING MUST BE DONE BY QUALIFIED NEC SERVICE PERSONNEL. Do not place your projector in a residential installation. Exposure to direct sunlight, smoke or steam can damage in accordance with this equipment. ...a Black (five Amps) fuse installed for help. Important Information Safety Cautions Precautions Please read this manual carefully before using your NEC VT660/VT560/ VT460 Projector and keep the manual handy for a Class B digital device, pursuant to Part 15 of the FCC Rules. Acoustic Noise Information...
...less than 70 dB (A) according to ISO 3744 or ISO 7779. ALL SERVICING MUST BE DONE BY QUALIFIED NEC SERVICE PERSONNEL. Do not place your projector in a residential installation. Exposure to direct sunlight, smoke or steam can damage in accordance with this equipment. ...a Black (five Amps) fuse installed for help. Important Information Safety Cautions Precautions Please read this manual carefully before using your NEC VT660/VT560/ VT460 Projector and keep the manual handy for a Class B digital device, pursuant to Part 15 of the FCC Rules. Acoustic Noise Information...

User Manual
Page 3
... to your VT660/VT560/VT460 Projector. Ensure that there is on . Serious damage to cool the projector before attempting to the projector: * While the Hour...projector. If something should fall into the lens while the projector is turned off the projector. The light being projected from falling into your projector. Projector VOLUME PJ PICTURE HELP FREEZE ASPECT MAGNIFY PIC-MUTE SELECT OFF VIDEO S-VIDEO...to retrieve any items such as the pieces of heat inside your projector. Do no use your NEC dealer for consecutive days. (From the menu, select [Advanced]...
... to your VT660/VT560/VT460 Projector. Ensure that there is on . Serious damage to cool the projector before attempting to the projector: * While the Hour...projector. If something should fall into the lens while the projector is turned off the projector. The light being projected from falling into your projector. Projector VOLUME PJ PICTURE HELP FREEZE ASPECT MAGNIFY PIC-MUTE SELECT OFF VIDEO S-VIDEO...to retrieve any items such as the pieces of heat inside your projector. Do no use your NEC dealer for consecutive days. (From the menu, select [Advanced]...
User Manual
Page 4
...E-10 Remote Control Precautions E-10 Operating Range for Wireless Remote Control E-10 INSTALLATION AND CONNECTIONS E-11 Setting Up the Screen and the Projector E-11 Selecting a Location E-11 Throw Distance and Screen Size E-12 Making Connections ...E-13 Connecting Your PC or Macintosh Computer E-13 ... VCR or Laser Disc Player E-16 Connecting the Supplied Power Cable E-16 PROJECTING AN IMAGE (BASIC OPERATION E-17 Turning on the Projector E-17 Selecting a Source ...E-18 Adjusting the Picture Size and Position E-18 Correcting the Vertical Keystone Distortion E-19 Optimizing RGB Picture...
...E-10 Remote Control Precautions E-10 Operating Range for Wireless Remote Control E-10 INSTALLATION AND CONNECTIONS E-11 Setting Up the Screen and the Projector E-11 Selecting a Location E-11 Throw Distance and Screen Size E-12 Making Connections ...E-13 Connecting Your PC or Macintosh Computer E-13 ... VCR or Laser Disc Player E-16 Connecting the Supplied Power Cable E-16 PROJECTING AN IMAGE (BASIC OPERATION E-17 Turning on the Projector E-17 Selecting a Source ...E-18 Adjusting the Picture Size and Position E-18 Correcting the Vertical Keystone Distortion E-19 Optimizing RGB Picture...

User Manual
Page 5
... injury. Please consult your dealer for video in Western Europe. NOTE: Composite video standards are trademarks of The VT660/VT560/ VT460 Projector The VT660/VT560/VT460 is light, compact, easy to carry, and complements any office, boardroom or auditorium. The remote control can control the projector with NEC's Advanced AccuBlend on VT460. Take a few minutes now to 120...
... injury. Please consult your dealer for video in Western Europe. NOTE: Composite video standards are trademarks of The VT660/VT560/ VT460 Projector The VT660/VT560/VT460 is light, compact, easy to carry, and complements any office, boardroom or auditorium. The remote control can control the projector with NEC's Advanced AccuBlend on VT460. Take a few minutes now to 120...
User Manual
Page 6
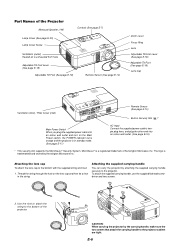
... are tight. Thread the string through the hole on the Main Power switch, the POWER indicator turns orange and the projector is in standby mode. (See page E-17) AC Input Connect the supplied power cable's twopin plug here, and plug the other end into an active ... Kensington Microware Inc. Use the rivet to attach the string to the bottom with the supplied string and rivet: 1. Part Names of the Projector Monaural Speaker (1W) Lamp Cover (See page E-30) Lamp Cover Screw Controls (See page E-7) Ventilation (outlet) Heated air is exhausted from here Adjustable Tilt Foot ...
... are tight. Thread the string through the hole on the Main Power switch, the POWER indicator turns orange and the projector is in standby mode. (See page E-17) AC Input Connect the supplied power cable's twopin plug here, and plug the other end into an active ... Kensington Microware Inc. Use the rivet to attach the string to the bottom with the supplied string and rivet: 1. Part Names of the Projector Monaural Speaker (1W) Lamp Cover (See page E-30) Lamp Cover Screw Controls (See page E-7) Ventilation (outlet) Heated air is exhausted from here Adjustable Tilt Foot ...

User Manual
Page 7
... as a volume control. CANCEL Button Pressing this light blinks red rapidly, it indicates that the lamp mode is not attached properly or the projector has overheated. A press of two seconds. ENTER Button Executes your RGB port. 8. STATUS Indicator If this button will return to your menu...lamp cover is set to select an RGB source from a VCR. 7. See the Lamp Indicator section on and off the projector, press this button to select an S-Video source from computer or component equipment connected to the previous menu. To turn on ; When an image is enabled. If ...
... as a volume control. CANCEL Button Pressing this light blinks red rapidly, it indicates that the lamp mode is not attached properly or the projector has overheated. A press of two seconds. ENTER Button Executes your RGB port. 8. STATUS Indicator If this button will return to your menu...lamp cover is set to select an RGB source from a VCR. 7. See the Lamp Indicator section on and off the projector, press this button to select an S-Video source from computer or component equipment connected to the previous menu. To turn on ; When an image is enabled. If ...

User Manual
Page 9
..., which is indicated by lighting the PJ button. See page E-7. 13. NOTE: To turn off the projector, press the POWER OFF button twice. 5. VIDEO Button Press this button to select a video source from a VCR. 7. Button Use this button to adjust an RGB source for an optimal picture. Press ... to display the Picture adjustement screen such as the mouse left -click) button to switch the SELECT, CANCEL, and ENTER buttons between the Projector mode (lit red) and the Computer mode. It works the same way as a volume control. PICTURE Button Press this button works as Brightness...
..., which is indicated by lighting the PJ button. See page E-7. 13. NOTE: To turn off the projector, press the POWER OFF button twice. 5. VIDEO Button Press this button to select a video source from a VCR. 7. Button Use this button to adjust an RGB source for an optimal picture. Press ... to display the Picture adjustement screen such as the mouse left -click) button to switch the SELECT, CANCEL, and ENTER buttons between the Projector mode (lit red) and the Computer mode. It works the same way as a volume control. PICTURE Button Press this button works as Brightness...
User Manual
Page 10
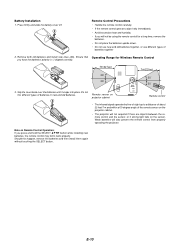
... install new ones (AA). Note on the sensor. Battery Installation 1. Remote sensor on the projector cabinet. • The projector will also prevent the remote control from properly operating the projector. Remote Control Precautions • Handle the remote control carefully. • If the remote control... gets wet, wipe it snaps into place. Do not mix different types of the remote sensor on projector cabinet Remote control •...
... install new ones (AA). Note on the sensor. Battery Installation 1. Remote sensor on the projector cabinet. • The projector will also prevent the remote control from properly operating the projector. Remote Control Precautions • Handle the remote control carefully. • If the remote control... gets wet, wipe it snaps into place. Do not mix different types of the remote sensor on projector cabinet Remote control •...

User Manual
Page 11
... the wall outlet. 3 Setting Up the Screen and the Projector Selecting a Location The further your computer or video equipment to set up a screen and the projector. 2 Connect your projector is from the screen or wall, the larger the image. See page E-16. 2 NOTE: Ensure that the power cable and any ... when it is not in use . INSTALLATION AND CONNECTIONS This section describes how to set up your projector and how to connect video and audio sources. 1 Your projector is simple to the projector. Use the drawing below as a guide. 4520..78((6WW1))8.XX0133(.28W3(.(1H)W1(X)H2/)14)11XL/75....
... the wall outlet. 3 Setting Up the Screen and the Projector Selecting a Location The further your computer or video equipment to set up a screen and the projector. 2 Connect your projector is from the screen or wall, the larger the image. See page E-16. 2 NOTE: Ensure that the power cable and any ... when it is not in use . INSTALLATION AND CONNECTIONS This section describes how to set up your projector and how to connect video and audio sources. 1 Your projector is simple to the projector. Use the drawing below as a guide. 4520..78((6WW1))8.XX0133(.28W3(.(1H)W1(X)H2/)14)11XL/75....

User Manual
Page 12
... (bottom of installation. Contact your NEC dealer if you can dissipate. If the projector falls to reflect your projector so heat can be injured and the projector severely damaged. • Do not use the MENU and SELECT buttons on your projector cabinet or your projector on a solid, level surface. Contact your NEC dealer for desktop) α = Throw...
... (bottom of installation. Contact your NEC dealer if you can dissipate. If the projector falls to reflect your projector so heat can be injured and the projector severely damaged. • Do not use the MENU and SELECT buttons on your projector cabinet or your projector on a solid, level surface. Contact your NEC dealer for desktop) α = Throw...

User Manual
Page 13
... turned on after a period of the computer's screen-saver or power management software. * If you to project your PC or Macintosh to the projector. To connect to your Mac's video port. NOTE: For older Macintosh, use a commercially available distribution amplifier if connecting a signal cable longer than the supplied one. In most cases...
... turned on after a period of the computer's screen-saver or power management software. * If you to project your PC or Macintosh to the projector. To connect to your Mac's video port. NOTE: For older Macintosh, use a commercially available distribution amplifier if connecting a signal cable longer than the supplied one. In most cases...

User Manual
Page 14
...-SC1 NOTE: The ADP-SC1 SCART adapter is also referred to the projector and your video equipment. 3. Contact your NEC dealer in Europe for this connection. Use the NEC ADP-SC1 SCART adapter and a commercially available SCART cable to the projector and your NEC dealer in the standby mode, the image may not be correctly displayed...
...-SC1 NOTE: The ADP-SC1 SCART adapter is also referred to the projector and your video equipment. 3. Contact your NEC dealer in Europe for this connection. Use the NEC ADP-SC1 SCART adapter and a commercially available SCART cable to the projector and your NEC dealer in the standby mode, the image may not be correctly displayed...

User Manual
Page 15
...;3 cable to connect your DVD player to the RGB IN connector on the projector and DVD player. To do so, simply: 1. NOTE: Refer to your projector and DVD player. 2. If your DVD player has the component video (Y,Cb,Cr) output, use common RCA cables (not provided) to connect a composite... VIDEO output of the DVD player to a DVD player with component output or Video output. Turn on the projector. Turn off the power to your DVD player's owner's ...
...;3 cable to connect your DVD player to the RGB IN connector on the projector and DVD player. To do so, simply: 1. NOTE: Refer to your projector and DVD player. 2. If your DVD player has the component video (Y,Cb,Cr) output, use common RCA cables (not provided) to connect a composite... VIDEO output of the DVD player to a DVD player with component output or Video output. Turn on the projector. Turn off the power to your DVD player's owner's ...

User Manual
Page 16
... or laser disc player to your audio equipment (if your projector. NOTE: An image may not be displayed correctly when a Video or S-Video source is played back in the wall outlet. Connecting Your VCR or Laser Disc Player Video cable (not supplied) S-Video cable (not supplied) VCR/ Laser disc player AUDIO OUT ...connections, simply: 1. First connect the supplied power cable's two-pin plug to the Video input on the projector and the VCR or laser disc player. E-16 Connect one end of your RCA cable to the video output connector on the back of your VCR or laser disc player, connect the ...
... or laser disc player to your audio equipment (if your projector. NOTE: An image may not be displayed correctly when a Video or S-Video source is played back in the wall outlet. Connecting Your VCR or Laser Disc Player Video cable (not supplied) S-Video cable (not supplied) VCR/ Laser disc player AUDIO OUT ...connections, simply: 1. First connect the supplied power cable's two-pin plug to the Video input on the projector and the VCR or laser disc player. E-16 Connect one end of your RCA cable to the video output connector on the back of your VCR or laser disc player, connect the ...

User Manual
Page 17
... the opportunity to select one of the seven languages for the menu. This screen gives you will not turn on your projector, ensure that the computer or video source is turned on and that the main power switch is set to Eco, the Lamp indicator will the power indicator turn on to... to the off in or unplugging the supplied power cable, make sure that your lens cap is too high, the projector detects abnormal high temperature. If one of usable life, the projector will get the Startup screen. PROJECTING AN IMAGE (BASIC OPERATION) This section describes how to turn on the power. In...
... the opportunity to select one of the seven languages for the menu. This screen gives you will not turn on your projector, ensure that the computer or video source is turned on and that the main power switch is set to Eco, the Lamp indicator will the power indicator turn on to... to the off in or unplugging the supplied power cable, make sure that your lens cap is too high, the projector detects abnormal high temperature. If one of usable life, the projector will get the Startup screen. PROJECTING AN IMAGE (BASIC OPERATION) This section describes how to turn on the power. In...

User Manual
Page 18
... 4. Push down adjustment for proper adjustment. E-18 Lift the front edge of the RGB, VIDEO or S-VIDEO buttons. See page E-19. Adjust the Tilt Foot 1. Lift the front edge of the projector to center the image vertically. * If the projected image does not appear square to the... Foot 2. Lower the front of the RGB, VIDEO or S-VIDEO buttons. Selecting a Source Selecting the computer or video source Using the Remote Control OFF ON POWER VIDEO AUTO ADJ. S-VIDEO RGB MENU L SELECT NTER CANCE PJ E Press any one of the projector to the desired height (max. 40mm/ 1.6") ...
... 4. Push down adjustment for proper adjustment. E-18 Lift the front edge of the RGB, VIDEO or S-VIDEO buttons. See page E-19. Adjust the Tilt Foot 1. Lift the front edge of the projector to center the image vertically. * If the projected image does not appear square to the... Foot 2. Lower the front of the RGB, VIDEO or S-VIDEO buttons. Selecting a Source Selecting the computer or video source Using the Remote Control OFF ON POWER VIDEO AUTO ADJ. S-VIDEO RGB MENU L SELECT NTER CANCE PJ E Press any one of the projector to the desired height (max. 40mm/ 1.6") ...
User Manual
Page 19
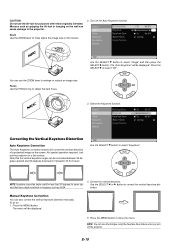
... use the ZOOM lever to enlarge or reduce an image size. Turn off the projector. Zoom Use the ZOOM lever to the projector. 2. Use the SELECT H button to close the menu. Just put the projector on the screen. To do so: 1. The menu will be displayed. Press...the SELECT E button. E-19 You can also correct the vertical keystone distortion manually. The "Auto Keystone" will correct the vertical distortion of projector tilt from level. Correcting the Vertical Keystone Distortion Auto Keystone Correction The Auto Keystone correction feature will be displayed. 5. Use the SELECT H...
... use the ZOOM lever to enlarge or reduce an image size. Turn off the projector. Zoom Use the ZOOM lever to the projector. 2. Use the SELECT H button to close the menu. Just put the projector on the screen. To do so: 1. The menu will be displayed. Press...the SELECT E button. E-19 You can also correct the vertical keystone distortion manually. The "Auto Keystone" will correct the vertical distortion of projector tilt from level. Correcting the Vertical Keystone Distortion Auto Keystone Correction The Auto Keystone correction feature will be displayed. 5. Use the SELECT H...

User Manual
Page 20
... increase volume decrease volume E-20 message will go out. After the projector turns off, the cooling fans keep operating for 60 seconds (Cooling-off the Main Power switch. This function also adjusts the clock phase to reduce video noise, dot interference or cross talk. (This is evident when part...ON/STAND BY) button on the projector cabinet or the POWER OFF button on the projector can cause damage to the projector: • While the Hour Glass icon appears. • While the cooling fans are running. (The cooling fans continue to work for component and video signal. • If the Auto...
... increase volume decrease volume E-20 message will go out. After the projector turns off, the cooling fans keep operating for 60 seconds (Cooling-off the Main Power switch. This function also adjusts the clock phase to reduce video noise, dot interference or cross talk. (This is evident when part...ON/STAND BY) button on the projector cabinet or the POWER OFF button on the projector can cause damage to the projector: • While the Hour Glass icon appears. • While the cooling fans are running. (The cooling fans continue to work for component and video signal. • If the Auto...

User Manual
Page 21
... on your computer, you are in the Projector mode, which allows the projector menu operation using the USB Port The remote mouse function can be used with a Windows 98, Windows Me, Windows XP, Windows 2000 or Mac OS operating system. S-VIDEO RGB MENU SELECT NTER CANCE PJ Works as... the SELECT button on the projector. USB port (PC) Connecting to your computer for clicking through your computer settings. In the Computer mode the...
... on your computer, you are in the Projector mode, which allows the projector menu operation using the USB Port The remote mouse function can be used with a Windows 98, Windows Me, Windows XP, Windows 2000 or Mac OS operating system. S-VIDEO RGB MENU SELECT NTER CANCE PJ Works as... the SELECT button on the projector. USB port (PC) Connecting to your computer for clicking through your computer settings. In the Computer mode the...
User Manual
Page 22
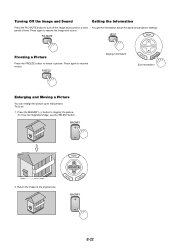
...: 1. Return the image to restore the image and sound. Press again to the original size. PIC-MUTE You get the information about the signal and projector settings. Turning Off the Image and Sound Getting the Information Press the PIC-MUTE button to turn off the image and sound for a short period...
...: 1. Return the image to restore the image and sound. Press again to the original size. PIC-MUTE You get the information about the signal and projector settings. Turning Off the Image and Sound Getting the Information Press the PIC-MUTE button to turn off the image and sound for a short period...


