
NP115 : RS232 codes- Projectors
Page 1
... Series VT : VT770 Series VT70 : VT37/VT47/VT480/VT57/VT570/VT575/VT670/VT676 Series VT80 : VT48/VT480/VT580 Series VT90 : VT49/VT490/VT590/VT595/VT695 Series VT700 : VT700 WT : W T600/W T610/WT615 Series NP4100 : NP4100/NP4100W Series NP3250 : NP1250/NP2250/NP3250...Series Contents 1. List of Response Error Codes 1. Table of Commands 5. Connection Method 3. Command Descriptions 6. Projector Control NEC projectors make use of control commands that control the functions of the projector via connection with a personal computer or another device. Interface Conditions...
... Series VT : VT770 Series VT70 : VT37/VT47/VT480/VT57/VT570/VT575/VT670/VT676 Series VT80 : VT48/VT480/VT580 Series VT90 : VT49/VT490/VT590/VT595/VT695 Series VT700 : VT700 WT : W T600/W T610/WT615 Series NP4100 : NP4100/NP4100W Series NP3250 : NP1250/NP2250/NP3250...Series Contents 1. List of Response Error Codes 1. Table of Commands 5. Connection Method 3. Command Descriptions 6. Projector Control NEC projectors make use of control commands that control the functions of the projector via connection with a personal computer or another device. Interface Conditions...

NP115 : RS232 codes- Projectors
Page 3
... No No VT37/VT47/VT470/VT57/VT570/VT575VT/670/VT676 Yes No No No No No VT48/VT480/VT580 Yes No No No No No VT49/VT490/VT590/VT595/VT695/VT700 Yes No No No No No VT700 Yes No No No No No VT800 Yes No No No Yes No WT600WT...
... No No VT37/VT47/VT470/VT57/VT570/VT575VT/670/VT676 Yes No No No No No VT48/VT480/VT580 Yes No No No No No VT49/VT490/VT590/VT595/VT695/VT700 Yes No No No No No VT700 Yes No No No No No VT800 Yes No No No Yes No WT600WT...

NP115 : RS232 codes- Projectors
Page 12
...D0H D0H D0H D0H 80H 90H (*3) Checksum: "CKS" inscription This is the value when forwarding a factory. Command Descriptions Precautions with Inscriptions: (*1) Projector ID It is the value of the lower 8 bits of the results calculated in byte units from all of response". (*5) Term "RGB" ...NP3150/NP3151W, NP1250/NP2250/NP3250/NP3250W, NP1200/NP2200, NP4000/NP4001, NP4100/NP4100W, NP905/NP901W/VT800, LT25/LT30/LT35, VT48/VT480/VT580, VT49/VT490/VT590/VT595/VT695/VT700, NP300/NP400/NP500/NP500W/NP500WS/NP600/NP600S, NP310/NP410/MP410W/NP510/NP510W/NP610WS/NP610/NP610S, NP40/NP50/NP60/NP41...
...D0H D0H D0H D0H 80H 90H (*3) Checksum: "CKS" inscription This is the value when forwarding a factory. Command Descriptions Precautions with Inscriptions: (*1) Projector ID It is the value of the lower 8 bits of the results calculated in byte units from all of response". (*5) Term "RGB" ...NP3150/NP3151W, NP1250/NP2250/NP3250/NP3250W, NP1200/NP2200, NP4000/NP4001, NP4100/NP4100W, NP905/NP901W/VT800, LT25/LT30/LT35, VT48/VT480/VT580, VT49/VT490/VT590/VT595/VT695/VT700, NP300/NP400/NP500/NP500W/NP500WS/NP600/NP600S, NP310/NP410/MP410W/NP510/NP510W/NP610WS/NP610/NP610S, NP40/NP50/NP60/NP41...

VT49/490/590 spec sheet
Page 2
...Arlington Heights Rd., Suite 400 Itasca, IL 60143-1248 Easy does it VT49, VT491 and VT590 digital projectors. All specifications subject to display properly on non-white surfaces. ADP-CV1E) VGA, SVGA, XGA, SXGA, SXGA+, UXGA Yes RGB 1 (analog) 15 ...VT49 205W / 170W VT491 255W / 205W VT590 255W / 205W MECHANICAL Installation Orientation Dimensions (WxDxH) Net Weight Fan Noise Regulations Floor / Front, Floor / Rear, Ceiling / Front, Ceiling / Rear 12.2 x 10.2 x 4.4 in program For more information, call 1.800.NEC.INFO or visit www.necvisualsystems.com NEC is covered for VT490...
...Arlington Heights Rd., Suite 400 Itasca, IL 60143-1248 Easy does it VT49, VT491 and VT590 digital projectors. All specifications subject to display properly on non-white surfaces. ADP-CV1E) VGA, SVGA, XGA, SXGA, SXGA+, UXGA Yes RGB 1 (analog) 15 ...VT49 205W / 170W VT491 255W / 205W VT590 255W / 205W MECHANICAL Installation Orientation Dimensions (WxDxH) Net Weight Fan Noise Regulations Floor / Front, Floor / Rear, Ceiling / Front, Ceiling / Rear 12.2 x 10.2 x 4.4 in program For more information, call 1.800.NEC.INFO or visit www.necvisualsystems.com NEC is covered for VT490...

VT49/490/491/590/595/695 UM
Page 3
.... The information should be installed as implemented in each Member State requires that important information concerning the operation and maintenance of the LCD panel. Machine Noise Information Regulation - 3. THERE ARE HIGH-VOLTAGE COMPONENTS INSIDE. Doing so can result in accordance with any part... level is located on the surface of this unit has been provided. If this should be disposed of your NEC VT695/VT595/VT590/VT490/VT59/VT49 projector and keep the manual handy for future reference. The static background from normal household waste. After collecting the used...
.... The information should be installed as implemented in each Member State requires that important information concerning the operation and maintenance of the LCD panel. Machine Noise Information Regulation - 3. THERE ARE HIGH-VOLTAGE COMPONENTS INSIDE. Doing so can result in accordance with any part... level is located on the surface of this unit has been provided. If this should be disposed of your NEC VT695/VT595/VT590/VT490/VT59/VT49 projector and keep the manual handy for future reference. The static background from normal household waste. After collecting the used...

VT49/490/491/590/595/695 UM
Page 7
... ᕧ Turning off the Projector 28 ᕨ After Use 29 v Installation and Connections 9 ᕡ Setting Up the Screen and the Projector 9 Selecting a Location (VT695 9 Selecting a Location (VT595/VT590/VT490/VT59 10 Selecting a Location (VT49 10 Throw Distance and Screen ... Control 8 2. Introduction 1 ᕡ What's in the Box 1 ᕢ Introduction to the Projector 2 ᕣ Part Names of the Projector 3 Attaching the supplied carrying handle (VT695, VT595, VT590 and VT490 only 4 Top Features 5 Terminal Panel Features 6 ᕤ Part Names of Contents Important Information i...
... ᕧ Turning off the Projector 28 ᕨ After Use 29 v Installation and Connections 9 ᕡ Setting Up the Screen and the Projector 9 Selecting a Location (VT695 9 Selecting a Location (VT595/VT590/VT490/VT59 10 Selecting a Location (VT49 10 Throw Distance and Screen ... Control 8 2. Introduction 1 ᕡ What's in the Box 1 ᕢ Introduction to the Projector 2 ᕣ Part Names of the Projector 3 Attaching the supplied carrying handle (VT695, VT595, VT590 and VT490 only 4 Top Features 5 Terminal Panel Features 6 ᕤ Part Names of Contents Important Information i...

VT49/490/491/590/595/695 UM
Page 9
... UP PAGE DOWN Remote control (7N900731) Batteries (AAAן2) Quick Setup Guide Important Information CD-ROM User's manual For VT695, VT595, VT590 and VT490 only For VT695 and VT595 only For North America only Registration card Limited warranty For Europe only Guarantee policy Carrying handle (24FT9651) Screw (M4...
... UP PAGE DOWN Remote control (7N900731) Batteries (AAAן2) Quick Setup Guide Important Information CD-ROM User's manual For VT695, VT595, VT590 and VT490 only For VT695 and VT595 only For North America only Registration card Limited warranty For Europe only Guarantee policy Carrying handle (24FT9651) Screw (M4...

VT49/490/491/590/595/695 UM
Page 10
... Control port. • Easy set up to 300 inches across (measured diagonally) from across the room. Introduction ᕢ Introduction to UXGA compatible, XGA native resolution (SVGA: VT490 and VT49). • Multiple video mode selections (depending on the power, the projector is powered down ; If the section doesn't apply, you to review the user's manual.
... Control port. • Easy set up to 300 inches across (measured diagonally) from across the room. Introduction ᕢ Introduction to UXGA compatible, XGA native resolution (SVGA: VT490 and VT49). • Multiple video mode selections (depending on the power, the projector is powered down ; If the section doesn't apply, you to review the user's manual.

VT49/490/491/590/595/695 UM
Page 11
... page 50) Two filters on VT695, VT595, VT590 and VT490 One filter on the Main Power, the POWER indicator turns orange and the projector is a registered trademark of the Projector Front/Top Zoom Lever (VT695/VT595/VT590/VT490/VT59) Digital Zoom Button (VT49) (→ page 24) Remote sensor (→ page 8)... * This security slot supports the MicroSaver ® Security System. Rear Terminal Panel (→ page 6) Monaural Speaker (VT695/VT595: 5W) (VT590/VT490/VT59/VT49: 1W) POWERSTATUSLAMP ON/STAND BY SOURCE AUTO ADJ. FOCUS ZOOM ᕣ Part Names of Kensington Microware Inc.
... page 50) Two filters on VT695, VT595, VT590 and VT490 One filter on the Main Power, the POWER indicator turns orange and the projector is a registered trademark of the Projector Front/Top Zoom Lever (VT695/VT595/VT590/VT490/VT59) Digital Zoom Button (VT49) (→ page 24) Remote sensor (→ page 8)... * This security slot supports the MicroSaver ® Security System. Rear Terminal Panel (→ page 6) Monaural Speaker (VT695/VT595: 5W) (VT590/VT490/VT59/VT49: 1W) POWERSTATUSLAMP ON/STAND BY SOURCE AUTO ADJ. FOCUS ZOOM ᕣ Part Names of Kensington Microware Inc.

VT49/490/491/590/595/695 UM
Page 12
... (VT695, VT595, VT590 and VT490 only) You can carry the projector by the carrying handle, make sure the two screws that the carrying handle is attached with correct orientation as shown below. Make sure that attach the carrying handle to the projector cabinet are tight. 4 Place ...a soft cloth on the working surface before turning the projector over to the projector. To attach the supplied carrying handle, use a Phillips-head screwdriver and the supplied...
... (VT695, VT595, VT590 and VT490 only) You can carry the projector by the carrying handle, make sure the two screws that the carrying handle is attached with correct orientation as shown below. Make sure that attach the carrying handle to the projector cabinet are tight. 4 Place ...a soft cloth on the working surface before turning the projector over to the projector. To attach the supplied carrying handle, use a Phillips-head screwdriver and the supplied...

VT49/490/491/590/595/695 UM
Page 14
... you to connect a PC or control system. AUDIO OUT Mini Jack (Stereo Mini) (→page 16) (VT695/VT595) 4. Terminal Panel Features VT695/VT595 VT590/VT490/VT59/VT49 5 S-VIDEO L IN 8 921 PC CTRL COMPUTER 2 (DVI-I 29 Pin) (→page 14,15) (VT695/VT595) 1. Introduction 6 COMPUTER 1 IN/ Component...,15) COMPUTER IN/ Component Input Connector (Mini D-Sub 15 Pin) (VT590/VT490/VT59/VT49) (→page 13,17) 2. PC CONTROL Port (DIN 8 Pin) (→page 64,65) Use this port to control the projector using serial communication protocol. AUDIO IN Mini Jack (Stereo Mini) (→page...
... you to connect a PC or control system. AUDIO OUT Mini Jack (Stereo Mini) (→page 16) (VT695/VT595) 4. Terminal Panel Features VT695/VT595 VT590/VT490/VT59/VT49 5 S-VIDEO L IN 8 921 PC CTRL COMPUTER 2 (DVI-I 29 Pin) (→page 14,15) (VT695/VT595) 1. Introduction 6 COMPUTER 1 IN/ Component...,15) COMPUTER IN/ Component Input Connector (Mini D-Sub 15 Pin) (VT590/VT490/VT59/VT49) (→page 13,17) 2. PC CONTROL Port (DIN 8 Pin) (→page 64,65) Use this port to control the projector using serial communication protocol. AUDIO IN Mini Jack (Stereo Mini) (→page...

VT49/490/491/590/595/695 UM
Page 15
... 30) * The PAGE UP/DOWN, MOUSE L-CLICK and MOUSE R-CLICK buttons work only when the optional remote mouse receiver is not available on VT590, VT490, VT59 and VT49) (→ page 22) 16. PAGE UP/DOWN Button* (→ page 34,35) 7. Button (→ page 27) 17. PICTURE Button (→ page 41,42) 21...
... 30) * The PAGE UP/DOWN, MOUSE L-CLICK and MOUSE R-CLICK buttons work only when the optional remote mouse receiver is not available on VT590, VT490, VT59 and VT49) (→ page 22) 16. PAGE UP/DOWN Button* (→ page 34,35) 7. Button (→ page 27) 17. PICTURE Button (→ page 41,42) 21...

VT49/490/491/590/595/695 UM
Page 16
...old batteries. EXIT ON/STAND BY SOURCE SELECT MENU FOCUS ZOOM LAMP STATUS POWER ENTER 7m/22feet Remote control *NOTE: The VT590, VT490, VT59 and VT49 do not have the batteries' polarity (+/-) aligned correctly. 1. teries until it dry immediately. • Avoid excessive heat and humidity. ... Operating Range for a long time, remove the batteries. • Ensure that you will also prevent the remote control from properly operating the projector. 8 Battery Installation 1 Press firmly and slide the battery cover off. 2 Install new batteries (AAA). Do not mix different types of ...
...old batteries. EXIT ON/STAND BY SOURCE SELECT MENU FOCUS ZOOM LAMP STATUS POWER ENTER 7m/22feet Remote control *NOTE: The VT590, VT490, VT59 and VT49 do not have the batteries' polarity (+/-) aligned correctly. 1. teries until it dry immediately. • Avoid excessive heat and humidity. ... Operating Range for a long time, remove the batteries. • Ensure that you will also prevent the remote control from properly operating the projector. 8 Battery Installation 1 Press firmly and slide the battery cover off. 2 Install new batteries (AAA). Do not mix different types of ...
VT49/490/491/590/595/695 UM
Page 18
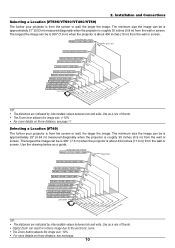
...The Zoom button adjusts the image size -10% • For more details on throw distance, see page 11. Selecting a Location (VT49) The further your projector is roughly 30 inches (0.8 m) from the screen or wall, the larger the image. The minimum size the image can be is ... size the image can be is approximately 25" (0.64 m) measured diagonally when the projector is from the wall or screen. Installation and Connections Selecting a Location (VT595/VT590/VT490/VT59) The further your projector is roughly 35 inches (0.9 m) from the screen or wall, the larger the image...
...The Zoom button adjusts the image size -10% • For more details on throw distance, see page 11. Selecting a Location (VT49) The further your projector is roughly 30 inches (0.8 m) from the screen or wall, the larger the image. The minimum size the image can be is ... size the image can be is approximately 25" (0.64 m) measured diagonally when the projector is from the wall or screen. Installation and Connections Selecting a Location (VT595/VT590/VT490/VT59) The further your projector is roughly 35 inches (0.9 m) from the screen or wall, the larger the image...

VT49/490/491/590/595/695 UM
Page 19
...8.3 350 8890 -21 -530 9.9 - 8.3 394 10000 -24 -600 9.9 - 8.3 438 11120 -26 -660 9.9 - 8.3 11 Distance Chart α Projector bottom C Screen center Lens center B = Vertical distance between lens center and screen center C = Throw distance D = Vertical distance between lens center and screen bottom...9690 -25 -640 9.9 - 8.3 424 10770 -28 -710 9.9 - 8.3 tele D α wide tele inch mm inch mm degree - VT595/VT590/VT490/VT59 Screen Size Diagonal Width Height B C wide inch mm inch mm inch mm inch mm inch mm - 21 533 17 427 13 320 4 110 ...
...8.3 350 8890 -21 -530 9.9 - 8.3 394 10000 -24 -600 9.9 - 8.3 438 11120 -26 -660 9.9 - 8.3 11 Distance Chart α Projector bottom C Screen center Lens center B = Vertical distance between lens center and screen center C = Throw distance D = Vertical distance between lens center and screen bottom...9690 -25 -640 9.9 - 8.3 424 10770 -28 -710 9.9 - 8.3 tele D α wide tele inch mm inch mm degree - VT595/VT590/VT490/VT59 Screen Size Diagonal Width Height B C wide inch mm inch mm inch mm inch mm inch mm - 21 533 17 427 13 320 4 110 ...

VT49/490/491/590/595/695 UM
Page 21
...VT595: The COMPUTER 1 connector supports Plug & Play (DDC2). • VT590/VT490/VT59/VT49: The COMPUTER connector supports Plug & Play (DDC2). PHONE IBM VGA or Compatibles (Notebook type) or Macintosh (Notebook type) NOTE: The projector is recommended that case, do the following. * When an image is displayed ...standby mode and before being powered up. * If the screen goes blank while using a PC compatible laptop, a combination of either the NEC ISS-6020 and ISS-6010 switchers. In that you use a commercially available pin adapter (not supplied) to connect to fill the screen...
...VT595: The COMPUTER 1 connector supports Plug & Play (DDC2). • VT590/VT490/VT59/VT49: The COMPUTER connector supports Plug & Play (DDC2). PHONE IBM VGA or Compatibles (Notebook type) or Macintosh (Notebook type) NOTE: The projector is recommended that case, do the following. * When an image is displayed ...standby mode and before being powered up. * If the screen goes blank while using a PC compatible laptop, a combination of either the NEC ISS-6020 and ISS-6010 switchers. In that you use a commercially available pin adapter (not supplied) to connect to fill the screen...

VT49/490/491/590/595/695 UM
Page 24
...output from the MONITOR OUT connector on a monitor the RGB analog image you're projecting. Connecting an External Monitor 2. Installation and Connections VT695/VT595 VT590/VT490/VT59/VT49 AUDIO OUT MONITOR OUT S-VIDEO L IN R VIDEO IN AUDIO IN PC CTRL COMPUTER 2 (DVI-I) IN AUDIO IN COMPUTER 1 IN AUDIO OUT MONITOR...R VIDEO IN AUDIO IN VGA signal cable (supplied) AUDIO IN VGA signal cable (not supplied) You can connect a separate, external monitor to your projector to simultaneously view on VT695 and VT595. • The VT590/VT490/VT59/VT49 do not have the AUDIO OUT connector. 16
...output from the MONITOR OUT connector on a monitor the RGB analog image you're projecting. Connecting an External Monitor 2. Installation and Connections VT695/VT595 VT590/VT490/VT59/VT49 AUDIO OUT MONITOR OUT S-VIDEO L IN R VIDEO IN AUDIO IN PC CTRL COMPUTER 2 (DVI-I) IN AUDIO IN COMPUTER 1 IN AUDIO OUT MONITOR...R VIDEO IN AUDIO IN VGA signal cable (supplied) AUDIO IN VGA signal cable (not supplied) You can connect a separate, external monitor to your projector to simultaneously view on VT695 and VT595. • The VT590/VT490/VT59/VT49 do not have the AUDIO OUT connector. 16

VT49/490/491/590/595/695 UM
Page 25
... If not, from the menu, select [Setup] → [Options] → [Signal Select] → [Computer 1 ([Computer] on VT590/VT490/VT59/VT49)], and then place a check mark in the Component radio button. to your DVD player's owner's manual for more information about your DVD player's ...video output requirements. 17 Installation and Connections Connecting Your DVD Player with Component Output VT695/VT595 VT590/VT490/VT59/VT49 AUDIO IN COMPUTER 1 IN S-VIDEO L IN R VIDEO IN AUDIO IN PC CTRL COMPUTER 2 (DVI-I) IN AUDIO IN COMPUTER 1 IN ...
... If not, from the menu, select [Setup] → [Options] → [Signal Select] → [Computer 1 ([Computer] on VT590/VT490/VT59/VT49)], and then place a check mark in the Component radio button. to your DVD player's owner's manual for more information about your DVD player's ...video output requirements. 17 Installation and Connections Connecting Your DVD Player with Component Output VT695/VT595 VT590/VT490/VT59/VT49 AUDIO IN COMPUTER 1 IN S-VIDEO L IN R VIDEO IN AUDIO IN PC CTRL COMPUTER 2 (DVI-I) IN AUDIO IN COMPUTER 1 IN ...

VT49/490/491/590/595/695 UM
Page 30
... FREEZE 22 Selecting from the menu. Each time the SOURCE button is present, the input will be displayed each time the projector is not available on the VT590, VT490, VT59 and VT49. TIP: If no input signal is pressed, the input source will be skipped. Selecting Default Source You can set a source as...
... FREEZE 22 Selecting from the menu. Each time the SOURCE button is present, the input will be displayed each time the projector is not available on the VT590, VT490, VT59 and VT49. TIP: If no input signal is pressed, the input source will be skipped. Selecting Default Source You can set a source as...

VT49/490/491/590/595/695 UM
Page 32
... MENU POWESRTATULSAMP ZOOM FOCUS VT49 Use the Digital ZOOM button on the screen. 3. SOURCE EXIT ON/STAND BY SELECT ENTER MENU POWESRTATUSLAMP FOCUS 24 POWERSTATUSLAMP ON/STAND BY SOURCE AUTO ADJ. Zoom VT695/VT595/VT590/VT490/VT59 Use the ZOOM lever to adjust the image size on the projector cabinet to electronically enlarge...
... MENU POWESRTATULSAMP ZOOM FOCUS VT49 Use the Digital ZOOM button on the screen. 3. SOURCE EXIT ON/STAND BY SELECT ENTER MENU POWESRTATUSLAMP FOCUS 24 POWERSTATUSLAMP ON/STAND BY SOURCE AUTO ADJ. Zoom VT695/VT595/VT590/VT490/VT59 Use the ZOOM lever to adjust the image size on the projector cabinet to electronically enlarge...