
EVA9150 User Manual
Page 16
...• Change channels when the remote is also used for example, a YouTube search box). Enters settings when you are configuring the NETGEAR Universal Remote. 0-9 A-D CLR Use for more information). For information about using buttons with specific media, see the Universal Remote User ... entry, choosing presets, and searching. Mute. Toggle Caps Lock or numbers on or off. Rotate. Cycle between TV output modes. Use to display the DVD main menu or the audio and subtitle options. Digital Entertainer Elite EVA9000/9150 User Manual Table 1-2. Display the Picture menu....
...• Change channels when the remote is also used for example, a YouTube search box). Enters settings when you are configuring the NETGEAR Universal Remote. 0-9 A-D CLR Use for more information). For information about using buttons with specific media, see the Universal Remote User ... entry, choosing presets, and searching. Mute. Toggle Caps Lock or numbers on or off. Rotate. Cycle between TV output modes. Use to display the DVD main menu or the audio and subtitle options. Digital Entertainer Elite EVA9000/9150 User Manual Table 1-2. Display the Picture menu....

EVA9150 User Manual
Page 42
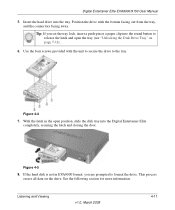
Remove the disk tray as shown in a safe place. 4. b. For greater security, set the lock inside the tray before installing the new hard disk into the tray (optional). b. Loosen and remove the four screws that secure the hard disk. a..... Figure 4-3 4-10 v1.0, March 2009 Listening and Viewing Figure 4-2 a. Swing open the front cover. Press to release the latch. For the EVA9150 only, remove the pre-installed hard disk from the tray. Digital Entertainer Elite EVA9000/9150 User Manual 1. Power off the Digital Entertainer Elite using the on/off switch on the back of the unit. 2.
Remove the disk tray as shown in a safe place. 4. b. For greater security, set the lock inside the tray before installing the new hard disk into the tray (optional). b. Loosen and remove the four screws that secure the hard disk. a..... Figure 4-3 4-10 v1.0, March 2009 Listening and Viewing Figure 4-2 a. Swing open the front cover. Press to release the latch. For the EVA9150 only, remove the pre-installed hard disk from the tray. Digital Entertainer Elite EVA9000/9150 User Manual 1. Power off the Digital Entertainer Elite using the on/off switch on the back of the unit. 2.
EVA9150 User Manual
Page 43
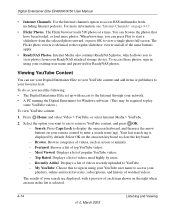
... with the unit to secure the drive to the tray. Listening and Viewing v1.0, March 2009 4-11 Figure 4-5 8. Digital Entertainer Elite EVA9000/9150 User Manual 5. With the latch in EVA9000 format, you set the tray lock, insert a push-pin or a paper clip into the tray. If the hard disk is not in the open... the round button to format the drive. Tip: If you are prompted to release the latch and open position, slide the disk tray into the Digital Entertainer Elite completely, securing the latch and closing the door.
... with the unit to secure the drive to the tray. Listening and Viewing v1.0, March 2009 4-11 Figure 4-5 8. Digital Entertainer Elite EVA9000/9150 User Manual 5. With the latch in EVA9000 format, you set the tray lock, insert a push-pin or a paper clip into the tray. If the hard disk is not in the open... the round button to format the drive. Tip: If you are prompted to release the latch and open position, slide the disk tray into the Digital Entertainer Elite completely, securing the latch and closing the door.
EVA9150 User Manual
Page 46
...on page 4-17. • Flickr Photos. Press Home, and select Video > YouTube, or select Internet Media > YouTube. 2. Press Caps Lock to display the onscreen keyboard, and then use to view photos from the selected photo onward, or press OK to access RSS multimedia feeds,... of videos rated highly by default. Most Viewed. Internet Media also contains ReadyNAS photos, which allows you need the following: • The Digital Entertainer Elite set up with a preview of watched videos. Top Rated. The results of your search are displayed, with access to access your network. ...
...on page 4-17. • Flickr Photos. Press Home, and select Video > YouTube, or select Internet Media > YouTube. 2. Press Caps Lock to display the onscreen keyboard, and then use to view photos from the selected photo onward, or press OK to access RSS multimedia feeds,... of videos rated highly by default. Most Viewed. Internet Media also contains ReadyNAS photos, which allows you need the following: • The Digital Entertainer Elite set up with a preview of watched videos. Top Rated. The results of your search are displayed, with access to access your network. ...

EVA9150 User Manual
Page 51
... view the status of the selected session, such as play, pause and skip. • Power off the Digital Entertainer Elite. • Message. Stops the selected session. and select Status. Send a message for the Digital Entertainer Elite to another Digital Entertainer Elite. • Lock. Play media in each room. The Status Figure 4-6 The Status screen includes these buttons: • Power Off...
... view the status of the selected session, such as play, pause and skip. • Power off the Digital Entertainer Elite. • Message. Stops the selected session. and select Status. Send a message for the Digital Entertainer Elite to another Digital Entertainer Elite. • Lock. Play media in each room. The Status Figure 4-6 The Status screen includes these buttons: • Power Off...

EVA9150 User Manual
Page 71
Digital Entertainer Elite EVA9000/9150 User Manual • Volume level lock. The default value, not fixed, allows you prefer for your slideshows. • Image zoom. When the volume is Never. • Power Off: Select the number ... Sharing. The default is fixed, the volume keys on page 4-12 for the video buffer. Enable File Sharing to the Internal Disk Drive" on the Digital Entertainer Elite remote do not operate. Power and Hard Drive Tools The Power and Hard Drive screen includes additional settings for best performance with a wireless connection. See...
Digital Entertainer Elite EVA9000/9150 User Manual • Volume level lock. The default value, not fixed, allows you prefer for your slideshows. • Image zoom. When the volume is Never. • Power Off: Select the number ... Sharing. The default is fixed, the volume keys on page 4-12 for the video buffer. Enable File Sharing to the Internal Disk Drive" on the Digital Entertainer Elite remote do not operate. Power and Hard Drive Tools The Power and Hard Drive screen includes additional settings for best performance with a wireless connection. See...
EVA9150 User Manual
Page 77
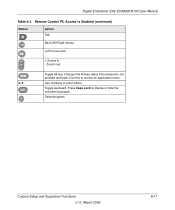
Remote Control PC Access Is Enabled (continued) Button Action Tab Next (Alt+Right Arrow) Left mouse-click + Zooms in - Toggle keyboard. Custom Setup and Supervisor Functions v1.0, March 2009 6-11 Changes the Alt key status from pressed to display or hide the onscreen keyboard. Press Caps Lock to not pressed and back. Zooms out Toggle Alt key. Select program. Use this to access an application menu. 0-9 Use numbers to enter letters. Digital Entertainer Elite EVA9000/9150 User Manual Table 6-1.
Remote Control PC Access Is Enabled (continued) Button Action Tab Next (Alt+Right Arrow) Left mouse-click + Zooms in - Toggle keyboard. Custom Setup and Supervisor Functions v1.0, March 2009 6-11 Changes the Alt key status from pressed to display or hide the onscreen keyboard. Press Caps Lock to not pressed and back. Zooms out Toggle Alt key. Select program. Use this to access an application menu. 0-9 Use numbers to enter letters. Digital Entertainer Elite EVA9000/9150 User Manual Table 6-1.
EVA9150 User Manual
Page 89
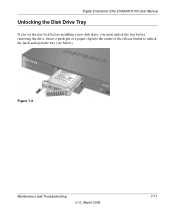
Digital Entertainer Elite EVA9000/9150 User Manual Unlocking the Disk Drive Tray If you set the tray lock before installing a new disk drive, you must unlock the tray before removing the drive. Insert a push-pin or a paper clip into the center of the release button to unlock the latch and open the tray (see below). Figure 7-2 Maintenance and Troubleshooting v1.0, March 2009 7-11
Digital Entertainer Elite EVA9000/9150 User Manual Unlocking the Disk Drive Tray If you set the tray lock before installing a new disk drive, you must unlock the tray before removing the drive. Insert a push-pin or a paper clip into the center of the release button to unlock the latch and open the tray (see below). Figure 7-2 Maintenance and Troubleshooting v1.0, March 2009 7-11