
FS726T User Manual
Page 4
....1Q Tag VLAN 3-7 Switch> Trunking Page 3-9 Switch> Monitor Page 3-10 Switch> Advanced> Jumbo Frame 3-10 Switch> Advanced> Spanning Tree Page 3-11 Switch> Advanced> SNMP 3-11 Firmware Menu ...3-12 Firmware> Configuration Backup Page 3-12 Firmware> Factory Reset Page 3-12 Logout ...3-13 Chapter 5 Software Upgrade Appendix A Default Settings Appendix B IEEE 802.1Q Virtual Local Area Network (VLAN) IEEE 802.1Q...
....1Q Tag VLAN 3-7 Switch> Trunking Page 3-9 Switch> Monitor Page 3-10 Switch> Advanced> Jumbo Frame 3-10 Switch> Advanced> Spanning Tree Page 3-11 Switch> Advanced> SNMP 3-11 Firmware Menu ...3-12 Firmware> Configuration Backup Page 3-12 Firmware> Factory Reset Page 3-12 Logout ...3-13 Chapter 5 Software Upgrade Appendix A Default Settings Appendix B IEEE 802.1Q Virtual Local Area Network (VLAN) IEEE 802.1Q...
FS726T User Manual
Page 16
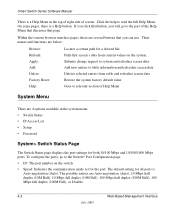
Smart Switch Series Software Manual There is a Help Menu in the system menu: • Switch Status • IP Access List • Setup • Password System> Switch Status Page The Switch Status page displays the port settings for both 10/100 Mbps and 10/100/1000 Mbps ports. If you ...click that button, you can use. Within the various browser interface pages, there are below: Browse: Refresh: Apply: Add: Delete: Factory Reset: Help: Locates...
Smart Switch Series Software Manual There is a Help Menu in the system menu: • Switch Status • IP Access List • Setup • Password System> Switch Status Page The Switch Status page displays the port settings for both 10/100 Mbps and 10/100/1000 Mbps ports. If you ...click that button, you can use. Within the various browser interface pages, there are below: Browse: Refresh: Apply: Add: Delete: Factory Reset: Help: Locates...

FS726T User Manual
Page 27
... click OK to the current switch. Note: Please be aware that the switch will enable you to quickly return to factory defaults. Firmware Menu Smart Switch Series Software Manual There are 2 options available: • Configuration Backup • Factory Reset Firmware> Configuration Backup Page You ...can backup the system and switch settings to store your Backup file. Web-Based ...
... click OK to the current switch. Note: Please be aware that the switch will enable you to quickly return to factory defaults. Firmware Menu Smart Switch Series Software Manual There are 2 options available: • Configuration Backup • Factory Reset Firmware> Configuration Backup Page You ...can backup the system and switch settings to store your Backup file. Web-Based ...

FS726T User Manual
Page 28
Logout When finished with all configuration and settings, click Logout to disconnect the current browser connection. The login page will reboot after a successful reset. Smart Switch Series Software Manual Note: Please be aware that the switch will pop up. 4-14 July 2005 Web-Based Management Interface
Logout When finished with all configuration and settings, click Logout to disconnect the current browser connection. The login page will reboot after a successful reset. Smart Switch Series Software Manual Note: Please be aware that the switch will pop up. 4-14 July 2005 Web-Based Management Interface

FS726T User Manual
Page 45
You can always configure the switch to default settings by using the Factory Reset function from a Web browser. Default Settings FEATURE Port Speed Port Duplex Flow Control (half duplex) Flow Control (full ...duplex) IP Configuration Password VLAN Link Aggregation (Trunk) Traffic Prioritization (QoS) DEFAULT SETTING Auto-negotiation Auto-negotiation Enabled Enabled DHCP enabled password Port-Based VLAN Disabled Optimized for the NETGEAR Smart Switches...
You can always configure the switch to default settings by using the Factory Reset function from a Web browser. Default Settings FEATURE Port Speed Port Duplex Flow Control (half duplex) Flow Control (full ...duplex) IP Configuration Password VLAN Link Aggregation (Trunk) Traffic Prioritization (QoS) DEFAULT SETTING Auto-negotiation Auto-negotiation Enabled Enabled DHCP enabled password Port-Based VLAN Disabled Optimized for the NETGEAR Smart Switches...
FS726T User Manual
Page 47
... 5-29 CLI Configure System IP-Mode 5-29 CLI Configure System Mask 5-29 CLI Configure System Password 5-31 CLI Configure System RADIUS 5-32 CLI Configure System Reset 5-33 1
... 5-29 CLI Configure System IP-Mode 5-29 CLI Configure System Mask 5-29 CLI Configure System Password 5-31 CLI Configure System RADIUS 5-32 CLI Configure System Reset 5-33 1
FS726T User Manual
Page 48
... 5-7 CLI Show Multimedia 5-7 CLI Show Running-Config 5-7 CLI Show SNMP 5-8 CLI Show Spanning-Tree Brief 5-9 CLI Show Spanning-Tree Interface 5-10 CLI Show System 5-10 CLI Show Trunking 5-11 CLI Show VLAN 5-11, 5-12, 5-34 CLI Show VLAN Brief 5-11 CLI Show VLAN COS-PVID 5-12 CMI... 3-3 COM Port Selection 3-2 Command Menu Interface 3-3 Configuration Manager 4-30 console port 3-1 conventions typography 1-2 Cost 3-25, 4-37 crossover cable D-2 2 D Device Reset 4-18 Differentiated...
... 5-7 CLI Show Multimedia 5-7 CLI Show Running-Config 5-7 CLI Show SNMP 5-8 CLI Show Spanning-Tree Brief 5-9 CLI Show Spanning-Tree Interface 5-10 CLI Show System 5-10 CLI Show Trunking 5-11 CLI Show VLAN 5-11, 5-12, 5-34 CLI Show VLAN Brief 5-11 CLI Show VLAN COS-PVID 5-12 CMI... 3-3 COM Port Selection 3-2 Command Menu Interface 3-3 Configuration Manager 4-30 console port 3-1 conventions typography 1-2 Cost 3-25, 4-37 crossover cable D-2 2 D Device Reset 4-18 Differentiated...

FS750T2 Hardware manual
Page 3
......8 CHAPTER 2: PHYSICAL DESCRIPTION ...9 Front and Back Panels ...9 10/100 Mbps and 10/100/1000 Mbps RJ-45 Ports ...9 SFP GBIC Module Bays ...10 LED Descriptions ...10 Reset Button ...10 Factory Defaults Button ...11 CHAPTER 3: APPLICATIONS...12 Desktop Switching ...12 Backbone Switching ...13 CHAPTER 4: INSTALLATION...14 Step 1: Preparing the Site ...14 Step 2: Installing the Switch ...14 Step 3: Checking the Installation...15 Step...
......8 CHAPTER 2: PHYSICAL DESCRIPTION ...9 Front and Back Panels ...9 10/100 Mbps and 10/100/1000 Mbps RJ-45 Ports ...9 SFP GBIC Module Bays ...10 LED Descriptions ...10 Reset Button ...10 Factory Defaults Button ...11 CHAPTER 3: APPLICATIONS...12 Desktop Switching ...12 Backbone Switching ...13 CHAPTER 4: INSTALLATION...14 Step 1: Preparing the Site ...14 Step 2: Installing the Switch ...14 Step 3: Checking the Installation...15 Step...

FS750T2 Hardware manual
Page 4
RESET BUTTON OF THE FS750T2 SMART SWITCH ...10 FIGURE 2-4. ATTACHING MOUNTING BRACKETS...15 FIGURE 4-2. CONNECTING DEVICES TO THE SWITCH ...15 FIGURE 4-3. EXAMPLE OF DESKTOP SWITCHING...12 FIGURE 3-2. EXAMPLE OF BACKBONE SWITCHING ...13 FIGURE 4-1. FRONT PANEL OF THE FS750T2 SMART SWITCH...9 FIGURE 2-2. BACK PANEL OF THE FS750T2 SMART SWITCH...9 FIGURE 2-3. FACTORY DEFAULTS BUTTON OF THE FS750T2 SMART SWITCH...11 FIGURE 3-1. INSTALLING A SFP GBIC MODULE INTO FS750T2...16 Page 4 of 21 PACKAGE CONTENTS ...8 FIGURE 2-1. Figures FIGURE 1-1.
RESET BUTTON OF THE FS750T2 SMART SWITCH ...10 FIGURE 2-4. ATTACHING MOUNTING BRACKETS...15 FIGURE 4-2. CONNECTING DEVICES TO THE SWITCH ...15 FIGURE 4-3. EXAMPLE OF DESKTOP SWITCHING...12 FIGURE 3-2. EXAMPLE OF BACKBONE SWITCHING ...13 FIGURE 4-1. FRONT PANEL OF THE FS750T2 SMART SWITCH...9 FIGURE 2-2. BACK PANEL OF THE FS750T2 SMART SWITCH...9 FIGURE 2-3. FACTORY DEFAULTS BUTTON OF THE FS750T2 SMART SWITCH...11 FIGURE 3-1. INSTALLING A SFP GBIC MODULE INTO FS750T2...16 Page 4 of 21 PACKAGE CONTENTS ...8 FIGURE 2-1. Figures FIGURE 1-1.

FS750T2 Hardware manual
Page 7
...the NETGEAR ProSafe FS750T2 Smart Switch. • Forty-eight 10/100 Mbps auto-sensing Ethernet switching ports and two 10/100/1000 Mbps copper ports • Two SFP GBIC combo Gigabit Ethernet slots for optional fiber connectivity • Reset Button • Factory Defaults Button • Administrative switch ...device follow control ♦ Support Auto-Discovery application program for discovering and managing the smart switches on the network ♦ Support flash upgrading, configuration backup/restore and factory reset ♦ IEEE 802.1D Spanning Tree Protocol (Q2 2005) ♦ RFC ...
...the NETGEAR ProSafe FS750T2 Smart Switch. • Forty-eight 10/100 Mbps auto-sensing Ethernet switching ports and two 10/100/1000 Mbps copper ports • Two SFP GBIC combo Gigabit Ethernet slots for optional fiber connectivity • Reset Button • Factory Defaults Button • Administrative switch ...device follow control ♦ Support Auto-Discovery application program for discovering and managing the smart switches on the network ♦ Support flash upgrading, configuration backup/restore and factory reset ♦ IEEE 802.1D Spanning Tree Protocol (Q2 2005) ♦ RFC ...

FS750T2 Hardware manual
Page 9
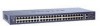
Topics include: • Front and back panels • 10/100 Mbps and 10/100/1000 Mbps auto-sensing RJ-45 ports • SFP GBIC Module bays • LED descriptions • Reset button • Factory defaults button Front and Back Panels Figures 2-1 and 2-2 ...the switch automatically ascertains the maximum speed (10 or 100 or 1000 Mbps) and duplex mode (half- or full-duplex) of the NETGEAR ProSafe FS750T2 Smart Switch. Front Panel of the FS750T2 Smart Switch 10/100 Mbps and 10/100/1000 Mbps RJ-45 Ports As Figure 2-1 shows, the FS750T2 Smart Switch has 48 10/100 Mbps and 2 10/100/...
Topics include: • Front and back panels • 10/100 Mbps and 10/100/1000 Mbps auto-sensing RJ-45 ports • SFP GBIC Module bays • LED descriptions • Reset button • Factory defaults button Front and Back Panels Figures 2-1 and 2-2 ...the switch automatically ascertains the maximum speed (10 or 100 or 1000 Mbps) and duplex mode (half- or full-duplex) of the NETGEAR ProSafe FS750T2 Smart Switch. Front Panel of the FS750T2 Smart Switch 10/100 Mbps and 10/100/1000 Mbps RJ-45 Ports As Figure 2-1 shows, the FS750T2 Smart Switch has 48 10/100 Mbps and 2 10/100/...

FS750T2 Hardware manual
Page 10
... power off and back on the port Reset Button The FS750T2 has a Reset Button to trigger a hardware reset of Gigabit copper port and SFP port cannot be loaded onto the switch as it resets. If both connectors are combo ports, sharing a connection with 10/100/1000 Mbps RJ-45 ports, port 49... is occurring on as the switch goes through its Power On Self Test (POST). To press the Reset Button, insert a small device such as a paper clip into the opening to press the recessed button. LED Descriptions The front panel of the NETGEAR ProSafe FS750T2 Smart Switch has LEDs that provide a quick...
... power off and back on the port Reset Button The FS750T2 has a Reset Button to trigger a hardware reset of Gigabit copper port and SFP port cannot be loaded onto the switch as it resets. If both connectors are combo ports, sharing a connection with 10/100/1000 Mbps RJ-45 ports, port 49... is occurring on as the switch goes through its Power On Self Test (POST). To press the Reset Button, insert a small device such as a paper clip into the opening to press the recessed button. LED Descriptions The front panel of the NETGEAR ProSafe FS750T2 Smart Switch has LEDs that provide a quick...

FS750T2 Hardware manual
Page 19
...or device is disabled Half- APPENDIX B: TROUBLESHOOTING This chapter provides information about troubleshooting the NETGEAR ProSafe FS750T2 Smart Switch. Make sure that the attached device supports autonegotiation. The gigabit port on all connected ...at a time. Auto Negotiation The 10/100/1000 Mbps ports negotiate the correct duplex mode and speed if the device at the switch and the connected device Make sure... Symptom Cause Solution Page 19 of the switch by testing them in this section. To reset the switch, use the Tools> Reset command or remove AC power from any ...
...or device is disabled Half- APPENDIX B: TROUBLESHOOTING This chapter provides information about troubleshooting the NETGEAR ProSafe FS750T2 Smart Switch. Make sure that the attached device supports autonegotiation. The gigabit port on all connected ...at a time. Auto Negotiation The 10/100/1000 Mbps ports negotiate the correct duplex mode and speed if the device at the switch and the connected device Make sure... Symptom Cause Solution Page 19 of the switch by testing them in this section. To reset the switch, use the Tools> Reset command or remove AC power from any ...


