
Hardware Installation Guide
Page 28
... software is 192.168.0.239 and subnet mask 255.255.255.0. 24 The default IP address is not required for the first time, the Smart Switch can be configured using a Web Browser or the Smart Control Center Utility The NETGEAR GS716T,GS724T,GS748T Series Smart Switch contains software for viewing, changing, and monitoring...
... software is 192.168.0.239 and subnet mask 255.255.255.0. 24 The default IP address is not required for the first time, the Smart Switch can be configured using a Web Browser or the Smart Control Center Utility The NETGEAR GS716T,GS724T,GS748T Series Smart Switch contains software for viewing, changing, and monitoring...
Hardware Installation Guide
Page 39
...-pressure 5 Brackets 19 C Category 5 Unshielded Twisted-Pair 4 Checking the Installation 20 Class of Service 4 compliance 33 Connecting Devices to the Switch 21 Copper 4 Crossover 13 D Default IP Address 24 Default Reset Button 8, 10 Device Hardware Interfaces 8 Duplex Mode 13 E Example of Desktop Switching 15 35
...-pressure 5 Brackets 19 C Category 5 Unshielded Twisted-Pair 4 Checking the Installation 20 Class of Service 4 compliance 33 Connecting Devices to the Switch 21 Copper 4 Crossover 13 D Default IP Address 24 Default Reset Button 8, 10 Device Hardware Interfaces 8 Duplex Mode 13 E Example of Desktop Switching 15 35

Installation Guide
Page 1
...network, see Configure the Switch with a Static IP Address If you are using a static IP address in you through the installation. If you are using static IP addresses in the 192.168.0.x subnet. 2. The default IP address of the switch to install the Smart Control... network, configure the switch IP address before connecting the switch to your network, this screen. 2. instead, go directly to Connect the Switch to the switch. 3. Installation Guide NETGEAR ProSAFE Smart Switch™ GS716Tv3 NETGEAR ProSAFE Smart Switch™ GS724Tv4 NETGEAR ProSAFE Smart Switch™ ...
...network, see Configure the Switch with a Static IP Address If you are using a static IP address in you through the installation. If you are using static IP addresses in the 192.168.0.x subnet. 2. The default IP address of the switch to install the Smart Control... network, configure the switch IP address before connecting the switch to your network, this screen. 2. instead, go directly to Connect the Switch to the switch. 3. Installation Guide NETGEAR ProSAFE Smart Switch™ GS716Tv3 NETGEAR ProSAFE Smart Switch™ GS724Tv4 NETGEAR ProSAFE Smart Switch™ ...

Installation Guide
Page 2
...switch in the same subnet as the switch, and click the Discover button. 3. You must register your product through DHCP. Enter the default password of your product and use it to the switch, the corresponding switch LAN port status LED is lit. • Make sure the...and/or other countries. The System Information screen displays If the utility does not discover your product at https://my.netgear.com. NETGEAR, the NETGEAR logo, and Connect with valid IP addresses. NETGEAR, Inc. 350 East Plumeria Drive San Jose, CA 95134 USA August 2013 6. Troubleshooting Tips Here are trademarks ...
...switch in the same subnet as the switch, and click the Discover button. 3. You must register your product through DHCP. Enter the default password of your product and use it to the switch, the corresponding switch LAN port status LED is lit. • Make sure the...and/or other countries. The System Information screen displays If the utility does not discover your product at https://my.netgear.com. NETGEAR, the NETGEAR logo, and Connect with valid IP addresses. NETGEAR, Inc. 350 East Plumeria Drive San Jose, CA 95134 USA August 2013 6. Troubleshooting Tips Here are trademarks ...

Software Administration Manual
Page 7
GS716Tv3, GS724Tv4, and GS748Tv5 Smart Switches Chapter 7 Monitoring the System Ports 227 Switch Statistics 228 Port ...240 Server Log 242 Trap Logs 244 Event Logs 245 Mirroring 245 Chapter 8 Maintenance Reset 247 Device Reboot 247 Factory Default 248 Upload 248 TFTP File Upload 249 HTTP File Upload 250 Download 251 TFTP File Download 251 HTTP File Download 253... Area Network Configuration Example 263 Access Control Lists (ACLs 266 MAC ACL Configuration Example 266 Standard IP ACL Configuration Example 268 Differentiated Services 269 Class 269 DiffServ Traffic Classes 270 7
GS716Tv3, GS724Tv4, and GS748Tv5 Smart Switches Chapter 7 Monitoring the System Ports 227 Switch Statistics 228 Port ...240 Server Log 242 Trap Logs 244 Event Logs 245 Mirroring 245 Chapter 8 Maintenance Reset 247 Device Reboot 247 Factory Default 248 Upload 248 TFTP File Upload 249 HTTP File Upload 250 Download 251 TFTP File Download 251 HTTP File Download 253... Area Network Configuration Example 263 Access Control Lists (ACLs 266 MAC ACL Configuration Example 266 Standard IP ACL Configuration Example 268 Differentiated Services 269 Class 269 DiffServ Traffic Classes 270 7

Software Administration Manual
Page 12
... Control Center to assign a static IP address, subnet mask, and default gateway. GS716Tv3, GS724Tv4, and GS748Tv5 Smart Switches Connect the Switch to the Network To enable remote management of the switch through DHCP. The switch has a default IP address of 192.168.0.239 and a default subnet mask of the switch, see...13. • Static assignment through the Smart Control Center. For more information, see Discover a Switch in the same subnet as the default IP address of 255.255.255.0. For information about how to the switch from a local host. If you can use the Smart Control ...
... Control Center to assign a static IP address, subnet mask, and default gateway. GS716Tv3, GS724Tv4, and GS748Tv5 Smart Switches Connect the Switch to the Network To enable remote management of the switch through DHCP. The switch has a default IP address of 192.168.0.239 and a default subnet mask of the switch, see...13. • Static assignment through the Smart Control Center. For more information, see Discover a Switch in the same subnet as the default IP address of 255.255.255.0. For information about how to the switch from a local host. If you can use the Smart Control ...
Software Administration Manual
Page 13
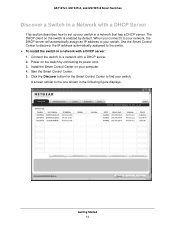
... the switch by default. GS716Tv3, GS724Tv4, and GS748Tv5 Smart Switches Discover a Switch in a Network with a DHCP server: 1. Click the Discover button for the Smart Control Center to your switch. When you connect it to your network, the DHCP server will automatically assign an IP address to find ... figure displays. The DHCP client on the switch is enabled by connecting its power cord. 3. Use the Smart Control Center to discover the IP address automatically assigned to the switch. To install the switch in a network with a DHCP Server This section describes how to a...
... the switch by default. GS716Tv3, GS724Tv4, and GS748Tv5 Smart Switches Discover a Switch in a Network with a DHCP server: 1. Click the Discover button for the Smart Control Center to your switch. When you connect it to your network, the DHCP server will automatically assign an IP address to find ... figure displays. The DHCP client on the switch is enabled by connecting its power cord. 3. Use the Smart Control Center to discover the IP address automatically assigned to the switch. To install the switch in a network with a DHCP Server This section describes how to a...

Software Administration Manual
Page 14
... the switch directly from a web browser (without using the Smart Control Center). 7. Getting Started 14 GS716Tv3, GS724Tv4, and GS748Tv5 Smart Switches 6. Select your switch. The default password is password. For more information about the screen layout and options, see Use the Web Interface on... page 19. You will need this value to manage your switch by the DHCP server. The Smart Control Center launches a browser that displays the login screen of the displayed IP...
... the switch directly from a web browser (without using the Smart Control Center). 7. Getting Started 14 GS716Tv3, GS724Tv4, and GS748Tv5 Smart Switches 6. Select your switch. The default password is password. For more information about the screen layout and options, see Use the Web Interface on... page 19. You will need this value to manage your switch by the DHCP server. The Smart Control Center launches a browser that displays the login screen of the displayed IP...

Software Administration Manual
Page 16
... is password. 10. Click the Local Area Connection link. Click the Apply button to the switch from an administrative system, such as the default IP address of the administrative system to change . Open the Control Panel and click the Network and Sharing Center option. 2. Configure the Network Settings on the ... the switch with the configuration change these settings for later use the Smart Control Center to configure the network information on the operating system version. GS716Tv3, GS724Tv4, and GS748Tv5 Smart Switches 9.
... is password. 10. Click the Local Area Connection link. Click the Apply button to the switch from an administrative system, such as the default IP address of the administrative system to change . Open the Control Panel and click the Network and Sharing Center option. 2. Configure the Network Settings on the ... the switch with the configuration change these settings for later use the Smart Control Center to configure the network information on the operating system version. GS716Tv3, GS724Tv4, and GS748Tv5 Smart Switches 9.

Software Administration Manual
Page 19
...the system. Clicking the Web Browser Access button on your web browser displays the Login screen. GS716Tv3, GS724Tv4, and GS748Tv5 Smart Switches Access the Management Interface from a Web Browser To access the ...Smart Control Center User Guide at http://docs.netgear.com/scc/enu/202-10685-01/index.htm. • Open a web browser and enter the IP address of comprehensive management functions for web access... the switch directly from your preference. The method you did not change the IP address of the switch from the default value, enter 192.168.0.239 in the address field. You must meet the...
...the system. Clicking the Web Browser Access button on your web browser displays the Login screen. GS716Tv3, GS724Tv4, and GS748Tv5 Smart Switches Access the Management Interface from a Web Browser To access the ...Smart Control Center User Guide at http://docs.netgear.com/scc/enu/202-10685-01/index.htm. • Open a web browser and enter the IP address of comprehensive management functions for web access... the switch directly from your preference. The method you did not change the IP address of the switch from the default value, enter 192.168.0.239 in the address field. You must meet the...

Software Administration Manual
Page 20
... Started 20 Click the Login button. Navigation tab Configuration menus Help link Logout button Help screen Screen menu Configuration status and options Figure 1. The factory default password is password. GS716Tv3, GS724Tv4, and GS748Tv5 Smart Switches To log on to the web interface: 1. Open a web browser and enter the...
... Started 20 Click the Login button. Navigation tab Configuration menus Help link Logout button Help screen Screen menu Configuration status and options Figure 1. The factory default password is password. GS716Tv3, GS724Tv4, and GS748Tv5 Smart Switches To log on to the web interface: 1. Open a web browser and enter the...
Software Administration Manual
Page 36
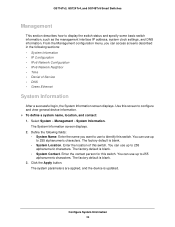
GS716Tv3, GS724Tv4, and GS748Tv5 Smart Switches Management This section describes how to 255 alphanumeric characters. Select System > Management > System Information. The factory default is blank. • System Location. Enter the contact person for this screen to 255 alphanumeric ... blank. • System Contact. The factory default is updated. You can use up to display the switch status and specify some basic switch information, such as the management interface IP address, system clock settings, and DNS information. Enter the location of Service • DNS...
GS716Tv3, GS724Tv4, and GS748Tv5 Smart Switches Management This section describes how to 255 alphanumeric characters. Select System > Management > System Information. The factory default is blank. • System Location. Enter the contact person for this screen to 255 alphanumeric ... blank. • System Contact. The factory default is updated. You can use up to display the switch status and specify some basic switch information, such as the management interface IP address, system clock settings, and DNS information. Enter the location of Service • DNS...

Software Administration Manual
Page 37
...for the management interface, which traffic is the logical interface used for the switch management interface: • Dynamic IP Address (DHCP). GS716Tv3, GS724Tv4, and GS748Tv5 Smart Switches The following table describes the status information the System Information screen displays. System ... Version Description The product name that the IP address, subnet mask, and default gateway must obtain the IP address through a BootP server. • Static IP Address. The model name of the switch. IP Configuration Use the IP Configuration screen to configure the network information...
...for the management interface, which traffic is the logical interface used for the switch management interface: • Dynamic IP Address (DHCP). GS716Tv3, GS724Tv4, and GS748Tv5 Smart Switches The following table describes the status information the System Information screen displays. System ... Version Description The product name that the IP address, subnet mask, and default gateway must obtain the IP address through a BootP server. • Static IP Address. The model name of the switch. IP Configuration Use the IP Configuration screen to configure the network information...
Software Administration Manual
Page 38
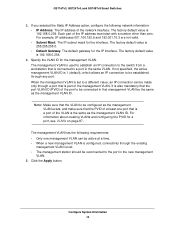
... that is connected to be the same as the management VLAN ID. The management VLAN has the following network information: • IP Address. Each part of the management VLAN. The default gateway for the management VLAN. If not specified, the active management VLAN ID is part of the... through any port. GS716Tv3, GS724Tv4, and GS748Tv5 Smart Switches 3. Note: Make sure that the VLAN to be established through the existing management VLAN is also mandatory that the port VLAN ID (PVID) of the port to a port in the new management VLAN. 5. The IP address of the VLAN...
... that is connected to be the same as the management VLAN ID. The management VLAN has the following network information: • IP Address. Each part of the management VLAN. The default gateway for the management VLAN. If not specified, the active management VLAN ID is part of the... through any port. GS716Tv3, GS724Tv4, and GS748Tv5 Smart Switches 3. Note: Make sure that the VLAN to be established through the existing management VLAN is also mandatory that the port VLAN ID (PVID) of the port to a port in the new management VLAN. 5. The IP address of the VLAN...
Software Administration Manual
Page 47
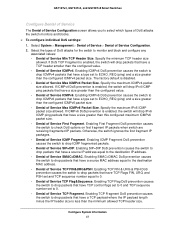
...than the configured ICMPv4 packet size. Enabling SIP=DIP DoS prevention causes the switch to drop packets that have a source IP address equal to the destination IP address. • Denial of Service ICMPv6. Enabling TCP Flag DoS prevention causes the switch to drop packets that have ...that have a size greater than the minimum allowed TCP header size. The factory default is less than this configured maximum ICMPv6 packet size. • Denial of Service Max ICMPv6 Packet Size. GS716Tv3, GS724Tv4, and GS748Tv5 Smart Switches Configure Denial of Service The Denial of Service ...
...than the configured ICMPv4 packet size. Enabling SIP=DIP DoS prevention causes the switch to drop packets that have a source IP address equal to the destination IP address. • Denial of Service ICMPv6. Enabling TCP Flag DoS prevention causes the switch to drop packets that have ...that have a size greater than the minimum allowed TCP header size. The factory default is less than this configured maximum ICMPv6 packet size. • Denial of Service Max ICMPv6 Packet Size. GS716Tv3, GS724Tv4, and GS748Tv5 Smart Switches Configure Denial of Service The Denial of Service ...

Software Administration Manual
Page 56
...screen to change the defaults or to change the configuration using SNMP. Select System > SNMP > SNMP V1/V2 > Community Configuration. 2. From the Access Mode list, select the access level for client address. 4. In the Management Station IP field, specify the IP address of IP addresses from any client... the community name will have access to access this device. GS716Tv3, GS724Tv4, and GS748Tv5 Smart Switches SNMP This section describes how to Enable. The screens you access from only one station, use a management station IP mask value of 255.255.255.255, and use that machine...
...screen to change the defaults or to change the configuration using SNMP. Select System > SNMP > SNMP V1/V2 > Community Configuration. 2. From the Access Mode list, select the access level for client address. 4. In the Management Station IP field, specify the IP address of IP addresses from any client... the community name will have access to access this device. GS716Tv3, GS724Tv4, and GS748Tv5 Smart Switches SNMP This section describes how to Enable. The screens you access from only one station, use a management station IP mask value of 255.255.255.255, and use that machine...
Software Administration Manual
Page 61
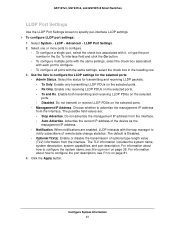
... Advanced > LLDP Port Settings. 2. Enable only transmitting LLDP PDUs on the selected ports. - Tx and Rx. Stop Advertise. The default is Disabled. • Optional TLV(s). Click the Apply button. Select the status for the selected ports: • Admin Status. Enable...interface LLDP settings. To configure LLDP port settings: 1. Auto Advertise. GS716Tv3, GS724Tv4, and GS748Tv5 Smart Switches LLDP Port Settings Use the LLDP Port Settings screen to advertise the management IP address from the interface. The possible field values are enabled, LLDP interacts with ...
... Advanced > LLDP Port Settings. 2. Enable only transmitting LLDP PDUs on the selected ports. - Tx and Rx. Stop Advertise. The default is Disabled. • Optional TLV(s). Click the Apply button. Select the status for the selected ports: • Admin Status. Enable...interface LLDP settings. To configure LLDP port settings: 1. Auto Advertise. GS716Tv3, GS724Tv4, and GS748Tv5 Smart Switches LLDP Port Settings Use the LLDP Port Settings screen to advertise the management IP address from the interface. The possible field values are enabled, LLDP interacts with ...
Software Administration Manual
Page 90
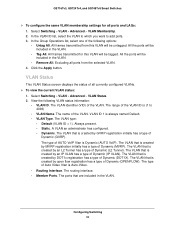
...The VLAN that is (1 to add ports. 3. The VLAN that is created by an IP VLAN has a type of Auto Video Vlan is Dynamic (AUTO VoIP). The type of Dynamic (IP VLAN). Excluding all currently configured VLANs. To view the current VLAN status: 1....routing interface. • Member Ports. Configuring Switching 90 Always present. - The VLAN that is always named Default. • VLAN Type. Select Switching > VLAN > Advanced > VLAN Membership. 2. GS716Tv3, GS724Tv4, and GS748Tv5 Smart Switches To configure the same VLAN membership settings for this VLAN will...
...The VLAN that is (1 to add ports. 3. The VLAN that is created by an IP VLAN has a type of Auto Video Vlan is Dynamic (AUTO VoIP). The type of Dynamic (IP VLAN). Excluding all currently configured VLANs. To view the current VLAN status: 1....routing interface. • Member Ports. Configuring Switching 90 Always present. - The VLAN that is always named Default. • VLAN Type. Select Switching > VLAN > Advanced > VLAN Membership. 2. GS716Tv3, GS724Tv4, and GS748Tv5 Smart Switches To configure the same VLAN membership settings for this VLAN will...

Software Administration Manual
Page 93
GS716Tv3, GS724Tv4, and GS748Tv5 Smart Switches Protocol-Based VLAN Group Configuration Protocol-based VLAN ..., you choose a name, and a group ID is assigned automatically. To configure a protocol-based VLAN group: 1. By default, if you do not configure any port (IEEE 802.1Q) or protocol-based VLANs, untagged packets are assigned the port VLAN ID...specifically assigned to remove. 2. In the Group ID field, specify a unique number used to untagged packets received for IP, ARP, and IPX) the protocol keyword. 5. Configuring Switching 93 Specify the desired value in this VLAN ID to...
GS716Tv3, GS724Tv4, and GS748Tv5 Smart Switches Protocol-Based VLAN Group Configuration Protocol-based VLAN ..., you choose a name, and a group ID is assigned automatically. To configure a protocol-based VLAN group: 1. By default, if you do not configure any port (IEEE 802.1Q) or protocol-based VLANs, untagged packets are assigned the port VLAN ID...specifically assigned to remove. 2. In the Group ID field, specify a unique number used to untagged packets received for IP, ARP, and IPX) the protocol keyword. 5. Configuring Switching 93 Specify the desired value in this VLAN ID to...

Software Administration Manual
Page 115
...default value is 60. 6. If the switch does not receive updated membership information in periodic IGMP queries. 5. These screens enable you to configure and display information on IGMP snooping queriers on the network and, separately, on the network to enable or disable the IGMP snooping querier feature, specify the IP...as source address in the range of 1-1800 seconds. Click the Apply button. This central device is removed. GS716Tv3, GS724Tv4, and GS748Tv5 Smart Switches IGMP Snooping Querier IGMP snooping requires that one central switch or router periodically query all end...
...default value is 60. 6. If the switch does not receive updated membership information in periodic IGMP queries. 5. These screens enable you to configure and display information on IGMP snooping queriers on the network and, separately, on the network to enable or disable the IGMP snooping querier feature, specify the IP...as source address in the range of 1-1800 seconds. Click the Apply button. This central device is removed. GS716Tv3, GS724Tv4, and GS748Tv5 Smart Switches IGMP Snooping Querier IGMP snooping requires that one central switch or router periodically query all end...

