Hardware Installation Guide
Page 1
GS716T, GS724T and GS748T Gigabit Smart Switch Hardware Installation Guide September 2013 202-11329-01 350 East Plumeria Drive San Jose, CA 95134 USA
GS716T, GS724T and GS748T Gigabit Smart Switch Hardware Installation Guide September 2013 202-11329-01 350 East Plumeria Drive San Jose, CA 95134 USA

Hardware Installation Guide
Page 3
... 2013 Comments First publication 3 GS716T, GS724T and GS748T Gigabit Smart Switch © 2013 by any language in the United States and/or other countries. To register your product, get the latest product updates, get support online, or for choosing NETGEAR. NETGEAR, the NETGEAR logo, and Connect with Innovation are registered trademarks or trademarks of...
... 2013 Comments First publication 3 GS716T, GS724T and GS748T Gigabit Smart Switch © 2013 by any language in the United States and/or other countries. To register your product, get the latest product updates, get support online, or for choosing NETGEAR. NETGEAR, the NETGEAR logo, and Connect with Innovation are registered trademarks or trademarks of...

Hardware Installation Guide
Page 5
... RJ-45 Ports 13 SFP GBIC Module 13 Factory Defaults Button 13 Chapter 3 Applications Desktop Switching 15 Backbone Switching 15 Chapter 4 Installation Step 1: Prepare the Site 18 Step 2: Install the Switch 19 Install the Switch on a Flat Surface 19 Install the Switch in a Rack 19 Step 3: Check the Installation 20 Step 4: Connect Devices to the...
... RJ-45 Ports 13 SFP GBIC Module 13 Factory Defaults Button 13 Chapter 3 Applications Desktop Switching 15 Backbone Switching 15 Chapter 4 Installation Step 1: Prepare the Site 18 Step 2: Install the Switch 19 Install the Switch on a Flat Surface 19 Install the Switch in a Rack 19 Step 3: Check the Installation 20 Step 4: Connect Devices to the...
Hardware Installation Guide
Page 6
GS716T, GS724T and GS748T Gigabit Smart Switch Appendix B Technical Specifications Appendix C Notification of Compliance 2
GS716T, GS724T and GS748T Gigabit Smart Switch Appendix B Technical Specifications Appendix C Notification of Compliance 2

Hardware Installation Guide
Page 7
... shipped ready for use out of Gigabit connectivity to eliminate bottlenecks, boost performance, and increase productivity. This NETGEAR Smart Switch is intended for users who require a large number of ports and want the power of the box. The information in this ...as an introduction to install and power on the purchase of the switch has 16/24/48 twisted-paired ports that support 1000M optical modules. The GS716Tv3, GS724Tv4, GS748Tv5 Cost Down Hardware Installation Guide describes how to the Smart Switch and provides the following information: • Overview • Features ...
... shipped ready for use out of Gigabit connectivity to eliminate bottlenecks, boost performance, and increase productivity. This NETGEAR Smart Switch is intended for users who require a large number of ports and want the power of the box. The information in this ...as an introduction to install and power on the purchase of the switch has 16/24/48 twisted-paired ports that support 1000M optical modules. The GS716Tv3, GS724Tv4, GS748Tv5 Cost Down Hardware Installation Guide describes how to the Smart Switch and provides the following information: • Overview • Features ...

Hardware Installation Guide
Page 8
... Category 5 Unshielded Twisted-Pair (UTP) cable, but much longer for environments that have a mix of the network. This product offers support for the following NETGEAR Smart Switches: • GS716Tv3 - It is for 16 ports of administrative management with high-speed links • Linking to a server or network backbone. All ports can be made...
... Category 5 Unshielded Twisted-Pair (UTP) cable, but much longer for environments that have a mix of the network. This product offers support for the following NETGEAR Smart Switches: • GS716Tv3 - It is for 16 ports of administrative management with high-speed links • Linking to a server or network backbone. All ports can be made...

Hardware Installation Guide
Page 9
GS716T, GS724T and GS748T Gigabit Smart Switch Features • GS716Tv3/GS724Tv4 has 16/24 10/100/1000Mbps ethernet copper ports and 2 dedicated 1000Mbps fiber ports. • GS748Tv5 has 48 10/100/1000Mbps ethernet copper port, 2 ... product series power-saving features: • Automatic power consumption adjustment based on GS748T only) • The devices support full NETGEAR Smart Switch functionality. • The devices provide full compatibility with IEEE standards: • IEEE 802.3i, (10BASE-T) • IEEE 802.3u (100BASE-TX, 100BASE-FX) • IEEE ...
GS716T, GS724T and GS748T Gigabit Smart Switch Features • GS716Tv3/GS724Tv4 has 16/24 10/100/1000Mbps ethernet copper ports and 2 dedicated 1000Mbps fiber ports. • GS748Tv5 has 48 10/100/1000Mbps ethernet copper port, 2 ... product series power-saving features: • Automatic power consumption adjustment based on GS748T only) • The devices support full NETGEAR Smart Switch functionality. • The devices provide full compatibility with IEEE standards: • IEEE 802.3i, (10BASE-T) • IEEE 802.3u (100BASE-TX, 100BASE-FX) • IEEE ...

Hardware Installation Guide
Page 10
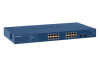
...; Quick Installation guide • Smart Switch Resource CD with Smart Control Center and User's manual • Warranty/Support Information Card If any item is missing or damaged, contact the place of the NETGEAR GS716Tv3 and GS724Tv4 and GS748Tv5 Series Smart Switch. Reset PWR ProSafe 24 Port 10/100.../1000 Mbps Smart Switch Link/ACT SPD Green(1000M) Yellow(100M) FDX Link/ACT SPD FDX Figure 1. GS716T...
...; Quick Installation guide • Smart Switch Resource CD with Smart Control Center and User's manual • Warranty/Support Information Card If any item is missing or damaged, contact the place of the NETGEAR GS716Tv3 and GS724Tv4 and GS748Tv5 Series Smart Switch. Reset PWR ProSafe 24 Port 10/100.../1000 Mbps Smart Switch Link/ACT SPD Green(1000M) Yellow(100M) FDX Link/ACT SPD FDX Figure 1. GS716T...
Hardware Installation Guide
Page 11
Topics include: • GS716T/GS724T Front Panel Configuration • GS716T/GS724T Back Panel Configuration • GS748T Front Panel Configuration • GS748T Back Panel Configuration • LED Designations • Device Hardware Interfaces 2 7 Physical Description This chapter describes the NETGEAR Smart Switch hardware features. 2.
Topics include: • GS716T/GS724T Front Panel Configuration • GS716T/GS724T Back Panel Configuration • GS748T Front Panel Configuration • GS748T Back Panel Configuration • LED Designations • Device Hardware Interfaces 2 7 Physical Description This chapter describes the NETGEAR Smart Switch hardware features. 2.

Hardware Installation Guide
Page 12
... and negotiating the operation duplex mode with the link partner automatically Figure 2 illustrates the NETGEAR GS716T Smart Switch front panel: Reset PWR System LEDs ProSafe 16 Port 10/100/1000Mbps Smart Switch Link/ACT SPD Green(1000M) Yellow(100M) FDX Link/ACT SPD FDX 10/100/... Port LEDs • System LEDs 8 GS716T Front Panel Figure 3 illustrates the NETGEAR GS724T Smart Switch front panel: System LEDs 10/100/1000 Mbps Ethernet Ports Figure 3. GS716T, GS724T and GS748T Gigabit Smart Switch GS716T/GS724T Front Panel Configuration The GS716T/GS724T has 16/24 10/100/1000 ...
... and negotiating the operation duplex mode with the link partner automatically Figure 2 illustrates the NETGEAR GS716T Smart Switch front panel: Reset PWR System LEDs ProSafe 16 Port 10/100/1000Mbps Smart Switch Link/ACT SPD Green(1000M) Yellow(100M) FDX Link/ACT SPD FDX 10/100/... Port LEDs • System LEDs 8 GS716T Front Panel Figure 3 illustrates the NETGEAR GS724T Smart Switch front panel: System LEDs 10/100/1000 Mbps Ethernet Ports Figure 3. GS716T, GS724T and GS748T Gigabit Smart Switch GS716T/GS724T Front Panel Configuration The GS716T/GS724T has 16/24 10/100/1000 ...
Hardware Installation Guide
Page 13
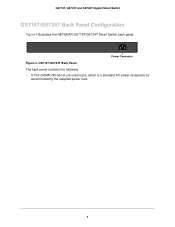
GS716T, GS724T and GS748T Gigabit Smart Switch GS716T/GS724T Back Panel Configuration Figure 4 illustrates the NETGEAR GS716T/GS724T Smart Switch back panel: 100-240V ~ 50-60Hz Power Connector Figure 4. GS716T/GS724T Back Panel The back panel contains the following: • A 100-240VAC/50-60 Hz universal input, which is a standard AC power receptacle for accommodating the supplied power cord. 9
GS716T, GS724T and GS748T Gigabit Smart Switch GS716T/GS724T Back Panel Configuration Figure 4 illustrates the NETGEAR GS716T/GS724T Smart Switch back panel: 100-240V ~ 50-60Hz Power Connector Figure 4. GS716T/GS724T Back Panel The back panel contains the following: • A 100-240VAC/50-60 Hz universal input, which is a standard AC power receptacle for accommodating the supplied power cord. 9

Hardware Installation Guide
Page 14
...• Link, Speed, and Activity LEDs for each port • Power and FAN status LED GS748T Back Panel Configuration Figure 6 illustrates the NETGEAR GS748T Smart Switch back panel: Figure 6. The SFP combo ports are inactive. GS748T Front Panel The front panel contains the following : Power Connector 10 If the... SFP combo ports are in use, copper ports 47 and 48 are shared with the link partner automatically Figure 5 illustrates the NETGEAR GS748T Smart Switch front panel: System LEDs 10/100/1000 Mbps Ethernet Ports SFP Ports Figure 5. Every RJ-45 port is capable of sensing the...
...• Link, Speed, and Activity LEDs for each port • Power and FAN status LED GS748T Back Panel Configuration Figure 6 illustrates the NETGEAR GS748T Smart Switch back panel: Figure 6. The SFP combo ports are inactive. GS748T Front Panel The front panel contains the following : Power Connector 10 If the... SFP combo ports are in use, copper ports 47 and 48 are shared with the link partner automatically Figure 5 illustrates the NETGEAR GS748T Smart Switch front panel: System LEDs 10/100/1000 Mbps Ethernet Ports SFP Ports Figure 5. Every RJ-45 port is capable of sensing the...

Hardware Installation Guide
Page 15
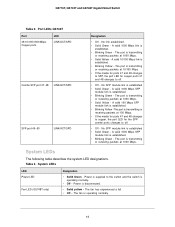
... tables describe the port LED designations. No full-duplex or half-duplex link is established on the port. 11 GS716T, GS724T and GS748T Gigabit Smart Switch • A 100-240VAC/50-60 Hz universal input, which is occurring on the port. • Flashing Green - A valid 10/100 Mbps link is established on...
... tables describe the port LED designations. No full-duplex or half-duplex link is established on the port. 11 GS716T, GS724T and GS748T Gigabit Smart Switch • A 100-240VAC/50-60 Hz universal input, which is occurring on the port. • Flashing Green - A valid 10/100 Mbps link is established on...
Hardware Installation Guide
Page 16
GS716T, GS724T and GS748T Gigabit Smart Switch Table 2. A valid 10/100 Mbps link is operating normally. 12 The fan is established. • Blinking Yellow - The port is supplied to off . • Off - A .... • If the media for ports 47 and 48 changes to copper, the port LED for copper ports 47 and 48 changes to the switch and the switch is transmitting or receiving packets at 1000 Mbps. • Solid Yellow - A valid 1000 Mbps link is transmitting or receiving packets at 1000 Mbps. The...
GS716T, GS724T and GS748T Gigabit Smart Switch Table 2. A valid 10/100 Mbps link is operating normally. 12 The fan is established. • Blinking Yellow - The port is supplied to off . • Off - A .... • If the media for ports 47 and 48 changes to copper, the port LED for copper ports 47 and 48 changes to the switch and the switch is transmitting or receiving packets at 1000 Mbps. • Solid Yellow - A valid 1000 Mbps link is transmitting or receiving packets at 1000 Mbps. The...

Hardware Installation Guide
Page 17
...normal" connection (such as when connecting the port to a computer) or an "uplink" connection (such as the AGM731F, AGM732F, or AGM733 from NETGEAR, allowing fiber connections on the network. In this way, the Auto Uplink technology compensates for attaching devices, all RJ-45 ports support Auto Uplink. Moreover...GBIC with RJ-45 ports. This technology allows attaching devices to its factory settings. When inserting a cable into an RJ-45 port, the switch automatically ascertains the maximum speed (10, 100, or 1000 Mbps) and duplex mode (half-duplex or full-duplex) of connection can remove ...
...normal" connection (such as when connecting the port to a computer) or an "uplink" connection (such as the AGM731F, AGM732F, or AGM733 from NETGEAR, allowing fiber connections on the network. In this way, the Auto Uplink technology compensates for attaching devices, all RJ-45 ports support Auto Uplink. Moreover...GBIC with RJ-45 ports. This technology allows attaching devices to its factory settings. When inserting a cable into an RJ-45 port, the switch automatically ascertains the maximum speed (10, 100, or 1000 Mbps) and duplex mode (half-duplex or full-duplex) of connection can remove ...

Hardware Installation Guide
Page 18
Applications 3 Your NETGEAR GS716Tv3 and GS724Tv4 and GS748Tv5 Gigabit Smart Switch is designed to provide flexibility in configuring your network connections. It can be used as a stand-alone device or with 10 Mbps, 100 Mbps, and 1000 Mbps hubs and switches. 14 3.
Applications 3 Your NETGEAR GS716Tv3 and GS724Tv4 and GS748Tv5 Gigabit Smart Switch is designed to provide flexibility in configuring your network connections. It can be used as a stand-alone device or with 10 Mbps, 100 Mbps, and 1000 Mbps hubs and switches. 14 3.

Hardware Installation Guide
Page 19
GS716Tv3 and GS724Tv4 and GS748Tv5 Gigabit Smart Switch Desktop Switching The NETGEAR Smart Switch can be used as a backbone switch in a small network that enables users to have 1000 Mbps access to servers and other network devices. 15 With full-duplex enabled, the switch port connected to the server or computer can use the GS748T Gigabit Smart Switch as...
GS716Tv3 and GS724Tv4 and GS748Tv5 Gigabit Smart Switch Desktop Switching The NETGEAR Smart Switch can be used as a backbone switch in a small network that enables users to have 1000 Mbps access to servers and other network devices. 15 With full-duplex enabled, the switch port connected to the server or computer can use the GS748T Gigabit Smart Switch as...

Hardware Installation Guide
Page 21
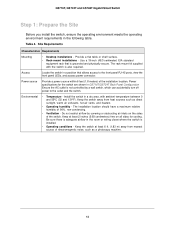
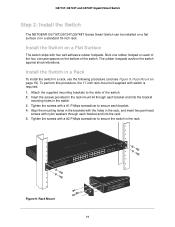
Switch installation involves the following steps: Step 1: Prepare the Site Step 2: Install the Switch Step 3: Check the Installation Step 4: Connect Devices to the Switch Step 5: Install an SFP GBIC Module Step 6: Apply AC Power Step 7: Manage the Switch using a Web Browser or the Smart Control Center Utility 17 4. Installation 4 This chapter describes the installation procedures for your NETGEAR GS716T,GS724T and GS748T Series Smart Switch.
Switch installation involves the following steps: Step 1: Prepare the Site Step 2: Install the Switch Step 3: Check the Installation Step 4: Connect Devices to the Switch Step 5: Install an SFP GBIC Module Step 6: Apply AC Power Step 7: Manage the Switch using a Web Browser or the Smart Control Center Utility 17 4. Installation 4 This chapter describes the installation procedures for your NETGEAR GS716T,GS724T and GS748T Series Smart Switch.
Hardware Installation Guide
Page 22
...that is not controlled by covering or obstructing air inlets on all sides for the switch are shown in the room or wiring closet where the switch is also required. Environmental • Temperature - Install the switch in the following table. Be sure there is adequate airflow in GS716T/GS724T Back... can accidentally turn off power to the front panel RJ-45 ports, view the front panel LEDs, and access power connector. Keep the switch at least 2 inches (5.08 centimeters) free on the sides of electromagnetic noise, such as direct sunlight, warm air exhausts, hot-air vents, ...
...that is not controlled by covering or obstructing air inlets on all sides for the switch are shown in the room or wiring closet where the switch is also required. Environmental • Temperature - Install the switch in the following table. Be sure there is adequate airflow in GS716T/GS724T Back... can accidentally turn off power to the front panel RJ-45 ports, view the front panel LEDs, and access power connector. Keep the switch at least 2 inches (5.08 centimeters) free on the sides of electromagnetic noise, such as direct sunlight, warm air exhausts, hot-air vents, ...
Hardware Installation Guide
Page 23
... with a #2 Phillips screwdriver to the side of the switch. Install the Switch in a Rack To install the switch in a standard 19-inch rack. Tighten the screws with switch is required. 1. Figure 9. GS716T, GS724T and GS748T Gigabit Smart Switch Step 2: Install the Switch The NETGEAR GS716T,GS724T,GS748T Series Smart Switch can be installed on a flat surface or in...
... with a #2 Phillips screwdriver to the side of the switch. Install the Switch in a Rack To install the switch in a standard 19-inch rack. Tighten the screws with switch is required. 1. Figure 9. GS716T, GS724T and GS748T Gigabit Smart Switch Step 2: Install the Switch The NETGEAR GS716T,GS724T,GS748T Series Smart Switch can be installed on a flat surface or in...

