Installation Guide (Cellular Version)
Page 9
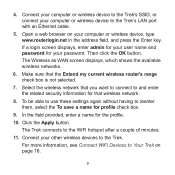
... security information for profile check box. 9. Then click the OK button. Select the wireless network that you want to connect to Your Trek on your password. The Trek connects to reenter them, select the To save a name for that the Extend my current wireless router's range check box is not selected....net in the address field, and press the Enter key. Click the Apply button. If a login screen displays, enter admin for your user name and password for the profile. 10.
... security information for profile check box. 9. Then click the OK button. Select the wireless network that you want to connect to Your Trek on your password. The Trek connects to reenter them, select the To save a name for that the Extend my current wireless router's range check box is not selected....net in the address field, and press the Enter key. Click the Apply button. If a login screen displays, enter admin for your user name and password for the profile. 10.
Installation Guide (Cellular Version)
Page 11
... available wireless networks. 7. Open a web browser on page 16. 11 Click the Apply button. If a login screen displays, enter admin for your user name and password for your other wireless devices to reenter them, select the To save a name for the profile. 11. In the field provided, enter a name for profile...
... available wireless networks. 7. Open a web browser on page 16. 11 Click the Apply button. If a login screen displays, enter admin for your user name and password for your other wireless devices to reenter them, select the To save a name for the profile. 11. In the field provided, enter a name for profile...
Installation Guide (Cellular Version)
Page 13
... field, and press the Enter key. See the user manual. 13 If a login screen displays, enter admin for your user name and password for your computer or wireless device to the Trek's SSID, or connect your password. Connect your computer or wireless device to the Trek's LAN port with an Ethernet cable. 5.
... field, and press the Enter key. See the user manual. 13 If a login screen displays, enter admin for your user name and password for your computer or wireless device to the Trek's SSID, or connect your password. Connect your computer or wireless device to the Trek's LAN port with an Ethernet cable. 5.

Installation Guide (Cellular Version)
Page 15
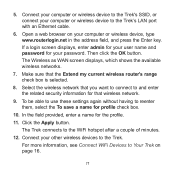
..., and press the Enter key. Select the wireless network that you want to connect to the Trek. In the field provided, enter a name for your password. For more information, see Connect WiFi Devices to reenter them, select the To save a name for that the Extend my current wireless router's range check... Apply button. Then click the OK button. Open a web browser on page 16. 15 If a login screen displays, enter admin for your user name and password for the profile. 11.
..., and press the Enter key. Select the wireless network that you want to connect to the Trek. In the field provided, enter a name for your password. For more information, see Connect WiFi Devices to reenter them, select the To save a name for that the Extend my current wireless router's range check... Apply button. Then click the OK button. Open a web browser on page 16. 15 If a login screen displays, enter admin for your user name and password for the profile. 11.
Installation Guide (Cellular Version)
Page 16
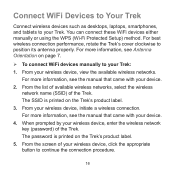
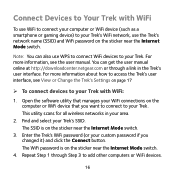
..., click the appropriate button to your Trek. From the screen of the Trek. From your wireless device, enter the wireless network key (password) of the Trek. When prompted by your wireless device, view the available wireless networks. The SSID is printed on the Trek's product ..., initiate a wireless connection. You can connect these WiFi devices either manually or using the WPS (Wi-Fi Protected Setup) method. The password is printed on page 7. To connect WiFi devices manually to continue the connection procedure. 16 For more information, see Antenna Orientation...
..., click the appropriate button to your Trek. From the screen of the Trek. From your wireless device, enter the wireless network key (password) of the Trek. When prompted by your wireless device, view the available wireless networks. The SSID is printed on the Trek's product ..., initiate a wireless connection. You can connect these WiFi devices either manually or using the WPS (Wi-Fi Protected Setup) method. The password is printed on page 7. To connect WiFi devices manually to continue the connection procedure. 16 For more information, see Antenna Orientation...
Installation Guide (Non-Cellular Version)
Page 6
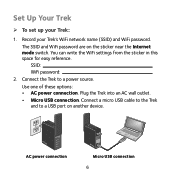
.... Set Up Your Trek ¾¾ To set up your Trek's WiFi network name (SSID) and WiFi password. Record your Trek: 1. SSID: WiFi password: 2. Internvieta PoWiwreerWdiOrfefles PWowireerWdOirfefles NETGEAR Power Internet WiFi USB AC power connection NETGEAR Micro USB connection 6 Connect the Trek to a USB port on the sticker near the Internet mode switch. The...
.... Set Up Your Trek ¾¾ To set up your Trek's WiFi network name (SSID) and WiFi password. Record your Trek: 1. SSID: WiFi password: 2. Internvieta PoWiwreerWdiOrfefles PWowireerWdOirfefles NETGEAR Power Internet WiFi USB AC power connection NETGEAR Micro USB connection 6 Connect the Trek to a USB port on the sticker near the Internet mode switch. The...
Installation Guide (Non-Cellular Version)
Page 9
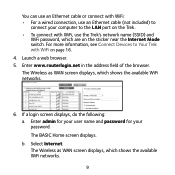
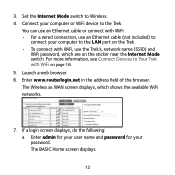
... on the sticker near the Internet Mode switch. If a login screen displays, do the following: a. Enter admin for your user name and password for your computer to connect your password. The BASIC Home screen displays. The Wireless as WAN screen displays, which shows the available WiFi networks. 6. Launch a web browser. 5. Enter www... available WiFi networks. 9 b. You can use an Ethernet cable or connect with WiFi: • For a wired connection, use the Trek's network name (SSID) and WiFi password, which are on page 16. 4. Select Internet.
... on the sticker near the Internet Mode switch. If a login screen displays, do the following: a. Enter admin for your user name and password for your computer to connect your password. The BASIC Home screen displays. The Wireless as WAN screen displays, which shows the available WiFi networks. 6. Launch a web browser. 5. Enter www... available WiFi networks. 9 b. You can use an Ethernet cable or connect with WiFi: • For a wired connection, use the Trek's network name (SSID) and WiFi password, which are on page 16. 4. Select Internet.
Installation Guide (Non-Cellular Version)
Page 10
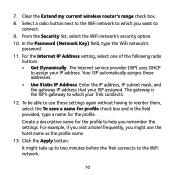
... to the WiFi network to the WiFi network. 10 From the Security list, select the WiFi network's security option. 10. In the Password (Network Key) field, type the WiFi network's password. 11. Click the Apply button. 7. The gateway is the ISP's gateway to which you might take up to two minutes before...
... to the WiFi network to the WiFi network. 10 From the Security list, select the WiFi network's security option. 10. In the Password (Network Key) field, type the WiFi network's password. 11. Click the Apply button. 7. The gateway is the ISP's gateway to which you might take up to two minutes before...
Installation Guide (Non-Cellular Version)
Page 12
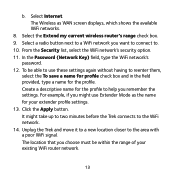
...connect your computer to Your Trek with WiFi, use the Trek's, network name (SSID) and WiFi password, which shows the available WiFi networks. 7. If a login screen displays, do the following: a. Connect your password. For more information, see Connect Devices to the LAN port on the Trek. • To... sticker near the Internet Mode switch. Enter www.routerlogin.net in the address field of the browser. Enter admin for your user name and password for your computer or WiFi device to Wireless. 4. Launch a web browser. 6. The BASIC Home screen displays. 12 Set the Internet Mode...
...connect your computer to Your Trek with WiFi, use the Trek's, network name (SSID) and WiFi password, which shows the available WiFi networks. 7. If a login screen displays, do the following: a. Connect your password. For more information, see Connect Devices to the LAN port on the Trek. • To... sticker near the Internet Mode switch. Enter www.routerlogin.net in the address field of the browser. Enter admin for your user name and password for your computer or WiFi device to Wireless. 4. Launch a web browser. 6. The BASIC Home screen displays. 12 Set the Internet Mode...
Installation Guide (Non-Cellular Version)
Page 13
.... 13 To be within the range of your extender profile settings. 13. b. The Wireless as the name for the profile. In the Password (Network Key) field, type the WiFi network's password. 12. Click the Apply button. From the Security list, select the WiFi network's security option. 11. Select a radio button next to...
.... 13 To be within the range of your extender profile settings. 13. b. The Wireless as the name for the profile. In the Password (Network Key) field, type the WiFi network's password. 12. Click the Apply button. From the Security list, select the WiFi network's security option. 11. Select a radio button next to...
Installation Guide (Non-Cellular Version)
Page 15
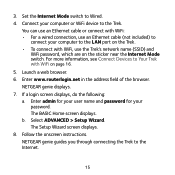
... more information, see Connect Devices to Your Trek with WiFi, use the Trek's network name (SSID) and WiFi password, which are on page 16. 5. The BASIC Home screen displays. b. NETGEAR genie guides you through connecting the Trek to Wired. 4. Enter www.routerlogin.net in the address field of the ...browser. Enter admin for your user name and password for your computer or WiFi device to the LAN port on the Trek. • To connect with WiFi on the sticker near the Internet Mode switch. 3. NETGEAR genie displays. 7. Set the Internet Mode switch to the Internet...
... more information, see Connect Devices to Your Trek with WiFi, use the Trek's network name (SSID) and WiFi password, which are on page 16. 5. The BASIC Home screen displays. b. NETGEAR genie guides you through connecting the Trek to Wired. 4. Enter www.routerlogin.net in the address field of the ...browser. Enter admin for your user name and password for your computer or WiFi device to the LAN port on the Trek. • To connect with WiFi on the sticker near the Internet Mode switch. 3. NETGEAR genie displays. 7. Set the Internet Mode switch to the Internet...
Installation Guide (Non-Cellular Version)
Page 16
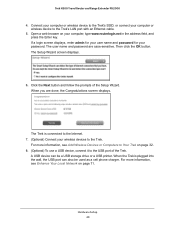
...button. This utility scans for all wireless networks in the Trek's user interface. Enter the Trek's WiFi password (or your Trek's SSID. Note: You can get the user manual online at http://downloadcenter.netgear.com or through Step 3 to your Trek's WiFi network, use the Trek's network name (SSID)... and WiFi password on page 17 ¾¾ To connect devices to add other computers or WiFi devices. ...
...button. This utility scans for all wireless networks in the Trek's user interface. Enter the Trek's WiFi password (or your Trek's SSID. Note: You can get the user manual online at http://downloadcenter.netgear.com or through Step 3 to your Trek's WiFi network, use the Trek's network name (SSID)... and WiFi password on page 17 ¾¾ To connect devices to add other computers or WiFi devices. ...
Installation Guide (Non-Cellular Version)
Page 17
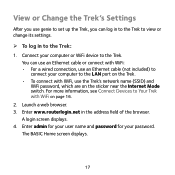
... can use an Ethernet cable or connect with WiFi, use genie to set up the Trek, you use the Trek's network name (SSID) and WiFi password, which are on the sticker near the Internet Mode switch. A login screen displays. 4. Launch a web browser. 3. For more information, see Connect Devices to Your ...: • For a wired connection, use an Ethernet cable (not included) to connect your computer to the Trek: 1. Enter admin for your user name and password for your computer or WiFi device to view or change its settings. ¾¾ To log in the address field of the browser. You can...
... can use an Ethernet cable or connect with WiFi, use genie to set up the Trek, you use the Trek's network name (SSID) and WiFi password, which are on the sticker near the Internet Mode switch. A login screen displays. 4. Launch a web browser. 3. For more information, see Connect Devices to Your ...: • For a wired connection, use an Ethernet cable (not included) to connect your computer to the Trek: 1. Enter admin for your user name and password for your computer or WiFi device to view or change its settings. ¾¾ To log in the address field of the browser. You can...

User Manual (Cellular Version)
Page 3
...ISP Information 26 Wireless Devices and Security Settings 26 Types of Logins and Access 26 NETGEAR genie Setup 27 Use NETGEAR genie After Installation 28 Upgrade the Trek Firmware 29 Change the Password 29 Password Recovery 30 Add Wireless Devices or Computers to Your Trek 32 Manual Method 32 Wi...-Fi Protected Setup Method 33 NETGEAR genie App and Mobile genie App 34 Chapter 3 genie BASIC Settings Internet Setup 37...
...ISP Information 26 Wireless Devices and Security Settings 26 Types of Logins and Access 26 NETGEAR genie Setup 27 Use NETGEAR genie After Installation 28 Upgrade the Trek Firmware 29 Change the Password 29 Password Recovery 30 Add Wireless Devices or Computers to Your Trek 32 Manual Method 32 Wi...-Fi Protected Setup Method 33 NETGEAR genie App and Mobile genie App 34 Chapter 3 genie BASIC Settings Internet Setup 37...

User Manual (Cellular Version)
Page 5
Trek N300 Travel Router and Range Extender PR2000 Specify Log Settings 106 Manage the Configuration File 108 Back Up Settings 108 Restore Configuration Settings 108 Erase the Current Configuration Settings 109 Update the ... 134 Troubleshoot PPPoE 135 Troubleshoot Internet Browsing 136 Changes Not Saved 137 Incorrect Date or Time 137 Wireless Connectivity 138 Restore the Factory Settings and Password 139 Troubleshoot Your Network Using the Ping Utility 139 Test the LAN Path to Your Trek 140 Test the Path from Your Computer to a Remote...
Trek N300 Travel Router and Range Extender PR2000 Specify Log Settings 106 Manage the Configuration File 108 Back Up Settings 108 Restore Configuration Settings 108 Erase the Current Configuration Settings 109 Update the ... 134 Troubleshoot PPPoE 135 Troubleshoot Internet Browsing 136 Changes Not Saved 137 Incorrect Date or Time 137 Wireless Connectivity 138 Restore the Factory Settings and Password 139 Troubleshoot Your Network Using the Ping Utility 139 Test the LAN Path to Your Trek 140 Test the Path from Your Computer to a Remote...

User Manual (Cellular Version)
Page 14
...Range Extender PR2000 Antenna Orientation The WiFi antenna is inside the cover. Rotate the cover to position the antenna. Antenna orientation For best performance, keep the cover vertical when you use your Trek. Device login information (URL, user name, and password) Preset ...wireless network name (SSID) and wireless network key (password) Figure 8. Product Label The device login information (URL, user name, and password), SSID, and wireless password are printed on the product label. Product label Hardware Setup 14 NETGEAR Reset Internet/LAN ...
...Range Extender PR2000 Antenna Orientation The WiFi antenna is inside the cover. Rotate the cover to position the antenna. Antenna orientation For best performance, keep the cover vertical when you use your Trek. Device login information (URL, user name, and password) Preset ...wireless network name (SSID) and wireless network key (password) Figure 8. Product Label The device login information (URL, user name, and password), SSID, and wireless password are printed on the product label. Product label Hardware Setup 14 NETGEAR Reset Internet/LAN ...

User Manual (Cellular Version)
Page 16
...position to the Wireless position. 3. For more information, see Power Inputs on page 14. 4. Hardware Setup 16 NETGEAR (Optional) Connect a USB device to the Trek's LAN port with an Ethernet cable. 5. For more information...13. 2. USB LAN Internet/LAN Reset Power Internet WiFi USB Trek N300 Travel Router and Range Extender PR2000 CAUTION: Most public WiFI hotspots offer no security. Turn on your computer or wireless device to the... field, and press the Enter key. The user name and password are case-sensitive. Then click the OK button. If a login screen displays, enter admin for ...
...position to the Wireless position. 3. For more information, see Power Inputs on page 14. 4. Hardware Setup 16 NETGEAR (Optional) Connect a USB device to the Trek's LAN port with an Ethernet cable. 5. For more information...13. 2. USB LAN Internet/LAN Reset Power Internet WiFi USB Trek N300 Travel Router and Range Extender PR2000 CAUTION: Most public WiFI hotspots offer no security. Turn on your computer or wireless device to the... field, and press the Enter key. The user name and password are case-sensitive. Then click the OK button. If a login screen displays, enter admin for ...

User Manual (Cellular Version)
Page 18
... Internet WiFi USB PWowireerWdOirfef les NETGEAR Power Internet WiFi USB When possible, have your Trek in the address field, and press the Enter key. If a login screen displays, enter admin for your user name and password for your existing router when you specify the settings of your computer, type www....Wireless position. 4. For more information, see Power Inputs on your router. The Wireless as a WiFi range extender: 1. Trek N300 Travel Router and Range Extender PR2000 To use the Trek as WAN screen displays, which shows the available wireless networks. 7.
... Internet WiFi USB PWowireerWdOirfef les NETGEAR Power Internet WiFi USB When possible, have your Trek in the address field, and press the Enter key. If a login screen displays, enter admin for your user name and password for your existing router when you specify the settings of your computer, type www....Wireless position. 4. For more information, see Power Inputs on your router. The Wireless as a WiFi range extender: 1. Trek N300 Travel Router and Range Extender PR2000 To use the Trek as WAN screen displays, which shows the available wireless networks. 7.
User Manual (Cellular Version)
Page 20
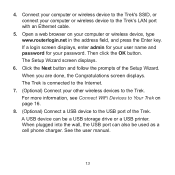
Then click the OK button. Hardware Setup 20 Trek N300 Travel Router and Range Extender PR2000 4. Connect your computer or wireless device to the Trek's SSID, or connect your wireless devices to the USB port of the Setup Wizard. Click the ... displays. 6. A USB device can also be a USB storage drive or a USB printer. The user name and password are done, the Congratulations screen displays. If a login screen displays, enter admin for your user name and password for your computer, type www.routerlogin.net in the address field, and press the Enter key. Open...
Then click the OK button. Hardware Setup 20 Trek N300 Travel Router and Range Extender PR2000 4. Connect your computer or wireless device to the Trek's SSID, or connect your wireless devices to the USB port of the Setup Wizard. Click the ... displays. 6. A USB device can also be a USB storage drive or a USB printer. The user name and password are done, the Congratulations screen displays. If a login screen displays, enter admin for your user name and password for your computer, type www.routerlogin.net in the address field, and press the Enter key. Open...

User Manual (Cellular Version)
Page 21
...your Ethernet-enabled device (such as a WiFi bridge: 1. The user name and password are case-sensitive. USB LAN Internet/LAN Reset Power Internet WiFi USB Trek N300 Travel Router and Range Extender PR2000 WiFi Bridge Setup Use the Ethernet ports on your Trek to connect up to ...password. Open a web browser on your computer or wireless device to the Trek's LAN port with an Ethernet cable. 5. (Optional) Connect an Ethernet cable between the LAN port of the Trek and the Ethernet port of another device. 6. Then click the OK button. Hardware Setup 21 Turn on page 14. 4. NETGEAR...
...your Ethernet-enabled device (such as a WiFi bridge: 1. The user name and password are case-sensitive. USB LAN Internet/LAN Reset Power Internet WiFi USB Trek N300 Travel Router and Range Extender PR2000 WiFi Bridge Setup Use the Ethernet ports on your Trek to connect up to ...password. Open a web browser on your computer or wireless device to the Trek's LAN port with an Ethernet cable. 5. (Optional) Connect an Ethernet cable between the LAN port of the Trek and the Ethernet port of another device. 6. Then click the OK button. Hardware Setup 21 Turn on page 14. 4. NETGEAR...


