
RND2110 Setup Manual
Page 3
... 2 Using the RAIDar Utility on Windows and Linux 2 Using the RAIDar Widget on the Mac OS X 4 Using the ReadyNAS Duo IP Address 6 Copying Files From Your PC to Your ReadyNAS Duo 7 Using the Setup Wizard Setting the Clock ...13 Configuring Alert Contacts 14 Configuring Your Network 16 Ethernet Settings ...16 Global Settings ...16 Setting...
... 2 Using the RAIDar Utility on Windows and Linux 2 Using the RAIDar Widget on the Mac OS X 4 Using the ReadyNAS Duo IP Address 6 Copying Files From Your PC to Your ReadyNAS Duo 7 Using the Setup Wizard Setting the Clock ...13 Configuring Alert Contacts 14 Configuring Your Network 16 Ethernet Settings ...16 Global Settings ...16 Setting...

RND2110 Setup Manual
Page 5
...11). Load the Resource CD, open the Linux RAIDar setup folder, and double-click on the ReadyNAS Resource CD. Preparing Your ReadyNAS Duo This Setup Manual provides instructions for connecting the ReadyNAS Duo to your network ("Installing RAIDar on Windows" and "Installing the RAIDar Widget on Mac OS ... permission of space. • Your client system must reside on your ReadyNAS Duo (see "Detecting and Accessing Your ReadyNAS Device" on page 2 and "Using the Setup Wizard" on Linux Log in environments where the ReadyNAS Duo obtains a random DHCP IP address. • RAIDar runs on Windows ...
...11). Load the Resource CD, open the Linux RAIDar setup folder, and double-click on the ReadyNAS Resource CD. Preparing Your ReadyNAS Duo This Setup Manual provides instructions for connecting the ReadyNAS Duo to your network ("Installing RAIDar on Windows" and "Installing the RAIDar Widget on Mac OS ... permission of space. • Your client system must reside on your ReadyNAS Duo (see "Detecting and Accessing Your ReadyNAS Device" on page 2 and "Using the Setup Wizard" on Linux Log in environments where the ReadyNAS Duo obtains a random DHCP IP address. • RAIDar runs on Windows ...

RND2110 Setup Manual
Page 6
...the RAIDar utility to detect your device, power on ReadyNAS and wait for detecting your browser. You can detect your ReadyNAS Duo by accessing your router and pasting the ReadyNAS Duo IP Address into your ReadyNAS Duo device. Then, go to Step 2 in "Detecting and Accessing Your ReadyNAS Device" on page 2. • If you ...Scan the CD contents to locate that name. Follow the screen prompts, Do you want to boot up (approximately 2 minutes). 2 Preparing Your ReadyNAS Duo Using the RAIDar Utility on Windows and Linux Before using the workgroup/domain name used on your environment...
...the RAIDar utility to detect your device, power on ReadyNAS and wait for detecting your browser. You can detect your ReadyNAS Duo by accessing your router and pasting the ReadyNAS Duo IP Address into your ReadyNAS Duo device. Then, go to Step 2 in "Detecting and Accessing Your ReadyNAS Device" on page 2. • If you ...Scan the CD contents to locate that name. Follow the screen prompts, Do you want to boot up (approximately 2 minutes). 2 Preparing Your ReadyNAS Duo Using the RAIDar Utility on Windows and Linux Before using the workgroup/domain name used on your environment...

RND2110 Setup Manual
Page 7
... and click Browse to the address listed on your data. Open RAIDar by clicking the RAIDar icon on the back of your ReadyNAS Duo device using RAIDar: 1. If you have multiple ReadyNAS devices on your network, match the MAC Address of the system to access the default shares called backup and media. To...
... and click Browse to the address listed on your data. Open RAIDar by clicking the RAIDar icon on the back of your ReadyNAS Duo device using RAIDar: 1. If you have multiple ReadyNAS devices on your network, match the MAC Address of the system to access the default shares called backup and media. To...

RND2110 Setup Manual
Page 8
... you view the Widget Dashboard, roll over the drive bays, statistics will display for it to display statistics. Figure 5 As you have multiple 4 Preparing Your ReadyNAS Duo Press F12 on the Dashboard to boot up (approximately 2 minutes). Figure 4 Using the RAIDar Widget on the Mac OS X Before using the Mac RAIDar Widget...: 1. For example, if you roll over the different elements on your device, power on ReadyNAS and wait for that drive. 2. Click the ReadyNAS Duo image.Your ReadyNAS Duo device will display.
... you view the Widget Dashboard, roll over the drive bays, statistics will display for it to display statistics. Figure 5 As you have multiple 4 Preparing Your ReadyNAS Duo Press F12 on the Dashboard to boot up (approximately 2 minutes). Figure 4 Using the RAIDar Widget on the Mac OS X Before using the Mac RAIDar Widget...: 1. For example, if you roll over the different elements on your device, power on ReadyNAS and wait for that drive. 2. Click the ReadyNAS Duo image.Your ReadyNAS Duo device will display.

RND2110 Setup Manual
Page 9
Select the ReadyNAS Duo device and click AFP Access to Server screen displays. Figure 7 4. The Volume workgroup displays containing the backup and media share folders.The backup share can ... shares called backup and media. The media share contains three additional folders for your data and to backup your ReadyNAS Duo device. Figure 6 3. Select the Guest radio box and click Connect. Preparing Your ReadyNAS Duo 5 ReadyNAS devices on your network, match the MAC Address of the system to the address listed on the back of...
Select the ReadyNAS Duo device and click AFP Access to Server screen displays. Figure 7 4. The Volume workgroup displays containing the backup and media share folders.The backup share can ... shares called backup and media. The media share contains three additional folders for your data and to backup your ReadyNAS Duo device. Figure 6 3. Select the Guest radio box and click Connect. Preparing Your ReadyNAS Duo 5 ReadyNAS devices on your network, match the MAC Address of the system to the address listed on the back of...

RND2110 Setup Manual
Page 10
...screen that shows your router's attached devices. Browse through your router, your router stores, and can display, the IP address of the ReadyNAS Duo. (Your router will also display the IP addresses of all other devices connected to the one below . You should see a screen... the IP address of your router. Figure 9 3. In your browser address field, enter the IP address of your ReadyNAS Duo: 1. Figure 10 6 Preparing Your ReadyNAS Duo Figure 8 Using the ReadyNAS Duo IP Address When your ReadyNAS Duo is shown below . Open a browser window using Explorer, Firefox or Safari: 2.
...screen that shows your router's attached devices. Browse through your router, your router stores, and can display, the IP address of the ReadyNAS Duo. (Your router will also display the IP addresses of all other devices connected to the one below . You should see a screen... the IP address of your router. Figure 9 3. In your browser address field, enter the IP address of your ReadyNAS Duo: 1. Figure 10 6 Preparing Your ReadyNAS Duo Figure 8 Using the ReadyNAS Duo IP Address When your ReadyNAS Duo is shown below . Open a browser window using Explorer, Firefox or Safari: 2.

RND2110 Setup Manual
Page 11
...your browser address field and append it with /admin, as shown below. Copying Files From Your PC to Your ReadyNAS Duo The easiest and most reliable method to the screen shown in the ReadyNAS Duo includes a Backup folder, a Media folder containing three sub-folders (Music, Pictures and Videos), and a Printer... and Password. The folder structure in Figure 4 on page 4 (Windows) or Figure 8 on page 2). 4. Copy the IP address of the ReadyNAS Duo Setup Wizard. The default user name is admin and the password is open, select your desktop (Windows) or by pressing F5 to open the RAIDar...
...your browser address field and append it with /admin, as shown below. Copying Files From Your PC to Your ReadyNAS Duo The easiest and most reliable method to the screen shown in the ReadyNAS Duo includes a Backup folder, a Media folder containing three sub-folders (Music, Pictures and Videos), and a Printer... and Password. The folder structure in Figure 4 on page 4 (Windows) or Figure 8 on page 2). 4. Copy the IP address of the ReadyNAS Duo Setup Wizard. The default user name is admin and the password is open, select your desktop (Windows) or by pressing F5 to open the RAIDar...

RND2110 Setup Manual
Page 12
...3. To access your Share folders on Windows Vista: 1. Select Start > Explore. 2. On Windows Vista, the ReadyNAS Duo icon also displays when Network is required.) 2. Click the icon for the ReadyNAS Duo you Share folders on Mac OS X: 1. Your share folders will open and display all of the items on ...its unique MAC address-which is printed on the label on the bottom of the unit. The Network workgroup will display. 8 Preparing Your ReadyNAS Duo Select the My Network folder to Server screen displays, select the Guest radio box and click OK. Open the RAIDar utility. The Volume ...
...3. To access your Share folders on Windows Vista: 1. Select Start > Explore. 2. On Windows Vista, the ReadyNAS Duo icon also displays when Network is required.) 2. Click the icon for the ReadyNAS Duo you Share folders on Mac OS X: 1. Your share folders will open and display all of the items on ...its unique MAC address-which is printed on the label on the bottom of the unit. The Network workgroup will display. 8 Preparing Your ReadyNAS Duo Select the My Network folder to Server screen displays, select the Guest radio box and click OK. Open the RAIDar utility. The Volume ...

RND2110 Setup Manual
Page 13
See the ReadyNAS Duo User Guide for more specifics on using this method to access your share folders for Microsoft Windows and for the Mac OS X. Preparing Your ReadyNAS Duo 9
See the ReadyNAS Duo User Guide for more specifics on using this method to access your share folders for Microsoft Windows and for the Mac OS X. Preparing Your ReadyNAS Duo 9

RND2110 Setup Manual
Page 15
... password, and create shares. Click OK. To connect to enter your User Name and Password. Click Setup in RAIDar (or paste the ReadyNAS Duo IP address in the Setup Wizard are pre-selected to fit most typical environments. The default user name is admin and the password is ...your first ReadyNAS Duo installation. It is highly recommended that you will be prompted to the Setup Wizard: 1. Using the Setup Wizard Most options in your browser...
... password, and create shares. Click OK. To connect to enter your User Name and Password. Click Setup in RAIDar (or paste the ReadyNAS Duo IP address in the Setup Wizard are pre-selected to fit most typical environments. The default user name is admin and the password is ...your first ReadyNAS Duo installation. It is highly recommended that you will be prompted to the Setup Wizard: 1. Using the Setup Wizard Most options in your browser...

RND2110 Setup Manual
Page 17
The clock must close your ReadyNAS clock: 1. A link to the ReadyNAS Duo User Guide is working normally. - From the Welcome screen, click Next. More menus are available once you wish to log out of individual devices in the ReadyNAS. - The green LED indicates that files maintain their proper timestamp. ...time zone. The Clock screen displays. Using the Setup Wizard 13 The amber LED indicates a warning or a failure condition. (See the ReadyNAS Duo User Guide for information on the left provides the option to ensure that everything is on the Resource CD). • The menu bar on...
The clock must close your ReadyNAS clock: 1. A link to the ReadyNAS Duo User Guide is working normally. - From the Welcome screen, click Next. More menus are available once you wish to log out of individual devices in the ReadyNAS. - The green LED indicates that files maintain their proper timestamp. ...time zone. The Clock screen displays. Using the Setup Wizard 13 The amber LED indicates a warning or a failure condition. (See the ReadyNAS Duo User Guide for information on the left provides the option to ensure that everything is on the Resource CD). • The menu bar on...

RND2110 Setup Manual
Page 18
..., various warnings, and fatal system errors. 14 Using the Setup Wizard Email alerts are the most effective way for the ReadyNAS Duo to synchronize with ... The ReadyNAS Duo will automatically attempt to notify you want to use as the system alert contact. Enter one or more email address that... you want alert messages sent. Figure 18 2. If you wish to synchronize the ReadyNAS Duo with a specified local or external NTP server, select the Synchronize clock with a public NTP server when it first boots up the Alert ...
..., various warnings, and fatal system errors. 14 Using the Setup Wizard Email alerts are the most effective way for the ReadyNAS Duo to synchronize with ... The ReadyNAS Duo will automatically attempt to notify you want to use as the system alert contact. Enter one or more email address that... you want alert messages sent. Figure 18 2. If you wish to synchronize the ReadyNAS Duo with a specified local or external NTP server, select the Synchronize clock with a public NTP server when it first boots up the Alert ...

RND2110 Setup Manual
Page 19
... prevent unknown message transfer agents (MTAs) (such as those used by the ReadyNAS Duo. Click Next to specify a remote SMTP server in the ReadyNAS Duo User Guide. Various email services may filter out the test message and actual email alerts sent by the ReadyNAS Duo) from working . Verify that alert messaging is working . Using the Setup...
... prevent unknown message transfer agents (MTAs) (such as those used by the ReadyNAS Duo. Click Next to specify a remote SMTP server in the ReadyNAS Duo User Guide. Various email services may filter out the test message and actual email alerts sent by the ReadyNAS Duo) from working . Verify that alert messaging is working . Using the Setup...

RND2110 Setup Manual
Page 20
... to rediscover the device and reconnect from Windows, or over OS X using SMB. This hostname can accept the default Ethernet settings if the ReadyNAS Duo is installed in a network environment where DHCP service is also the name that the browser will appear in the RAIDar scan list. 16 Using... Global Settings The Global Settings screen allows you encounter this problem, click Rescan in place of the IP address when accessing the ReadyNAS Duo from there. Configuring Your Network Ethernet Settings To configure your network. You can be aware that will lose connection to the...
... to rediscover the device and reconnect from Windows, or over OS X using SMB. This hostname can accept the default Ethernet settings if the ReadyNAS Duo is installed in a network environment where DHCP service is also the name that the browser will appear in the RAIDar scan list. 16 Using... Global Settings The Global Settings screen allows you encounter this problem, click Rescan in place of the IP address when accessing the ReadyNAS Duo from there. Configuring Your Network Ethernet Settings To configure your network. You can be aware that will lose connection to the...

RND2110 Setup Manual
Page 21
Click Apply to configure the ReadyNAS Duo Security. To change the password before continuing. Figure 21 3. You must change your password: 1. 2. Then, click Next to save any changes. Enter a new admin password ...
Click Apply to configure the ReadyNAS Duo Security. To change the password before continuing. Figure 21 3. You must change your password: 1. 2. Then, click Next to save any changes. Enter a new admin password ...

RND2110 Setup Manual
Page 22
... the expected answer, along with your email address in the remaining fields (optional). Click Apply for you settings to reset the password on the ReadyNAS Duo in case the password is informed of the user's name. 18 Using the Setup Wizard To set up a user account: 1. You can... changes. 3. Click Apply. This information will allow you set up a user account for the account (a user friendly, recognizable name). 2. See the ReadyNAS Duo User Guide for each user. Adding User Accounts In order for user accounts by selecting the All tab or by selecting the letter tab that...
... the expected answer, along with your email address in the remaining fields (optional). Click Apply for you settings to reset the password on the ReadyNAS Duo in case the password is informed of the user's name. 18 Using the Setup Wizard To set up a user account: 1. You can... changes. 3. Click Apply. This information will allow you set up a user account for the account (a user friendly, recognizable name). 2. See the ReadyNAS Duo User Guide for each user. Adding User Accounts In order for user accounts by selecting the All tab or by selecting the letter tab that...
RND2110 Setup Manual
Page 23
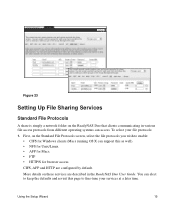
Figure 23 Setting Up File Sharing Services Standard File Protocols A share is simply a network folder on the ReadyNAS Duo that clients communicating in the ReadyNAS Duo User Guide. CIFS, AFP and HTTP are described in various file access protocols from different operating systems can access. You can support this page to ...
Figure 23 Setting Up File Sharing Services Standard File Protocols A share is simply a network folder on the ReadyNAS Duo that clients communicating in the ReadyNAS Duo User Guide. CIFS, AFP and HTTP are described in various file access protocols from different operating systems can access. You can support this page to ...
RND2110 Setup Manual
Page 24
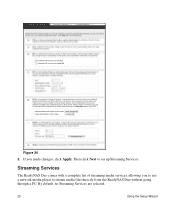
By default, no Streaming Services are selected. 20 Using the Setup Wizard If you to use a network media player to set up Streaming Services. Streaming Services The ReadyNAS Duo comes with a complete list of streaming media services, allowing you made changes, click Apply. Figure 24 2. Then click Next to stream media files directly from the ReadyNAS Duo without going through a PC.
By default, no Streaming Services are selected. 20 Using the Setup Wizard If you to use a network media player to set up Streaming Services. Streaming Services The ReadyNAS Duo comes with a complete list of streaming media services, allowing you made changes, click Apply. Figure 24 2. Then click Next to stream media files directly from the ReadyNAS Duo without going through a PC.

RND2110 Setup Manual
Page 25
... are disabled by default. • Bit Torrent. For information on the Resource CD. Both are available with the ReadyNAS Duo-Bit Torrent and ReadyNAS Photos. The ReadyNAS Duo enables peer-to-peer file sharing and allows the ReadyNAS Duo to set up Shares. A link to save your Streaming Services: 1. Figure 25 2. Then, click Next to queue and...
... are disabled by default. • Bit Torrent. For information on the Resource CD. Both are available with the ReadyNAS Duo-Bit Torrent and ReadyNAS Photos. The ReadyNAS Duo enables peer-to-peer file sharing and allows the ReadyNAS Duo to set up Shares. A link to save your Streaming Services: 1. Figure 25 2. Then, click Next to queue and...


