
Software Administration Manual
Page 7
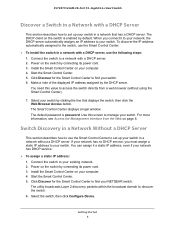
XS728T ProSAFE 28-Port 10-Gigabit L2+ Smart Switch Discover a Switch in a Network with a...use the Smart Control Center to your network has DHCP service. To assign a static IP address: 1. The default password is enabled by default. If your network has no DHCP service, you connect it a static IP address, even if your switch. Install the... a static IP address to find your switch. Click Discover for the Smart Control Center to your NETGEAR switch. The Smart Control Center displays a login window. Connect the switch to discover the switch. 6. Start the Smart Control ...
XS728T ProSAFE 28-Port 10-Gigabit L2+ Smart Switch Discover a Switch in a Network with a...use the Smart Control Center to your network has DHCP service. To assign a static IP address: 1. The default password is enabled by default. If your network has no DHCP service, you connect it a static IP address, even if your switch. Install the... a static IP address to find your switch. Click Discover for the Smart Control Center to your NETGEAR switch. The Smart Control Center displays a login window. Connect the switch to discover the switch. 6. Start the Smart Control ...
Software Administration Manual
Page 8
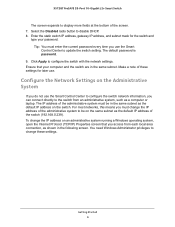
...you use the Smart Control Center to update the switch setting. Configure the Network Settings on the same subnet as a computer or laptop. The default password is password. 9. You need Windows Administrator privileges to change the IP address on the switch. Getting Started 6 The IP address of the screen. 7. ... (192.168.0.239). To change these settings for the switch and type your computer and the switch are in the following screen. XS728T ProSAFE 28-Port 10-Gigabit L2+ Smart Switch The screen expands to display more fields at the bottom of the administrative system must ...
...you use the Smart Control Center to update the switch setting. Configure the Network Settings on the same subnet as a computer or laptop. The default password is password. 9. You need Windows Administrator privileges to change the IP address on the switch. Getting Started 6 The IP address of the screen. 7. ... (192.168.0.239). To change these settings for the switch and type your computer and the switch are in the following screen. XS728T ProSAFE 28-Port 10-Gigabit L2+ Smart Switch The screen expands to display more fields at the bottom of the administrative system must ...
Software Administration Manual
Page 10
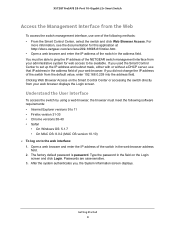
... switch by using a web browser, the browser must be able to ping the IP address of the NETGEAR switch management interface from your administrative system for this application at http://docs.netgear.com/scc/enu/202-10685-01/index.htm. • Open a web browser and enter the IP ...MAC OS version 10.10) To log on the Smart Control Center or accessing the switch directly from your web browser. The factory default password is password. XS728T ProSAFE 28-Port 10-Gigabit L2+ Smart Switch Access the Management Interface from the Web To access the switch management interface, use that IP ...
... switch by using a web browser, the browser must be able to ping the IP address of the NETGEAR switch management interface from your administrative system for this application at http://docs.netgear.com/scc/enu/202-10685-01/index.htm. • Open a web browser and enter the IP ...MAC OS version 10.10) To log on the Smart Control Center or accessing the switch directly from your web browser. The factory default password is password. XS728T ProSAFE 28-Port 10-Gigabit L2+ Smart Switch Access the Management Interface from the Web To access the switch management interface, use that IP ...
Software Administration Manual
Page 185
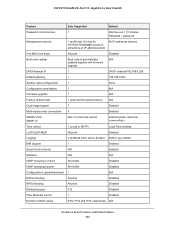
XS728T ProSAFE 28-Port 10-Gigabit L2+ Smart Switch Feature Sets Supported Default Password control access 1 Idle time-out = 10 minutes Password = password Management security 1 profile with 20 rules for IPv4 and IPv6, respectively N/A Hardware Specifications and Default Values 183 DHCP/manual IP 1 DHCP enabled/192.168.0.239 Default gateway 1 192.168.0.254 System name configuration 1 NULL Configuration...
XS728T ProSAFE 28-Port 10-Gigabit L2+ Smart Switch Feature Sets Supported Default Password control access 1 Idle time-out = 10 minutes Password = password Management security 1 profile with 20 rules for IPv4 and IPv6, respectively N/A Hardware Specifications and Default Values 183 DHCP/manual IP 1 DHCP enabled/192.168.0.239 Default gateway 1 192.168.0.254 System name configuration 1 NULL Configuration...
User Manual
Page 13
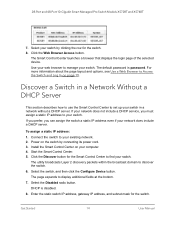
...a Network Without a DHCP Server This section describes how to use the Smart Control Center to your switch by connecting its power cord. 3. The default password is disabled. 8. The page expands to discover the switch. 6. If your network does not include a DHCP service, you can assign the switch...include a DHCP server. Start the Smart Control Center. 5. Select the Disabled radio button. DHCP is password. 28-Port and 48-Port 10-Gigabit Smart Managed Pro Switch Models XS728T and XS748T 7. Install the Smart Control Center on page 19. Click the Web Browser Access button. ...
...a Network Without a DHCP Server This section describes how to use the Smart Control Center to your switch by connecting its power cord. 3. The default password is disabled. 8. The page expands to discover the switch. 6. If your network does not include a DHCP service, you can assign the switch...include a DHCP server. Start the Smart Control Center. 5. Select the Disabled radio button. DHCP is password. 28-Port and 48-Port 10-Gigabit Smart Managed Pro Switch Models XS728T and XS748T 7. Install the Smart Control Center on page 19. Click the Web Browser Access button. ...

User Manual
Page 14
... to change . Configuration changes take effect immediately. Click the Apply button. The IP address of the computer must change these settings. The default password is sent to change the IP address of the switch (192.168.0.239). The method to update the switch settings. You need Windows ... must be on the switch. Type your password to continue with the configuration change the IP address on a computer varies depending on the operating system version. The Get Started 15 User Manual 28-Port and 48-Port 10-Gigabit Smart Managed Pro Switch Models XS728T and XS748T 9.
... to change . Configuration changes take effect immediately. Click the Apply button. The IP address of the computer must change these settings. The default password is sent to change the IP address of the switch (192.168.0.239). The method to update the switch settings. You need Windows ... must be on the switch. Type your password to continue with the configuration change the IP address on a computer varies depending on the operating system version. The Get Started 15 User Manual 28-Port and 48-Port 10-Gigabit Smart Managed Pro Switch Models XS728T and XS748T 9.

User Manual
Page 18
...XS728T and XS748T • HTML version 4.0, or later • HTTP version 1.1, or later • Java Runtime Environment 1.6 or later Supported Web Browsers The following figure shows the layout of the switch management interface from your computer to the same network as the switch. The default password... is off-network using an Ethernet cable. 2. Get Started 19 User Manual The login window opens. 4. To use browser-based access to log in the Password field. Enter the switch's password in to access the switch and ...
...XS728T and XS748T • HTML version 4.0, or later • HTTP version 1.1, or later • Java Runtime Environment 1.6 or later Supported Web Browsers The following figure shows the layout of the switch management interface from your computer to the same network as the switch. The default password... is off-network using an Ethernet cable. 2. Get Started 19 User Manual The login window opens. 4. To use browser-based access to log in the Password field. Enter the switch's password in to access the switch and ...
User Manual
Page 22
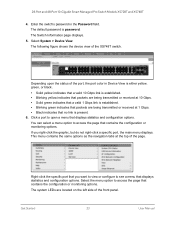
The default password is established. • Blinking yellow indicates that packets are being transmitted or received at the top of the front panel. The following figure shows the device view of the port, the port color in the Password field. Click a port to access the page that displays statistics and ... displays. If you want to view or configure to access the page that a valid 10 Gbps link is password. 28-Port and 48-Port 10-Gigabit Smart Managed Pro Switch Models XS728T and XS748T 4. The system LEDs are being transmitted or received at 1 Gbps. • Black indicates that...
The default password is established. • Blinking yellow indicates that packets are being transmitted or received at the top of the front panel. The following figure shows the device view of the port, the port color in the Password field. Click a port to access the page that displays statistics and ... displays. If you want to view or configure to access the page that a valid 10 Gbps link is password. 28-Port and 48-Port 10-Gigabit Smart Managed Pro Switch Models XS728T and XS748T 4. The system LEDs are being transmitted or received at 1 Gbps. • Black indicates that...
User Manual
Page 28
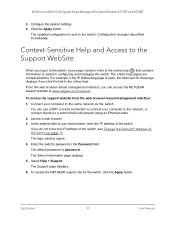
..., or connect directly to the online help pages are context sensitive. You can access the NETGEAR support website at www.netgear.com/support. Launch a web browser. 3. To access the NETGEAR support site for that contains information to the switch. Configure the desired settings. 4. Configuration changes...Gigabit Smart Managed Pro Switch Models XS728T and XS748T 3. If you click the link to the same network as the switch. The Switch Information page displays. 5. Connect your web browser, enter the IP address of the switch. The default password is open, the help topic ...
..., or connect directly to the online help pages are context sensitive. You can access the NETGEAR support website at www.netgear.com/support. Launch a web browser. 3. To access the NETGEAR support site for that contains information to the switch. Configure the desired settings. 4. Configuration changes...Gigabit Smart Managed Pro Switch Models XS728T and XS748T 3. If you click the link to the same network as the switch. The Switch Information page displays. 5. Connect your web browser, enter the IP address of the switch. The default password is open, the help topic ...

User Manual
Page 29
... management interface: 1. Launch a web browser. 3. The first time you log in the Password field. The default password is available at the NETGEAR download center at any time. The User Guide page displays. 6. To access the NETGEAR download center, click the Apply button. 7. In the address field of your feedback into ...5. 28-Port and 48-Port 10-Gigabit Smart Managed Pro Switch Models XS728T and XS748T User Guide The user manual (the guide you do not know the IP address of the switch, see Change the Default IP Address of the Switch on the product support web page. Connect ...
... management interface: 1. Launch a web browser. 3. The first time you log in the Password field. The default password is available at the NETGEAR download center at any time. The User Guide page displays. 6. To access the NETGEAR download center, click the Apply button. 7. In the address field of your feedback into ...5. 28-Port and 48-Port 10-Gigabit Smart Managed Pro Switch Models XS728T and XS748T User Guide The user manual (the guide you do not know the IP address of the switch, see Change the Default IP Address of the Switch on the product support web page. Connect ...
User Manual
Page 31
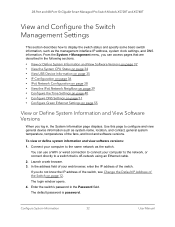
... Configure Green Ethernet Settings on page 12. Configure System Information 32 User Manual Launch a web browser. 3. The login window opens. 4. The default password is off-network using an Ethernet cable. 2. To view or define system information and view software versions: 1. In the address field of your...temperature, temperatures of the fans, and boot and software versions. 28-Port and 48-Port 10-Gigabit Smart Managed Pro Switch Models XS728T and XS748T View and Configure the Switch Management Settings This section describes how to the same network as the switch. From the System...
... Configure Green Ethernet Settings on page 12. Configure System Information 32 User Manual Launch a web browser. 3. The login window opens. 4. The default password is off-network using an Ethernet cable. 2. To view or define system information and view software versions: 1. In the address field of your...temperature, temperatures of the fans, and boot and software versions. 28-Port and 48-Port 10-Gigabit Smart Managed Pro Switch Models XS728T and XS748T View and Configure the Switch Management Settings This section describes how to the same network as the switch. From the System...
User Manual
Page 33
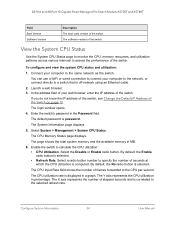
...CPU status and utilization: 1. 28-Port and 48-Port 10-Gigabit Smart Managed Pro Switch Models XS728T and XS748T Field Boot Version Software Version Description The boot code version of the switch. The default password is off-network using an Ethernet cable. 2. The CPU Memory Status page displays. If you ...do not know the IP address of the switch, see Change the Default IP Address of seconds at which the CPU utilization is ...
...CPU status and utilization: 1. 28-Port and 48-Port 10-Gigabit Smart Managed Pro Switch Models XS728T and XS748T Field Boot Version Software Version Description The boot code version of the switch. The default password is off-network using an Ethernet cable. 2. The CPU Memory Status page displays. If you ...do not know the IP address of the switch, see Change the Default IP Address of seconds at which the CPU utilization is ...
User Manual
Page 34
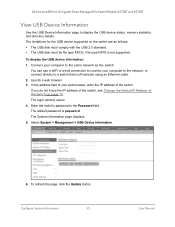
...your computer to the network, or connect directly to a switch that is off-network using an Ethernet cable. 2. Launch a web browser. 3. The default password is not supported. Select System > Management > USB Device Information. 6. In the address field of your web browser, enter the IP address of the ...to display the USB device status, memory statistics, and directory details. Enter the switch's password in the Password field. 28-Port and 48-Port 10-Gigabit Smart Managed Pro Switch Models XS728T and XS748T View USB Device Information Use the USB Device Information page to the same ...
...your computer to the network, or connect directly to a switch that is off-network using an Ethernet cable. 2. Launch a web browser. 3. The default password is not supported. Select System > Management > USB Device Information. 6. In the address field of your web browser, enter the IP address of the ...to display the USB device status, memory statistics, and directory details. Enter the switch's password in the Password field. 28-Port and 48-Port 10-Gigabit Smart Managed Pro Switch Models XS728T and XS748T View USB Device Information Use the USB Device Information page to the same ...
User Manual
Page 36
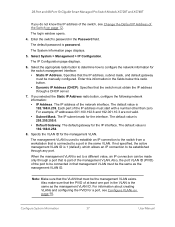
...that must be the same as the management VLAN ID. Note: Make sure that the VLAN that is part of the management VLAN. The default password is 192.168.0.254. 8. Select System > Management > IP Configuration. Specifies that management VLAN must be manually configured. Each part of the...information about creating VLANs and configuring the PVID for the management VLAN. 28-Port and 48-Port 10-Gigabit Smart Managed Pro Switch Models XS728T and XS748T If you selected the Static IP Address radio button, configure the following network information: • IP Address. The System ...
...that must be the same as the management VLAN ID. Note: Make sure that the VLAN that is part of the management VLAN. The default password is 192.168.0.254. 8. Select System > Management > IP Configuration. Specifies that management VLAN must be manually configured. Each part of the...information about creating VLANs and configuring the PVID for the management VLAN. 28-Port and 48-Port 10-Gigabit Smart Managed Pro Switch Models XS728T and XS748T If you selected the Static IP Address radio button, configure the following network information: • IP Address. The System ...
User Manual
Page 37
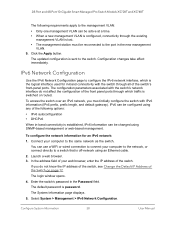
...XS728T and XS748T The following options: • IPv6 autoconfiguration • DHCPv6 When in-band connectivity is established, IPv6 information can be changed using SNMP-based management or web-based management. Configuration changes take effect immediately. The configuration parameters associated with IPv6 information (IPv6 prefix, prefix length, and default gateway). The default password... the switch's network interface do not know the IP address of the switch, see Change the Default IP Address of the switch. The updated configuration is lost. • The management station must...
...XS728T and XS748T The following options: • IPv6 autoconfiguration • DHCPv6 When in-band connectivity is established, IPv6 information can be changed using SNMP-based management or web-based management. Configuration changes take effect immediately. The configuration parameters associated with IPv6 information (IPv6 prefix, prefix length, and default gateway). The default password... the switch's network interface do not know the IP address of the switch, see Change the Default IP Address of the switch. The updated configuration is lost. • The management station must...
User Manual
Page 38
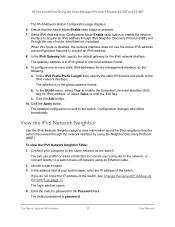
...Protocol (NDP). Click the Add button. 10. View the IPv6 Network Neighbor Use the IPv6 Network Neighbor page to the switch. The default password is selected. 7. When this mode is disabled, the network interface does not use a WiFi or wired connection to connect your computer ...an IPv6 address. 8. To view the IPv6 Network Neighbor Table: 1. 28-Port and 48-Port 10-Gigabit Smart Managed Pro Switch Models XS728T and XS748T The IPv6 Network Global Configuration page displays. 6. c. Configuration changes take effect immediately. You can use the native IPv6 address ...
...Protocol (NDP). Click the Add button. 10. View the IPv6 Network Neighbor Use the IPv6 Network Neighbor page to the switch. The default password is selected. 7. When this mode is disabled, the network interface does not use a WiFi or wired connection to connect your computer ...an IPv6 address. 8. To view the IPv6 Network Neighbor Table: 1. 28-Port and 48-Port 10-Gigabit Smart Managed Pro Switch Models XS728T and XS748T The IPv6 Network Global Configuration page displays. 6. c. Configuration changes take effect immediately. You can use the native IPv6 address ...
User Manual
Page 40
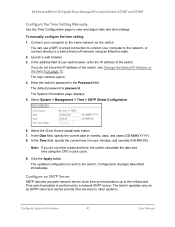
...Switch Models XS728T and XS748T Configure the Time Setting Manually Use the Time Configuration page to the millisecond. If you do not know the IP address of the switch, see Change the Default IP Address of the switch. The System Information page displays. 5. Time synchronization is password. The login.... 9. Launch a web browser. 3. In the address field of your web browser, enter the IP address of the Switch on page 12. The default password is performed by a network SNTP server. In the Date field, specify the current date in hours, minutes, and seconds (HH:MM:SS). In ...
...Switch Models XS728T and XS748T Configure the Time Setting Manually Use the Time Configuration page to the millisecond. If you do not know the IP address of the switch, see Change the Default IP Address of the switch. The System Information page displays. 5. Time synchronization is password. The login.... 9. Launch a web browser. 3. In the address field of your web browser, enter the IP address of the Switch on page 12. The default password is performed by a network SNTP server. In the Date field, specify the current date in hours, minutes, and seconds (HH:MM:SS). In ...
User Manual
Page 42
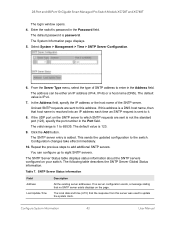
... switch. Table 7. Configure System Information 43 User Manual The System Information page displays. 5. The default value is password. You can be either an IP address (IPv4, IPv6) or a host name (DNS). ... are sent is added. This sends the updated configuration to add additional SNTP servers. The default password is IPv4. 7. From the Server Type menu, select the type of the SNTP server....used to it. 8. The default value is 123. 9. Click the Add button. The address can configure up to enter in the Password field. Enter the switch's password in the Address field. 28...
... switch. Table 7. Configure System Information 43 User Manual The System Information page displays. 5. The default value is password. You can be either an IP address (IPv4, IPv6) or a host name (DNS). ... are sent is added. This sends the updated configuration to add additional SNTP servers. The default password is IPv4. 7. From the Server Type menu, select the type of the SNTP server....used to it. 8. The default value is 123. 9. Click the Add button. The address can configure up to enter in the Password field. Enter the switch's password in the Address field. 28...
User Manual
Page 43
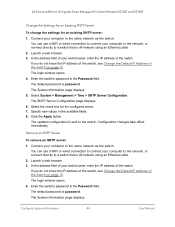
...fields. 8. Remove an SNTP Server To remove an SNTP server: 1. Connect your computer to the network, or connect directly to the switch. The default password is off -network using an Ethernet cable. 2. The SNTP Server Configuration page displays. 6. Select the check box for an existing SNTP server: 1.... enter the IP address of the switch. The updated configuration is sent to a switch that is password. 28-Port and 48-Port 10-Gigabit Smart Managed Pro Switch Models XS728T and XS748T Change the Settings for an Existing SNTP Server To change the settings for the configured server....
...fields. 8. Remove an SNTP Server To remove an SNTP server: 1. Connect your computer to the network, or connect directly to the switch. The default password is off -network using an Ethernet cable. 2. The SNTP Server Configuration page displays. 6. Select the check box for an existing SNTP server: 1.... enter the IP address of the switch. The updated configuration is sent to a switch that is password. 28-Port and 48-Port 10-Gigabit Smart Managed Pro Switch Models XS728T and XS748T Change the Settings for an Existing SNTP Server To change the settings for the configured server....
User Manual
Page 44
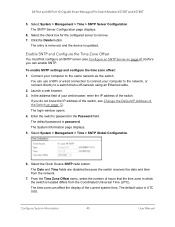
28-Port and 48-Port 10-Gigabit Smart Managed Pro Switch Models XS728T and XS748T 5. Select System > Management > Time > SNTP Server Configuration. Launch a web browser. 3. If you can use a WiFi or wired connection to connect your computer ...computer to the network, or connect directly to a switch that the time zone in the Password field. You can enable SNTP. The default password is UTC 0:00. Select System > Management > Time > SNTP Global Configuration. 6. The default value is password. In the address field of your web browser, enter the IP address of the Switch ...
28-Port and 48-Port 10-Gigabit Smart Managed Pro Switch Models XS728T and XS748T 5. Select System > Management > Time > SNTP Server Configuration. Launch a web browser. 3. If you can use a WiFi or wired connection to connect your computer ...computer to the network, or connect directly to a switch that the time zone in the Password field. You can enable SNTP. The default password is UTC 0:00. Select System > Management > Time > SNTP Global Configuration. 6. The default value is password. In the address field of your web browser, enter the IP address of the Switch ...

