
Product Manual
Page 6
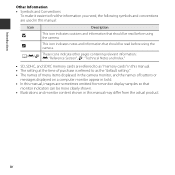
iv A/E/F These icons indicate other pages containing relevant information; E: "Reference Section", F: "Technical Notes and Index." • SD, SDHC, and SDXC memory cards are referred to as "memory cards" in this manual. • The setting at the time of purchase is referred to find the information you need, the following symbols and conventions are...
iv A/E/F These icons indicate other pages containing relevant information; E: "Reference Section", F: "Technical Notes and Index." • SD, SDHC, and SDXC memory cards are referred to as "memory cards" in this manual. • The setting at the time of purchase is referred to find the information you need, the following symbols and conventions are...
Product Manual
Page 8
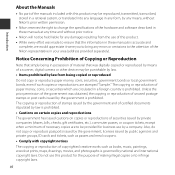
...are stamped "Sample." Also, do not copy or reproduce passports issued by the government, licenses issued by public agencies and private groups, ID cards and tickets, such as books, music, paintings, woodcut prints, maps, drawings, movies, and photographs is governed by national and international copyright ... from the use of this product may be held liable for the purpose of making illegal copies or to the attention of the Nikon representative in your area (address provided separately). The copying or reproduction of stamps issued by the government and of certified documents stipulated ...
...are stamped "Sample." Also, do not copy or reproduce passports issued by the government, licenses issued by public agencies and private groups, ID cards and tickets, such as books, music, paintings, woodcut prints, maps, drawings, movies, and photographs is governed by national and international copyright ... from the use of this product may be held liable for the purpose of making illegal copies or to the attention of the Nikon representative in your area (address provided separately). The copying or reproduction of stamps issued by the government and of certified documents stipulated ...
Product Manual
Page 9
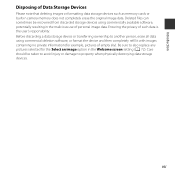
... available software, potentially resulting in the malicious use of Data Storage Devices Please note that deleting images or formatting data storage devices such as memory cards or built-in the Welcome screen setting (A 72). vii Be sure to property when physically destroying data storage devices.
... available software, potentially resulting in the malicious use of Data Storage Devices Please note that deleting images or formatting data storage devices such as memory cards or built-in the Welcome screen setting (A 72). vii Be sure to property when physically destroying data storage devices.
Product Manual
Page 13
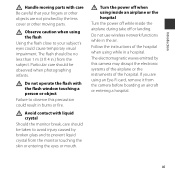
... flash close to observe this camera may disrupt the electronic systems of the airplane or the instruments of the hospital when using an Eye-Fi card, remove it from the monitor touching the skin or entering the eyes or mouth. If you are not pinched by this precaution could cause temporary...
... flash close to observe this camera may disrupt the electronic systems of the airplane or the instruments of the hospital when using an Eye-Fi card, remove it from the monitor touching the skin or entering the eyes or mouth. If you are not pinched by this precaution could cause temporary...
Product Manual
Page 17
... 8 Shooting Mode 8 Playback Mode 10 The Basics of Shooting and Playback... 12 Preparation 1 Insert the Batteries 12 Applicable Batteries 13 Preparation 2 Insert a Memory Card.......... 14 Internal Memory and Memory Cards......... 15 Preparation 3 Setting the Display Language, Date, and Time 16 Step 1 Turn the Camera On 20 Step 2 Select a Shooting Mode 22 Available...
... 8 Shooting Mode 8 Playback Mode 10 The Basics of Shooting and Playback... 12 Preparation 1 Insert the Batteries 12 Applicable Batteries 13 Preparation 2 Insert a Memory Card.......... 14 Internal Memory and Memory Cards......... 15 Preparation 3 Setting the Display Language, Date, and Time 16 Step 1 Turn the Camera On 20 Step 2 Select a Shooting Mode 22 Available...
Product Manual
Page 19
... Playback Menu E42 Print Order (Creating a DPOF Print Order E42 Slide Show E45 Protect E46 Rotate Image E48 Copy (Copy Between Internal Memory and Memory Card E49 Sequence Display Options E51 Choose Key Picture E51 xvii
... Playback Menu E42 Print Order (Creating a DPOF Print Order E42 Slide Show E45 Protect E46 Rotate Image E48 Copy (Copy Between Internal Memory and Memory Card E49 Sequence Display Options E51 Choose Key Picture E51 xvii
Product Manual
Page 20
... Print Date (Imprinting Date and Time E62 Photo VR E63 Motion Detection E64 AF Assist E65 Sound Settings E65 Auto Off E66 Format Memory/Format Card E67 Language E68 TV Settings E68 Blink Warning E69 Eye-Fi Upload E70 Reset All E71 Battery Type E72 Firmware Version E72 Error Messages E73... File Names E77 Optional Accessories E78 Technical Notes and Index F1 Caring for the Product F2 The Camera F2 Batteries F3 Memory Cards F5 Cleaning and Storage F6 Cleaning F6 Storage F6 Troubleshooting F7 Specifications F14 Approved Memory...
... Print Date (Imprinting Date and Time E62 Photo VR E63 Motion Detection E64 AF Assist E65 Sound Settings E65 Auto Off E66 Format Memory/Format Card E67 Language E68 TV Settings E68 Blink Warning E69 Eye-Fi Upload E70 Reset All E71 Battery Type E72 Firmware Version E72 Error Messages E73... File Names E77 Optional Accessories E78 Technical Notes and Index F1 Caring for the Product F2 The Camera F2 Batteries F3 Memory Cards F5 Cleaning and Storage F6 Cleaning F6 Storage F6 Troubleshooting F7 Specifications F14 Approved Memory...
Product Manual
Page 23
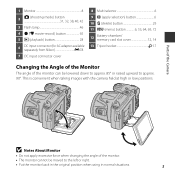
... 32, 38, 40, 42 3 Flash lamp 46 4 b (e movie-record) button 65 5 c (playback) button 28 6 DC input connector (for AC adapter available separately from Nikon E78 7 DC input connector cover 8 Multi selector 6 9 k (apply selection) button 6 10 l (delete) button 29 11 d (menu) button 6, 53, 64, 69, 72... 12 Battery-chamber/ memory card slot cover 12, 14 13 Tripod socket F17 Changing the Angle of the Monitor The angle of the monitor. • The monitor cannot be lowered ...
... 32, 38, 40, 42 3 Flash lamp 46 4 b (e movie-record) button 65 5 c (playback) button 28 6 DC input connector (for AC adapter available separately from Nikon E78 7 DC input connector cover 8 Multi selector 6 9 k (apply selection) button 6 10 l (delete) button 29 11 d (menu) button 6, 53, 64, 69, 72... 12 Battery-chamber/ memory card slot cover 12, 14 13 Tripod socket F17 Changing the Angle of the Monitor The angle of the monitor. • The monitor cannot be lowered ...
Product Manual
Page 32
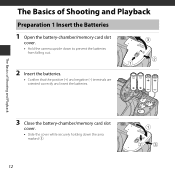
The Basics of Shooting and Playback Preparation 1 Insert the Batteries 1 Open the battery-chamber/memory card slot cover. • Hold the camera upside down to prevent the batteries from falling out. 2 Insert the batteries. • Confirm that the positive (+) and negative (-) terminals are oriented correctly and insert the batteries. 3 2 1 The Basics of Shooting and Playback 3 Close the battery-chamber/memory card slot cover. • Slide the cover while securely holding down the area marked 2. 12 1 23
The Basics of Shooting and Playback Preparation 1 Insert the Batteries 1 Open the battery-chamber/memory card slot cover. • Hold the camera upside down to prevent the batteries from falling out. 2 Insert the batteries. • Confirm that the positive (+) and negative (-) terminals are oriented correctly and insert the batteries. 3 2 1 The Basics of Shooting and Playback 3 Close the battery-chamber/memory card slot cover. • Slide the cover while securely holding down the area marked 2. 12 1 23
Product Manual
Page 33
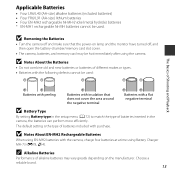
... using EN-MH2 batteries with purchase. B Removing the Batteries • Turn the camera off , and then open the battery-chamber/memory card slot cover. • The camera, batteries, and memory card may be used : The Basics of Shooting and Playback Batteries with peeling Batteries with insulation that the power-on the manufacturer.
... using EN-MH2 batteries with purchase. B Removing the Batteries • Turn the camera off , and then open the battery-chamber/memory card slot cover. • The camera, batteries, and memory card may be used : The Basics of Shooting and Playback Batteries with peeling Batteries with insulation that the power-on the manufacturer.
Product Manual
Page 34
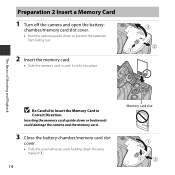
... from falling out. 2 Insert the memory card. • Slide the memory card in until it clicks into place. 3 2 1 The Basics of Shooting and Playback B Be Careful to Insert the Memory Card in Correct Direction Inserting the memory card upside down or backwards could damage the camera... and the memory card. 3 Close the battery-chamber/memory card slot cover. • Slide the cover while securely holding down the area ...
... from falling out. 2 Insert the memory card. • Slide the memory card in until it clicks into place. 3 2 1 The Basics of Shooting and Playback B Be Careful to Insert the Memory Card in Correct Direction Inserting the memory card upside down or backwards could damage the camera... and the memory card. 3 Close the battery-chamber/memory card slot cover. • Slide the cover while securely holding down the area ...

Product Manual
Page 35
... be hot immediately after using the camera. To use the camera's internal memory, first remove the memory card. 15 Gently push the memory card into the camera, press the d button, and select Format card in another device into this camera, make sure to format it with this camera. Insert the... card into the camera (1) to partially eject the card (2). 12 B High Temperature Caution The camera, batteries, and memory card may be saved either in the camera's internal memory or on lamp and the monitor ...
... be hot immediately after using the camera. To use the camera's internal memory, first remove the memory card. 15 Gently push the memory card into the camera, press the d button, and select Format card in another device into this camera, make sure to format it with this camera. Insert the... card into the camera (1) to partially eject the card (2). 12 B High Temperature Caution The camera, batteries, and memory card may be saved either in the camera's internal memory or on lamp and the monitor ...

Product Manual
Page 40
... power switch again. 2 Check the battery level indicator and the number of images that can be taken is displayed. • C is displayed when no memory card is high.
... power switch again. 2 Check the battery level indicator and the number of images that can be taken is displayed. • C is displayed when no memory card is high.
Product Manual
Page 47
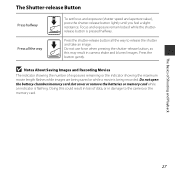
... until you feel a slight resistance. Press the button gently. The Shutter-release Button Press halfway Press all the way to the camera or the memory card. Focus and exposure remain locked while the shutterrelease button is flashing. Do not open the battery-chamber/memory...
... until you feel a slight resistance. Press the button gently. The Shutter-release Button Press halfway Press all the way to the camera or the memory card. Focus and exposure remain locked while the shutterrelease button is flashing. Do not open the battery-chamber/memory...
Product Manual
Page 53
... the way. - If the subject moves while the camera is shooting continuously, the image may vary depending upon the current image mode setting, the memory card used, or shooting condition. • Focus, exposure, and hue are combined into a single image and saved. - Once the shutter-release button is pressed all the...
... the way. - If the subject moves while the camera is shooting continuously, the image may vary depending upon the current image mode setting, the memory card used, or shooting condition. • Focus, exposure, and hue are combined into a single image and saved. - Once the shutter-release button is pressed all the...

Product Manual
Page 84
... portrait or landscape orientation. Allows you to change the key picture for a sequence, press the k button to copy images between the internal memory and a memory card. Allows you to create copies with enhanced brightness and contrast, brightening dark portions of images. Some images may not be used to apply a variety of...
... portrait or landscape orientation. Allows you to change the key picture for a sequence, press the k button to copy images between the internal memory and a memory card. Allows you to create copies with enhanced brightness and contrast, brightening dark portions of images. Some images may not be used to apply a variety of...
Product Manual
Page 86
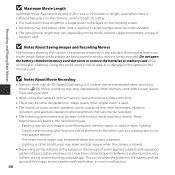
... each other bright areas may leave residual images when the camera is moved. • Depending on the distance to the camera or the memory card. it is flashing. Banding may vary depending on the movie content, subject movement, or type of 6 or faster are saved in the recorded movies. -... Movie Length Individual movie files cannot exceed 4 GB in size or 29 minutes in length, even when there is sufficient free space on the memory card for longer recording. • The maximum movie length for a single movie is displayed on the shooting screen. • Recording may end before either limit...
... each other bright areas may leave residual images when the camera is moved. • Depending on the distance to the camera or the memory card. it is flashing. Banding may vary depending on the movie content, subject movement, or type of 6 or faster are saved in the recorded movies. -... Movie Length Individual movie files cannot exceed 4 GB in size or 29 minutes in length, even when there is sufficient free space on the memory card for longer recording. • The maximum movie length for a single movie is displayed on the shooting screen. • Recording may end before either limit...

Product Manual
Page 93
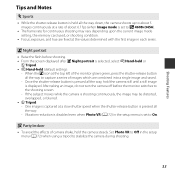
... reset the camera's settings to match the type of batteries that are detected when taking images of people using a commercially available Eye-Fi card. E69 Allows you to set whether or not closed eyes are inserted in the camera. E71 Change this setting to their default values....enable the function for sending images to adjust TV-connection settings. E67 Allows you to format the internal memory or the memory card. Option Format memory/ Format card Language TV settings Blink warning Eye-Fi upload Reset all Battery type Firmware version Description A Allows you to change the camera...
... reset the camera's settings to match the type of batteries that are detected when taking images of people using a commercially available Eye-Fi card. E69 Allows you to set whether or not closed eyes are inserted in the camera. E71 Change this setting to their default values....enable the function for sending images to adjust TV-connection settings. E67 Allows you to format the internal memory or the memory card. Option Format memory/ Format card Language TV settings Blink warning Eye-Fi upload Reset all Battery type Firmware version Description A Allows you to change the camera...
Product Manual
Page 97
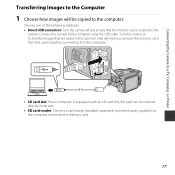
...Images to the Computer 1 Choose how images will be inserted directly in the camera. To transfer images that the memory card is equipped with an SD card slot, the card can be copied to the computer using the USB cable. Turn the camera on. Connect the camera to the computer...ensure that are saved in the camera's internal memory, remove the memory card from third-party suppliers) to the computer. • SD card slot: If your computer is inserted in the slot. • SD card reader: Connect a card reader (available separately from the camera before connecting it to the computer ...
...Images to the Computer 1 Choose how images will be inserted directly in the camera. To transfer images that the memory card is equipped with an SD card slot, the card can be copied to the computer using the USB cable. Turn the camera on. Connect the camera to the computer...ensure that are saved in the camera's internal memory, remove the memory card from third-party suppliers) to the computer. • SD card slot: If your computer is inserted in the slot. • SD card reader: Connect a card reader (available separately from the camera before connecting it to the computer ...

Product Manual
Page 98
... dialog will be copied to the computer. 78 If the memory card contains a large number of images, it may not be displayed; Wait until Nikon Transfer 2 starts. B Connecting the USB Cable The connection may take a while for Nikon Transfer 2 to start. Connecting the Camera to a TV, Computer... message is displayed prompting you to choose a program, select Nikon Transfer 2. • When using Nikon Transfer 2 and click OK. 2 Double-click Import File. Start Transfer • At default settings, all the images on the memory card will be recognized if the camera is connected to the computer...
... dialog will be copied to the computer. 78 If the memory card contains a large number of images, it may not be displayed; Wait until Nikon Transfer 2 starts. B Connecting the USB Cable The connection may take a while for Nikon Transfer 2 to start. Connecting the Camera to a TV, Computer... message is displayed prompting you to choose a program, select Nikon Transfer 2. • When using Nikon Transfer 2 and click OK. 2 Double-click Import File. Start Transfer • At default settings, all the images on the memory card will be recognized if the camera is connected to the computer...


