
Product Manual
Page 95
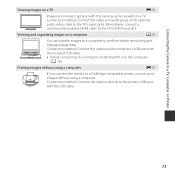
Connection method: Connect the camera to the computer's USB port with the included USB cable. • Before connecting to the TV's input jacks. Connection method: Connect the video and audio plugs of the optional audio video cable to a computer, install ViewNX 2 on the computer (A 76). ...on a TV. Connection method: Connect the camera directly to the TV's HDMI input jack. Alternatively, connect a commercially available HDMI cable to the printer's USB port with the camera can print images without using a computer. Connecting the Camera to a TV, Computer, or Printer Viewing images...
Connection method: Connect the camera to the computer's USB port with the included USB cable. • Before connecting to the TV's input jacks. Connection method: Connect the video and audio plugs of the optional audio video cable to a computer, install ViewNX 2 on the computer (A 76). ...on a TV. Connection method: Connect the camera directly to the TV's HDMI input jack. Alternatively, connect a commercially available HDMI cable to the printer's USB port with the camera can print images without using a computer. Connecting the Camera to a TV, Computer, or Printer Viewing images...
Product Manual
Page 97
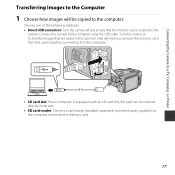
Choose one of the following methods: • Direct USB connection: Turn the camera off and ensure that are saved in the camera's internal memory, remove the memory card from the camera before connecting it ... memory card is equipped with an SD card slot, the card can be copied to the computer. Connect the camera to the computer using the USB cable. Connecting the Camera to a TV, Computer, or Printer Transferring Images to the Computer 1 Choose how images will be inserted directly in the camera...
Choose one of the following methods: • Direct USB connection: Turn the camera off and ensure that are saved in the camera's internal memory, remove the memory card from the camera before connecting it ... memory card is equipped with an SD card slot, the card can be copied to the computer. Connect the camera to the computer using the USB cable. Connecting the Camera to a TV, Computer, or Printer Transferring Images to the Computer 1 Choose how images will be inserted directly in the camera...

Product Manual
Page 98
... contains a large number of images, it may not be recognized if the camera is connected to the computer via a USB hub. 2 Transfer images to start. B Connecting the USB Cable The connection may take a while for Nikon Transfer 2 to the computer. • Click Start Transfer. A program selection dialog will be displayed; Connecting the Camera to...
... contains a large number of images, it may not be recognized if the camera is connected to the computer via a USB hub. 2 Transfer images to start. B Connecting the USB Cable The connection may take a while for Nikon Transfer 2 to the computer. • Click Start Transfer. A program selection dialog will be displayed; Connecting the Camera to...
Product Manual
Page 99
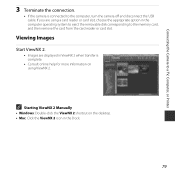
..., choose the appropriate option in the computer operating system to eject the removable disk corresponding to the computer, turn the camera off and disconnect the USB cable. Viewing Images Start ViewNX 2. • Images are using ViewNX 2.
..., choose the appropriate option in the computer operating system to eject the removable disk corresponding to the computer, turn the camera off and disconnect the USB cable. Viewing Images Start ViewNX 2. • Images are using ViewNX 2.

Product Manual
Page 118
Take images Select images for printing and number of PictBridge-compatible printers can connect the camera directly to the printer (E19) Print images one at a time (E20) Print multiple images (E22) When printing is complete, turn the camera off and disconnect the USB cable Reference Section E18 Connecting the Camera to a Printer (Direct Print) Users of copies using Print order option (E42) Connect to the printer and print images without using a computer.
Take images Select images for printing and number of PictBridge-compatible printers can connect the camera directly to the printer (E19) Print images one at a time (E20) Print multiple images (E22) When printing is complete, turn the camera off and disconnect the USB cable Reference Section E18 Connecting the Camera to a Printer (Direct Print) Users of copies using Print order option (E42) Connect to the printer and print images without using a computer.
Product Manual
Page 119
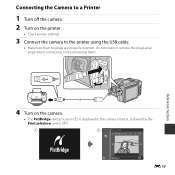
Do not insert or remove the plugs at an angle when connecting or disconnecting them. Reference Section 4 Turn on the printer. • Check printer settings. 3 Connect the camera to a Printer 1 Turn off the camera. 2 Turn on the camera. • The PictBridge startup screen (1) is displayed in the camera monitor, followed by the Print selection screen (2). 1 2 Print selection 15/05/2014 No. 32 32 E19 Connecting the Camera to the printer using the USB cable. • Make sure that the plugs are properly oriented.
Do not insert or remove the plugs at an angle when connecting or disconnecting them. Reference Section 4 Turn on the printer. • Check printer settings. 3 Connect the camera to a Printer 1 Turn off the camera. 2 Turn on the camera. • The PictBridge startup screen (1) is displayed in the camera monitor, followed by the Print selection screen (2). 1 2 Print selection 15/05/2014 No. 32 32 E19 Connecting the Camera to the printer using the USB cable. • Make sure that the plugs are properly oriented.

Product Manual
Page 175
... the camera on again. Turn the camera off, remove and reinsert the batteries, and turn the camera off and reconnect the USB cable. If the error persists, contact your retailer or Nikon-authorized service representative. resume printing.* Reference Section E75 Raise the flash when shooting in the camera's internal circuitry. Remove the jammed...
... the camera on again. Turn the camera off, remove and reinsert the batteries, and turn the camera off and reconnect the USB cable. If the error persists, contact your retailer or Nikon-authorized service representative. resume printing.* Reference Section E75 Raise the flash when shooting in the camera's internal circuitry. Remove the jammed...

Product Manual
Page 185
...camera has entered standby mode to save power 21 (auto off , remove and reinsert the battery or batteries or, if you are connected via a USB cable. 74, 77 • The camera and TV are using an AC adapter, disconnect and reconnect the AC adapter. If the problem persists, turn off.... Troubleshooting If the camera fails to end. F7 Camera turns off until the inside of common problems below before consulting your retailer or Nikon-authorized service representative. Note that although any data currently being recorded will be lost, data that have already been recorded will not be ...
...camera has entered standby mode to save power 21 (auto off , remove and reinsert the battery or batteries or, if you are connected via a USB cable. 74, 77 • The camera and TV are using an AC adapter, disconnect and reconnect the AC adapter. If the problem persists, turn off.... Troubleshooting If the camera fails to end. F7 Camera turns off until the inside of common problems below before consulting your retailer or Nikon-authorized service representative. Note that although any data currently being recorded will be lost, data that have already been recorded will not be ...
Product Manual
Page 187
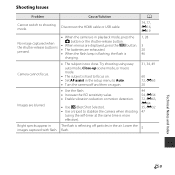
... mode, Close-up scene mode, or macro mode. • The subject is too close. Lower the flash. 5 Technical Notes and Index F9 Disconnect the HDMI cable or USB cable. 74, 77, E16, E19 • When the camera is in the air. The flash is reflecting off and then on again. 31, 34, 49...
... mode, Close-up scene mode, or macro mode. • The subject is too close. Lower the flash. 5 Technical Notes and Index F9 Disconnect the HDMI cable or USB cable. 74, 77, E16, E19 • When the camera is in the air. The flash is reflecting off and then on again. 31, 34, 49...
Product Manual
Page 190
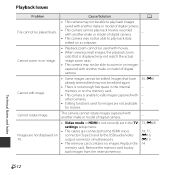
.... • Video mode or HDMI is not correctly set in the TV settings setup menu. • The cables are not displayed on TV. Replace the memory card. Remove the memory card to the USB/audio/video output connector simultaneously. • The memory card contains no images. Cannot edit image. Images that is...
.... • Video mode or HDMI is not correctly set in the TV settings setup menu. • The cables are not displayed on TV. Replace the memory card. Remove the memory card to the USB/audio/video output connector simultaneously. • The memory card contains no images. Cannot edit image. Images that is...

Product Manual
Page 191
.... • The printer automatically selects the paper size. For more information about Nikon Transfer 2, refer to print images from a PictBridge-compatible printer. Problem Nikon Transfer 2 does not start Nikon Transfer 2 automatically. The camera cannot be printed are exhausted. • The USB cable is not correctly connected. • The camera is connected to select the paper...
.... • The printer automatically selects the paper size. For more information about Nikon Transfer 2, refer to print images from a PictBridge-compatible printer. Problem Nikon Transfer 2 does not start Nikon Transfer 2 automatically. The camera cannot be printed are exhausted. • The USB cable is not correctly connected. • The camera is connected to select the paper...

Product Manual
Page 203
... and date 16, 72, E58 Toy camera effect 1 m 38 Toy camera effect 2 n 38 Tripod socket 3, F17 TV 75, E16 TV settings 73, E68 U USB cable 74, 77, E19 USB/audio/video output connector 1, 74, 77, E16, E18 V Video mode E68 ViewNX 2 76 Vivid color E35 Volume 70 W Welcome screen 72, E57 White balance...
... and date 16, 72, E58 Toy camera effect 1 m 38 Toy camera effect 2 n 38 Tripod socket 3, F17 TV 75, E16 TV settings 73, E68 U USB cable 74, 77, E19 USB/audio/video output connector 1, 74, 77, E16, E18 V Video mode E68 ViewNX 2 76 Vivid color E35 Volume 70 W Welcome screen 72, E57 White balance...


