

P7000 User's Manual
Page 3
Introduction First Steps Basic Photography and Playback: A (Auto) Mode More on Shooting More on Playback Editing Pictures Movie Recording and Playback Connecting to Televisions, Computers and Printers Basic Camera Setup Caring for the Camera Technical Notes and Index i
Introduction First Steps Basic Photography and Playback: A (Auto) Mode More on Shooting More on Playback Editing Pictures Movie Recording and Playback Connecting to Televisions, Computers and Printers Basic Camera Setup Caring for the Camera Technical Notes and Index i
P7000 User's Manual
Page 4
... the battery or other small parts into their entirety before using this Nikon product, to a Nikon-authorized service representative for inspection, after unplugging the product and/or removing the battery. Should the camera or Battery Charger break open as this section are indicated by qualified technicians... injury. ii For Your Safety To prevent damage to your Nikon product or injury to yourself or to others, read the following symbol: This icon marks warnings, information that could result from the camera or Battery Charger, unplug the Battery Charger and remove the battery...
... the battery or other small parts into their entirety before using this Nikon product, to a Nikon-authorized service representative for inspection, after unplugging the product and/or removing the battery. Should the camera or Battery Charger break open as this section are indicated by qualified technicians... injury. ii For Your Safety To prevent damage to your Nikon product or injury to yourself or to others, read the following symbol: This icon marks warnings, information that could result from the camera or Battery Charger, unplug the Battery Charger and remove the battery...
P7000 User's Manual
Page 6
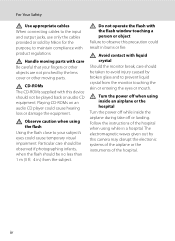
...CD-ROMs on audio CD equipment. Avoid contact with liquid crystal Should the monitor break, care should be taken to avoid injury caused by Nikon for the purpose, to maintain compliance with care Be careful that your subject's eyes could cause hearing loss or damage the equipment. Observe ...CD player could cause temporary visual impairment. The electromagnetic waves given out by the lens cover or other objects are not pinched by this camera may disrupt the electronic systems of the airplane or the instruments of the hospital when using inside an airplane or the hospital Turn the...
...CD-ROMs on audio CD equipment. Avoid contact with liquid crystal Should the monitor break, care should be taken to avoid injury caused by Nikon for the purpose, to maintain compliance with care Be careful that your subject's eyes could cause hearing loss or damage the equipment. Observe ...CD player could cause temporary visual impairment. The electromagnetic waves given out by the lens cover or other objects are not pinched by this camera may disrupt the electronic systems of the airplane or the instruments of the hospital when using inside an airplane or the hospital Turn the...

P7000 User's Manual
Page 9
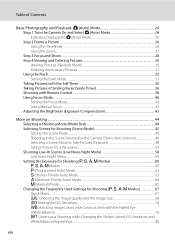
Table of Contents For Your Safety ...ii WARNINGS ...ii Notices ...v Introduction ...1 About This Manual ...1 Information and Precautions ...2 Parts of the Camera ...4 Camera Body ...4 Monitor ...6 Basic Operations...9 Command Dial ...9 f (Av/Tv) Button ...9 Quick Menu Dial and Quick Menu Button 10 Pressing the ...) Button ...11 Rotary Multi Selector ...12 d Button ...13 Switching Between Tabs in the Menu Screen 14 x (Monitor) Button ...14 Attaching the Camera Strap ...15 First Steps ...16 Charging the Battery ...16 Inserting the Battery...18 Removing the Battery...19 Turning On and Off the...
Table of Contents For Your Safety ...ii WARNINGS ...ii Notices ...v Introduction ...1 About This Manual ...1 Information and Precautions ...2 Parts of the Camera ...4 Camera Body ...4 Monitor ...6 Basic Operations...9 Command Dial ...9 f (Av/Tv) Button ...9 Quick Menu Dial and Quick Menu Button 10 Pressing the ...) Button ...11 Rotary Multi Selector ...12 d Button ...13 Switching Between Tabs in the Menu Screen 14 x (Monitor) Button ...14 Attaching the Camera Strap ...15 First Steps ...16 Charging the Battery ...16 Inserting the Battery...18 Removing the Battery...19 Turning On and Off the...
P7000 User's Manual
Page 10
Table of Contents Basic Photography and Playback: A (Auto) Mode 24 Step 1 Turn the Camera On and Select A (Auto) Mode 24 Indicators Displayed in A (Auto) Mode 25 Step 2 Frame a Picture...26 Using the Viewfinder ...26 Using the Zoom...27 Step 3 ... Selecting a Shooting Mode (Mode Dial 44 Selecting Scenes for Shooting (Scene Mode 45 Setting the Scene Mode...45 Shooting in the Scene Selected by the Camera (Scene Auto Selector 46 Selecting a Scene Mode to Take Pictures (Features 48 Taking Pictures for a Panorama...56 Shooting Low-lit Scenes (Low Noise Night Mode...
Table of Contents Basic Photography and Playback: A (Auto) Mode 24 Step 1 Turn the Camera On and Select A (Auto) Mode 24 Indicators Displayed in A (Auto) Mode 25 Step 2 Frame a Picture...26 Using the Viewfinder ...26 Using the Zoom...27 Step 3 ... Selecting a Shooting Mode (Mode Dial 44 Selecting Scenes for Shooting (Scene Mode 45 Setting the Scene Mode...45 Shooting in the Scene Selected by the Camera (Scene Auto Selector 46 Selecting a Scene Mode to Take Pictures (Features 48 Taking Pictures for a Panorama...56 Shooting Low-lit Scenes (Low Noise Night Mode...

P7000 User's Manual
Page 12
... Picture 153 Deleting Unnecessary Movies ...153 Connecting to Televisions, Computers and Printers 154 Connecting to a TV...154 Connecting to a Computer...156 Before Connecting the Camera ...156 Transferring Images from a Camera to a Computer 157 Connecting to a Printer...161 Connecting the Camera and Printer...162 Printing Pictures One at a Time...163 Printing Multiple Pictures ...164 x
... Picture 153 Deleting Unnecessary Movies ...153 Connecting to Televisions, Computers and Printers 154 Connecting to a TV...154 Connecting to a Computer...156 Before Connecting the Camera ...156 Transferring Images from a Camera to a Computer 157 Connecting to a Printer...161 Connecting the Camera and Printer...162 Printing Pictures One at a Time...163 Printing Multiple Pictures ...164 x

P7000 User's Manual
Page 13
Table of Contents Basic Camera Setup ...167 Setup Menu...167 Welcome Screen ...169 Date...170 Monitor Settings...173 Date Imprint...174 Vibration Reduction ...175 Motion Detection...176 AF Assist...177 ... ...186 Av/Tv Button...187 Customize My Menu...187 Reset File Numbering...188 Blink Warning ...189 Reset All ...191 Firmware Version...194 Caring for the Camera...195 Caring for the Camera ...195 Cleaning ...197 Storage ...198 xi
Table of Contents Basic Camera Setup ...167 Setup Menu...167 Welcome Screen ...169 Date...170 Monitor Settings...173 Date Imprint...174 Vibration Reduction ...175 Motion Detection...176 AF Assist...177 ... ...186 Av/Tv Button...187 Customize My Menu...187 Reset File Numbering...188 Blink Warning ...189 Reset All ...191 Firmware Version...194 Caring for the Camera...195 Caring for the Camera ...195 Cleaning ...197 Storage ...198 xi

P7000 User's Manual
Page 15
...If a memory card is inserted, the memory card is referred to as "memory card." • The setting at the time of Nikon COOLPIX P7000 digital camera. This icon marks tips, additional D information that should be more A information is written to help you enjoy taking pictures with this... camera can be read before use, and keep it where all those who use the internal memory for your Nikon digital camera. This icon indicates that more clearly shown. C Memory Cards Pictures taken with your...
...If a memory card is inserted, the memory card is referred to as "memory card." • The setting at the time of Nikon COOLPIX P7000 digital camera. This icon marks tips, additional D information that should be more A information is written to help you enjoy taking pictures with this... camera can be read before use, and keep it where all those who use the internal memory for your Nikon digital camera. This icon indicates that more clearly shown. C Memory Cards Pictures taken with your...

P7000 User's Manual
Page 16
... of the hardware and software described in these manuals at any time and without prior notice. • Nikon will not be held liable for contact information: http://imaging.nikon.com/ Use Only Nikon Brand Electronic Accessories Nikon COOLPIX cameras are engineered and proven to operate within the operational and safety requirements of this product may result...
... of the hardware and software described in these manuals at any time and without prior notice. • Nikon will not be held liable for contact information: http://imaging.nikon.com/ Use Only Nikon Brand Electronic Accessories Nikon COOLPIX cameras are engineered and proven to operate within the operational and safety requirements of this product may result...
P7000 User's Manual
Page 17
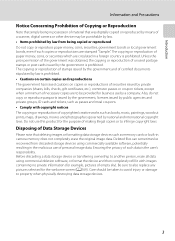
...securities issued by a company. Disposing of Data Storage Devices Please note that was obtained, the copying or reproduction of a scanner, digital camera or other device may be taken to avoid injury or damage to infringe copyright laws. Also, do not copy or reproduce passports issued ...of making illegal copies or to property when physically destroying data storage devices. 3 Deleted files can sometimes be recovered from being in camera memory does not completely erase the original image data. The copying or reproduction of stamps issued by national and international copyright laws. ...
...securities issued by a company. Disposing of Data Storage Devices Please note that was obtained, the copying or reproduction of a scanner, digital camera or other device may be taken to avoid injury or damage to infringe copyright laws. Also, do not copy or reproduce passports issued ...of making illegal copies or to property when physically destroying data storage devices. 3 Deleted files can sometimes be recovered from being in camera memory does not completely erase the original image data. The copying or reproduction of stamps issued by national and international copyright laws. ...
P7000 User's Manual
Page 18
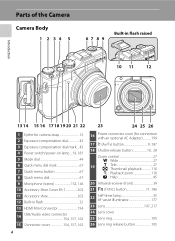
... 5 67 89 Built-in flash raised 10 11 12 13 14 15 16 17 18 19 20 21 22 23 24 25 26 1 Eyelet for camera strap 15 2 Exposure compensation dial 43 3 Exposure compensation dial mark....43 4 Power switch/power-on lamp... 19, 181 5 Mode dial 44 6 Quick menu dial mark...
... 5 67 89 Built-in flash raised 10 11 12 13 14 15 16 17 18 19 20 21 22 23 24 25 26 1 Eyelet for camera strap 15 2 Exposure compensation dial 43 3 Exposure compensation dial mark....43 4 Power switch/power-on lamp... 19, 181 5 Mode dial 44 6 Quick menu dial mark...

P7000 User's Manual
Page 19
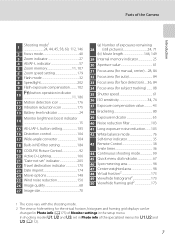
... 11 19 20 21 12 13 14 15 16 17 18 22 23 24 1 External microphone connector ..... 146 2 Eyelet for camera strap 15 3 K (Flash pop-up) button 33 4 Diopter adjustment control 26 5 Autofocus (AF) lamp 28 6 Flash lamp 34 7 Viewfinder 26 8 c (playback) button 30 9 Command dial 9 ...
... 11 19 20 21 12 13 14 15 16 17 18 22 23 24 1 External microphone connector ..... 146 2 Eyelet for camera strap 15 3 K (Flash pop-up) button 33 4 Diopter adjustment control 26 5 Autofocus (AF) lamp 28 6 Flash lamp 34 7 Viewfinder 26 8 c (playback) button 30 9 Command dial 9 ...

P7000 User's Manual
Page 20
Shooting 45 44 43 42 4 6 5 2 13 89 7 14 10 11 12 15 13 16 39 41 40 37 38 36 1/250 F5.6 999 35 30 29 34 33 32 31 999 9999 a 28 1m00s 1m00s b 19 17 20 18 23 21 22 24 25 26 27 46 47 1/250 F5.6 1342 48 49 50 1/250 F5.6 1342 6 1/250 F5.6 1342 1/250 F5.6 1342 Introduction Parts of the Camera Monitor Press the x (monitor) button to the camera settings and condition. The displayed information varies according to switch between displaying and hiding information (A14).
Shooting 45 44 43 42 4 6 5 2 13 89 7 14 10 11 12 15 13 16 39 41 40 37 38 36 1/250 F5.6 999 35 30 29 34 33 32 31 999 9999 a 28 1m00s 1m00s b 19 17 20 18 23 21 22 24 25 26 27 46 47 1/250 F5.6 1342 48 49 50 1/250 F5.6 1342 6 1/250 F5.6 1342 1/250 F5.6 1342 Introduction Parts of the Camera Monitor Press the x (monitor) button to the camera settings and condition. The displayed information varies according to switch between displaying and hiding information (A14).
P7000 User's Manual
Page 21
Parts of the Camera Introduction 1 Shooting mode1 24, 44, 45, 58, 60, 112, 146 2 Focus mode 40 3 Zoom indicator 27 4 AE/AF-L indicator 57 5 Zoom memory 11, 107 6 Zoom ... indicator 15 15 AE-L/AF-L button setting 185 16 Distortion control 104 17 Wide-angle converter 104 18 Built-in ND filter setting 184 19 COOLPIX Picture Control 92 20 Active D-Lighting 106 21 "Date not set in Photo info of Monitor settings in Photo info (A173) of the specialized menus...
Parts of the Camera Introduction 1 Shooting mode1 24, 44, 45, 58, 60, 112, 146 2 Focus mode 40 3 Zoom indicator 27 4 AE/AF-L indicator 57 5 Zoom memory 11, 107 6 Zoom ... indicator 15 15 AE-L/AF-L button setting 185 16 Distortion control 104 17 Wide-angle converter 104 18 Built-in ND filter setting 184 19 COOLPIX Picture Control 92 20 Active D-Lighting 106 21 "Date not set in Photo info of Monitor settings in Photo info (A173) of the specialized menus...

P7000 User's Manual
Page 22
Introduction Parts of the Camera Playback 1 23 4 5 22 15/11/2010 12:00 21 24 9999.JPG 20 23 6 19 18 17 16 7 15 8 14 999/999 10 9 11 999/...
Introduction Parts of the Camera Playback 1 23 4 5 22 15/11/2010 12:00 21 24 9999.JPG 20 23 6 19 18 17 16 7 15 8 14 999/999 10 9 11 999/...
P7000 User's Manual
Page 24
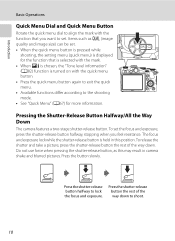
...shutter-release button, as a (image quality and image size) can be set . Pressing the Shutter-Release Button Halfway/All the Way Down The camera features a two-stage shutter-release button. Press the shutter-release button halfway to shoot. 10 Press the shutter-release button the rest of the way... is selected with the mark. • When e is chosen, the "Tone level information" (A82) function is held in this may result in camera shake and blurred pictures. Items such as this position. To release the shutter and take a picture, press the shutter-release button the rest of the...
...shutter-release button, as a (image quality and image size) can be set . Pressing the Shutter-Release Button Halfway/All the Way Down The camera features a two-stage shutter-release button. Press the shutter-release button halfway to shoot. 10 Press the shutter-release button the rest of the way... is selected with the mark. • When e is chosen, the "Tone level information" (A82) function is held in this may result in camera shake and blurred pictures. Items such as this position. To release the shutter and take a picture, press the shutter-release button the rest of the...
P7000 User's Manual
Page 29
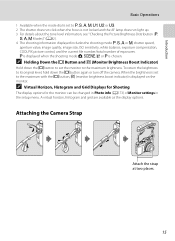
...menu. C Holding Down the x Button and b (Monitor Brightness Boost Indicator) Hold down the x button again or turn off the camera. Attaching the Camera Strap Attach the strap at two places. 15 A virtual horizon, histogram and grid are available as the display options. A is ...The shooting information displayed includes the shooting mode A, B, C or D, shutter speed, aperture value, image quality, image size, ISO sensitivity, white balance, exposure compensation, COOLPIX picture control, and the current file number/total number of Monitor settings in Photo info (A173) of exposures.
...menu. C Holding Down the x Button and b (Monitor Brightness Boost Indicator) Hold down the x button again or turn off the camera. Attaching the Camera Strap Attach the strap at two places. 15 A virtual horizon, histogram and grid are available as the display options. A is ...The shooting information displayed includes the shooting mode A, B, C or D, shutter speed, aperture value, image quality, image size, ISO sensitivity, white balance, exposure compensation, COOLPIX picture control, and the current file number/total number of Monitor settings in Photo info (A173) of exposures.
P7000 User's Manual
Page 30
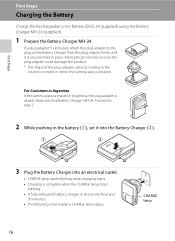
... Charger (2). 1 2 3 Plug the Battery Charger into an electrical outlet. • CHARGE lamp starts blinking when charging starts. • Charging is securely held in which the camera was purchased in Argentina, the plug adapter is included, attach the plug adapter to the country or region in place. Proceed to step 2. 2 While pushing... Li-ion Battery EN-EL14 (supplied) using the Battery Charger MH-24 (supplied). 1 Prepare the Battery Charger MH-24. For Customers in Argentina If the camera was purchased. If a plug adapter* is already fixed onto the Battery Charger MH-24.
... Charger (2). 1 2 3 Plug the Battery Charger into an electrical outlet. • CHARGE lamp starts blinking when charging starts. • Charging is securely held in which the camera was purchased in Argentina, the plug adapter is included, attach the plug adapter to the country or region in place. Proceed to step 2. 2 While pushing... Li-ion Battery EN-EL14 (supplied) using the Battery Charger MH-24 (supplied). 1 Prepare the Battery Charger MH-24. For Customers in Argentina If the camera was purchased. If a plug adapter* is already fixed onto the Battery Charger MH-24.
P7000 User's Manual
Page 31
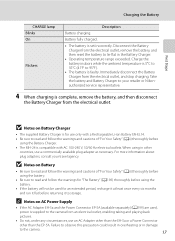
... then disconnect the Battery Charger from the electrical outlet, remove the battery, and then reset the battery to lie flat in damage to the camera from the electrical outlet, and stop charging. B Notes on Battery Charger • The supplied Battery Charger is for "The Battery" (A196...Battery Charger from the electrical outlet. When using the battery. • If the battery will not be used , power is supplied to the camera. 17 Immediately disconnect the Battery Charger from an electrical outlet, enabling taking and playing back pictures. • Do not, under any circumstances, use...
... then disconnect the Battery Charger from the electrical outlet, remove the battery, and then reset the battery to lie flat in damage to the camera from the electrical outlet, and stop charging. B Notes on Battery Charger • The supplied Battery Charger is for "The Battery" (A196...Battery Charger from the electrical outlet. When using the battery. • If the battery will not be used , power is supplied to the camera. 17 Immediately disconnect the Battery Charger from an electrical outlet, enabling taking and playing back pictures. • Do not, under any circumstances, use...

P7000 User's Manual
Page 32
...battery. • Use the battery to the Z position (2). 18 B Inserting the Battery Correctly Inserting the battery upside down or backwards could damage the camera. Battery chamber • When the battery is in the correct orientation. 3 Close the battery-chamber/memory card slot cover. • Close the ... to push the orange battery latch in place. First Steps Inserting the Battery Insert a Rechargeable Li-ion Battery EN-EL14 (supplied) into the camera. • Charge the battery before first use or when the battery is running low (A16). 1 Open the battery-chamber/memory card slot ...
...battery. • Use the battery to the Z position (2). 18 B Inserting the Battery Correctly Inserting the battery upside down or backwards could damage the camera. Battery chamber • When the battery is in the correct orientation. 3 Close the battery-chamber/memory card slot cover. • Close the ... to push the orange battery latch in place. First Steps Inserting the Battery Insert a Rechargeable Li-ion Battery EN-EL14 (supplied) into the camera. • Charge the battery before first use or when the battery is running low (A16). 1 Open the battery-chamber/memory card slot ...


