

P7000 User's Manual
Page 9
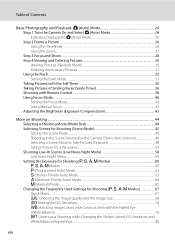
... Camera Strap ...15 First Steps ...16 Charging the Battery ...16 Inserting the Battery...18 Removing the Battery...19 Turning On and Off the Camera...19 Setting the Display Language, Date and Time 20 Inserting the Memory Card ...22 Removing the Memory Card...22 vii
... Camera Strap ...15 First Steps ...16 Charging the Battery ...16 Inserting the Battery...18 Removing the Battery...19 Turning On and Off the Camera...19 Setting the Display Language, Date and Time 20 Inserting the Memory Card ...22 Removing the Memory Card...22 vii
P7000 User's Manual
Page 10
... the Self-Timer 35 Taking Pictures of Smiling Faces (Smile Timer 36 Shooting with Remote Control ...38 Using Focus Mode ...40 Setting the Focus Mode ...41 Using Manual Focus...42 Adjusting the Brightness (Exposure Compensation 43 More on Shooting ...44 Selecting a Shooting Mode... Mode to Take Pictures (Features 48 Taking Pictures for a Panorama...56 Shooting Low-lit Scenes (Low Noise Night Mode 58 Low Noise Night Menu ...59 Setting the Exposure for Shooting (A, B, C, D Modes 60 A, B, C, D Modes ...60 A (Programmed Auto) Mode...62 B (Shutter-Priority Auto) Mode ...63 C (Aperture-Priority ...
... the Self-Timer 35 Taking Pictures of Smiling Faces (Smile Timer 36 Shooting with Remote Control ...38 Using Focus Mode ...40 Setting the Focus Mode ...41 Using Manual Focus...42 Adjusting the Brightness (Exposure Compensation 43 More on Shooting ...44 Selecting a Shooting Mode... Mode to Take Pictures (Features 48 Taking Pictures for a Panorama...56 Shooting Low-lit Scenes (Low Noise Night Mode 58 Low Noise Night Menu ...59 Setting the Exposure for Shooting (A, B, C, D Modes 60 A, B, C, D Modes ...60 A (Programmed Auto) Mode...62 B (Shutter-Priority Auto) Mode ...63 C (Aperture-Priority ...
P7000 User's Manual
Page 11
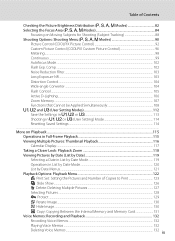
... List by Date Mode 119 Operations in List by Date Mode ...120 List by Date Menus ...121 Playback Options: Playback Menu 122 a Print Set: Setting the Pictures and Number of Contents Checking the Picture Brightness Distribution (A, B, C, D Modes 82 Selecting the Focus Area (A, B, C, D Modes... 84 Focusing on Moving Subjects for Shooting (Subject Tracking 88 Shooting Options: Shooting Menu (A, B, C, D Modes 90 Picture Control (COOLPIX Picture Control 92 Custom Picture Control (COOLPIX Custom Picture Control 96 Metering ...98 Continuous ...99 Autofocus Mode...102 Flash Exp.
... List by Date Mode 119 Operations in List by Date Mode ...120 List by Date Menus ...121 Playback Options: Playback Menu 122 a Print Set: Setting the Pictures and Number of Contents Checking the Picture Brightness Distribution (A, B, C, D Modes 82 Selecting the Focus Area (A, B, C, D Modes... 84 Focusing on Moving Subjects for Shooting (Subject Tracking 88 Shooting Options: Shooting Menu (A, B, C, D Modes 90 Picture Control (COOLPIX Picture Control 92 Custom Picture Control (COOLPIX Custom Picture Control 96 Metering ...98 Continuous ...99 Autofocus Mode...102 Flash Exp.

P7000 User's Manual
Page 12
...a Black Border to Pictures 138 e Skin Softening: Making Skin Appear Smoother 139 R Straighten: Compensating for Picture Slanting 141 S Miniature Effect: Setting Close-up Miniature Effects 142 F NRW (RAW) Processing: Creating JPEG Images from NRW Images 143 a Crop: Cropping Pictures...145 Movie Recording ...and Playback 146 Recording Movies ...146 Selecting a Movie Type to Shoot...148 Changing the Movie Mode Settings ...149 Autofocus Mode...150 Wind Noise Reduction...150 Movie Playback ...151 Editing Movies ...152 Saving a Frame from a Movie as a...
...a Black Border to Pictures 138 e Skin Softening: Making Skin Appear Smoother 139 R Straighten: Compensating for Picture Slanting 141 S Miniature Effect: Setting Close-up Miniature Effects 142 F NRW (RAW) Processing: Creating JPEG Images from NRW Images 143 a Crop: Cropping Pictures...145 Movie Recording ...and Playback 146 Recording Movies ...146 Selecting a Movie Type to Shoot...148 Changing the Movie Mode Settings ...149 Autofocus Mode...150 Wind Noise Reduction...150 Movie Playback ...151 Editing Movies ...152 Saving a Frame from a Movie as a...

P7000 User's Manual
Page 13
... ...167 Setup Menu...167 Welcome Screen ...169 Date...170 Monitor Settings...173 Date Imprint...174 Vibration Reduction ...175 Motion Detection...176 AF Assist...177 Red-eye Reduction ...177 Digital Zoom...178 Zoom Speed ...179 Sound Settings...179 Record Orientation ...180 Auto Off ...181 Format Memory/Format ...Card...182 Language...183 TV Settings ...183 Built-in ND Filter...184 AE/AF Lock Button ...185 Fn Button ...186 Av...
... ...167 Setup Menu...167 Welcome Screen ...169 Date...170 Monitor Settings...173 Date Imprint...174 Vibration Reduction ...175 Motion Detection...176 AF Assist...177 Red-eye Reduction ...177 Digital Zoom...178 Zoom Speed ...179 Sound Settings...179 Record Orientation ...180 Auto Off ...181 Format Memory/Format ...Card...182 Language...183 TV Settings ...183 Built-in ND Filter...184 AE/AF Lock Button ...185 Fn Button ...186 Av...

P7000 User's Manual
Page 15
...card, and SDXC memory card are sometimes omitted from actual display. Screen Samples In this manual, images are referred to as the "default setting". • The names of menu items displayed in the camera monitor, and the names of purchase is used : This icon marks cautions..., remove the memory card. 1 C Memory Cards Pictures taken with your purchase of Nikon COOLPIX P7000 digital camera. If a memory card is inserted, the memory card is referred to as "memory card." • The setting at the time of buttons or messages displayed in a computer monitor are used . ...
...card, and SDXC memory card are sometimes omitted from actual display. Screen Samples In this manual, images are referred to as the "default setting". • The names of menu items displayed in the camera monitor, and the names of purchase is used : This icon marks cautions..., remove the memory card. 1 C Memory Cards Pictures taken with your purchase of Nikon COOLPIX P7000 digital camera. If a memory card is inserted, the memory card is referred to as "memory card." • The setting at the time of buttons or messages displayed in a computer monitor are used . ...

P7000 User's Manual
Page 20
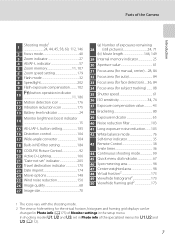
The displayed information varies according to switch between displaying and hiding information (A14). Introduction Parts of the Camera Monitor Press the x (monitor) button to the camera settings and condition. Shooting 45 44 43 42 4 6 5 2 13 89 7 14 10 11 12 15 13 16 39 41 40 37 38 36 1/250 F5.6 999 35 30 29 34 33 32 31 999 9999 a 28 1m00s 1m00s b 19 17 20 18 23 21 22 24 25 26 27 46 47 1/250 F5.6 1342 48 49 50 1/250 F5.6 1342 6 1/250 F5.6 1342 1/250 F5.6 1342
The displayed information varies according to switch between displaying and hiding information (A14). Introduction Parts of the Camera Monitor Press the x (monitor) button to the camera settings and condition. Shooting 45 44 43 42 4 6 5 2 13 89 7 14 10 11 12 15 13 16 39 41 40 37 38 36 1/250 F5.6 999 35 30 29 34 33 32 31 999 9999 a 28 1m00s 1m00s b 19 17 20 18 23 21 22 24 25 26 27 46 47 1/250 F5.6 1342 48 49 50 1/250 F5.6 1342 6 1/250 F5.6 1342 1/250 F5.6 1342
P7000 User's Manual
Page 21
... 16 Distortion control 104 17 Wide-angle converter 104 18 Built-in ND filter setting 184 19 COOLPIX Picture Control 92 20 Active D-Lighting 106 21 "Date not set in Photo info of the specialized menus for the virtual horizon, histogram and framing grid displays can be changed in the ...setup menu. In shooting modes E, F and N, set " indicator 205 22 Travel destination indicator 170 23 ...
... 16 Distortion control 104 17 Wide-angle converter 104 18 Built-in ND filter setting 184 19 COOLPIX Picture Control 92 20 Active D-Lighting 106 21 "Date not set in Photo info of the specialized menus for the virtual horizon, histogram and framing grid displays can be changed in the ...setup menu. In shooting modes E, F and N, set " indicator 205 22 Travel destination indicator 170 23 ...

P7000 User's Manual
Page 22
... 21 D-Lighting icon 136 22 Quick retouch icon 135 23 Voice memo indicator 132 24 File number and type 203 * The icons vary with the settings used for shooting. 8
... 21 D-Lighting icon 136 22 Quick retouch icon 135 23 Voice memo indicator 132 24 File number and type 203 * The icons vary with the settings used for shooting. 8
P7000 User's Manual
Page 23
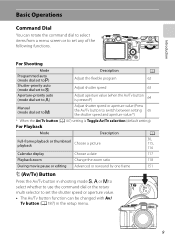
Introduction Basic Operations Command Dial You can rotate the command dial to select items from a menu screen or to set the shutter speed or aperture value. • The Av/Tv button function can be changed with Av/ Tv button (A187) in shooting mode B, C or D to ... f (Av/Tv) Button Press the Av/Tv button in the setup menu. 9 For Shooting Mode Programmed auto (mode dial set to A) Shutter-priority auto (mode dial set to B) Aperture-priority auto (mode dial set to C) Description Adjust the flexible program A 62 Adjust shutter speed 63 Adjust aperture value (when the Av/Tv button...
Introduction Basic Operations Command Dial You can rotate the command dial to select items from a menu screen or to set the shutter speed or aperture value. • The Av/Tv button function can be changed with Av/ Tv button (A187) in shooting mode B, C or D to ... f (Av/Tv) Button Press the Av/Tv button in the setup menu. 9 For Shooting Mode Programmed auto (mode dial set to A) Shutter-priority auto (mode dial set to B) Aperture-priority auto (mode dial set to C) Description Adjust the flexible program A 62 Adjust shutter speed 63 Adjust aperture value (when the Av/Tv button...
P7000 User's Manual
Page 24
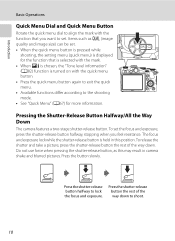
...information. Items such as this may result in this position. To set the focus and exposure, press the shutter-release button halfway, stopping when you want to set . • When the quick menu button is pressed while shooting, the setting menu (quick menu) is displayed for the function that you ...rest of the way down . Do not use force when pressing the shutter-release button, as a (image quality and image size) can be set . Press the button slowly. Press the shutter-release button the rest of the way down to lock the focus and exposure. Pressing the Shutter-Release...
...information. Items such as this may result in this position. To set the focus and exposure, press the shutter-release button halfway, stopping when you want to set . • When the quick menu button is pressed while shooting, the setting menu (quick menu) is displayed for the function that you ...rest of the way down . Do not use force when pressing the shutter-release button, as a (image quality and image size) can be set . Press the button slowly. Press the shutter-release button the rest of the way down to lock the focus and exposure. Pressing the Shutter-Release...
P7000 User's Manual
Page 25
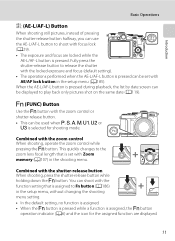
... the zoom control When shooting, operate the zoom control while pressing the w button. This quickly changes to the zoom lens focal length that is set with the shutter-release button When shooting, press the shutter-release button while holding down the w button. w (FUNC) Button Use the w ... shoot with Zoom memory (A107) in the setup menu (A185). You can be displayed to release the shutter with the locked exposure and focus (default setting). • The operations performed when the AE-L/AF-L button is pressed can be used when A, B, C, D, E, F or N is selected for the ...
... the zoom control When shooting, operate the zoom control while pressing the w button. This quickly changes to the zoom lens focal length that is set with the shutter-release button When shooting, press the shutter-release button while holding down the w button. w (FUNC) Button Use the w ... shoot with Zoom memory (A107) in the setup menu (A185). You can be displayed to release the shutter with the locked exposure and focus (default setting). • The operations performed when the AE-L/AF-L button is pressed can be used when A, B, C, D, E, F or N is selected for the ...

P7000 User's Manual
Page 26
... apply selection Apply selection or display sub-menu Shooting menu Picture Control Custom Picture Control Metering Continuous Autofocus mode Flash exp. Items can also be set the exposure/ Choose the option1 Display m (flash mode) (A32) menu/Choose the option above * Choose the option on the rotary multi selector, or pressing the... Display n (Self-timer/ Smile timer/ Remote control) menu (A35, 36, 38)/Choose the option on the left (J) or right (K) on the left*/Return display to set in shooting mode B, C, D, E, F or N (A63, 64, 65).
... apply selection Apply selection or display sub-menu Shooting menu Picture Control Custom Picture Control Metering Continuous Autofocus mode Flash exp. Items can also be set the exposure/ Choose the option1 Display m (flash mode) (A32) menu/Choose the option above * Choose the option on the rotary multi selector, or pressing the... Display n (Self-timer/ Smile timer/ Remote control) menu (A35, 36, 38)/Choose the option on the left (J) or right (K) on the left*/Return display to set in shooting mode B, C, D, E, F or N (A63, 64, 65).

P7000 User's Manual
Page 28
... end tab to switch to choose tab. Shooting menu Picture Control Custom Picture Control Metering Continuous Autofocus mode Flash exp. Noise reduction filter Set up Welcome screen Date Monitor settings Date imprint Vibration reduction Motion detection AF assist Press the rotary multi selector J to highlight the Press the rotary multi selector H or...
... end tab to switch to choose tab. Shooting menu Picture Control Custom Picture Control Metering Continuous Autofocus mode Flash exp. Noise reduction filter Set up Welcome screen Date Monitor settings Date imprint Vibration reduction Motion detection AF assist Press the rotary multi selector J to highlight the Press the rotary multi selector H or...
P7000 User's Manual
Page 29
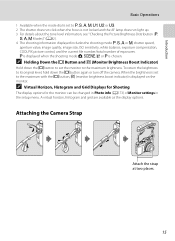
...the setup menu. Attaching the Camera Strap Attach the strap at two places. 15 Introduction Basic Operations 1 Available when the mode dial is set the monitor to the maximum brightness. A is displayed when the shooting mode A, y, O or A is displayed on the monitor. ... C or D, shutter speed, aperture value, image quality, image size, ISO sensitivity, white balance, exposure compensation, COOLPIX picture control, and the current file number/total number of Monitor settings in Photo info (A173) of exposures. A virtual horizon, histogram and grid are available as the display options.
...the setup menu. Attaching the Camera Strap Attach the strap at two places. 15 Introduction Basic Operations 1 Available when the mode dial is set the monitor to the maximum brightness. A is displayed when the shooting mode A, y, O or A is displayed on the monitor. ... C or D, shutter speed, aperture value, image quality, image size, ISO sensitivity, white balance, exposure compensation, COOLPIX picture control, and the current file number/total number of Monitor settings in Photo info (A173) of exposures. A virtual horizon, histogram and grid are available as the display options.
P7000 User's Manual
Page 30
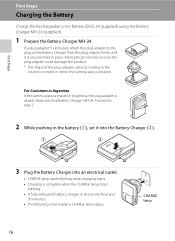
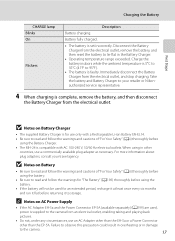
... starts blinking when charging starts. • Charging is included, attach the plug adapter to the plug on the Battery Charger. For Customers in the battery (1), set it is already fixed onto the Battery Charger MH-24. Proceed to the country or region in which the camera was purchased in Argentina, the...
... starts blinking when charging starts. • Charging is included, attach the plug adapter to the plug on the Battery Charger. For Customers in the battery (1), set it is already fixed onto the Battery Charger MH-24. Proceed to the country or region in which the camera was purchased in Argentina, the...
P7000 User's Manual
Page 31
... with AC 100-240 V, 50/60 Hz electrical outlets. Battery fully charged. • The battery is faulty. Failure to 95°F). • The battery is set incorrectly. Charge the battery indoors while the ambient temperature is 5°C to 35°C (41°F to observe this precaution could result in overheating or...
... with AC 100-240 V, 50/60 Hz electrical outlets. Battery fully charged. • The battery is faulty. Failure to 95°F). • The battery is set incorrectly. Charge the battery indoors while the ambient temperature is 5°C to 35°C (41°F to observe this precaution could result in overheating or...
P7000 User's Manual
Page 33
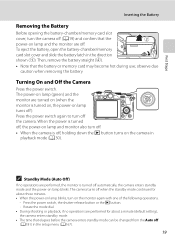
... power switch again to turn the camera off (A19) and confirm that the power-on lamp and the monitor are performed for about a minute (default setting), the camera enters standby mode. • The time that the battery or memory card may become hot during use; First Steps Inserting the Battery Removing...
... power switch again to turn the camera off (A19) and confirm that the power-on lamp and the monitor are performed for about a minute (default setting), the camera enters standby mode. • The time that the battery or memory card may become hot during use; First Steps Inserting the Battery Removing...

P7000 User's Manual
Page 34
... home time zone (Time zone) (A172), and press the k button. Setting the Display Language, Date and Time Dialogs for language selection and camera clock setting are not set. Yes No London Casablanca D Daylight Saving Time To set the date and time in a time zone where daylight saving is in effect..., turn on the daylight saving setting with H in the time zone selection screen shown in...
... home time zone (Time zone) (A172), and press the k button. Setting the Display Language, Date and Time Dialogs for language selection and camera clock setting are not set. Yes No London Casablanca D Daylight Saving Time To set the date and time in a time zone where daylight saving is in effect..., turn on the daylight saving setting with H in the time zone selection screen shown in...

P7000 User's Manual
Page 35
...15 10 Edit D Imprinting the Date and Changing the Date and Time • To imprint the date on pictures when shooting, first set the date and time, and then set the contents: Rotate the rotary multi selector, or press H or I. • YMD, MDY or DMY can be chosen for the.... Follow the procedure described in step 5 above. • Select Time zone from Date in the setup menu to shooting mode. First Steps Setting the Display Language, Date and Time 5 Set the date and time. • To choose an item: Press K or J (selected in the following order: D (day) ➝ M (month) ➝ Y (year...
...15 10 Edit D Imprinting the Date and Changing the Date and Time • To imprint the date on pictures when shooting, first set the date and time, and then set the contents: Rotate the rotary multi selector, or press H or I. • YMD, MDY or DMY can be chosen for the.... Follow the procedure described in step 5 above. • Select Time zone from Date in the setup menu to shooting mode. First Steps Setting the Display Language, Date and Time 5 Set the date and time. • To choose an item: Press K or J (selected in the following order: D (day) ➝ M (month) ➝ Y (year...


