
Reference Manual
Page 4
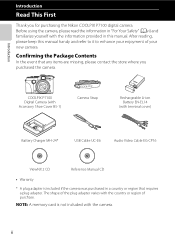
COOLPIX P7100 Digital Camera (with Accessory Shoe Cover BS-1) Camera Strap Rechargeable Li-ion Battery EN-EL14 (with the country or region of your new camera. After reading, please keep this manual. The shape of the plug adapter varies with terminal cover) Battery Charger MH-24* USB Cable UC-E6 Audio Video Cable EG-CP16... using the camera, please read the information in a country or region that any items are missing, please contact the store where you for purchasing the Nikon COOLPIX P7100 digital camera.
COOLPIX P7100 Digital Camera (with Accessory Shoe Cover BS-1) Camera Strap Rechargeable Li-ion Battery EN-EL14 (with the country or region of your new camera. After reading, please keep this manual. The shape of the plug adapter varies with terminal cover) Battery Charger MH-24* USB Cable UC-E6 Audio Video Cable EG-CP16... using the camera, please read the information in a country or region that any items are missing, please contact the store where you for purchasing the Nikon COOLPIX P7100 digital camera.
Reference Manual
Page 6
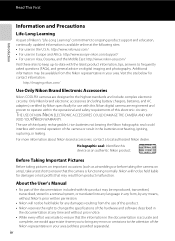
... transmitted, transcribed, stored in a retrieval system, or translated into any language in your area. Only Nikon brand electronic accessories (including battery chargers, batteries, and AC adapters) certified by any errors or omissions to frequently asked questions (FAQs), and general ... Nikon's prior written permission. • Nikon will not be held liable for contact information: http://imaging.nikon.com/ Use Only Nikon Brand Electronic Accessories Nikon COOLPIX cameras are engineered and proven to ensure that may be available from the Nikon representative in the batteries ...
... transmitted, transcribed, stored in a retrieval system, or translated into any language in your area. Only Nikon brand electronic accessories (including battery chargers, batteries, and AC adapters) certified by any errors or omissions to frequently asked questions (FAQs), and general ... Nikon's prior written permission. • Nikon will not be held liable for contact information: http://imaging.nikon.com/ Use Only Nikon Brand Electronic Accessories Nikon COOLPIX cameras are engineered and proven to ensure that may be available from the Nikon representative in the batteries ...

Reference Manual
Page 8
..., after unplugging the product and/or removing the battery. Keep these safety instructions where all those who use . Parts of children. Do not disassemble Touching the internal parts of a fall or other accident, take the equipment to a Nikon-authorized service representative for extended periods may cause injury... the sun or other small parts into their entirety before using this Nikon product, to prevent possible injury. Do not remain in use the product will read them. Do not use the camera or Battery Charger in the presence of flammable gas Using the camera in the...
..., after unplugging the product and/or removing the battery. Keep these safety instructions where all those who use . Parts of children. Do not disassemble Touching the internal parts of a fall or other accident, take the equipment to a Nikon-authorized service representative for extended periods may cause injury... the sun or other small parts into their entirety before using this Nikon product, to prevent possible injury. Do not remain in use the product will read them. Do not use the camera or Battery Charger in the presence of flammable gas Using the camera in the...

Reference Manual
Page 9
...explode if improperly handled. Do not transport or store with metal objects such as discoloration or deformation. • If liquid from the damaged battery comes in contact with clothing or skin, rinse immediately with plenty of the plug should you are not rechargeable. Continued use immediately should be...8226; Do not immerse in fire. • Do not handle the plug or go near the metal parts of water. • If leaked battery fluid gets into your eyes, rinse them out immediately with a dry cloth. For Remote Control ML-L3 (available separately), use in this precaution ...
...explode if improperly handled. Do not transport or store with metal objects such as discoloration or deformation. • If liquid from the damaged battery comes in contact with clothing or skin, rinse immediately with plenty of the plug should you are not rechargeable. Continued use immediately should be...8226; Do not immerse in fire. • Do not handle the plug or go near the metal parts of water. • If leaked battery fluid gets into your eyes, rinse them out immediately with a dry cloth. For Remote Control ML-L3 (available separately), use in this precaution ...

Reference Manual
Page 10
... or entering the eyes or mouth. Playing CD-ROMs on audio CD equipment. viii Introduction For Your Safety • Do not handle the plug or Battery Charger with product regulations. CD-ROMs The CD-ROMs included with care Be careful that your subject's eyes could cause temporary visual impairment. Observe caution... not operate the flash with the flash window touching a person or object Failure to maintain compliance with wet hands. The electromagnetic waves given out by Nikon for the purpose, to observe this precaution could result in a hospital.
... or entering the eyes or mouth. Playing CD-ROMs on audio CD equipment. viii Introduction For Your Safety • Do not handle the plug or Battery Charger with product regulations. CD-ROMs The CD-ROMs included with care Be careful that your subject's eyes could cause temporary visual impairment. Observe caution... not operate the flash with the flash window touching a person or object Failure to maintain compliance with wet hands. The electromagnetic waves given out by Nikon for the purpose, to observe this precaution could result in a hospital.

Reference Manual
Page 12
.... • For more information, contact the retailer or the local authorities in charge of waste management. This symbol indicates that the battery is to cause birth defects or other reproductive harm. Notices for Customers in European countries: • This product is designated for separate...waste. • For more information, contact the retailer or the local authorities in charge of California to be collected separately. x Nikon Inc., 1300 Walt Whitman Road, Melville, New York 11747-3064 USA Tel: 631-547-4200 Notice for separate collection at an appropriate collection ...
.... • For more information, contact the retailer or the local authorities in charge of waste management. This symbol indicates that the battery is to cause birth defects or other reproductive harm. Notices for Customers in European countries: • This product is designated for separate...waste. • For more information, contact the retailer or the local authorities in charge of California to be collected separately. x Nikon Inc., 1300 Walt Whitman Road, Melville, New York 11747-3064 USA Tel: 631-547-4200 Notice for separate collection at an appropriate collection ...

Reference Manual
Page 13
... d Button) ...13 Switching the Monitor Display (the x Button 15 Using the Viewfinder ...16 The Basics of Shooting and Playback 17 Preparation 1 Charge the Battery 18 Preparation 2 Insert the Battery...20 Preparation 3 Insert a Memory Card 22 Internal Memory and Memory Cards...23 Approved Memory Cards ...23 Step 1 Turn the Camera On ...24 Turning...
... d Button) ...13 Switching the Monitor Display (the x Button 15 Using the Viewfinder ...16 The Basics of Shooting and Playback 17 Preparation 1 Charge the Battery 18 Preparation 2 Insert the Battery...20 Preparation 3 Insert a Memory Card 22 Internal Memory and Memory Cards...23 Approved Memory Cards ...23 Step 1 Turn the Camera On ...24 Turning...

Reference Manual
Page 18
... Accessories ...E103 Shooting with Remote Control...E105 Error Messages ...E107 Technical Notes and Index ...F1 Caring for the Products...F2 The Camera ...F2 The Battery...F3 The Battery Charger ...F4 The Memory Cards...F5 Caring for the Camera ...F6 Cleaning ...F6 Storage ...F6 Troubleshooting...F7 Specifications ...F13 Supported Standards ...F16 Index ...F17...
... Accessories ...E103 Shooting with Remote Control...E105 Error Messages ...E107 Technical Notes and Index ...F1 Caring for the Products...F2 The Camera ...F2 The Battery...F3 The Battery Charger ...F4 The Memory Cards...F5 Caring for the Camera ...F6 Cleaning ...F6 Storage ...F6 Troubleshooting...F7 Specifications ...F13 Supported Standards ...F16 Index ...F17...

Reference Manual
Page 21
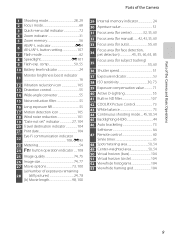
... 12 16 k (apply selection) button 12 17 d (menu) button 13 18 Infrared receiver (rear 60, E105 19 l (delete) button 36, 102 20 Tripod socket 21 Battery-chamber/ memory card slot cover 20, 22 22 Cover latch 20, 22 23 Memory card slot 22 24...
... 12 16 k (apply selection) button 12 17 d (menu) button 13 18 Infrared receiver (rear 60, E105 19 l (delete) button 36, 102 20 Tripod socket 21 Battery-chamber/ memory card slot cover 20, 22 22 Cover latch 20, 22 23 Memory card slot 22 24...
Reference Manual
Page 27
comp 50, 55 10 Battery level indicator 24 Monitor brightness boost indicator 11 16 12 Vibration reduction icon 105 13 Distortion control 55 14 Wide-angle converter 55 15 Noise ... 37 Exposure indicator 53 38 ISO sensitivity 30, 73 39 Exposure compensation value 71 40 Active D-Lighting 55 41 Built-in ND filter 107 42 COOLPIX Picture Control 73 43 White balance 73 44 Continuous shooting mode..... 45, 50, 54 45 Backlighting (HDR 44 46 Auto bracketing 73 Self-timer 64...
comp 50, 55 10 Battery level indicator 24 Monitor brightness boost indicator 11 16 12 Vibration reduction icon 105 13 Distortion control 55 14 Wide-angle converter 55 15 Noise ... 37 Exposure indicator 53 38 ISO sensitivity 30, 73 39 Exposure compensation value 71 40 Active D-Lighting 55 41 Built-in ND filter 107 42 COOLPIX Picture Control 73 43 White balance 73 44 Continuous shooting mode..... 45, 50, 54 45 Backlighting (HDR 44 46 Auto bracketing 73 Self-timer 64...

Reference Manual
Page 28
... 1m 0s 12 15 9999/9999 1m 0s a b 1 Date of recording 26 2 Time of recording 26 3 Voice memo indicator 90 4 List by date display 88 5 Battery level indicator 24 6 Monitor brightness boost indicator 16 7 Protect icon 89 8 Print order icon 89 9 Image quality 75 10 Image size 77 11 Movie options...
... 1m 0s 12 15 9999/9999 1m 0s a b 1 Date of recording 26 2 Time of recording 26 3 Voice memo indicator 90 4 List by date display 88 5 Battery level indicator 24 6 Monitor brightness boost indicator 16 7 Protect icon 89 8 Print order icon 89 9 Image quality 75 10 Image size 77 11 Movie options...

Reference Manual
Page 35
The Basics of Shooting and Playback The Basics of Shooting and Playback Preparation Preparation 1 Charge the Battery 18 Preparation 2 Insert the Battery 20 Preparation 3 Insert a Memory Card 22 Shooting Step 1 Turn the Camera On 24 Setting the Display Language, Date, and Time (First Use Only 26 Step 2 Select a Shooting Mode 28 Step 3 Frame a Picture ...30 Step 4 Focus and Shoot...32 Playback Step 5 Play Back Images ...34 Step 6 Delete Unwanted Images 36 17
The Basics of Shooting and Playback The Basics of Shooting and Playback Preparation Preparation 1 Charge the Battery 18 Preparation 2 Insert the Battery 20 Preparation 3 Insert a Memory Card 22 Shooting Step 1 Turn the Camera On 24 Setting the Display Language, Date, and Time (First Use Only 26 Step 2 Select a Shooting Mode 28 Step 3 Frame a Picture ...30 Step 4 Focus and Shoot...32 Playback Step 5 Play Back Images ...34 Step 6 Delete Unwanted Images 36 17

Reference Manual
Page 36
... camera was purchased. The Basics of the plug adapter varies according to the plug on the Battery Charger. Push the plug adapter firmly until it into the Battery Charger (2). 1 2 3 Plug the Battery Charger into an electrical outlet. • CHARGE lamp starts blinking when charging starts. •... product. * The shape of Shooting and Playback Preparation 1 Charge the Battery 1 Prepare the included Battery Charger MH-24. CHARGE lamp 4 When charging is securely held in Argentina, Brazil and Korea. The Battery Charger comes with your camera, attach the plug adapter to the country...
... camera was purchased. The Basics of the plug adapter varies according to the plug on the Battery Charger. Push the plug adapter firmly until it into the Battery Charger (2). 1 2 3 Plug the Battery Charger into an electrical outlet. • CHARGE lamp starts blinking when charging starts. •... product. * The shape of Shooting and Playback Preparation 1 Charge the Battery 1 Prepare the included Battery Charger MH-24. CHARGE lamp 4 When charging is securely held in Argentina, Brazil and Korea. The Battery Charger comes with your camera, attach the plug adapter to the country...

Reference Manual
Page 37
... outlet, and stop charging. Preparation 1 Charge the Battery Understanding CHARGE Lamp Status Blinks On Flickers Description Battery charging. Immediately disconnect the Battery Charger from the electrical outlet, remove the battery, and then reset the battery to the camera. 19 Battery fully charged. • The battery is faulty. B Notes on Battery Charger • Be sure to read and follow...
... outlet, and stop charging. Preparation 1 Charge the Battery Understanding CHARGE Lamp Status Blinks On Flickers Description Battery charging. Immediately disconnect the Battery Charger from the electrical outlet, remove the battery, and then reset the battery to the camera. 19 Battery fully charged. • The battery is faulty. B Notes on Battery Charger • Be sure to read and follow...

Reference Manual
Page 38
Be sure to push the orange battery latch in the direction shown (1), and fully insert the battery (2). • When the battery is in place. The Basics of Shooting and Playback Preparation 2 Insert the Battery 1 Open the battery-chamber/memory card slot cover. 2 Insert the battery. • Use the battery to confirm that the battery is fully inserted, the battery latch locks it in the correct orientation. 3 Close the battery-chamber/memory card slot cover. 20 Battery latch B Inserting the Battery Correctly Inserting the battery upside down or backwards could damage the camera.
Be sure to push the orange battery latch in the direction shown (1), and fully insert the battery (2). • When the battery is in place. The Basics of Shooting and Playback Preparation 2 Insert the Battery 1 Open the battery-chamber/memory card slot cover. 2 Insert the battery. • Use the battery to confirm that the battery is fully inserted, the battery latch locks it in the correct orientation. 3 Close the battery-chamber/memory card slot cover. 20 Battery latch B Inserting the Battery Correctly Inserting the battery upside down or backwards could damage the camera.

Reference Manual
Page 39
Preparation 2 Insert the Battery Removing the Battery Before opening the battery-chamber/memory card slot cover, turn the camera off (A25) and confirm that the power-on lamp and the monitor are off. Observe caution when removing the battery or memory card. 21 Then, remove the battery straight (2). The Basics of Shooting and Playback B High Temperature Caution The camera, battery, and memory card may be hot immediately after using the camera. To eject the battery, open the battery-chamber/memory card slot cover and slide the orange battery latch in the direction shown (1).
Preparation 2 Insert the Battery Removing the Battery Before opening the battery-chamber/memory card slot cover, turn the camera off (A25) and confirm that the power-on lamp and the monitor are off. Observe caution when removing the battery or memory card. 21 Then, remove the battery straight (2). The Basics of Shooting and Playback B High Temperature Caution The camera, battery, and memory card may be hot immediately after using the camera. To eject the battery, open the battery-chamber/memory card slot cover and slide the orange battery latch in the direction shown (1).

Reference Manual
Page 40
... card. • Slide the memory card until it with the memory card, as well as "The Memory Cards" (F5) in the correct orientation. 3 Close the battery-chamber/memory card slot cover. B Formatting a Memory Card • The first time you wish to confirm that the power-on a memory card is permanently deleted...
... card. • Slide the memory card until it with the memory card, as well as "The Memory Cards" (F5) in the correct orientation. 3 Close the battery-chamber/memory card slot cover. B Formatting a Memory Card • The first time you wish to confirm that the power-on a memory card is permanently deleted...

Reference Manual
Page 41
... camera's internal memory (approximately 94 MB) or on the above cards. 23 Before using the camera. B High Temperature Caution The camera, battery, and memory card may end unexpectedly. Internal Memory and Memory Cards Camera data, including images and movies, can be hot immediately after using...for shooting or playback, first remove the memory card. The Basics of Class 6 or higher is recommended. Observe caution when removing the battery or memory card. Approved Memory Cards The following Secure Digital (SD) memory cards have been tested and approved for use the camera's ...
... camera's internal memory (approximately 94 MB) or on the above cards. 23 Before using the camera. B High Temperature Caution The camera, battery, and memory card may end unexpectedly. Internal Memory and Memory Cards Camera data, including images and movies, can be hot immediately after using...for shooting or playback, first remove the memory card. The Basics of Class 6 or higher is recommended. Observe caution when removing the battery or memory card. Approved Memory Cards The following Secure Digital (SD) memory cards have been tested and approved for use the camera's ...

Reference Manual
Page 42
... indicator The Basics of Shooting and Playback 1/250 F5.6 38 Number of exposures remaining Battery Level Display b B N Battery exhausted. Description Battery level high. Charge or replace the battery. Battery level low. Prepare to the internal memory (approx. 94 MB). • The number of pictures that can be stored depends on the remaining capacity of ... the Display Language, Date, and Time" (A26). • The lens extends, and the monitor is displayed and pictures are recorded to charge or replace the battery. Cannot take pictures.
... indicator The Basics of Shooting and Playback 1/250 F5.6 38 Number of exposures remaining Battery Level Display b B N Battery exhausted. Description Battery level high. Charge or replace the battery. Battery level low. Prepare to the internal memory (approx. 94 MB). • The number of pictures that can be stored depends on the remaining capacity of ... the Display Language, Date, and Time" (A26). • The lens extends, and the monitor is displayed and pictures are recorded to charge or replace the battery. Cannot take pictures.

Reference Manual
Page 45
... the daylight saving time function. Press I , J or K to set by a backup battery that is separate from the camera's main battery. • The backup battery charges after about ten hours of charging when the main battery is inserted into the camera or when the camera is connected to an optional AC...time difference between the travel destination and the w home time zone, and saves images using the included ViewNX 2 software (A92). 27 C The Clock Battery • The camera's clock is powered by rotating the command dial. • Finish setting: Choose minute, and press the k button or K. ...
... the daylight saving time function. Press I , J or K to set by a backup battery that is separate from the camera's main battery. • The backup battery charges after about ten hours of charging when the main battery is inserted into the camera or when the camera is connected to an optional AC...time difference between the travel destination and the w home time zone, and saves images using the included ViewNX 2 software (A92). 27 C The Clock Battery • The camera's clock is powered by rotating the command dial. • Finish setting: Choose minute, and press the k button or K. ...


