
Reference Manual
Page 4
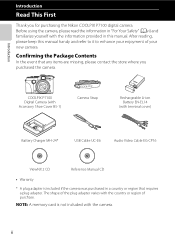
... in a country or region that any items are missing, please contact the store where you for purchasing the Nikon COOLPIX P7100 digital camera. Before using the camera, please read the information in this manual handy and refer to it to enhance your enjoyment of purchase. The shape of the plug adapter varies with the information...
... in a country or region that any items are missing, please contact the store where you for purchasing the Nikon COOLPIX P7100 digital camera. Before using the camera, please read the information in this manual handy and refer to it to enhance your enjoyment of purchase. The shape of the plug adapter varies with the information...

Reference Manual
Page 5
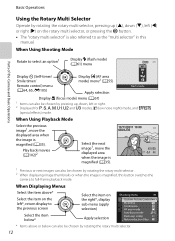
...and SDXC memory cards are referred to as "memory cards" in this manual. • The setting at the time of purchase is referred to start using the camera. iii A/E/F These icons indicate other pages containing relevant information; Introduction Read This First About This Manual If you need, the... monitor, and the names of buttons or messages displayed on a computer monitor appear in bold. • In this manual, images are used in this manual: Icon Description B This icon indicates cautions and information that should be read before using the camera right away, see ...
...and SDXC memory cards are referred to as "memory cards" in this manual. • The setting at the time of purchase is referred to start using the camera. iii A/E/F These icons indicate other pages containing relevant information; Introduction Read This First About This Manual If you need, the... monitor, and the names of buttons or messages displayed on a computer monitor appear in bold. • In this manual, images are used in this manual: Icon Description B This icon indicates cautions and information that should be read before using the camera right away, see ...

Reference Manual
Page 15
...Settings ...101 Options Available in the Movie Menu 101 Playing Back Movies...102 General Camera Setup...103 The Setup Menu ...104 Reference Section...E1 Taking Pictures with Manual Focus E2 Using Panorama Assist...E3 A, B, C, D Modes...E5 A (Programmed Auto), B (Shutter-Priority Auto) or C (...Aperture-Priority Auto)...E5 D (Manual) Mode ...E7 Editing Still Images...E9 Editing Features ...E9 k Quick Retouch: Enhancing Contrast and Saturation E11 I D-Lighting: Enhancing Brightness and ...
...Settings ...101 Options Available in the Movie Menu 101 Playing Back Movies...102 General Camera Setup...103 The Setup Menu ...104 Reference Section...E1 Taking Pictures with Manual Focus E2 Using Panorama Assist...E3 A, B, C, D Modes...E5 A (Programmed Auto), B (Shutter-Priority Auto) or C (...Aperture-Priority Auto)...E5 D (Manual) Mode ...E7 Editing Still Images...E9 Editing Features ...E9 k Quick Retouch: Enhancing Contrast and Saturation E11 I D-Lighting: Enhancing Brightness and ...
Reference Manual
Page 30
... (A35). Play back movies (A102)2 15/11/2011 15:30 0004.JPG Select the next image1, move the displayed area when the image is also referred to full-frame playback mode. When Using Shooting Mode Rotate to select an option1 Display m (flash mode) (A61) menu Parts of the Camera and... multi selector. 2 When displaying image thumbnails or when the image is magnified, this button switches the camera to as the "multi selector" in this manual. When Using Playback Mode Select the previous image1, move the displayed area when the image is magnified (A35). 44 1 Previous or next images can ...
... (A35). Play back movies (A102)2 15/11/2011 15:30 0004.JPG Select the next image1, move the displayed area when the image is also referred to full-frame playback mode. When Using Shooting Mode Rotate to select an option1 Display m (flash mode) (A61) menu Parts of the Camera and... multi selector. 2 When displaying image thumbnails or when the image is magnified, this button switches the camera to as the "multi selector" in this manual. When Using Playback Mode Select the previous image1, move the displayed area when the image is magnified (A35). 44 1 Previous or next images can ...

Reference Manual
Page 127
Reference Section E Reference Section The Reference Section provides detailed information and hints for E, F or N E58 The Playback Menu E60 The Movie Menu ...E69 The Setup Menu...E70 Additional Information File and Folder Names E99 Speedlights (External Flash Unit E101 Optional Accessories E103 Error Messages ...E107 E1 Shooting Taking Pictures with Manual Focus E2 Using Panorama...
Reference Section E Reference Section The Reference Section provides detailed information and hints for E, F or N E58 The Playback Menu E60 The Movie Menu ...E69 The Setup Menu...E70 Additional Information File and Folder Names E99 Speedlights (External Flash Unit E101 Optional Accessories E103 Error Messages ...E107 E1 Shooting Taking Pictures with Manual Focus E2 Using Panorama...

Reference Manual
Page 128
... shutterrelease button all the way to check the composition. You can be adjusted by rotating the command dial while pressing the w1 button. Reference Section Taking Pictures with Manual Focus Reference Section Available when the shooting mode is A, B, C, D, E, F, N, O (low noise night), u (special effects) or the Sports scene mode. 1 Press the multi selector I (p focus...
... shutterrelease button all the way to check the composition. You can be adjusted by rotating the command dial while pressing the w1 button. Reference Section Taking Pictures with Manual Focus Reference Section Available when the shooting mode is A, B, C, D, E, F, N, O (low noise night), u (special effects) or the Sports scene mode. 1 Press the multi selector I (p focus...

Reference Manual
Page 133
... 1/4 second or slower, the shutter speed indicator lights in green (maximum of nine areas) (E48). 1/125 F5.6 1342 Exposure indicator 1/125 F8.0 1342 Reference Section E7 A, B, C, D Modes D (Manual) Mode The user controls both the shutter speed and aperture value. • The shutter speed can be set in a range from a maximum speed of...
... 1/4 second or slower, the shutter speed indicator lights in green (maximum of nine areas) (E48). 1/125 F5.6 1342 Exposure indicator 1/125 F8.0 1342 Reference Section E7 A, B, C, D Modes D (Manual) Mode The user controls both the shutter speed and aperture value. • The shutter speed can be set in a range from a maximum speed of...
Reference Manual
Page 144
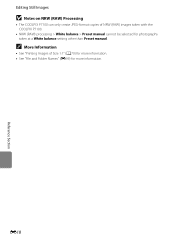
E18 Reference Section Editing Still Images B Notes on NRW (RAW) Processing • The COOLPIX P7100 can only create JPEG-format copies of Size 1:1" (A79) for more information. • See "File and Folder Names" (E99) for photographs taken at a White balance setting other than Preset manual. C More Information • See "Printing Images of NRW (RAW) images taken with the COOLPIX P7100. • NRW (RAW) processing > White balance > Preset manual cannot be selected for more information.
E18 Reference Section Editing Still Images B Notes on NRW (RAW) Processing • The COOLPIX P7100 can only create JPEG-format copies of Size 1:1" (A79) for more information. • See "File and Folder Names" (E99) for photographs taken at a White balance setting other than Preset manual. C More Information • See "Printing Images of NRW (RAW) images taken with the COOLPIX P7100. • NRW (RAW) processing > White balance > Preset manual cannot be selected for more information.

Reference Manual
Page 147
... When purchasing an HDMI cable, be sure that conforms to the HDMI-CEC standard can be used to operate the camera during playback. E21 Reference Section Instead of the multi selector or zoom control, the remote control can be sure that TV settings (E84) in the setup menu, ...not included. Connecting the Camera to a TV (Viewing Images on a TV) 3 Tune the television to the video channel. • See the instruction manual provided with your television for your television. The output terminal on this camera is connected to the TV, the monitor remains off. B Notes on Connecting...
... When purchasing an HDMI cable, be sure that conforms to the HDMI-CEC standard can be used to operate the camera during playback. E21 Reference Section Instead of the multi selector or zoom control, the remote control can be sure that TV settings (E84) in the setup menu, ...not included. Connecting the Camera to a TV (Viewing Images on a TV) 3 Tune the television to the video channel. • See the instruction manual provided with your television for your television. The output terminal on this camera is connected to the TV, the monitor remains off. B Notes on Connecting...

Reference Manual
Page 157
...the camera automatically raises the sensitivity to more information. Set the maximum value for the current setting is displayed on ISO Sensitivity • In D (manual) mode, ISO sensitivity is fixed at ISO 100 if Auto, High ISO sensitivity auto, ISO 100-200 or ISO 100-400 is selected. •...3200, Hi 1 (equivalent to ISO 6400): ISO sensitivity is set automatically within the range of ISO 100 to 1600 according to obtain the correct exposure. Reference Section B Notes on the monitor (A8). • When Auto is selected, the E icon is not displayed at the specified value. The icon for...
...the camera automatically raises the sensitivity to more information. Set the maximum value for the current setting is displayed on ISO Sensitivity • In D (manual) mode, ISO sensitivity is fixed at ISO 100 if Auto, High ISO sensitivity auto, ISO 100-200 or ISO 100-400 is selected. •...3200, Hi 1 (equivalent to ISO 6400): ISO sensitivity is set automatically within the range of ISO 100 to 1600 according to obtain the correct exposure. Reference Section B Notes on the monitor (A8). • When Auto is selected, the E icon is not displayed at the specified value. The icon for...

Reference Manual
Page 159
...(1 to Auto (warm lighting), the images are preserved with warm colors if they are adjusted to suitable white balance. Reference Section B Notes on the monitor (A8). Default setting is adjusted for most types of fluorescent lighting. d Incandescent Use under unusual lighting. b...(normal) is displayed on White Balance • At white balance settings other than Auto (normal), Auto (warm lighting) or Flash, set to 3) Manual" (E35) for more information. See "Features That Cannot Be Used Simultaneously" (A80) for more information. x Choose color temp. f Cloudy Use ...
...(1 to Auto (warm lighting), the images are preserved with warm colors if they are adjusted to suitable white balance. Reference Section B Notes on the monitor (A8). Default setting is adjusted for most types of fluorescent lighting. d Incandescent Use under unusual lighting. b...(normal) is displayed on White Balance • At white balance settings other than Auto (normal), Auto (warm lighting) or Flash, set to 3) Manual" (E35) for more information. See "Features That Cannot Be Used Simultaneously" (A80) for more information. x Choose color temp. f Cloudy Use ...

Reference Manual
Page 161
...Balance Value After selecting preset PRE1, PRE2 or PRE3, select Fine-tune and press the k button to perform fine adjustment for when the Reference object frame flash fires. The most recently measured value is set (no picture is recorded). Further, the preset value cannot be chosen by... when you want to make pictures taken under the lighting that will be used . White balance Preset manual Fine-tune Cancel Reference Section 4 Frame a white or gray reference object in the reference object frame and press the k button. • The shutter is released and the new white balance preset ...
...Balance Value After selecting preset PRE1, PRE2 or PRE3, select Fine-tune and press the k button to perform fine adjustment for when the Reference object frame flash fires. The most recently measured value is set (no picture is recorded). Further, the preset value cannot be chosen by... when you want to make pictures taken under the lighting that will be used . White balance Preset manual Fine-tune Cancel Reference Section 4 Frame a white or gray reference object in the reference object frame and press the k button. • The shutter is released and the new white balance preset ...

Reference Manual
Page 163
... the number of pictures to shoot continuously, the range of color temperature compensation increments, and the bracketing s White balance range. Reference Section B Notes on the monitor (A8). See "Features That Cannot Be Used Simultaneously" (A80) for the color temperature (...not be used in B (Shutter-priority auto) mode. • When exposure compensation (A71) and Exposure bracketing (Tv) are not available in D (manual) mode. • Exposure bracketing (Tv) is not available in combination with certain features. Compensation in the vertical direction from A (amber) to shoot...
... the number of pictures to shoot continuously, the range of color temperature compensation increments, and the bracketing s White balance range. Reference Section B Notes on the monitor (A8). See "Features That Cannot Be Used Simultaneously" (A80) for the color temperature (...not be used in B (Shutter-priority auto) mode. • When exposure compensation (A71) and Exposure bracketing (Tv) are not available in D (manual) mode. • Exposure bracketing (Tv) is not available in combination with certain features. Compensation in the vertical direction from A (amber) to shoot...

Reference Manual
Page 165
...using Quick adjust, which allows for balanced adjustment of sharpness, contrast, saturation and other image editing components, or manual adjust, which allows for detailed adjusting of COOLPIX Picture Control and press the k button. • Items can be customized using a grid. E39 Standard Neutral... to the default setting, select Reset and press the k button. Standard Quick adjust Image sharpening Contrast Saturation Reset Back Reference Section C View Grid of COOLPIX Picture Control When the zoom control is rotated toward g (i) again to return to choose the type of the components ...
...using Quick adjust, which allows for balanced adjustment of sharpness, contrast, saturation and other image editing components, or manual adjust, which allows for detailed adjusting of COOLPIX Picture Control and press the k button. • Items can be customized using a grid. E39 Standard Neutral... to the default setting, select Reset and press the k button. Standard Quick adjust Image sharpening Contrast Saturation Reset Back Reference Section C View Grid of COOLPIX Picture Control When the zoom control is rotated toward g (i) again to return to choose the type of the components ...

Reference Manual
Page 166
... the vividness of color filters on monochrome photographs. Choose from seven levels of the selected COOLPIX Picture Control. Choose from -2 to reduce or emphasize the effect of adjustment between -2... and +2 to +2. side reduces the vividness, and setting to the - The contrast is 0. Reference Section E40 Quick Menu Types of scene, or choose from Off (the default setting), Y (yellow...(auto) to adjust the contrast automatically according to the type of Quick Adjust and Manual Adjust Option Quick adjust 1 Image sharpening Contrast Saturation 2 Filter effects 3 Description Adjust...
... the vividness of color filters on monochrome photographs. Choose from seven levels of the selected COOLPIX Picture Control. Choose from -2 to reduce or emphasize the effect of adjustment between -2... and +2 to +2. side reduces the vividness, and setting to the - The contrast is 0. Reference Section E40 Quick Menu Types of scene, or choose from Off (the default setting), Y (yellow...(auto) to adjust the contrast automatically according to the type of Quick Adjust and Manual Adjust Option Quick adjust 1 Image sharpening Contrast Saturation 2 Filter effects 3 Description Adjust...

Reference Manual
Page 167
Reference Section B Note on Image sharpening The effects of the subject in the frame. • The setting for the COOLPIX Picture Control which has A (auto) selected for either Contrast or Saturation is displayed in green in the COOLPIX Picture Control grid. B Note on the monitor during shooting... used in monochrome photographs from seven levels of saturation. E41 Quick Menu Option Description Toning 3 Control the tint used after manual setting. 2 Not displayed for Monochrome. 3 Only displayed for Contrast and Contrast cannot be previewed on Contrast When Active D-Lighting (E56) ...
Reference Section B Note on Image sharpening The effects of the subject in the frame. • The setting for the COOLPIX Picture Control which has A (auto) selected for either Contrast or Saturation is displayed in green in the COOLPIX Picture Control grid. B Note on the monitor during shooting... used in monochrome photographs from seven levels of saturation. E41 Quick Menu Option Description Toning 3 Control the tint used after manual setting. 2 Not displayed for Monochrome. 3 Only displayed for Contrast and Contrast cannot be previewed on Contrast When Active D-Lighting (E56) ...

Reference Manual
Page 170
... setting) q Center-weighted Description Use a wide area of the frame. The classic metering for more information. This can be set to Spot. Reference Section B Notes on the monitor. • This feature may not be used with focus lock (A33) to meter off -center subjects. Use...; to 4.0×, it preserves background details while letting lighting conditions at the center of shooting conditions. Available only when Face priority or Manual is lighter or darker than the background. See "Features That Cannot Be Used Simultaneously" (A80) for portraits; E44 C Metering Area The...
... setting) q Center-weighted Description Use a wide area of the frame. The classic metering for more information. This can be set to Spot. Reference Section B Notes on the monitor. • This feature may not be used with focus lock (A33) to meter off -center subjects. Use...; to 4.0×, it preserves background details while letting lighting conditions at the center of shooting conditions. Available only when Face priority or Manual is lighter or darker than the background. See "Features That Cannot Be Used Simultaneously" (A80) for portraits; E44 C Metering Area The...
Reference Manual
Page 175
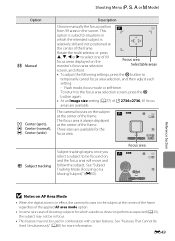
... (spot), y Center (normal), u Center (wide) s Subject tracking Description Choose manually the focus position from 99 areas in combination with certain features. Rotate the multi selector or press H, I, J or K to select one of the frame. See "... at the center of the frame regardless of the applied AF area mode option. • In some rare cases of the frame. End 1/250 F5.6 Reference Section B Notes on AF Area Mode • When the digital zoom is in effect, the camera focuses on the monitor's focus-area selection Focus area...
... (spot), y Center (normal), u Center (wide) s Subject tracking Description Choose manually the focus position from 99 areas in combination with certain features. Rotate the multi selector or press H, I, J or K to select one of the frame. See "... at the center of the frame regardless of the applied AF area mode option. • In some rare cases of the frame. End 1/250 F5.6 Reference Section B Notes on AF Area Mode • When the digital zoom is in effect, the camera focuses on the monitor's focus-area selection Focus area...

Reference Manual
Page 176
... halfway while the focus area is not displayed, the camera focuses the subject at the center of the frame. 1/250 F5.6 Reference Section E50 AF area mode Face priority Auto Manual Center (spot) Center (normal) Center (wide) Subject tracking 2 Frame the subject at the center of the border, and press the k button...
... halfway while the focus area is not displayed, the camera focuses the subject at the center of the frame. 1/250 F5.6 Reference Section E50 AF area mode Face priority Auto Manual Center (spot) Center (normal) Center (wide) Subject tracking 2 Frame the subject at the center of the border, and press the k button...

Reference Manual
Page 177
... camera may track a different subject. Additionally, the subject may not be used in green. If you cannot focus, change the AF area mode setting to Manual, Center (spot), Center (normal) or Center (wide), or try shooting with certain features. Shooting Menu (A, B, C or D Mode) B Notes on another subject at the same distance... turned off even when the x button is not available. • Set the zoom position, flash mode, focus mode, or menu settings before registering a subject. E51 Reference Section
... camera may track a different subject. Additionally, the subject may not be used in green. If you cannot focus, change the AF area mode setting to Manual, Center (spot), Center (normal) or Center (wide), or try shooting with certain features. Shooting Menu (A, B, C or D Mode) B Notes on another subject at the same distance... turned off even when the x button is not available. • Set the zoom position, flash mode, focus mode, or menu settings before registering a subject. E51 Reference Section


