Reference Manual
Page 4
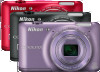
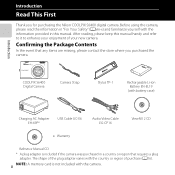
...yourself with the information provided in a country or region that any items are missing, please contact the store where you for purchasing the Nikon COOLPIX S6400 digital camera. The shape of the plug adapter varies with the camera. After reading, please keep this manual. ii NOTE: A memory... in this manual handy and refer to it to enhance your enjoyment of purchase (A16). Introduction COOLPIX S6400 Digital Camera Camera Strap Stylus TP-1 Rechargeable Li-ion Battery EN-EL19 (with battery case) Charging AC Adapter EH-69P* USB Cable UC-E6 Audio Video Cable EG-CP16 ViewNX ...
...yourself with the information provided in a country or region that any items are missing, please contact the store where you for purchasing the Nikon COOLPIX S6400 digital camera. The shape of the plug adapter varies with the camera. After reading, please keep this manual. ii NOTE: A memory... in this manual handy and refer to it to enhance your enjoyment of purchase (A16). Introduction COOLPIX S6400 Digital Camera Camera Strap Stylus TP-1 Rechargeable Li-ion Battery EN-EL19 (with battery case) Charging AC Adapter EH-69P* USB Cable UC-E6 Audio Video Cable EG-CP16 ViewNX ...
Reference Manual
Page 7
... on digital imaging and photography. For more information about Nikon brand accessories, contact a local authorized Nikon dealer. v Only Nikon brand electronic accessories (including battery chargers, batteries, Charging AC adapters, and AC adapters) certified by Nikon specifically for contact information: http://imaging.nikon.com/ Use Only Nikon Brand Electronic Accessories Nikon COOLPIX cameras are engineered and proven to the highest standards...
... on digital imaging and photography. For more information about Nikon brand accessories, contact a local authorized Nikon dealer. v Only Nikon brand electronic accessories (including battery chargers, batteries, Charging AC adapters, and AC adapters) certified by Nikon specifically for contact information: http://imaging.nikon.com/ Use Only Nikon Brand Electronic Accessories Nikon COOLPIX cameras are engineered and proven to the highest standards...

Reference Manual
Page 10
...section are indicated by qualified technicians. After removing or disconnecting the power source, take the product to prevent infants from putting the battery or other accident, take the equipment to avoid burns. Introduction WARNINGS Turn off in the event of a fall or other ... the following symbol: This icon marks warnings, information that could result in injury. The consequences that should be taken to a Nikon-authorized service viii representative for inspection. Do not disassemble Touching the internal parts of children Particular care should be performed only by...
...section are indicated by qualified technicians. After removing or disconnecting the power source, take the product to prevent infants from putting the battery or other accident, take the equipment to avoid burns. Introduction WARNINGS Turn off in the event of a fall or other ... the following symbol: This icon marks warnings, information that could result in injury. The consequences that should be taken to a Nikon-authorized service viii representative for inspection. Do not disassemble Touching the internal parts of children Particular care should be performed only by...
Reference Manual
Page 11
...near the Charging AC Adapter during lightning storms. Failure to observe this precaution could result in this precaution could result in the battery case before transporting it to a Nikonauthorized service representative for use Parts of the devices become exposed, take it . Should the...heat or flames. ix Introduction Observe caution when handling the battery The battery may result in lowtemperature burns. Charge the battery by using a camera that supports battery charging or by computer function. • When inserting the battery, do not attempt to insert it to leakage when fully ...
...near the Charging AC Adapter during lightning storms. Failure to observe this precaution could result in this precaution could result in the battery case before transporting it to a Nikonauthorized service representative for use Parts of the devices become exposed, take it . Should the...heat or flames. ix Introduction Observe caution when handling the battery The battery may result in lowtemperature burns. Charge the battery by using a camera that supports battery charging or by computer function. • When inserting the battery, do not attempt to insert it to leakage when fully ...

Reference Manual
Page 14
...may exceed the limits of Class B Part 15 of waste management. Introduction Interface Cables Use the interface cables sold or provided by Nikon for separate collection at an appropriate collection point. Wash hands after handling. The following apply only to users in the State of California... waste management. The following apply only to users in charge of the FCC rules. Using other reproductive harm. This symbol indicates that the battery is to be collected separately. Do not dispose of as household waste. • For more information, contact the retailer or the local...
...may exceed the limits of Class B Part 15 of waste management. Introduction Interface Cables Use the interface cables sold or provided by Nikon for separate collection at an appropriate collection point. Wash hands after handling. The following apply only to users in the State of California... waste management. The following apply only to users in charge of the FCC rules. Using other reproductive harm. This symbol indicates that the battery is to be collected separately. Do not dispose of as household waste. • For more information, contact the retailer or the local...

Reference Manual
Page 15
... 5 Indicators of the Monitor/Touch Panel........ 6 Shooting Mode 6 Playback Mode 8 Using Menus 10 The Basics of Shooting and Playback 13 Preparation 1 Insert the Battery 14 Preparation 2 Charge the Battery 16 Preparation 3 Insert a Memory Card.......... 18 Internal Memory and Memory Cards......... 19 Preparation 4 Setting the Display Language, Date, and Time 20 Step 1 Turn...
... 5 Indicators of the Monitor/Touch Panel........ 6 Shooting Mode 6 Playback Mode 8 Using Menus 10 The Basics of Shooting and Playback 13 Preparation 1 Insert the Battery 14 Preparation 2 Charge the Battery 16 Preparation 3 Insert a Memory Card.......... 18 Internal Memory and Memory Cards......... 19 Preparation 4 Setting the Display Language, Date, and Time 20 Step 1 Turn...
Reference Manual
Page 18
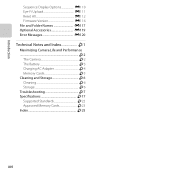
Introduction Sequence Display Options E110 Eye-Fi Upload E111 Reset All E112 Firmware Version E116 File and Folder Names E117 Optional Accessories E119 Error Messages E120 Technical Notes and Index F1 Maximizing Camera Life and Performance F2 The Camera F2 The Battery F3 Charging AC Adapter F4 Memory Cards F5 Cleaning and Storage F6 Cleaning F6 Storage F6 Troubleshooting F7 Specifications F17 Supported Standards F22 Approved Memory Cards F23 Index F25 xvi
Introduction Sequence Display Options E110 Eye-Fi Upload E111 Reset All E112 Firmware Version E116 File and Folder Names E117 Optional Accessories E119 Error Messages E120 Technical Notes and Index F1 Maximizing Camera Life and Performance F2 The Camera F2 The Battery F3 Charging AC Adapter F4 Memory Cards F5 Cleaning and Storage F6 Cleaning F6 Storage F6 Troubleshooting F7 Specifications F17 Supported Standards F22 Approved Memory Cards F23 Index F25 xvi
Reference Manual
Page 21
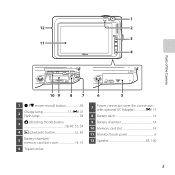
1 12 2 3 11 4 Parts of the Camera 10 9 8 7 6 5 1 b (e movie-record) button 96 2 Charge lamp 17, E107 Flash lamp 58 3 A (shooting mode) button 38, 40, 52, 54 4 c (playback) button 32, 82 5 Battery-chamber/ memory card slot cover 14, 15 6 Tripod socket 7 Power connector cover (for connection with optional AC Adapter E119 8 Battery latch 14 9 Battery chamber 14 10 Memory card slot 18 11 Monitor/touch panel 6 12 Speaker 85, 100 3
1 12 2 3 11 4 Parts of the Camera 10 9 8 7 6 5 1 b (e movie-record) button 96 2 Charge lamp 17, E107 Flash lamp 58 3 A (shooting mode) button 38, 40, 52, 54 4 c (playback) button 32, 82 5 Battery-chamber/ memory card slot cover 14, 15 6 Tripod socket 7 Power connector cover (for connection with optional AC Adapter E119 8 Battery latch 14 9 Battery chamber 14 10 Memory card slot 18 11 Monitor/touch panel 6 12 Speaker 85, 100 3

Reference Manual
Page 25
... portrait auto release 49 5 Focus indicator 30 6 AE/AF-L indicator 50 7 Eye-Fi communication indicator 105 8 Motion detection icon 104 9 Vibration reduction icon 104 10 Battery level indicator 24 11 Print date 104 12 "Date not set" indicator 22, 104, E120 13 Travel destination icon 22, 104 14 Zoom indicator 29...
... portrait auto release 49 5 Focus indicator 30 6 AE/AF-L indicator 50 7 Eye-Fi communication indicator 105 8 Motion detection icon 104 9 Vibration reduction icon 104 10 Battery level indicator 24 11 Print date 104 12 "Date not set" indicator 22, 104, E120 13 Travel destination icon 22, 104 14 Zoom indicator 29...

Reference Manual
Page 27
... r Stretch icon 84, E27 q Perspective control icon.........84, E28 8 Eye-Fi communication indicator 105 9 Protect icon 84, E71 10 Print order icon 84, E73 11 Battery level indicator 24 12 3D image icon 50 Sequence display (when Individual 13 pictures is selected) 105, E14, E110 15 Small picture icon 84, E31...
... r Stretch icon 84, E27 q Perspective control icon.........84, E28 8 Eye-Fi communication indicator 105 9 Protect icon 84, E71 10 Print order icon 84, E73 11 Battery level indicator 24 12 3D image icon 50 Sequence display (when Individual 13 pictures is selected) 105, E14, E110 15 Small picture icon 84, E31...
Reference Manual
Page 31
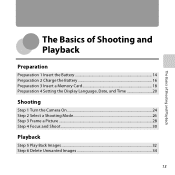
The Basics of Shooting and Playback The Basics of Shooting and Playback Preparation Preparation 1 Insert the Battery 14 Preparation 2 Charge the Battery 16 Preparation 3 Insert a Memory Card 18 Preparation 4 Setting the Display Language, Date, and Time 20 Shooting Step 1 Turn the Camera On 24 Step 2 Select a Shooting Mode 26 Step 3 Frame a Picture ...28 Step 4 Focus and Shoot...30 Playback Step 5 Play Back Images ...32 Step 6 Delete Unwanted Images 34 13
The Basics of Shooting and Playback The Basics of Shooting and Playback Preparation Preparation 1 Insert the Battery 14 Preparation 2 Charge the Battery 16 Preparation 3 Insert a Memory Card 18 Preparation 4 Setting the Display Language, Date, and Time 20 Shooting Step 1 Turn the Camera On 24 Step 2 Select a Shooting Mode 26 Step 3 Frame a Picture ...28 Step 4 Focus and Shoot...30 Playback Step 5 Play Back Images ...32 Step 6 Delete Unwanted Images 34 13
Reference Manual
Page 32
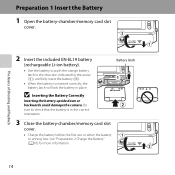
.... The Basics of Shooting and Playback 2 Insert the included EN-EL19 battery (rechargeable Li-ion battery). • Use the battery to check that the battery is inserted correctly, the battery latch will lock the battery in the correct orientation. Be sure to push the orange battery latch in the direction indicated by the arrow (1), and fully insert...
.... The Basics of Shooting and Playback 2 Insert the included EN-EL19 battery (rechargeable Li-ion battery). • Use the battery to check that the battery is inserted correctly, the battery latch will lock the battery in the correct orientation. Be sure to push the orange battery latch in the direction indicated by the arrow (1), and fully insert...
Reference Manual
Page 33
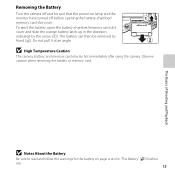
... card may be hot immediately after using the camera. Do not pull it at an angle. B Notes About the Battery Be sure to read and follow the warnings for the battery on lamp and the monitor have turned off and be sure that the power-on page ix and in the... by hand (2). The Basics of Shooting and Playback Removing the Battery Turn the camera off before use. 15 To eject the battery, open the battery-chamber/memory card slot cover and slide the orange battery latch up in "The Battery" (F3) before opening the battery-chamber/ memory card slot cover. Observe caution when removing the...
... card may be hot immediately after using the camera. Do not pull it at an angle. B Notes About the Battery Be sure to read and follow the warnings for the battery on lamp and the monitor have turned off and be sure that the power-on page ix and in the... by hand (2). The Basics of Shooting and Playback Removing the Battery Turn the camera off before use. 15 To eject the battery, open the battery-chamber/memory card slot cover and slide the orange battery latch up in "The Battery" (F3) before opening the battery-chamber/ memory card slot cover. Observe caution when removing the...

Reference Manual
Page 34
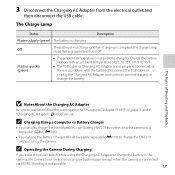
... the included Charging AC Adapter EH-69P. The Charging AC Adapter comes with your camera, attach the plug adapter to charge a fully exhausted battery. • When the battery has been completely charged, the charge lamp turns off. 16 • See "The Charge Lamp" (A17) for more information. If a plug adapter* is... forcibly remove the plug adapter could damage the product. * The shape of 1 to 3. • Keep the camera turned off. • Be sure that the battery is installed in the camera, and then connect the camera to the Charging AC Adapter in Argentina and Korea. 2 Make sure the...
... the included Charging AC Adapter EH-69P. The Charging AC Adapter comes with your camera, attach the plug adapter to charge a fully exhausted battery. • When the battery has been completely charged, the charge lamp turns off. 16 • See "The Charge Lamp" (A17) for more information. If a plug adapter* is... forcibly remove the plug adapter could damage the product. * The shape of 1 to 3. • Keep the camera turned off. • Be sure that the battery is installed in the camera, and then connect the camera to the Charging AC Adapter in Argentina and Korea. 2 Make sure the...
Reference Manual
Page 35
... Adapter to a computer (A86, E106). • You can play back images (except when the camera is connected via HDMI). Charge the battery indoors with an ambient temperature of Shooting and Playback B Notes About the Charging AC Adapter Be sure to charging. The Charge Lamp Status Description ...Flashes slowly (green) The battery is not possible. 17 Shooting is charging. The Basics of 5°C to 35°C (41°F to 95°F). • The ...
... Adapter to a computer (A86, E106). • You can play back images (except when the camera is connected via HDMI). Charge the battery indoors with an ambient temperature of Shooting and Playback B Notes About the Charging AC Adapter Be sure to charging. The Charge Lamp Status Description ...Flashes slowly (green) The battery is not possible. 17 Shooting is charging. The Basics of 5°C to 35°C (41°F to 95°F). • The ...
Reference Manual
Page 36
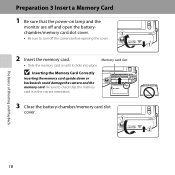
... that the memory card is in until it clicks into place. Memory card slot • Slide the memory card in the correct orientation. 3 Close the battery-chamber/memory card slot cover. The Basics of Shooting and Playback 18 B Inserting the Memory Card Correctly Inserting the memory card upside down or backwards...
... that the memory card is in until it clicks into place. Memory card slot • Slide the memory card in the correct orientation. 3 Close the battery-chamber/memory card slot cover. The Basics of Shooting and Playback 18 B Inserting the Memory Card Correctly Inserting the memory card upside down or backwards...
Reference Manual
Page 37
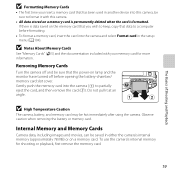
... card (2). Do not pull it with your memory card for shooting or playback, first remove the memory card. 19 B High Temperature Caution The camera, battery, and memory card may be saved in either the camera's internal memory (approximately 78 MB) or on a memory card. To use the camera's internal... of Shooting and Playback B Formatting Memory Cards • The first time you wish to keep, copy that data to a computer before opening the battery-chamber/ memory card slot cover. Removing Memory Cards Turn the camera off and be sure that the power-on the memory card that you insert...
... card (2). Do not pull it with your memory card for shooting or playback, first remove the memory card. 19 B High Temperature Caution The camera, battery, and memory card may be saved in either the camera's internal memory (approximately 78 MB) or on a memory card. To use the camera's internal... of Shooting and Playback B Formatting Memory Cards • The first time you wish to keep, copy that data to a computer before opening the battery-chamber/ memory card slot cover. Removing Memory Cards Turn the camera off and be sure that the power-on the memory card that you insert...

Reference Manual
Page 40
... (w) is automatically calculated and the date and time in the selected region are captured by a backup battery that is separate from the camera's main battery. • The backup battery charges when the main battery is inserted into the camera or when the camera is turned on. See step 3 (A20) of... days of backup power after about ten hours of "Preparation 4 Setting the Display Language, Date, and Time" for more information. C The Clock Battery • The camera's clock is displayed. C Imprinting the Shooting Date on images as they are saved at the time of Shooting and Playback C...
... (w) is automatically calculated and the date and time in the selected region are captured by a backup battery that is separate from the camera's main battery. • The backup battery charges when the main battery is inserted into the camera or when the camera is turned on. See step 3 (A20) of... days of backup power after about ten hours of "Preparation 4 Setting the Display Language, Date, and Time" for more information. C The Clock Battery • The camera's clock is displayed. C Imprinting the Shooting Date on images as they are saved at the time of Shooting and Playback C...
Reference Manual
Page 42
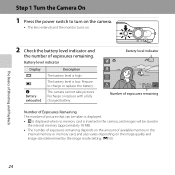
...by the image mode setting; Description The battery level is low. The camera cannot take pictures. The Basics of exposures remaining. Battery level indicator Display b B N Battery exhausted. Recharge or replace with a fully charged battery. E50). 24 The battery level is high. Battery level indicator 25 0 1010 Number of ...amount of available memory in the internal memory or memory card, and also varies depending on . 2 Check the battery level indicator and the number of Shooting and Playback Step 1 Turn the Camera On 1 Press the power switch to charge or replace ...
...by the image mode setting; Description The battery level is low. The camera cannot take pictures. The Basics of exposures remaining. Battery level indicator Display b B N Battery exhausted. Recharge or replace with a fully charged battery. E50). 24 The battery level is high. Battery level indicator 25 0 1010 Number of ...amount of available memory in the internal memory or memory card, and also varies depending on . 2 Check the battery level indicator and the number of Shooting and Playback Step 1 Turn the Camera On 1 Press the power switch to charge or replace ...
Reference Manual
Page 49
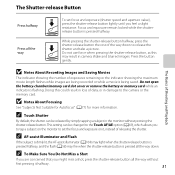
...-release button is being saved. This setting can be changed to release the shutter and take a picture. Do not open the battery-chamber/memory card slot cover or remove the battery or memory card while an indicator is pressed halfway. Press all the way down to the Touch AF/AE option (A69...
...-release button is being saved. This setting can be changed to release the shutter and take a picture. Do not open the battery-chamber/memory card slot cover or remove the battery or memory card while an indicator is pressed halfway. Press all the way down to the Touch AF/AE option (A69...


