
Reference Manual
Page 2
... Features p Quick Effects A32 You can apply various effects to images later by simply pressing the b (e movie-record) button. e (Movie A82 You can record movies by pressing the k button during playback. GPS Function (COOLPIX S9500 only A88 You can be played back in accordance with the shooting mode and ...white balance settings. Wi-Fi (Wireless LAN) Feature (COOLPIX S9500 only A93 You can use the camera's internal Wi-Fi feature to automatically transfer pictures that can record position information (latitude and...
... Features p Quick Effects A32 You can apply various effects to images later by simply pressing the b (e movie-record) button. e (Movie A82 You can record movies by pressing the k button during playback. GPS Function (COOLPIX S9500 only A88 You can be played back in accordance with the shooting mode and ...white balance settings. Wi-Fi (Wireless LAN) Feature (COOLPIX S9500 only A93 You can use the camera's internal Wi-Fi feature to automatically transfer pictures that can record position information (latitude and...

Reference Manual
Page 5
... manual. A/E/F These icons indicate other pages containing relevant information; See "Parts of the Camera and Main Functions" (A 1) for both the COOLPIX S9500 and the COOLPIX S9400 are referred to as the "default setting." • The names of menu items displayed in the monitor screen, and the names of... buttons or messages displayed on a computer monitor appear in this manual, images are sometimes omitted from monitor screen samples so that ...
... manual. A/E/F These icons indicate other pages containing relevant information; See "Parts of the Camera and Main Functions" (A 1) for both the COOLPIX S9500 and the COOLPIX S9400 are referred to as the "default setting." • The names of menu items displayed in the monitor screen, and the names of... buttons or messages displayed on a computer monitor appear in this manual, images are sometimes omitted from monitor screen samples so that ...

Reference Manual
Page 6
... ongoing product support and education, continually updated information is available online at any time and without Nikon's prior written permission. • Nikon will not be held liable for contact information: http://imaging.nikon.com/ Use Only Nikon Brand Electronic Accessories Nikon COOLPIX cameras are engineered and proven to ensure that the camera is accurate and complete, we...
... ongoing product support and education, continually updated information is available online at any time and without Nikon's prior written permission. • Nikon will not be held liable for contact information: http://imaging.nikon.com/ Use Only Nikon Brand Electronic Accessories Nikon COOLPIX cameras are engineered and proven to ensure that the camera is accurate and complete, we...

Reference Manual
Page 7
... or coupon tickets, except when a minimum of making illegal copies or to property when physically destroying data storage devices. • For the COOLPIX S9500, the log data saved on the memory card, select Create log ➝ End log ➝ Erase log. • For the...image option in the setup menu. The copying or reproduction of such data is prohibited. v Unless the prior permission of the government was digitally copied or reproduced by means of a scanner, digital camera or other data. Do not use this product for example, pictures of empty sky) (For the COOLPIX S9500...
... or coupon tickets, except when a minimum of making illegal copies or to property when physically destroying data storage devices. • For the COOLPIX S9500, the log data saved on the memory card, select Create log ➝ End log ➝ Erase log. • For the...image option in the setup menu. The copying or reproduction of such data is prohibited. v Unless the prior permission of the government was digitally copied or reproduced by means of a scanner, digital camera or other data. Do not use this product for example, pictures of empty sky) (For the COOLPIX S9500...
Reference Manual
Page 10
...of 3D images may disrupt the electronic systems of the airplane or the instruments of children whose visual systems are not pinched by this device should be played back on an audio CD player could cause hearing loss or damage the equipment. Observe caution when using the COOLPIX S9500, disable... the hospital Turn the power off while inside the airplane during take off or landing. This could cause a traffic accident. 3D Images Do not continuously view 3D images recorded with this camera may cause eye strain, nausea, or discomfort. Introduction For Your Safety Handle moving parts.
...of 3D images may disrupt the electronic systems of the airplane or the instruments of children whose visual systems are not pinched by this device should be played back on an audio CD player could cause hearing loss or damage the equipment. Observe caution when using the COOLPIX S9500, disable... the hospital Turn the power off while inside the airplane during take off or landing. This could cause a traffic accident. 3D Images Do not continuously view 3D images recorded with this camera may cause eye strain, nausea, or discomfort. Introduction For Your Safety Handle moving parts.
Reference Manual
Page 16
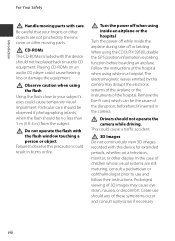
...Many studies of low-level RF exposures have not found to OET65 and RSS-102 of RF can produce health effects (by additional research. xiv COOLPIX S9500, which is equipped with a DW092 (FCC ID:EW4DW092 / IC ID:4634A-3149EC) Wireless LAN Module, has been tested and found any other...not produce heating effects causes no proof, however, that any health problems are absolutely safe. Introduction Wi-Fi (Wireless LAN Network) Function (COOLPIX S9500 only) FCC/IC RF Exposure Statement This transmitter must not be consulted at http:// imaging.nikon.com/support/pdf/DoC_S9500.pdf.
...Many studies of low-level RF exposures have not found to OET65 and RSS-102 of RF can produce health effects (by additional research. xiv COOLPIX S9500, which is equipped with a DW092 (FCC ID:EW4DW092 / IC ID:4634A-3149EC) Wireless LAN Module, has been tested and found any other...not produce heating effects causes no proof, however, that any health problems are absolutely safe. Introduction Wi-Fi (Wireless LAN Network) Function (COOLPIX S9500 only) FCC/IC RF Exposure Statement This transmitter must not be consulted at http:// imaging.nikon.com/support/pdf/DoC_S9500.pdf.

Reference Manual
Page 18
... Information and Precautions...iv For Your Safety ...vi WARNINGS ...vi Notices ...ix Notes on GPS/Electronic Compass (COOLPIX S9500 only xi Wi-Fi (Wireless LAN Network) Function (COOLPIX S9500 only xiii Parts of the Camera and Main Functions 1 The Camera Body ...1 Principle Functions of the Controls ...Available Shooting Modes...23 Step 3 Frame a Picture...24 Using the Zoom...25 Step 4 Focus and Shoot ...26 Step 5 Play Back Images ...28 Step 6 Delete Unwanted Images 29 Shooting Features...31 A (Auto) Mode ...31 Using Quick Effects ...32 Scene Mode (Shooting Suited to Scenes 33 Viewing a ...
... Information and Precautions...iv For Your Safety ...vi WARNINGS ...vi Notices ...ix Notes on GPS/Electronic Compass (COOLPIX S9500 only xi Wi-Fi (Wireless LAN Network) Function (COOLPIX S9500 only xiii Parts of the Camera and Main Functions 1 The Camera Body ...1 Principle Functions of the Controls ...Available Shooting Modes...23 Step 3 Frame a Picture...24 Using the Zoom...25 Step 4 Focus and Shoot ...26 Step 5 Play Back Images ...28 Step 6 Delete Unwanted Images 29 Shooting Features...31 A (Auto) Mode ...31 Using Quick Effects ...32 Scene Mode (Shooting Suited to Scenes 33 Viewing a ...

Reference Manual
Page 19
... Face Detection...67 Focus Lock...68 Autofocus ...68 Playback Features...69 Playback Zoom...69 Viewing Several Images (Thumbnail Playback and Calendar Display 70 Selecting Certain Types of Images for Playback 71 Available Playback Modes...71 Switching Between Playback Modes ...71 Features That Can Be ...78 Transferring Images to the Computer 80 Viewing Images ...81 Recording and Playing Back Movies 82 Recording Movies ...82 Features That Can Be Set Using the d (Menu) Button (Movie Menu 86 Available Movie Menu...86 Playing Back Movies...87 Using GPS/Electronic Compass (COOLPIX S9500 only ...
... Face Detection...67 Focus Lock...68 Autofocus ...68 Playback Features...69 Playback Zoom...69 Viewing Several Images (Thumbnail Playback and Calendar Display 70 Selecting Certain Types of Images for Playback 71 Available Playback Modes...71 Switching Between Playback Modes ...71 Features That Can Be ...78 Transferring Images to the Computer 80 Viewing Images ...81 Recording and Playing Back Movies 82 Recording Movies ...82 Features That Can Be Set Using the d (Menu) Button (Movie Menu 86 Available Movie Menu...86 Playing Back Movies...87 Using GPS/Electronic Compass (COOLPIX S9500 only ...

Reference Manual
Page 20
Introduction Table of Contents Using the Wi-Fi (Wireless LAN) Feature (COOLPIX S9500 only 93 Functions that Can Be Performed Using Wi-Fi 93 Installing the Software on the Smart Device 93 Connecting the Smart Device to the ... Panorama (Shooting and Playing back E2 Taking Pictures with Easy Panorama E2 Viewing Easy Panorama (Scroll) ...E4 Favorite Pictures Mode ...E5 Adding Images to Albums...E5 Playing Back Images in Albums ...E6 Removing Images From Albums ...E6 Changing the Favorites Album Icon E7 Auto Sort Mode ...E8 List by Date Mode ...E10 Playing...
Introduction Table of Contents Using the Wi-Fi (Wireless LAN) Feature (COOLPIX S9500 only 93 Functions that Can Be Performed Using Wi-Fi 93 Installing the Software on the Smart Device 93 Connecting the Smart Device to the ... Panorama (Shooting and Playing back E2 Taking Pictures with Easy Panorama E2 Viewing Easy Panorama (Scroll) ...E4 Favorite Pictures Mode ...E5 Adding Images to Albums...E5 Playing Back Images in Albums ...E6 Removing Images From Albums ...E6 Changing the Favorites Album Icon E7 Auto Sort Mode ...E8 List by Date Mode ...E10 Playing...

Reference Manual
Page 21
...Print Order (Creating a DPOF Print Order E51 Slide Show...E54 Protect ...E55 Rotate Image ...E55 Voice Memo ...E56 Copy (Copy Between Internal Memory and Memory Card E57 Sequence Display Options...E58 Choose Key Picture...E58 GPS Options Menu (COOLPIX S9500 only E59 GPS Options ...E59 Points of Interest (POI) (Recording and Displaying ......E77 Auto Off ...E77 Format Memory/Format Card...E78 Language...E78 TV Settings ...E79 Charge by Computer...E80 Blink Warning ...E82 Wi-Fi Options (COOLPIX S9500 only E83 Eye-Fi Upload ...E85 Filmstrip ...E86 Reset All ...E87 Firmware Version...E90 xix
...Print Order (Creating a DPOF Print Order E51 Slide Show...E54 Protect ...E55 Rotate Image ...E55 Voice Memo ...E56 Copy (Copy Between Internal Memory and Memory Card E57 Sequence Display Options...E58 Choose Key Picture...E58 GPS Options Menu (COOLPIX S9500 only E59 GPS Options ...E59 Points of Interest (POI) (Recording and Displaying ......E77 Auto Off ...E77 Format Memory/Format Card...E78 Language...E78 TV Settings ...E79 Charge by Computer...E80 Blink Warning ...E82 Wi-Fi Options (COOLPIX S9500 only E83 Eye-Fi Upload ...E85 Filmstrip ...E86 Reset All ...E87 Firmware Version...E90 xix
Reference Manual
Page 26
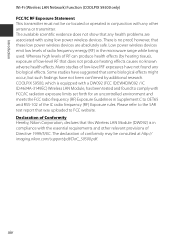
... hold 19 this button to turn the camera on in playback mode. • Return to shooting mode. 28 • Enlarge the image when rotated toward g (i), display image thumbnail or the calendar when rotated toward f (h). • Adjust the volume for voice memo and movie playback. 69, 70 74,... 87 • While the playback screen is displayed: 28 Change the displayed image by pressing up (H), down (I), left (J) and right (K), or by rotating the rotary multi selector. • While the setting screen is displayed: 6 ...
... hold 19 this button to turn the camera on in playback mode. • Return to shooting mode. 28 • Enlarge the image when rotated toward g (i), display image thumbnail or the calendar when rotated toward f (h). • Adjust the volume for voice memo and movie playback. 69, 70 74,... 87 • While the playback screen is displayed: 28 Change the displayed image by pressing up (H), down (I), left (J) and right (K), or by rotating the rotary multi selector. • While the setting screen is displayed: 6 ...
Reference Manual
Page 27
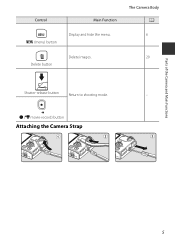
Parts of the Camera and Main Functions Control Main Function The Camera Body A Display and hide the menu. 6 d (menu) button Delete images. 29 Delete button Shutter-release button Return to shooting mode. - b (e movie-record) button Attaching the Camera Strap 5
Parts of the Camera and Main Functions Control Main Function The Camera Body A Display and hide the menu. 6 d (menu) button Delete images. 29 Delete button Shutter-release button Return to shooting mode. - b (e movie-record) button Attaching the Camera Strap 5

Reference Manual
Page 28
Image mode White balance Metering Continuous 29m 0s ISO sensitivity 970 AF area mode Autofocus mode 2 Use the Rotary multi selector to display the shooting screen. 6 ...
Image mode White balance Metering Continuous 29m 0s ISO sensitivity 970 AF area mode Autofocus mode 2 Use the Rotary multi selector to display the shooting screen. 6 ...

Reference Manual
Page 29
... Shooting For Playback Shooting menu Image mode Playback mode Play White balance Favorite pictures Metering Auto sort Continuous List by date ISO sensitivity AF area mode Autofocus mode A menu icon: Displays available settings in the current shooting mode (A23). z menu icon (COOLPIX S9500 only): Displays the GPS options...a different menu, such as the setup menu (A96), use the multi selector to switch to another menu icon. Menu icons Image mode White balance Metering Continuous ISO sensitivity AF area mode Autofocus mode Press J to move to apply the selection. Shooting menu...
... Shooting For Playback Shooting menu Image mode Playback mode Play White balance Favorite pictures Metering Auto sort Continuous List by date ISO sensitivity AF area mode Autofocus mode A menu icon: Displays available settings in the current shooting mode (A23). z menu icon (COOLPIX S9500 only): Displays the GPS options...a different menu, such as the setup menu (A96), use the multi selector to switch to another menu icon. Menu icons Image mode White balance Metering Continuous ISO sensitivity AF area mode Autofocus mode Press J to move to apply the selection. Shooting menu...

Reference Manual
Page 31
... level indicator 18 9 Vibration reduction icon 97 10 Wi-Fi communication indicator (COOLPIX S9500 only 93 Eye-Fi communication indicator 11 98, E85 12 GPS reception (COOLPIX S9500 only 90 13 Log display (COOLPIX S9500 only) ....92 14 Motion detection icon 97 15 Wind noise reduction 86 16... "Date not set" indicator 21, 96 17 Print date 96 18 Travel destination indicator 96 19 Movie options (normal speed movies 86 20 Movie options (HS movies 86 21 Movie length 82, E47 22 Image...
... level indicator 18 9 Vibration reduction icon 97 10 Wi-Fi communication indicator (COOLPIX S9500 only 93 Eye-Fi communication indicator 11 98, E85 12 GPS reception (COOLPIX S9500 only 90 13 Log display (COOLPIX S9500 only) ....92 14 Motion detection icon 97 15 Wind noise reduction 86 16... "Date not set" indicator 21, 96 17 Print date 96 18 Travel destination indicator 96 19 Movie options (normal speed movies 86 20 Movie options (HS movies 86 21 Movie length 82, E47 22 Image...
Reference Manual
Page 32
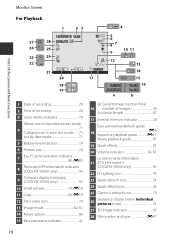
...74 7 Eye-Fi communication indicator 98, E85 8 Recorded GPS information indicator (COOLPIX S9500 only 90 Compass display (compass) 9 (COOLPIX S9500 only 92 10 Small picture 74, E18 11 Crop 69, E19 12 Print order icon 74 13 Image mode 62, 63 14 Movie options 86 15 Easy panorama indicator 41 (a) ...Location name information 21 (POI information) (COOLPIX S9500 only 91 22 D-Lighting icon 74 23 Quick retouch icon 74 24 Quick effects icon 28 25 Glamour retouch icon 74 26 Sequence display (when Individual pictures is set 74 27 3D image indicator 43 28 File number and type...
...74 7 Eye-Fi communication indicator 98, E85 8 Recorded GPS information indicator (COOLPIX S9500 only 90 Compass display (compass) 9 (COOLPIX S9500 only 92 10 Small picture 74, E18 11 Crop 69, E19 12 Print order icon 74 13 Image mode 62, 63 14 Movie options 86 15 Easy panorama indicator 41 (a) ...Location name information 21 (POI information) (COOLPIX S9500 only 91 22 D-Lighting icon 74 23 Quick retouch icon 74 24 Quick effects icon 28 25 Glamour retouch icon 74 26 Sequence display (when Individual pictures is set 74 27 3D image indicator 43 28 File number and type...

Reference Manual
Page 37
...turned off. • The ambient temperature is not suited to a computer (A77, 98). • The EN-EL12 can also charge the COOLPIX S9500/S9400 Rechargeable Li-ion Battery EN-EL12 by using the Battery Charger MH-65 (available separately; B Notes on in overheating or damage to the...F4) before using the AC Adapter EH-62F (available separately; C Operating the Camera During Charging If you can take pictures and play back images. Charge the battery indoors with the battery. Off The battery is not possible. Failure to observe this precaution could result in playback mode,...
...turned off. • The ambient temperature is not suited to a computer (A77, 98). • The EN-EL12 can also charge the COOLPIX S9500/S9400 Rechargeable Li-ion Battery EN-EL12 by using the Battery Charger MH-65 (available separately; B Notes on in overheating or damage to the...F4) before using the AC Adapter EH-62F (available separately; C Operating the Camera During Charging If you can take pictures and play back images. Charge the battery indoors with the battery. Off The battery is not possible. Failure to observe this precaution could result in playback mode,...

Reference Manual
Page 39
...SDXC. • Contact the manufacturer for shooting or playback, first remove the memory card. Internal Memory and Memory Cards Camera data, including images and movies, can be hot immediately after using a card reader or similar device, check that the poweron lamp and the monitor are ...for use the camera's internal memory for details on a memory card. Press the memory card in either the camera's internal memory (COOLPIX S9500: approximately 23 MB, COOLPIX S9400: approximately 65 MB) or on the above cards. 17 The Basics of Shooting and Playback Preparation 3 Insert a Memory Card ...
...SDXC. • Contact the manufacturer for shooting or playback, first remove the memory card. Internal Memory and Memory Cards Camera data, including images and movies, can be hot immediately after using a card reader or similar device, check that the poweron lamp and the monitor are ...for use the camera's internal memory for details on a memory card. Press the memory card in either the camera's internal memory (COOLPIX S9500: approximately 23 MB, COOLPIX S9400: approximately 65 MB) or on the above cards. 17 The Basics of Shooting and Playback Preparation 3 Insert a Memory Card ...

Reference Manual
Page 40
... extends, and the monitor is displayed and pictures are recorded to charge or replace the battery. Prepare to the internal memory (COOLPIX S9500: approximately 23 MB, COOLPIX S9400: approximately 65 MB). • The number of pictures that can be stored depends on . 2 Check the battery level...; When a memory card is not inserted, C is turned on the remaining capacity of the internal memory or memory card, the image quality, and the image size (image mode) (A62). • The number of exposures remaining Battery Level Display b B N Battery exhausted. Battery level indicator The Basics...
... extends, and the monitor is displayed and pictures are recorded to charge or replace the battery. Prepare to the internal memory (COOLPIX S9500: approximately 23 MB, COOLPIX S9400: approximately 65 MB). • The number of pictures that can be stored depends on . 2 Check the battery level...; When a memory card is not inserted, C is turned on the remaining capacity of the internal memory or memory card, the image quality, and the image size (image mode) (A62). • The number of exposures remaining Battery Level Display b B N Battery exhausted. Battery level indicator The Basics...

Reference Manual
Page 43
...; You can change these settings using the ViewNX 2 software (A78). 21 Set the date and time again. C Imprinting the Shooting Date in Printed Images • Set the date and time before shooting. • You can also be printed without using the Print date setting, print using the Language and... you exit without setting the date and time, O flashes when the shooting screen is displayed. Date and time can imprint the shooting date in images as they are captured by setting Print date in z setup menu, when the daylight saving time function is enabled, the camera's clock is turned...
...; You can change these settings using the ViewNX 2 software (A78). 21 Set the date and time again. C Imprinting the Shooting Date in Printed Images • Set the date and time before shooting. • You can also be printed without using the Print date setting, print using the Language and... you exit without setting the date and time, O flashes when the shooting screen is displayed. Date and time can imprint the shooting date in images as they are captured by setting Print date in z setup menu, when the daylight saving time function is enabled, the camera's clock is turned...


