
User Manual
Page 1
En The Nikon Guide to Digital Photography with the DIGITAL CAMERA
En The Nikon Guide to Digital Photography with the DIGITAL CAMERA

User Manual
Page 3
This icon marks tips, additional information that may be read before using the camera. This icon marks notes, information that should be read before use to prevent damage to the camera. Introduction First Steps Basic Photography Scene Mode More on Photography Movies More on Playback The Shooting Menu The Playback...the information you need, the following symbols and conventions are used: This icon marks cautions, information that should be helpful when using the camera. This icon indicates that more information is available elsewhere in this manual or in the Quick Start Guide.
This icon marks tips, additional information that may be read before using the camera. This icon marks notes, information that should be read before use to prevent damage to the camera. Introduction First Steps Basic Photography Scene Mode More on Photography Movies More on Playback The Shooting Menu The Playback...the information you need, the following symbols and conventions are used: This icon marks cautions, information that should be helpful when using the camera. This icon indicates that more information is available elsewhere in this manual or in the Quick Start Guide.

User Manual
Page 4
..., information that should be removed with a dry cloth. Failure to a Nikon-authorized service representative for inspection after unplugging the product and/or removing the battery. Observe caution when using the camera strap Never place the strap around the neck of the plug should be ...the battery immediately, taking care to a Nikon-authorized service representative for inspection. Keep out of reach of flammable gas, as the result of the camera or battery charger could cause permanent visual impairment. Do not use the camera or battery charger in the presence of...
..., information that should be removed with a dry cloth. Failure to a Nikon-authorized service representative for inspection after unplugging the product and/or removing the battery. Observe caution when using the camera strap Never place the strap around the neck of the plug should be ...the battery immediately, taking care to a Nikon-authorized service representative for inspection. Keep out of reach of flammable gas, as the result of the camera or battery charger could cause permanent visual impairment. Do not use the camera or battery charger in the presence of...

User Manual
Page 5
... the battery, turn the product off and allow the battery to cool. • Discontinue use immediately should you are not pinched by Nikon for an extended period. Playing CD-ROMs on battery power for the purpose, to leakage when fully discharged. Avoid contact with care Be... diopter adjustment control with wet hands. CD-ROMs The CD-ROMs supplied with this product: • Before replacing the battery, turn the camera off . Handle moving parts. Observe due caution when removing memory cards from the subject. Use appropriate cables When connecting cables to prevent liquid...
... the battery, turn the product off and allow the battery to cool. • Discontinue use immediately should you are not pinched by Nikon for an extended period. Playing CD-ROMs on battery power for the purpose, to leakage when fully discharged. Avoid contact with care Be... diopter adjustment control with wet hands. CD-ROMs The CD-ROMs supplied with this product: • Before replacing the battery, turn the camera off . Handle moving parts. Observe due caution when removing memory cards from the subject. Use appropriate cables When connecting cables to prevent liquid...

User Manual
Page 7
The copying or reproduction of paper money, coins, or securities which are circulated in Canada CAUTION This class B digital apparatus meets all requirements of the Canadian Interference Causing Equipment Regulations. Also, do not copy or reproduce passports issued by the government, ... coupon tickets, except when a minimum of necessary copies are stamped "Sample." Do not use this product for business use by means of a scanner, digital camera or other device may be provided for the purpose of Copying or Reproduction Note that simply being copied or reproduced Do not copy or reproduce...
The copying or reproduction of paper money, coins, or securities which are circulated in Canada CAUTION This class B digital apparatus meets all requirements of the Canadian Interference Causing Equipment Regulations. Also, do not copy or reproduce passports issued by the government, ... coupon tickets, except when a minimum of necessary copies are stamped "Sample." Do not use this product for business use by means of a scanner, digital camera or other device may be provided for the purpose of Copying or Reproduction Note that simply being copied or reproduced Do not copy or reproduce...
User Manual
Page 8
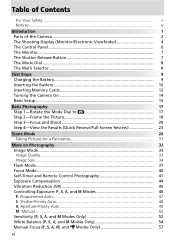
Table of Contents For Your Safety ii Notices...iv Introduction 1 Parts of the Camera 2 The Shooting Display (Monitor/Electronic Viewfinder 4 The Control Panel 6 The Monitor...7 The Shutter-Release Button 7 The Mode Dial 8 The Multi Selector 8 First ...Steps 9 Charging the Battery 9 Inserting the Battery 10 Inserting Memory Cards 12 Turning the Camera On 14 Basic Setup ...15 Basic Photography 17 Step 1-Rotate the Mode Dial to 17 Step 2-Frame the Picture 18 Step 3-Focus and Shoot 20...
Table of Contents For Your Safety ii Notices...iv Introduction 1 Parts of the Camera 2 The Shooting Display (Monitor/Electronic Viewfinder 4 The Control Panel 6 The Monitor...7 The Shutter-Release Button 7 The Mode Dial 8 The Multi Selector 8 First ...Steps 9 Charging the Battery 9 Inserting the Battery 10 Inserting Memory Cards 12 Turning the Camera On 14 Basic Setup ...15 Basic Photography 17 Step 1-Rotate the Mode Dial to 17 Step 2-Frame the Picture 18 Step 3-Focus and Shoot 20...

User Manual
Page 9
Movies 59 Movie Mode...59 Recording Movies 61 Viewing Movies 64 More on Playback 65 Viewing Pictures on the Camera 65 Viewing Pictures on TV 75 Viewing Pictures on a Computer 76 Printing Pictures 79 The Shooting Menu 85 Metering ...87 Continuous...88 Best Shot Selector (...
Movies 59 Movie Mode...59 Recording Movies 61 Viewing Movies 64 More on Playback 65 Viewing Pictures on the Camera 65 Viewing Pictures on TV 75 Viewing Pictures on a Computer 76 Printing Pictures 79 The Shooting Menu 85 Metering ...87 Continuous...88 Best Shot Selector (...
User Manual
Page 10
... rechargeable Li-ion batteries not approved by Nikon specifically for Your Camera 145 Error Messages 148 Troubleshooting 151 Specifications 154 Index...157 Use Only Nikon Brand Electronic Accessories Nikon COOLPIX cameras are engineered and proven to operate within the operational and safety requirements of this Nikon digital camera are designed to the highest standards and...
... rechargeable Li-ion batteries not approved by Nikon specifically for Your Camera 145 Error Messages 148 Troubleshooting 151 Specifications 154 Index...157 Use Only Nikon Brand Electronic Accessories Nikon COOLPIX cameras are engineered and proven to operate within the operational and safety requirements of this Nikon digital camera are designed to the highest standards and...

User Manual
Page 11
...of a Nikon COOLPIX 8800 digital camera. Introduction Introduction Thank you enjoy taking the camera on a trip), take a test shot to ensure that may be held liable for the second eyelet. ቢ ባ The Lens Cap When replacing or removing the lens cap, press the tabs on digital imaging and .... Repeat for damages or lost profits that the camera is available on-line at weddings or before use, and keep up-to-date with your Nikon digital camera. Attaching the Camera Strap Attach the camera strap as shown below . Read this manual thoroughly before taking...
...of a Nikon COOLPIX 8800 digital camera. Introduction Introduction Thank you enjoy taking the camera on a trip), take a test shot to ensure that may be held liable for the second eyelet. ቢ ባ The Lens Cap When replacing or removing the lens cap, press the tabs on digital imaging and .... Repeat for damages or lost profits that the camera is available on-line at weddings or before use, and keep up-to-date with your Nikon digital camera. Attaching the Camera Strap Attach the camera strap as shown below . Read this manual thoroughly before taking...

User Manual
Page 12
Parts of the Camera Introduction Accessory shoe cover ( 104) Control panel ( 6) (flash mode) button ( 37) (LCD illuminator) button ( 6) Mode dial ( 8) (exposure compensation) button ( 44) Voice memo record/ playback ...
Parts of the Camera Introduction Accessory shoe cover ( 104) Control panel ( 6) (flash mode) button ( 37) (LCD illuminator) button ( 6) Mode dial ( 8) (exposure compensation) button ( 44) Voice memo record/ playback ...

User Manual
Page 13
Introduction (monitor) button ( 4) Eyelet for camera strap (× 2) Electronic viewfinder ( 4, 5) Monitor ( 4, 5, 7) AE/AF-L (AE/AF lock) button ( 22, 138) Zoom ( / ) buttons ( 18, 67, 70) Command dial Memory card slot ( ... control ( 19) Interface connector cover Vibration reduction (VR) switch ( 18, 45) Lens ring DC-IN connector ( 11) /MF (focus mode/ manual focus) button ( 40, 57) Digital I/O (USB) and audio/video (A/V) out connector ( 75, 77, 80) Speaker ( 64, 74) 3
Introduction (monitor) button ( 4) Eyelet for camera strap (× 2) Electronic viewfinder ( 4, 5) Monitor ( 4, 5, 7) AE/AF-L (AE/AF lock) button ( 22, 138) Zoom ( / ) buttons ( 18, 67, 70) Command dial Memory card slot ( ... control ( 19) Interface connector cover Vibration reduction (VR) switch ( 18, 45) Lens ring DC-IN connector ( 11) /MF (focus mode/ manual focus) button ( 40, 57) Digital I/O (USB) and audio/video (A/V) out connector ( 75, 77, 80) Speaker ( 64, 74) 3
User Manual
Page 14
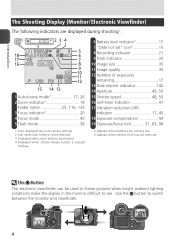
... 26 2 Zoom indicator3 18 Folder name 25, 116, 133 3 Focus indicator4 20 4 Focus mode 40 5 Flash mode 38 1 Icons displayed vary with camera settings. 2 Icon varies with mode or scene selected. 3 Displayed when zoom buttons are pressed. 4 Displayed when shutter-release button is pressed halfway. 6 Battery...17, 45 18 Exposure compensation 44 19 Exposure/focus lock........... 31, 63, 98 5 Appears when batteries are running low. 6 Appears when camera clock has not been set. The Button The electronic viewfinder can be used to frame pictures when bright ambient lighting conditions make ...
... 26 2 Zoom indicator3 18 Folder name 25, 116, 133 3 Focus indicator4 20 4 Focus mode 40 5 Flash mode 38 1 Icons displayed vary with camera settings. 2 Icon varies with mode or scene selected. 3 Displayed when zoom buttons are pressed. 4 Displayed when shutter-release button is pressed halfway. 6 Battery...17, 45 18 Exposure compensation 44 19 Exposure/focus lock........... 31, 63, 98 5 Appears when batteries are running low. 6 Appears when camera clock has not been set. The Button The electronic viewfinder can be used to frame pictures when bright ambient lighting conditions make ...

User Manual
Page 15
... 34 User Settings bank 95 7 Five focus areas are displayed when Manual is selected in scene mode ( 26). The active focus area lights when the camera focuses. Current settings Histogram (P, S, A only; not displayed when AE lock is selected in P, S, A, or M mode ( 100) or (Portrait), (Night portrait), or (Close up) is on...
... 34 User Settings bank 95 7 Five focus areas are displayed when Manual is selected in scene mode ( 26). The active focus area lights when the camera focuses. Current settings Histogram (P, S, A only; not displayed when AE lock is selected in P, S, A, or M mode ( 100) or (Portrait), (Night portrait), or (Close up) is on...

User Manual
Page 17
... remain locked while the shutter-release button is pressed halfway. Failure to observe this position. The camera sets focus and exposure when the button is kept in final picture. † If camera is on, monitor turns off and electronic viewfinder turns on automatically. Press halfway to... lock focus and exposure Press all the way down to shoot Do Not Use Excessive Force Do not use Stow on camera body 0° 90° 180° Range of rotation Storage position† Frame self-portraits* * Monitor shows mirror image of the way down...
... remain locked while the shutter-release button is pressed halfway. Failure to observe this position. The camera sets focus and exposure when the button is kept in final picture. † If camera is on, monitor turns off and electronic viewfinder turns on automatically. Press halfway to... lock focus and exposure Press all the way down to shoot Do Not Use Excessive Force Do not use Stow on camera body 0° 90° 180° Range of rotation Storage position† Frame self-portraits* * Monitor shows mirror image of the way down...

User Manual
Page 18
...64257;fteen "scenes" suited to the mode dial. Setup ( 130) Display the setup menu, where you can perform such tasks as setting the camera clock and adjusting monitor brightness. The Multi Selector The multi selector is used to make selection Display sub-menu, move cursor left Move cursor down... 8 Press center to navigate through the camera menus. Introduction The Mode Dial To select a mode, align the mode icon with the mark next to different subjects or shooting conditions and...
...64257;fteen "scenes" suited to the mode dial. Setup ( 130) Display the setup menu, where you can perform such tasks as setting the camera clock and adjusting monitor brightness. The Multi Selector The multi selector is used to make selection Display sub-menu, move cursor left Move cursor down... 8 Press center to navigate through the camera menus. Introduction The Mode Dial To select a mode, align the mode icon with the mark next to different subjects or shooting conditions and...

User Manual
Page 19
... as follows: CHARGE lamp starts blinking when battery is complete when lamp stops blinking. Battery error. It may be necessary to retailer or Nikon-autho- consult with non-compatible batteries. The MH-56 is for use only. rized service representative. Do not use abroad; The supplied ... fully charged. Otherwise unplug charger and remove battery immediately and take both devices to purchase another cable for use with a local Nikon-authorized retailer or service representative. 9 Charge the battery before charging. First Steps First Steps Charging the Battery The...
... as follows: CHARGE lamp starts blinking when battery is complete when lamp stops blinking. Battery error. It may be necessary to retailer or Nikon-autho- consult with non-compatible batteries. The MH-56 is for use only. rized service representative. Do not use abroad; The supplied ... fully charged. Otherwise unplug charger and remove battery immediately and take both devices to purchase another cable for use with a local Nikon-authorized retailer or service representative. 9 Charge the battery before charging. First Steps First Steps Charging the Battery The...

User Manual
Page 20
First Steps Inserting the Battery 1 Turn the camera off 2 Open the battery-chamber cover Slide the battery-chamber cover latch to the 1 2 position (ቢ) and flip the battery-chamber cover open (ባ). 3 ... be sure the battery is in the label inside the battery-chamber cover. Inserting Batteries Inserting the battery upside down or backwards could damage the camera. Check to the position (ባ). 10
First Steps Inserting the Battery 1 Turn the camera off 2 Open the battery-chamber cover Slide the battery-chamber cover latch to the 1 2 position (ቢ) and flip the battery-chamber cover open (ባ). 3 ... be sure the battery is in the label inside the battery-chamber cover. Inserting Batteries Inserting the battery upside down or backwards could damage the camera. Check to the position (ባ). 10

User Manual
Page 21
... Note that the battery may become hot during use an EH-54 AC adapter (available separately; 143). Alternative Power Sources To power the camera continuously for the battery to the point that the battery may become hot during use , remove it from charging normally. Recycle Used Batteries ... longer functions. Replace the battery-chamber cover when the battery pack is not in the vicinity of current even when off before charging. The camera and battery charger draw minute amounts of 5-35 °C (41- 95 °F). First Steps EN-EL7 Batteries Before using the optional MB...
... Note that the battery may become hot during use an EH-54 AC adapter (available separately; 143). Alternative Power Sources To power the camera continuously for the battery to the point that the battery may become hot during use , remove it from charging normally. Recycle Used Batteries ... longer functions. Replace the battery-chamber cover when the battery pack is not in the vicinity of current even when off before charging. The camera and battery charger draw minute amounts of 5-35 °C (41- 95 °F). First Steps EN-EL7 Batteries Before using the optional MB...

User Manual
Page 22
... Remove the notice and read the instructions. 3 Insert a memory card Check that the eject button is all the way down or backwards could damage the camera or the card. See "Technical Notes: Approved Memory Cards" ( 144) for a list of insertion First Steps Inserting Memory Cards The... camera stores pictures on CompactFlash™ memory cards. nals first. DO NOT INSERT: Sideways Upside down 4 Close the memory card slot cover Format Memory Cards ...
... Remove the notice and read the instructions. 3 Insert a memory card Check that the eject button is all the way down or backwards could damage the camera or the card. See "Technical Notes: Approved Memory Cards" ( 144) for a list of insertion First Steps Inserting Memory Cards The... camera stores pictures on CompactFlash™ memory cards. nals first. DO NOT INSERT: Sideways Upside down 4 Close the memory card slot cover Format Memory Cards ...

User Manual
Page 23
... button to pop it up when the card-slot cover is closed, closing the cover will partially eject the memory card, causing errors when the camera is turned on. tion when removing memory cards. 1 First Steps 13 Note that 2 memory cards may become hot during use; Removing Memory Cards Memory... cards can then be removed without loss of data when the camera is down before inserting memory cards. observe due cau- The card can be removed by hand. Be sure the eject button is off and ...
... button to pop it up when the card-slot cover is closed, closing the cover will partially eject the memory card, causing errors when the camera is turned on. tion when removing memory cards. 1 First Steps 13 Note that 2 memory cards may become hot during use; Removing Memory Cards Memory... cards can then be removed without loss of data when the camera is down before inserting memory cards. observe due cau- The card can be removed by hand. Be sure the eject button is off and ...


