
L12 User's Manual
Page 9
...MENU Button 9 Help Displays 9 Preparation for Shooting 10 Insert the Batteries 10 Supported Batteries 10 Turning On and Off the Camera 10 Setting Display Language, Date, and Time 12 Inserting Memory Cards 14 Removing Memory Cards 15 L Basic Photography and Playback: Auto Mode 16 Step1 Select L (Auto) ...Mode and Turn the Camera On 16 Step2 Frame a Picture 18 Step3 Focus and Shoot 20 Step4 Viewing/Deleting Pictures ...
...MENU Button 9 Help Displays 9 Preparation for Shooting 10 Insert the Batteries 10 Supported Batteries 10 Turning On and Off the Camera 10 Setting Display Language, Date, and Time 12 Inserting Memory Cards 14 Removing Memory Cards 15 L Basic Photography and Playback: Auto Mode 16 Step1 Select L (Auto) ...Mode and Turn the Camera On 16 Step2 Frame a Picture 18 Step3 Focus and Shoot 20 Step4 Viewing/Deleting Pictures ...
L12 User's Manual
Page 18
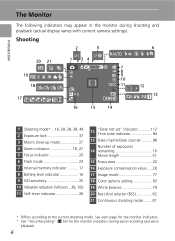
... monitor during voice recording and voice playback. 6 Shooting 20 21 19 18 2 5 1 34 AUTO 7 8 9 10 10 11 6 12 +1.0 13 17 9999 16 15 14 1 Shooting mode*... 16, 29, 38, 39, 49 2 Exposure lock 37 3 Macro close-up ...Battery level indicator 16 9 ISO sensitivity 25 10 Vibration reduction (VR) icon....38, 100 11 Self-timer indicator 26 12 "Date not set" indicator 112 Time zone indicator 94 13 Date imprint/Date counter .......... 98 Number of exposures 14 remaining... 55) for the monitor indicators during shooting and playback (actual display varies with current camera settings).
... monitor during voice recording and voice playback. 6 Shooting 20 21 19 18 2 5 1 34 AUTO 7 8 9 10 10 11 6 12 +1.0 13 17 9999 16 15 14 1 Shooting mode*... 16, 29, 38, 39, 49 2 Exposure lock 37 3 Macro close-up ...Battery level indicator 16 9 ISO sensitivity 25 10 Vibration reduction (VR) icon....38, 100 11 Self-timer indicator 26 12 "Date not set" indicator 112 Time zone indicator 94 13 Date imprint/Date counter .......... 98 Number of exposures 14 remaining... 55) for the monitor indicators during shooting and playback (actual display varies with current camera settings).
L12 User's Manual
Page 19
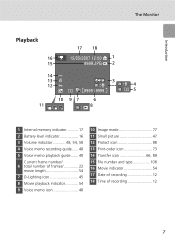
Introduction The Monitor Playback 16 15 17 18 15/05/2007 12:00 1 9999.JPG 2 14 13 12 3 4 9999 /9999 5 10 9 7 6 11 8 1 Internal memory indicator .......... 17 2 Battery level indicator 16 3 Volume indicator 48, 54, 58 4 Voice memo recording guide...... 48 5 Voice memo playback ... of frames 22 movie length 54 7 D-Lighting icon 45 8 Movie playback indicator 54 9 Voice memo icon 48 10 Image mode 77 11 Small picture 47 12 Protect icon 88 13 Print-order icon 73 14 Transfer icon 66, 89 15 File number and type 108 16 Movie indicator 54 17 Date...
Introduction The Monitor Playback 16 15 17 18 15/05/2007 12:00 1 9999.JPG 2 14 13 12 3 4 9999 /9999 5 10 9 7 6 11 8 1 Internal memory indicator .......... 17 2 Battery level indicator 16 3 Volume indicator 48, 54, 58 4 Voice memo recording guide...... 48 5 Voice memo playback ... of frames 22 movie length 54 7 D-Lighting icon 45 8 Movie playback indicator 54 9 Voice memo icon 48 10 Image mode 77 11 Small picture 47 12 Protect icon 88 13 Print-order icon 73 14 Transfer icon 66, 89 15 File number and type 108 16 Movie indicator 54 17 Date...

L12 User's Manual
Page 24
...] menu (c 94) in the setup menu. Setting Display Language, Date, and Time A language-selection dialog is displayed the first time the camera is turned on. 1 Turn on the camera. • The power-on lamp (green) will light for Shooting 2 Press the multi selector G, H, I or J to choose the ... No Yes Time zone London, Casablanca DaylightSaving l Daylight Saving Time If daylight saving time is in the time zone menu and set back one hour. 12 The camera's clock is selected, the date and time will turn on [DaylightSaving] in effect, turn [DaylightSaving] off . 3 Press G and then J and ...
...] menu (c 94) in the setup menu. Setting Display Language, Date, and Time A language-selection dialog is displayed the first time the camera is turned on. 1 Turn on the camera. • The power-on lamp (green) will light for Shooting 2 Press the multi selector G, H, I or J to choose the ... No Yes Time zone London, Casablanca DaylightSaving l Daylight Saving Time If daylight saving time is in the time zone menu and set back one hour. 12 The camera's clock is selected, the date and time will turn on [DaylightSaving] in effect, turn [DaylightSaving] off . 3 Press G and then J and ...

L12 User's Manual
Page 28
Batteries low; Replace batteries. 12 Number of exposures remaining Number of Exposures Remaining The number of pictures that can be stored...for the image mode setting (c 78). 16 Basic Photography and Playback: Auto Mode 2 Turn the camera on. • The power-on . ON / OFF 3 Check the battery level and number of digital cameras. 1 Slide the mode selector to take pictures in L (auto) mode, an automatic, "point-... fully charged. ready spare batteries. Basic Photography and Playback: Auto Mode Step1 Select L (Auto) Mode and Turn the Camera On This section describes how to L.
Batteries low; Replace batteries. 12 Number of exposures remaining Number of Exposures Remaining The number of pictures that can be stored...for the image mode setting (c 78). 16 Basic Photography and Playback: Auto Mode 2 Turn the camera on. • The power-on . ON / OFF 3 Check the battery level and number of digital cameras. 1 Slide the mode selector to take pictures in L (auto) mode, an automatic, "point-... fully charged. ready spare batteries. Basic Photography and Playback: Auto Mode Step1 Select L (Auto) Mode and Turn the Camera On This section describes how to L.

L12 User's Manual
Page 29
...Vibration reduction can be applied to memory card. This menu allows you plan to the shooting conditions. Step1 Select L (Auto) Mode and Turn the Camera On Indicators in L (auto) Mode Shooting mode L displayed in auto mode Internal memory indicator Pictures will be recorded to effec- Pressing m in... Functions in L (auto) Mode In L (auto) mode, macro close-up according to use the picture. Basic Photography and Playback: Auto Mode 12 Image mode Choose from seven options depending on how you to specify the image mode (c 77), white balance setting (c 79), and to apply continuous...
...Vibration reduction can be applied to memory card. This menu allows you plan to the shooting conditions. Step1 Select L (Auto) Mode and Turn the Camera On Indicators in L (auto) Mode Shooting mode L displayed in auto mode Internal memory indicator Pictures will be recorded to effec- Pressing m in... Functions in L (auto) Mode In L (auto) mode, macro close-up according to use the picture. Basic Photography and Playback: Auto Mode 12 Image mode Choose from seven options depending on how you to specify the image mode (c 77), white balance setting (c 79), and to apply continuous...
L12 User's Manual
Page 30
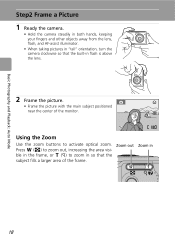
... W Zoom in the frame, or v (k) to activate optical zoom. Basic Photography and Playback: Auto Mode Step2 Frame a Picture 1 Ready the camera. • Hold the camera steadily in both hands, keeping your fingers and other objects away from the lens, flash, and AF-assist illuminator. • When taking pictures in... "tall" orientation, turn the camera clockwise so that the subject fills a larger area of the monitor. 12 Using the Zoom Use the zoom buttons to zoom in so that the built-in flash is above the lens...
... W Zoom in the frame, or v (k) to activate optical zoom. Basic Photography and Playback: Auto Mode Step2 Frame a Picture 1 Ready the camera. • Hold the camera steadily in both hands, keeping your fingers and other objects away from the lens, flash, and AF-assist illuminator. • When taking pictures in... "tall" orientation, turn the camera clockwise so that the subject fills a larger area of the monitor. 12 Using the Zoom Use the zoom buttons to zoom in so that the built-in flash is above the lens...

L12 User's Manual
Page 31
... and Playback: Auto Mode Step2 Frame a Picture When the camera is zoomed in effect j Digital Zoom Unlike optical zoom, data from the camera's image sensor are processed digitally with the highest level of 12×. The subject is magnified up to 3×) Zoom indicator turns yellow when digital zoom is in to 4×, for a total magnification...
... and Playback: Auto Mode Step2 Frame a Picture When the camera is zoomed in effect j Digital Zoom Unlike optical zoom, data from the camera's image sensor are processed digitally with the highest level of 12×. The subject is magnified up to 3×) Zoom indicator turns yellow when digital zoom is in to 4×, for a total magnification...

L12 User's Manual
Page 32
... and Playback: Auto Mode Step3 Focus and Shoot 1 Press the shutter-release button halfway. • The camera focuses on and adjusts the exposure to the subject in the focus area. • When the subject is...shutter-release button all the way down . • The picture will blink. Do not turn the camera off, open the battery-chamber cover and the memory card slot cover, eject the memory card, or...source while these circumstances could result in loss of the way down . When the camera is not displayed. 12 2 Press the shutter-release button the rest of 20 data or in effect, the focus...
... and Playback: Auto Mode Step3 Focus and Shoot 1 Press the shutter-release button halfway. • The camera focuses on and adjusts the exposure to the subject in the focus area. • When the subject is...shutter-release button all the way down . • The picture will blink. Do not turn the camera off, open the battery-chamber cover and the memory card slot cover, eject the memory card, or...source while these circumstances could result in loss of the way down . When the camera is not displayed. 12 2 Press the shutter-release button the rest of 20 data or in effect, the focus...
L12 User's Manual
Page 33
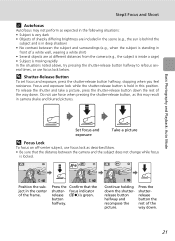
... is standing in front of a white wall, wearing a white shirt) • Several objects are at different distances from the camera (e.g., the subject is inside a cage) • Subject is locked. 12 Position the subject in the center of the way down. Step3 Focus and Shoot k Autofocus Autofocus may result in.... To release the shutter and take a picture, press the shutter-release button down the rest of the frame. 12 Press the Confirm that the distance between the camera and the subject does not change while focus is moving rapidly In the situations noted above, try pressing the shutter-...
... is standing in front of a white wall, wearing a white shirt) • Several objects are at different distances from the camera (e.g., the subject is inside a cage) • Subject is locked. 12 Position the subject in the center of the way down. Step3 Focus and Shoot k Autofocus Autofocus may result in.... To release the shutter and take a picture, press the shutter-release button down the rest of the frame. 12 Press the Confirm that the distance between the camera and the subject does not change while focus is moving rapidly In the situations noted above, try pressing the shutter-...
L12 User's Manual
Page 36
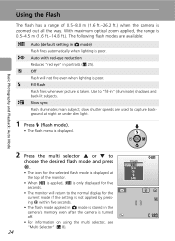
...fires whenever picture is 0.5-4.5 m (1.6 ft.-14.8 ft.). Use to capture background at the top of 0.5-8.0 m (1.6 ft.-26.2 ft.) when the camera is zoomed out all the way. With maximum optical zoom applied, the range is taken. slow shutter speeds are available: z Auto (default setting in... The flash mode applied in L mode is stored in " (illuminate) shadows and back-lit subjects. Flash 12 The following flash modes are used to "fill-in the camera's memory even after the camera is turned off. • For information on using the multi selector, see "Multi Selector" (c 8). Using...
...fires whenever picture is 0.5-4.5 m (1.6 ft.-14.8 ft.). Use to capture background at the top of 0.5-8.0 m (1.6 ft.-26.2 ft.) when the camera is zoomed out all the way. With maximum optical zoom applied, the range is taken. slow shutter speeds are available: z Auto (default setting in... The flash mode applied in L mode is stored in " (illuminate) shadows and back-lit subjects. Flash 12 The following flash modes are used to "fill-in the camera's memory even after the camera is turned off. • For information on using the multi selector, see "Multi Selector" (c 8). Using...
L12 User's Manual
Page 38
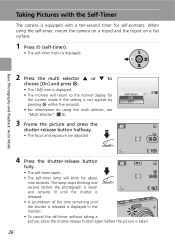
... 2 Press the multi selector G or H to the normal display for the current mode if the setting is displayed. When using the self-timer, mount the camera on a tripod and the tripod on a flat surface. 1 Press H (self-timer). • The self-timer menu is not applied by pressing d within five...press the shutter-release button halfway. • The focus and exposure are adjusted. The lamp stops blinking one second before the photograph is taken 12 and remains lit until the shutter is released. • A countdown of the time remaining until the shutter is released is displayed in the monitor...
... 2 Press the multi selector G or H to the normal display for the current mode if the setting is displayed. When using the self-timer, mount the camera on a tripod and the tripod on a flat surface. 1 Press H (self-timer). • The self-timer menu is not applied by pressing d within five...press the shutter-release button halfway. • The focus and exposure are adjusted. The lamp stops blinking one second before the photograph is taken 12 and remains lit until the shutter is released. • A countdown of the time remaining until the shutter is released is displayed in the monitor...
L12 User's Manual
Page 40
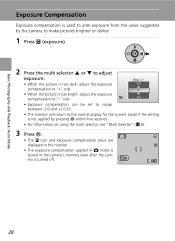
era is not applied by the camera to adjust exposure. Basic Photography and Playback: Auto Mode Exposure Compensation Exposure compensation is used to alter exposure from .... 1 Press I icon and exposure compensation value are displayed in the monitor. • The exposure compensation applied in L mode is stored in the camera's memory even after the cam- Exp. +/- • When the picture is too dark: adjust the exposure compensation to "+" side. • When... EV. • The monitor will return to the normal display for the current mode if the setting is turned off. 12 28
era is not applied by the camera to adjust exposure. Basic Photography and Playback: Auto Mode Exposure Compensation Exposure compensation is used to alter exposure from .... 1 Press I icon and exposure compensation value are displayed in the monitor. • The exposure compensation applied in L mode is stored in the camera's memory even after the cam- Exp. +/- • When the picture is too dark: adjust the exposure compensation to "+" side. • When... EV. • The monitor will return to the normal display for the current mode if the setting is turned off. 12 28
L12 User's Manual
Page 42
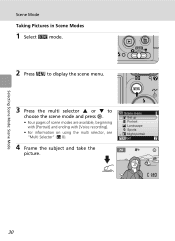
Scene menu Set up Portrait Landscape Sports Night portrait Exit 12 30 W T 3 Press the multi selector G or H to display the scene menu. Selecting Scene Mode: Scene Mode Scene Mode Taking Pictures in Scene Modes 1 Select b mode. 2 Press m to choose the scene mode and press d. • Four pages of scene modes are available, beginning with [Portrait] and ending with [Voice recording]. • For information on using the multi selector, see "Multi Selector" (c 8). 4 Frame the subject and take the picture.
Scene menu Set up Portrait Landscape Sports Night portrait Exit 12 30 W T 3 Press the multi selector G or H to display the scene menu. Selecting Scene Mode: Scene Mode Scene Mode Taking Pictures in Scene Modes 1 Select b mode. 2 Press m to choose the scene mode and press d. • Four pages of scene modes are available, beginning with [Portrait] and ending with [Voice recording]. • For information on using the multi selector, see "Multi Selector" (c 8). 4 Frame the subject and take the picture.
L12 User's Manual
Page 48
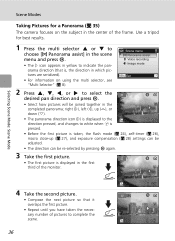
...the flash mode (c 24), self-timer (c 26), macro close-up (S), or down (T). • The panorama direction icon (E) is displayed to the 12 direction pressed, and changes to select the desired pan direction and press d. • Select how pictures will be re-selected by pressing d again. 3 ...adjusted. • The direction can be joined together in yellow to complete the scene. 11 36 Use a tripod for a Panorama (c 35) The camera focuses on the subject in which pictures are serialized). • For information on using the multi selector, see "Multi Selector" (c 8). sary number ...
...the flash mode (c 24), self-timer (c 26), macro close-up (S), or down (T). • The panorama direction icon (E) is displayed to the 12 direction pressed, and changes to select the desired pan direction and press d. • Select how pictures will be re-selected by pressing d again. 3 ...adjusted. • The direction can be joined together in yellow to complete the scene. 11 36 Use a tripod for a Panorama (c 35) The camera focuses on the subject in which pictures are serialized). • For information on using the multi selector, see "Multi Selector" (c 8). sary number ...
L12 User's Manual
Page 50
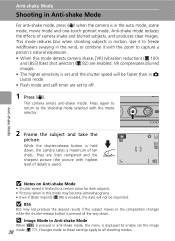
..., the menu is displayed to enable set the image 38 mode (c 77). l Image Mode in Anti-shake Mode When m is pressed in this mode detects camera shake, [VR] (vibration reduction) (c 100) and [BSS] (best shot selector) (c 82) are enabled. VR compensates blurred images. • The higher ...mode and self-timer are then compared and the sharpest picture (the picture with highest 12 level of detail) is saved. Press again to return to all the way down , the camera takes a maximum of camera shake and blurred subjects, and produces clear images. Changes made to these settings apply...
..., the menu is displayed to enable set the image 38 mode (c 77). l Image Mode in Anti-shake Mode When m is pressed in this mode detects camera shake, [VR] (vibration reduction) (c 100) and [BSS] (best shot selector) (c 82) are enabled. VR compensates blurred images. • The higher ...mode and self-timer are then compared and the sharpest picture (the picture with highest 12 level of detail) is saved. Press again to return to all the way down , the camera takes a maximum of camera shake and blurred subjects, and produces clear images. Changes made to these settings apply...
L12 User's Manual
Page 90
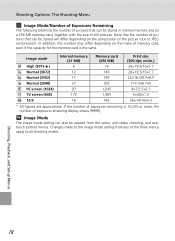
... any of still pictures. Image mode F High (3072A) E Normal (3072) d Normal (2592) e Normal (2048) h PC screen (1024) i TV screen (640) B 16:9 Internal memory (21 MB) 6 12 17 27 93 175 16 Memory card (256 MB) 70 140 195 305 1,045 1,965 185 Print size (300 dpi; Note that the number of...
... any of still pictures. Image mode F High (3072A) E Normal (3072) d Normal (2592) e Normal (2048) h PC screen (1024) i TV screen (640) B 16:9 Internal memory (21 MB) 6 12 17 27 93 175 16 Memory card (256 MB) 70 140 195 305 1,045 1,965 185 Print size (300 dpi; Note that the number of...
L12 User's Manual
Page 106
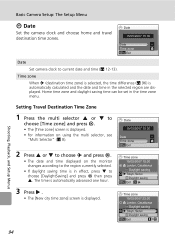
... Selector" (c 8). 2 Press G or H to choose Y and press d. • The date and time displayed on the monitor changes according to current date and time (c 12-13). Date 15/05/2007 15:30 Date -- Time zone Exit Time zone 15/05/2007 15:30 London, Casablanca Daylight saving Tokyo, Seoul Daylight... G or H to choose [Time zone] and press d. • The [Time zone] screen is in the time zone menu. Basic Camera Setup: The Setup Menu W Date Set the camera clock and choose home and travel destination time zones. Time zone When Y (destination time zone) is selected, the time difference (c 96) ...
... Selector" (c 8). 2 Press G or H to choose Y and press d. • The date and time displayed on the monitor changes according to current date and time (c 12-13). Date 15/05/2007 15:30 Date -- Time zone Exit Time zone 15/05/2007 15:30 London, Casablanca Daylight saving Tokyo, Seoul Daylight... G or H to choose [Time zone] and press d. • The [Time zone] screen is in the time zone menu. Basic Camera Setup: The Setup Menu W Date Set the camera clock and choose home and travel destination time zones. Time zone When Y (destination time zone) is selected, the time difference (c 96) ...
L12 User's Manual
Page 108
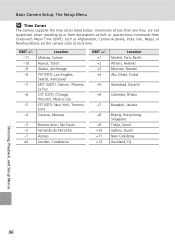
...: The Setup Menu l Time Zones The camera supports the time zones listed below. GMT +/- -11 -10 -9 -8 -7 -6 -5 -4 Location Midway, Samoa Hawaii, Tahiti Alaska, Anchorage PST (PDT): Los Angeles, Seattle, Vancouver MST (MDT): ..., Helsinki Moscow, Nairobi Abu Dhabi, Dubai +5 Islamabad, Karachi +6 Colombo, Dhaka +7 Bangkok, Jakarta +8 Beijing, Hong Kong, Singapore +9 Tokyo, Seoul +10 Sydney, Guam +11 New Caledonia +12 Auckland, Fiji Shooting, Playback, and Setup Menus 96 when travelling to local time. Increments of less than one hour are not supported; or quarter-hour...
...: The Setup Menu l Time Zones The camera supports the time zones listed below. GMT +/- -11 -10 -9 -8 -7 -6 -5 -4 Location Midway, Samoa Hawaii, Tahiti Alaska, Anchorage PST (PDT): Los Angeles, Seattle, Vancouver MST (MDT): ..., Helsinki Moscow, Nairobi Abu Dhabi, Dubai +5 Islamabad, Karachi +6 Colombo, Dhaka +7 Bangkok, Jakarta +8 Beijing, Hong Kong, Singapore +9 Tokyo, Seoul +10 Sydney, Guam +11 New Caledonia +12 Auckland, Fiji Shooting, Playback, and Setup Menus 96 when travelling to local time. Increments of less than one hour are not supported; or quarter-hour...

L12 User's Manual
Page 109
...following options are displayed for information on indicators in the monitor. The current settings or operation guide is displayed to help frame pictures; Basic Camera Setup: The Setup Menu Z Monitor Settings The following display options are displayed in the monitor (c 6). other indicators are available: Photo ... monitor during shooting and playback mode. Shooting mode Playback mode Show info 15/05/2007 15:30 0004.JPG 12 4/ 4 Auto info The same information displayed when [Show info] is selected is (default setting) shown, but icons are displayed for monitor ...
...following options are displayed for information on indicators in the monitor. The current settings or operation guide is displayed to help frame pictures; Basic Camera Setup: The Setup Menu Z Monitor Settings The following display options are displayed in the monitor (c 6). other indicators are available: Photo ... monitor during shooting and playback mode. Shooting mode Playback mode Show info 15/05/2007 15:30 0004.JPG 12 4/ 4 Auto info The same information displayed when [Show info] is selected is (default setting) shown, but icons are displayed for monitor ...

