
User Manual
Page 2
...this manual assume that should be read before using the camera for the first time, read before use the product. A This icon marks notes; Digitutor Digitutor, a series of a Nikon single-lens reflex (SLR) digital camera. information that should be read the safety instructions in... movie form, is available from the following symbols and conventions are shown in the camera monitor are used . To get the most from...
...this manual assume that should be read before using the camera for the first time, read before use the product. A This icon marks notes; Digitutor Digitutor, a series of a Nikon single-lens reflex (SLR) digital camera. information that should be read the safety instructions in... movie form, is available from the following symbols and conventions are shown in the camera monitor are used . To get the most from...
User Manual
Page 4
...Release Modes Can I take photos in quick succession? 111 How do I take pictures with the self-timer? 114 i Focus Can I choose how the camera focuses? 97 Can I choose the focus point? 103 i Exposure Can I make photos brighter or darker? 137 How do I preserve details in shadows...unwanted photos? 251 ii How can I get more pictures on the memory card? 90, 93 Viewing Photographs 0 i Playback How do I view photographs on the camera? 235 How do I view more information about a photo? 238 Can I view photos in the monitor (C live view)? Can I take snapshots? Q&A Index...
...Release Modes Can I take photos in quick succession? 111 How do I take pictures with the self-timer? 114 i Focus Can I choose how the camera focuses? 97 Can I choose the focus point? 103 i Exposure Can I make photos brighter or darker? 137 How do I preserve details in shadows...unwanted photos? 251 ii How can I get more pictures on the memory card? 90, 93 Viewing Photographs 0 i Playback How do I view photographs on the camera? 235 How do I view more information about a photo? 238 Can I view photos in the monitor (C live view)? Can I take snapshots? Q&A Index...
User Manual
Page 5
... Where should I use? 192 What other accessories are available for servicing and repairs? 405 iii How do I set the camera clock? How do I get help for a menu or message? 0 19 316, 317 38 30, 348 36 207, 295, 305 22 Connections 0 How do I ... Maintenance and Optional Accessories 0 What memory cards can I use? 442 What lenses can I use? 385 What optional flash units (Speedlights) can I take my camera for my camera? How do I keep the displays from turning off? How do I use the menus? Retouching Photographs 0 How do I create retouched copies of photos? 361 How...
... Where should I use? 192 What other accessories are available for servicing and repairs? 405 iii How do I set the camera clock? How do I get help for a menu or message? 0 19 316, 317 38 30, 348 36 207, 295, 305 22 Connections 0 How do I ... Maintenance and Optional Accessories 0 What memory cards can I use? 442 What lenses can I use? 385 What optional flash units (Speedlights) can I take my camera for my camera? How do I keep the displays from turning off? How do I use the menus? Retouching Photographs 0 How do I create retouched copies of photos? 361 How...
User Manual
Page 6
... Top Control Panel 7 The Rear Control Panel 9 The Viewfinder Display 11 The Information Display 13 The BS-2 Accessory Shoe Cover 17 Tutorial 19 Camera Menus 19 Using Camera Menus 20 Help ...22 First Steps 23 Charge the Battery 23 Insert the Battery 25 Attach a Lens 28 Basic Setup 30 Insert a Memory Card...
... Top Control Panel 7 The Rear Control Panel 9 The Viewfinder Display 11 The Information Display 13 The BS-2 Accessory Shoe Cover 17 Tutorial 19 Camera Menus 19 Using Camera Menus 20 Help ...22 First Steps 23 Charge the Battery 23 Insert the Battery 25 Attach a Lens 28 Basic Setup 30 Insert a Memory Card...
User Manual
Page 10
... 251 The Playback Menu 253 Voice Memos 255 Recording Voice Memos 255 Playing Voice Memos 260 Connections 263 Connecting to a Computer 263 Before Connecting the Camera 263 Direct USB Connection 267 Ethernet and Wireless Networks 269 Printing Photographs 271 Connecting the Printer 272 Printing Pictures One at a Time 273 Printing Multiple...
... 251 The Playback Menu 253 Voice Memos 255 Recording Voice Memos 255 Playing Voice Memos 260 Connections 263 Connecting to a Computer 263 Before Connecting the Camera 263 Direct USB Connection 267 Ethernet and Wireless Networks 269 Printing Photographs 271 Connecting the Printer 272 Printing Pictures One at a Time 273 Printing Multiple...
User Manual
Page 11
... Space 299 Vignette Control 300 Auto Distortion Control 301 Long Exposure NR (Long Exposure Noise Reduction) ...302 High ISO NR 302 A Custom Settings: Fine-Tuning Camera Settings 303 Custom Settings Bank 305 a: Autofocus 307 a1: AF-C Priority Selection 307 a2: AF-S Priority Selection 308 a3: Focus Tracking with Lock-On 309...
... Space 299 Vignette Control 300 Auto Distortion Control 301 Long Exposure NR (Long Exposure Noise Reduction) ...302 High ISO NR 302 A Custom Settings: Fine-Tuning Camera Settings 303 Custom Settings Bank 305 a: Autofocus 307 a1: AF-C Priority Selection 307 a2: AF-S Priority Selection 308 a3: Focus Tracking with Lock-On 309...
User Manual
Page 13
... 340 g1: Assign Fn Button 340 g2: Assign Preview Button 341 g3: Assign Sub-selector Center 342 g4: Assign Shutter Button 343 B The Setup Menu: Camera Setup 344 Format Memory Card 345 Monitor Brightness 345 Image Dust Off Ref Photo 346 Flicker Reduction 348 Time Zone and Date 348 Language 349...
... 340 g1: Assign Fn Button 340 g2: Assign Preview Button 341 g3: Assign Sub-selector Center 342 g4: Assign Shutter Button 343 B The Setup Menu: Camera Setup 344 Format Memory Card 345 Monitor Brightness 345 Image Dust Off Ref Photo 346 Flicker Reduction 348 Time Zone and Date 348 Language 349...
User Manual
Page 14
...Recent Settings 380 Technical Notes 385 Compatible Lenses 385 Other Accessories 391 Attaching a Power Connector and AC Adapter 396 Caring for the Camera 398 Storage 398 Cleaning 398 The Low-Pass Filter 399 "Clean Now 399 "Clean at Startup/Shutdown 400 Manual Cleaning 402 Replacing... the Clock Battery 406 Caring for the Camera and Battery: Cautions 408 Defaults 412 Exposure Program 418 Troubleshooting 419 Error Messages 424 Specifications 430 Calibrating Batteries 440 Approved Memory ...
...Recent Settings 380 Technical Notes 385 Compatible Lenses 385 Other Accessories 391 Attaching a Power Connector and AC Adapter 396 Caring for the Camera 398 Storage 398 Cleaning 398 The Low-Pass Filter 399 "Clean Now 399 "Clean at Startup/Shutdown 400 Manual Cleaning 402 Replacing... the Clock Battery 406 Caring for the Camera and Battery: Cautions 408 Defaults 412 Exposure Program 418 Troubleshooting 419 Error Messages 424 Specifications 430 Calibrating Batteries 440 Approved Memory ...
User Manual
Page 15
... service center for inspection. Should you notice smoke or an Sunlight focused into the camera unusual smell coming from failure to observe the precautions listed in your Nikon product or injury to yourself or to others, read the following symbol: A This icon marks warnings. xiii In the event... adjustment control with your eye to the viewfinder, care should be repaired only by the following safety precautions in their entirety before using this Nikon product. ❚❚ WARNINGS A Keep the sun out of the frame A Turn off immediately in the event of Keep the sun ...
... service center for inspection. Should you notice smoke or an Sunlight focused into the camera unusual smell coming from failure to observe the precautions listed in your Nikon product or injury to yourself or to others, read the following symbol: A This icon marks warnings. xiii In the event... adjustment control with your eye to the viewfinder, care should be repaired only by the following safety precautions in their entirety before using this Nikon product. ❚❚ WARNINGS A Keep the sun out of the frame A Turn off immediately in the event of Keep the sun ...
User Manual
Page 16
...heat. • Do not immerse in injury. A Do not place the strap around the neck of an infant or child Placing the camera strap around the neck of an infant or child could cause an explosion. Observe the following precautions when handling batteries for use in this equipment..., consult a physician immediately. Before removing the battery turn the camera off and allow the battery to leakage when fully discharged. Leaving the device in direct contact with the camera, battery, or charger for extended periods while the devices are prone to cool. •...
...heat. • Do not immerse in injury. A Do not place the strap around the neck of an infant or child Placing the camera strap around the neck of an infant or child could cause an explosion. Observe the following precautions when handling batteries for use in this equipment..., consult a physician immediately. Before removing the battery turn the camera off and allow the battery to leakage when fully discharged. Leaving the device in direct contact with the camera, battery, or charger for extended periods while the devices are prone to cool. •...
User Manual
Page 21
...of this product for business use of third-party rechargeable Li-ion batteries not bearing the Nikon holographic seal shown at right could damage the camera and may be provided for the purpose of making illegal copies or to the highest ...or reproduced by means of a scanner, digital camera, or other device may void your Nikon warranty. The use this electronic circuitry. For more information about Nikon brand accessories, contact a local authorized Nikon dealer. Use Only Nikon Brand Electronic Accessories Nikon cameras are circulated in the batteries overheating, igniting,...
...of this product for business use of third-party rechargeable Li-ion batteries not bearing the Nikon holographic seal shown at right could damage the camera and may be provided for the purpose of making illegal copies or to the highest ...or reproduced by means of a scanner, digital camera, or other device may void your Nikon warranty. The use this electronic circuitry. For more information about Nikon brand accessories, contact a local authorized Nikon dealer. Use Only Nikon Brand Electronic Accessories Nikon cameras are circulated in the batteries overheating, igniting,...
User Manual
Page 22
... two years, and that it be included when the camera is used with your Nikon digital camera are particularly recommended if the camera is inspected or serviced. Nikon recommends that the camera be held liable for use with the camera, such as at weddings or before taking the camera on a trip), take a test shot to operate within its...
... two years, and that it be included when the camera is used with your Nikon digital camera are particularly recommended if the camera is inspected or serviced. Nikon recommends that the camera be held liable for use with the camera, such as at weddings or before taking the camera on a trip), take a test shot to operate within its...
User Manual
Page 24
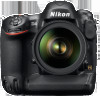
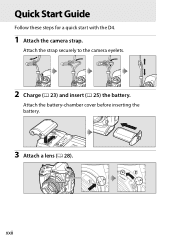
Quick Start Guide Follow these steps for a quick start with the D4. 1 Attach the camera strap. xxii Attach the battery-chamber cover before inserting the battery. 3 Attach a lens (0 28). Attach the strap securely to the camera eyelets. 2 Charge (0 23) and insert (0 25) the battery.
Quick Start Guide Follow these steps for a quick start with the D4. 1 Attach the camera strap. xxii Attach the battery-chamber cover before inserting the battery. 3 Attach a lens (0 28). Attach the strap securely to the camera eyelets. 2 Charge (0 23) and insert (0 25) the battery.
User Manual
Page 25
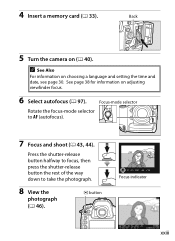
4 Insert a memory card (0 33). Back 5 Turn the camera on adjusting viewfinder focus. 6 Select autofocus (0 97). See page 38 for information on (0 40). K button Focus indicator xxiii Press the shutter-release button halfway to focus, then press the shutter-release button the rest of the way down to AF (autofocus). 7 Focus and shoot (0 43, 44). Focus-mode selector Rotate the focus-mode selector to take the photograph. 8 View the photograph (0 46). A See Also For information on choosing a language and setting the time and date, see page 30.
4 Insert a memory card (0 33). Back 5 Turn the camera on adjusting viewfinder focus. 6 Select autofocus (0 97). See page 38 for information on (0 40). K button Focus indicator xxiii Press the shutter-release button halfway to focus, then press the shutter-release button the rest of the way down to AF (autofocus). 7 Focus and shoot (0 43, 44). Focus-mode selector Rotate the focus-mode selector to take the photograph. 8 View the photograph (0 46). A See Also For information on choosing a language and setting the time and date, see page 30.
User Manual
Page 27
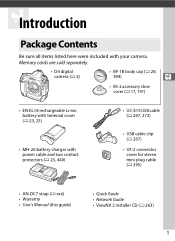
...) • Warranty • User's Manual (this guide) • Quick Guide • Network Guide • ViewNX 2 installer CD (0 263) 1 Memory cards are sold separately. • D4 digital camera (0 2) • BF-1B body cap (0 28, 394) X • BS-2 accessory shoe cover (0 17, 191) • EN-EL18 rechargeable Li-ion battery with terminal cover (0 23...
...) • Warranty • User's Manual (this guide) • Quick Guide • Network Guide • ViewNX 2 installer CD (0 263) 1 Memory cards are sold separately. • D4 digital camera (0 2) • BF-1B body cap (0 28, 394) X • BS-2 accessory shoe cover (0 17, 191) • EN-EL18 rechargeable Li-ion battery with terminal cover (0 23...
User Manual
Page 28
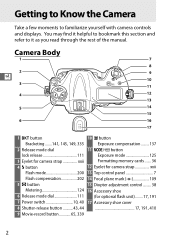
...145, 149, 335 Exposure compensation .........137 2 Release mode dial 11 I/Q button lock release 111 Exposure mode 125 3 Eyelet for camera strap xxii Formatting memory cards ....... 36 4 M button 12 Eyelet for camera strap xxii Flash mode 200 13 Top control panel 7 Flash compensation 202 14 Focal plane mark (E 109 5 Y button 15..., 40 17 Accessory shoe cover 8 Shutter-release button ...........43, 44 17, 191, 410 9 Movie-record button 65, 339 2 Getting to Know the Camera Take a few moments to it helpful to bookmark this section and refer to familiarize yourself with...
...145, 149, 335 Exposure compensation .........137 2 Release mode dial 11 I/Q button lock release 111 Exposure mode 125 3 Eyelet for camera strap xxii Formatting memory cards ....... 36 4 M button 12 Eyelet for camera strap xxii Flash mode 200 13 Top control panel 7 Flash compensation 202 14 Focal plane mark (E 109 5 Y button 15..., 40 17 Accessory shoe cover 8 Shutter-release button ...........43, 44 17, 191, 410 9 Movie-record button 65, 339 2 Getting to Know the Camera Take a few moments to it helpful to bookmark this section and refer to familiarize yourself with...
User Manual
Page 30
Camera Body (Continued) X 1 Pv button 6 Vertical shooting shutter-release Using the Pv button button lock 42 67, 125, 333, 341 7 Fn button (vertical) 2 Sub-command dial ...
Camera Body (Continued) X 1 Pv button 6 Vertical shooting shutter-release Using the Pv button button lock 42 67, 125, 333, 341 7 Fn button (vertical) 2 Sub-command dial ...
User Manual
Page 32
Camera Body (Continued) X 1 Viewfinder 38 12 Live view selector 49, 63 2 Sub-selector 13 a button 104, 105, 135, 333, 342 Live view 49, 63 3 B button 14 ...
Camera Body (Continued) X 1 Viewfinder 38 12 Live view selector 49, 63 2 Sub-selector 13 a button 104, 105, 135, 333, 342 Live view 49, 63 3 B button 14 ...

User Manual
Page 36
A LCD Illuminators Rotating the power switch toward D again. X 10 After the power switch is released, the backlights will remain lit for six seconds while the standby timer is active or until the shutter is released or the power switch is rotated toward D Power switch activates the standby timer, control panel backlights (LCD illuminators), and button backlights (0 322), making it easier to use the camera in the dark.
A LCD Illuminators Rotating the power switch toward D again. X 10 After the power switch is released, the backlights will remain lit for six seconds while the standby timer is active or until the shutter is released or the power switch is rotated toward D Power switch activates the standby timer, control panel backlights (LCD illuminators), and button backlights (0 322), making it easier to use the camera in the dark.
User Manual
Page 38
...is inserted, the display in the viewfinder will return to take pictures in "tall" (portrait) orientation. 2 Functions as a pitch indicator when camera is rotated to take pictures in "tall" (portrait) orientation. 3 Displayed when an optional flash unit is charged. This is inserted. The ...battery warning 40 Active D-Lighting amount .........332 AF-area mode 101, 102 18 Network display 269 1 Functions as a roll indicator when camera is rotated to normal when a fullycharged battery is normal and does not indicate a malfunction. 7 Bracketing indicator: 19 Frame count 321...
...is inserted, the display in the viewfinder will return to take pictures in "tall" (portrait) orientation. 2 Functions as a pitch indicator when camera is rotated to take pictures in "tall" (portrait) orientation. 3 Displayed when an optional flash unit is charged. This is inserted. The ...battery warning 40 Active D-Lighting amount .........332 AF-area mode 101, 102 18 Network display 269 1 Functions as a roll indicator when camera is rotated to normal when a fullycharged battery is normal and does not indicate a malfunction. 7 Bracketing indicator: 19 Frame count 321...


